
Likes
Comments
Share


@Dwillsun1
Follow
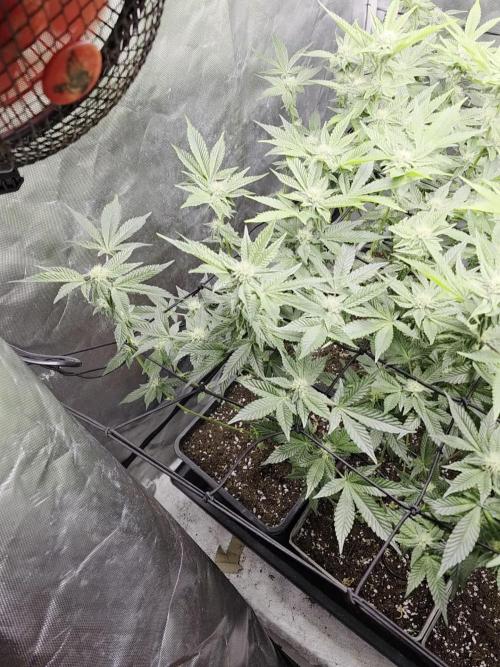
This girls just chugging along. She seems to look good??? Have had No leaf curling, discoloration or spotting 🤞 so far... Don't defoliate much since she looks and seems so strong and healthy. Only got about 6 more of hey own grids on the Scrog net and she'll have covered two thirds the available lit floor space. Gonna start Nature's Living Soil Girl Flower Power.
2nd week Flower Yay.

Likes
Comments
Share


@Kannisho
Follow
We will harvest in a few days, as the humidity has risen considerably in the growing area and I prefer not to lose anything from this growing cycle.


Likes
7
Share


@DripDrop88
Follow
Spider mites have taken over my plant. I've been taking leaves off and lost bud sites because of this issue. I'm broke til tomorrow so I can't buy any products. At this point I'm thinking of just throwing the plant out and starting fresh. Yes it's has come along way but damn the spider mites are worse than bed bugs at this point

Likes
30
Share


@Grower_Of_Persia
Follow
week intel:
we had some dear guests of family from foreign country to meet again after years so i had to make some free space for their stuff therefore girls are going to be gusts too for a week in their neighbors home :D some times unpredicted things happen you must be ready to change at any time , so i moved some and chopped off weak ones
stresses :
E.C stress around 1.2 3 times per week
feeding:
replaced b-52 with Bloom base nutrient
i feed them 3 times this week with this order :
day 1 : i feed them high with base nutrients(calcium & micros (half dose) + Bloom) about 631 ppm - 1.2 e.c to cause a little stress.
day 3 : i feed them high dose of Top-Max + Bloom Base nutrient around 600 ppm - 1.2 e.c to let them recover a little but not fully recover still a little stress will caused.
day 5 : i feed them high dose of Feeding Booster around 630 ppm - 1.2 e.c to cause stress this last week
guide of the week :
we are in the final phases of this run , i'm happy about quality but depressed about quantity :D


Likes
24
Share


@MadeInGermany
Follow
Hey everyone 😊.
Welcome to the last week 😃.
She looks beautiful :-)
Her buds, the smell, everything is just right 😍.
I can't wait to try it for the first time in a few weeks 😄.
It will be harvested in the next 2-3 days.
There will also be another update during the drying process before the final harvest update comes 😃.
I wish you lots of fun with the update, stay healthy and let it grow 😎
You can buy this Strain at :
www.Zamnesia.com
Type:
Runtz
☝️🏼
Genetics:
Zkittlez x Gelato
👍
Vega lamp: 2 x Todogrow Led
Quantum Board 100 W
💡
Bloom Lamp : 2 x Todogrow Led
Cxb 3590 COB 3500 K 205 W
💡💡☝️🏼
Soil : Canna Bio
☝️🏼
Nutrients : Canna Bio
☝️🏼🌱
Water: Osmosis water mixed with normal water (24 hours stale that the chlorine evaporates) to 0.2 EC. Add Cal / Mag to 0.4 Ec Ph with Organic Ph - to 6.0 - 6.3
Likes
10
Share


@Diegobike
Follow
Esta planta realmente fue Muy rápida ya que se le recortó el tiempo de vegetación para alcanzar una buena floración en el maceto en el que estába, fue un experimento para ver qué podía hacer esta cepa en poco sustrato para minimizar gastos las fertilizadas también fueron mínimas y con fertilizantes naturales elaborados en la zona.como lo son: humus de lombriz y en floración melaza hubo algunos problemas de mildiu oidiom pero se solucionaron con una mezcla de leche con bicarbonato de sodio y así como vino se fue el hongo. Es una planta muy resistente tanto en vegetativo como en floración en su floración el olor de la planta es muy fuerte solo por pasar cerca de ella te envolverá su olor. En conclusión estoy feliz con los resultados y la rapidez con la que fue cultivada esta cepa sin duda la volvería a tener en mi jardín

Likes
1
Share


@Eric49
Follow
Going good not much growth comeing in to week 2 , four sets of leaves water twice a week fox farms nutrition one tsp one water cycle of a gallon

Likes
22
Share


@Slobasian
Follow
Love every plant each one is growing differently stacking different even the visual difference of one strain growin two different ways combined smells of diesel, pez candy and lemons


Processing
Likes
9
Share


@Kushizlez
Follow
Everything is looking good so far. They’re all done stretching and the cheese and black garlic have stretched the most. I adjusted each plant with boxes to create a more even canopy. Buds are swelling up nicely. The two black berry breath plants are looking swollen and fantastic. I don’t like the structure and bud size of the black garlic plants and will not be running them again. Although, they’re getting quite keify and the breeder claims they have a genetic trait that make them put on most of their weight late in flower. So far I’m not too impressed by their size. The seedsman Badazz OG cheese has got good node spacing and structure but has very little trichs and smaller buds. I was just running the cheese to test old European genetics and my bias is starting to confirm my bias. Dutch and Euro genetics are shit. The slurricane #4 is looking fantastic in terms of frost but the buds are lacking a little in size. I’m going to do the 21 day strip today. I should have done most of this defoliation earlier in veg but right now is still fine. Ice cream cake #1 hermed which isn’t at all surprising so I scrapped her. At least it gives me more space to get in and tend to the rest of the plants. I got a pump sprayer to get in a bit closer to the plants as well.

Likes
12
Share


@Trippin66
Follow
Hi to every one i hope you enjoing my diaries
The video uploaded is just before the girls wake up and after i did some defoliation on pheno2 and heavy one on pheno 1 hoping start showing some flower formation whitaout all that littel leaf
The pass ed week i start main lining on runtz xl she responds too good and shown healty new growth i Also defoliated the littel zenzation she litteraly have two weeks less to the other sisters she doing great
I watered only the big gyal couse she drinking all things faster obiviusly then her sisters
By to everyone see ya in the next episode
Stay safe and never stop grow
Likes
85
Share


@Organic_G
Follow
Die Ladys beenden morgen Ihre 4. Woche und haben mal wieder extrem an Masse und Wachstum zugelegt.
Der Start in die 5. Woche mit Vorblüte und bereits die ersten Streches.
Verwunderlich finde ich, dass die kleinste mit dem kleinsten Top am längsten braucht um in die Blüte zu gehen 😄 aber das wird auch noch 😎
Ab morgen bin ich für zwei Wochen im Urlaub und ein Freund wird sich um das Gießen kümmern.
Ich gehe davon aus das alles gut wird.
Sie wurden nun zum zweiten mal entlaubt, die unteren Blätter wurden entfernt als auch Triebe die sich nicht optimal entwickelt haben.
Wenn ich wieder komme werden sicherlich die ersten Terpene zu riechen sein 🙏🏽
Lasst gerne ein Like da!
Processing
Likes
10
Share

@CrackinBeans
Follow
The mephisto is has bounced back and pushing hard. All the plants still have a high runoff but has been pushing hard this last week or so. Ph run off has been around 7.6 from around 8.4ph😬😬
I kinda gave up on the freeze berry but I started checking it out and I didnt notice how well the branching is on that plant and how frosty it is.
the freeze berry has been getting set up nicely hoping it fills out nicely because the branching and spacing on that one is not too shabby
I'm not sure wth is going on with the big bomb that one decided to just grow like a bush real fast and has soo many bud sites but is flowering super slow.. I started all the seeds at the same time except the mephisto is about a week or two younger than the rest.
The crystal meth is about ready I'm going to start flushing that here sometime this week when I get my new ph pen.


Likes
12
Share


@Skunkiest_bender39
Follow
Wieder 2Wochen rum, pro Woche ca 10cm dazu gekommen. Mängel zu erkennen, CalMag gekauft ActiVera wird folgen.

Processing
Likes
10
Share

@CrackinBeans
Follow
Plants are growing at a nice pace especially dealing with the extra high PH runoff

Processing
Likes
5
Share


Likes
5
Share


@Burneracct
Follow
Was out of town all week and came back to find the CBD Star in my space bucket not looking good. It looks like a phosphorus deficiency but not entirely sure. Yellow leaves with brown/black spots and dark red/purple stems. I flushed it with 2 gallons 6.5 pH water, re-fertilized, put it out in the sun and defoliated. I defoliated pretty heavily since many of the fan leaves were yellowed and blocking light from the lower bud sites. The center was also getting pretty dense so I carefully removed some of the leaves to help with airflow.
Despite the stress, It seems to have bounced back reasonably well. There’s probably irreparable damage given the level of yellowing but the buds continue to grow and thicken.
Cheese has absolutely exploded and looks great. It probably doubled in height last week with many bud sites on the 5 main stalks. Excited to see how it turns out.

Likes
7
Share


@StonedandSteady
Follow
Training for Top Quality Topz!!!
Training Day is underway for Top Quality Topz!!! 3/2021
I'm starting the Training process on two of my Cannabis plants today, on the Opium breed by #DivineSeeds and FireAlienRomulan breed by #AlienBloodGenetix which are Growing into thier 7th Week of Veg and also Defoliated the lower leaves from every Cannabis plant! I threw in a few #ProGrowerTipz throughout as Well! I'm always sharing and hoping to Help everyone else with what I've learned along the way on my Journey! Teacher teaching with his Teaching Techniques!!! My Seedlings are on Spring Break and Yep These Cannabis plants are Camping out in the Closet for a week or so! Lol
This is my 2nd run using the Osree.Light QB1000w and Everything is Mesmerizing!!!
My Opium and Pablo Escobar *Fems* from #DivineSeeds Regs: SalamiLegF3's×2 and FireAlienRomulan look$ Outstandingly Awesome and Growing Up Phenomenally Fine into her 5th/6th week of Veg in our 2- 10 gallon The Grow Bags from Broski #as420.ca and also 2- 5 gallons as Well! Our others are Super and Breed by #thehumancannabiniod #AlienBloodGenetix #TNBNaturals #Foop
Yo!!! Thanks Again for All the Love and Support my fellow Growmies and Growmets!!! These Magnificent and Magical Ladies are Growing in our 48×24×60 ViparSpectra Official Club 🌿 ®️ Grow Tent and under our #Osree QB1000w and #GrowStarStore Kokokala QB1000w and our Lavender, Sunflowers×5 and The 5 Brand New and Fresh Starts are Wonderful with a Huge Hint of Fantastical Fire is my #SalamiLegF3×2 by Broski @thehumancannabiniod #DankFlowGenetics #EastCoastSeedBank #FireAlienRomulan by Broski #AlienBloodGenetix my #PabloEscobar and #Opium by Team #DivineSeeds #DivineSeedsBreedingCompany We Grow with #Growatt 600w with #FoopOrangicBioSciences and #TNBNaturals The Enhancer Co2 Despersal canister and ph'd them w/ Declorinated watering w/ TNB ph Up and Down! Totally Top Quality Topz all Around! Thanks Again #GallowGlas420 #HarleyGrower #thehumancannabiniod #AlienBloodGenetix #TNBNATURALS #FoopOrangicBioSciences #as420.ca #divineseeds #divineseedssquad #divineseedsbreedingcompany #BioFlux Family's and Teams!!! Your Genetics are Merry Magnificent, Mega Marvelous and Mighty Medical! Love um!!! I really Can't stress enough how Thankful and Grateful I am of All of you and what you've Shared with Us! Means the World!!! It's definitely a Pleasure being able to Grow with these Phenomenal Grow Lights! Please Enjoy! BudBrothers4-Life! Cheers Famz!!! Much Props and Much Topz!💯🔥 #Osree #GrowStarStore #Growatt #TNBNaturals #TNBTeam #FoopOrangics #GrowYourOwn #Bliss
https://instagram.com/divine.seeds?igshid=1r90iwe9xiwz8
https://instagram.com/thehumancannabinoid?igshid=17k159pumklkq
https://www.instagram.com/alienblood_genetix_official/
https://instagram.com/as420.ca?igshid=1f116alw054wp
The Grow Bags: https://www.as420.ca/en
