
Likes
Comments
Share


@Bread_n_Buds
Follow
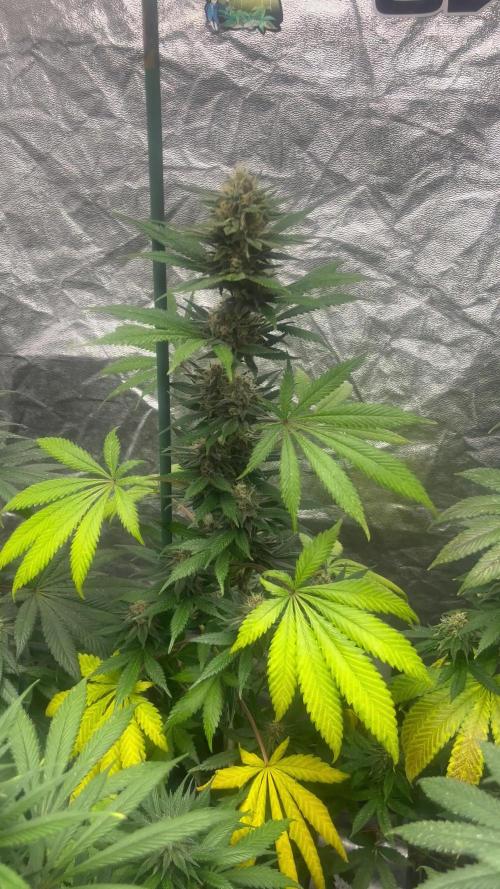
Here we are again ready to start again, always under the sign of Zamnesia, we make our fantastic plants and we show you what we are capable of. We have 5 autoflowering strains and 5 photoperiodic ones and now we present them to you.
The fifth and last autoflowering for now of this round that we present to you is another classic of the classics always in the Zamnesia version. We have already grown it once and we sincerely hope to find the purple phenotype, Mythical mythological herb really in music and in everything, WE ARE TALKING
To explain my germination method which is a combination of experiences acquired in the field and readings of right advisors, I have chosen to divide it into phases so whoever wants can follow them and understand better step by step.
- Preparatory Phase ---- Check the average temperature in the room, humidity status to understand well whether it is the case to start or wait, I decided for the end of August because the temperatures start to drop towards the 22-25 degrees recommended for germination.
Then another thing more or less credible depending on the sensitivity is the control of the lunar phases. I believe in it a lot, it is a method that ancient farmers used to understand when it was best to plant depending on the attraction of the moon. To make my life easier I use a simple app that advises you on the right time to plant, harvest and put in a jar (depending on the lunar phases).
- Phase 1 --- Soaking in water. There are many authoritative friends who advise against this method due to the risk of drowning, but I have always been fine and I follow the rule if it opens in water almost certainly the seed is healthy and will come out of the ground 90% normally.
- Phase 2 --- Opening of the seed in water. As soon as the seed opens and the root comes out a little you have to be very very careful not to leave the seed in water open for too long. This is why there is a risk of drowning. So as soon as the root has come out it must be planted. Do not wait for it to stretch out too much, in the absorbent paper you can wait a little longer in water no.
- Phase 3 --- While I soaked the seeds I prepared my pots: I use small biodegradable pots (choose the ones with holes underneath for drainage). A few hours before working with the opened seeds I moistened the soil with water adjusted to the right pH (5.8 - 6.2) and Plagron Power Roots. The small root is now open and we can make a little hole with a toothpick, widen it and insert the seed. Not too deep with the root facing downwards. From Serious Seeds we learned the dome technique: if you put a small dome of soil on the seed the water will settle on the sides avoiding overwatering problems.
- Phase 4 --- The plant emerges from the soil. Up to now I have not put the light on, now I turn it on at minimum after half a day of soil to give direction to the seedlings. The first week the light will be gradually brought from 40% to 60% to go to 70% - 75% in the remaining weeks of veg. During the first week maximum, I keep the cycle of 24 hours to avoid stretching. Be careful not to exceed the first week at least with photoperiodic.
- Germination % --- In water 20/20 seeds have opened for good luck I'm waiting to talk when they come out of the ground but it seems that we are going towards an excellent percentage of germination..."Not too bad"...
- Soil and Food --- The soil used is entirely organic in every part and is the Plagron Promix that will be used with the 100% organic pack supplied by Zamnesia complete with all the main fertilizers for your plant buy it at the link --
https://www.zamnesia.io/it/11457-plagron-easy-pack-natural.html
// Strain Description // Have you ever wondered what Jimi played in 1967? With Purple Haze Automatic, it has never been easier to experience the magic of Purple Haze firsthand. In just 65 days, this compact autoflowering will reward you with top-quality sativa buds that will take you on a long creative journey. -
- Get a seed of this fantastic strain --- https://www.zamnesia.io/it/8174-zamnesia-seeds-purple-haze-automatic.html
- Soil and Fertilizers entirely organic --- https://plagron.com/en
- Growbox --- https://www.secretjardin.com/
- Music and sound --- I made my girls listen to 432hz frequencies and music from www.radionula.com
- Z --- You can find these seeds, much more from the world of cannabis, mushrooms and an incredible series of accessories and gadgets on the reference site not only mine but of many growers ----
https://www.zamnesia.io

Likes
37
Share


@iMpulsive_Grow
Follow
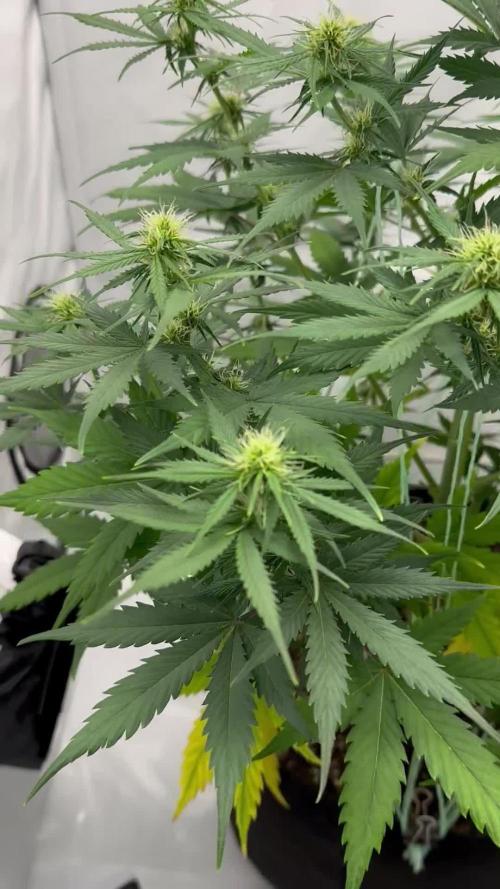
Day 1 of week 2 of flowering! Stoked to see what this week brings 🌱🙌🏼
Day 58!
Did some heavy defoliation at the bottom on the leaves that were getting much light anymore
Day 59!
25.5”
Day 60!
Starting to see some action going on
Day 61!
Starting to see some more flowering but slowly
Day 62!
Just trying to be patient lol all are coming along nicely and are very healthy
Day 63!
Today when I went to check on them, the odor was way stronger. Here we goooo!!!!
Day 64!
Those colors ☺️🌱💚

Likes
2
Share

@eldruida_lamota
Follow
Que pasa familia, vamos con la quinta semana de floración de estas Forbidden Mochi feminizadas de Seedstockers.
Vamos al lío, las plantas se trasplantaron a macetas de 7 litros.
El ph se controla en 6.5, la temperatura la tenemos entre 24/21 grados y la humedad ronda el 50%.
El ciclo de crecimiento puse 12h de luz, el foco está al 100% de potencia.
Tenemos como visitante de nuevo los trips, compré depredadores que colocaré a principios de semana.
Me gustaría estar más encima este cultivo pero la salud me está impidiendo un poco estar 100% con el proyecto.
- os dejo por aquí un CÓDIGO: Eldruida
Descuento para la tienda de MARS HYDRO.
https://www.mars-hydro.com
Hasta aquí todo, Buenos humos 💨💨💨

Likes
24
Share


@3lementa1
Follow
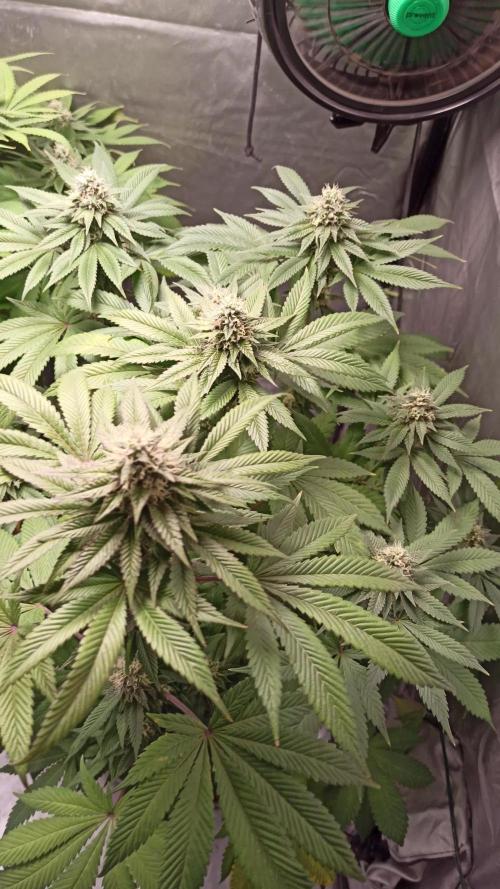
Fed nutes at 6.3 pH. Runoff was close to 7 pH. Other than that they look like they're doing well. Very sticky and very fragrant.
The leaves of the CBD Blue Shark are a nice dark shiny green. The Wedding Cake is lighter. The profiles of both are starting to come out in the flowers. The CBD Blue Shark has these long, dramatic white pistils. The Wedding Cake is starting to show its creamy colouration with red hairs mixing in with the white and looking very delicious.
The smell is incredible in there now. Fruity and creamy and delicious.

Likes
Comments
Share

@GoodTimesOrganics
Follow
Hi liebe Community 💚 das Blue Cream Haze Outdoor-Projekt neigt sich langsam dem Ende zu.
Auch die herben und wechselhaften Bedingungen scheine der BCH nicht ganz zu schaden. Die Pflanze steht unter absolutem Stresstest und bis jetzt ist dennoch alles in Ordnung.
Klar ist die Pflanze relativ klein und da die Wachstumszeit nicht sonderlich lange war, sind die Blüten relativ klein.
Trotzdem scheint die Pflanze bis jetzt allen Bedingungen zu trotzen. Auch die erste Nacht mit knapp 0 - 1 Grad Celsius hat sie überlebt.
Ich bin top zufrieden.
🌱💚
Likes
83
Share


@Southwest_budders21
Follow
Gsc has started to slowly drink the water up now so she is not far away from harvest 😍 purple kush seems to be getting bigger now and skywalker is not to far away so far everything seems to be ok 🤞🏻🙏🏻✌️🏻💚


Processing
Likes
5
Share


@Mr_nugs_lover_David
Follow
She has been Transplanted on November 10th to her new 15l home, she's gonna be such a beautiful amnesia pro plant, love this strain, the shape pf the leafs is just so beautiful.

Processing
Likes
3
Share


@MadBumbleBee
Follow
I wish I could've taken more picture this week and previous week but I just could'nt remember to do it. Feeling nervous, but wierdly excited. Most promising strains for big yields are Super Silver and Tangie. Girl Scout Cookies being an autoflower already started to flower, wish it would have taken more time on veg to get bigger but it is what it is.
Now starting flower. 12/12 cycle. 9 weeks

Likes
22
Share

@Michijardinero
Follow
Muy buenas familia aquí una semana más mostrando el progreso de mis niñas este último riego le he puesto de todo siempre le pongo el mínimo de la tabla como lo ven? Hago bien o le pongo un poco más según se experiencia que me dirían? La verdad que yo veo que están avanzando bien están agarrando buena estructura los cogollos buen color y buen olor 😁 el foco esta a 30 cm de la punta mas alta esto está bien? Las otras puntas son un poco más bajas la humedad sigue igual la temperatura tambien 25° en algún momento llega a los 26 pero no siempre extractor e infractor funcionando al 100% un ventilador que mueve el aire pH de agua de riego en 6.3 y el de salida de la tierra igual la EC de entrada y de salida perfecta en el siguiente riego que lo haré sólo con agua y atazyme tomaré foto de las medidas de PH Y EC bueno familia en 7 días vuelvo por aquí espero sus comentarios que tengan buena semana paz familia

Likes
3
Share


At this point of the process, you just sit there and observe how the plant gets fatter and fatter. The only thing you have to do is give her food, take care of her and that's it. Harvest is coming
Sólo queda mirar, alimentarla y cuidarla básicamente. Los cogollos sólo se dedican a crecer.

Likes
7
Share


@unclewoody3
Follow
Some of these were planted later but all doing good at all or not topped
Likes
3
Share


@MayJorGrowers
Follow
This week was a tough one because we were not prepared for the heat and lack of clouds/rain that we were going to get. After the rain from last week died down the plants had a chance to get some raw sunlight. This was great but the temperature of the greenhouse did soar and the 'windows' could only do so much. PLUS there was barely any wind. We had to leave the Ghouse door open during the day but at night when the temperature dropped we closed it. The girls were doing great and you could tell who really loved the nutrients and who didn't... I recommend leaving ghte nutrient until the plants have at least three sets of leaves each, not including the initial sunleaves that will eventually die.


Likes
131
Share


@Roberts
Follow
Just cut down the Miller high life bottle grow with QP. Was a really neat micro grow. It got much bigger then I expected. Was a pain to get started, and growing. Finally got it. The Unit Farm UF2000 worked great. Thank you Unit Farm 🌱
I will be back when dried to weigh out.
Happy growing 🌱🌱
Thank you grow diaries community for the likes, follows, comments, and subscriptions on my YouTube channel. 🍻🌱👍
https://youtube.com/channel/UCAhN7yRzWLpcaRHhMIQ7X4g

Likes
2
Share

@RebelSeedBank
Follow
Week 7 il phenohunting procede bene
35piante tra cui #1 e #15 stanno mostrando una vigorosita esplosiva 5/5
N4 e 6 4/5
N23 3/5
Ma non scarto le altre...
Profili terpenici e flawor sono la mia priorità
Likes
470
Share


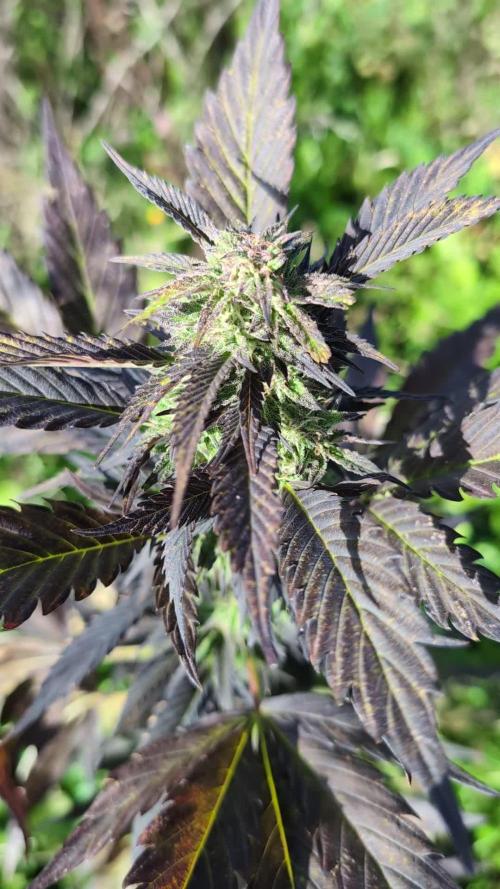
@PurpleWorship
Follow
Day 58 : Performed what might be the last big LST session, to make the plant flat as much as possible. The last one, because I'll start flowering on next week 😁 So I believe that all next LST session will just be to keep everything a the same eight, but I will not force the plant to be flat anymore. I was also supposed to apply black soap for the last time today, and continue with water for one or two weeks. But i saw one thrip, so I may continue for one week, and apply only water later. But the plant isn't showing any signs of bugs bites, so they are under control I believe. I also got one bottle of biobizz leaf coat, that I'll apply later ;)
Damn.. I'm so excited to start the flowering :D She look verry great right now, I'm verry confident with this plant :) Taking care of it is a pleasure, even if it take me one hour to apply LST 😆
Day 60 : Watering and feeding plant, and applied black soap for thrips.
Day 61 : Did some Defoliation : Removed dying leaves not receiving light.
Day 62 : Spray water + Fishmix (1.6ml/L). This is going to feed the plant by the leaves, and also clean leaves from any thrips. Haven't seen any thrips since like 3 days... But you know how they are ;)

Likes
170
Share


@Tropicannibis_Todd
Follow
👉Alrighty Then👈
This plant finished out just around 90 days from seed
👉Puffed a bunch of it , and its good 👍 nice terp profile👌
However she was super leafy...... which sucked , and a small producer .....
Lucky she had bite , which is why I bumped her numbers up 😳 6 out of 10
I may give this one a try way down the road , just to see if it was a bad pheno ....
Can't say at this time if I would recommend, but she's worth a try from those terps alone .....
Persian Pie from Greenhouseseeds
Full Gas from Greenhouseseeds
Babba Kush from Greenhouseseeds
Rainbow Melon from Fastbuds
Papaya Sherbet from Fastbuds
Weddingcheesecake FF From Fastbuds
Purple Oreoz F1 From Seedsman
Slurricane From Premium Cultivars
Soil by Promix
Nutrients by Cronks
This was a crap ton fun 🙃
Thanks to all my growmies out there for stopping by its much appreciated 👈
👉Happy Growing👈


Likes
10
Share


@rickytpb
Follow
Hey everyone,
I have a sour ripper plant in my 40x40 cm grow tent, and I've shared my light setup above. I need your opinions on whether I should transition her into the flowering stage or wait a bit longer. I think I may have trimmed the main stem too much to the side, and I'm a bit worried about it, honestly. This is my first grow, and I've made some mistakes along the way.
Should I perform more low-stress training (LST) to the opposite side of where I trimmed the main stem? I've also removed four big leaves from the bottom that were covering a significant amount of light to the lower branches, and I've just performed four toppings. I need your opinions , happy growing all!

Likes
24
Share


@Zegr8
Follow
I’m feeding megacrop A+B full bloom +epsom+silica. Not much else to do.
I expect the plant to be ready in 20 days, more or less.
Last week I raised the light a little since I found damage on top leaves.
I think I’ll change pot next growth. I’ve calculated that a bonsai style pot, bigger and shallower than my actual one, would contain at least 3 times the volume of medium.
Day 64 - Damage is spreading on all small top leaves, I guess these were not frying because of lights. A full dose of megacrop it’s probably too much for a plant watered with a dripping system, I’ll keep than in mind for my next crop.
Day 65 - Plant is drinking like crazy, yesterday it consumed much more than usual, almost 9 liters. I’m going refill the reservoir today with megacrop AB+epsom at 2/3 of the suggested dose.

Likes
24
Share


@AsNoriu
Follow
Day 86. Almost no sugar leaves, most of trim went to bin, part left for bubble hash. Kind off hoped a bit more from this strain, maybe smoke will bright me up ;)
Day 96. 77 g. went for curing. Smallest from all.
Two month later. Made some bubble hash. Great strain, waiting for sunny day and will make smoke review. Not a lot of bubble, but it was great !
Happy Growing !

Likes
Comments
Share

@Vet_J
Follow
Day 52
The lower leaves of the plant turned yellow
I have two options that could have caused the lower leaves to turn yellow
The first is a lack of nitrogen. In the last two weeks, I have reduced the dose of AD Grow fertilizer from 4 ml to 2 ml which contains nitrogen and i have not added AD B-52 for two weeks
The second option is that I have a low-quality ph meter. I measure the ph with drops I don’t have digital one and there may be an ph error
The plant was unable to absorb the fertilizer and a large amount of salts are most likely accumulated in the soil.
one more detail:He was defoliated a few days ago.
I hope that this problem will be resolved by next week and the plant will continue to grow at a good pace.
