
Likes
Comments
Share


@PalmaGrow
Follow
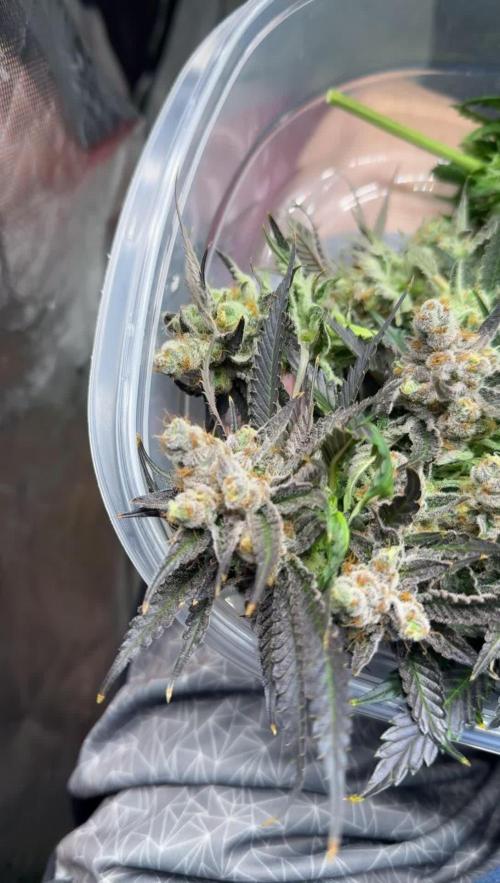
No se cómo expresar mi felicidad después de casi 3 años sin poder cultivar consecutivamente he podido cosechar esta belleza gracias a @blacktunaco por la K.O una genética llena de resina con flores compactas. Cometiendo errores desde el principio se pudo obtener una excelente planta corrigiendo todo para así mejorar el aprendizaje continuo. Se dieron 12 días de lavado de raíz y 3 de estos estuvo expuesto a lluvia constante durante los 3 días por tal razón se decidió cosechar para evitar dañar las flores

Likes
7
Share


@OwlGang_Uk
Follow
Week 4 - Sometimes You Got To Lose To Gain Phase 2 - I took off the fan leaves so that the plant would redirect its energy into the stem and branches rather than the leaves. I also cut of the top heads so that the energy would go into the development of the 2 heads below.


Likes
32
Share


@AsNoriu
Follow
Day 50. Selective defoliation, constant spraying ( I said never in flower, but it goes well, so I will keep up for few more days ).
All good, nothing special except missing space as always ;))))
Day 54. I repositioned them a bit, think too intense air was making both big Mimosas - a real sl@tty DIVAS ;)) Hope they will feel better aside.
Happy Growing !!!
Likes
27
Share


@babyboo
Follow
The looks on this one are sexy! It also burns even.
Effects wise, first 15 mins you perceive a high cerebral rush that peaks at 30 mins. Makes you feel creative and with energy. Later on, the cerebral effect dissipates and leaves you feeling all giggly and relaxed in da body.
The smell is all about sweetness and gas with a funky grapey smell hugging and keeping those close.
Colors didn't showed much cause of the 24/0 light cycle but it ended up showing some purple hues during late bloom.
Overall this girl was so fn grateful with the treatment she received.


Likes
93
Share


@Ferenc
Follow
Hi! First of all, this is my first time in my life. I planted 2 different kind of plants one is autoflowering (Gelato Cookie D'ohpe), Gelato Cookie Doh-ope Auto By Dr Krippling Seeds
Gelato Cookie Doh-ope Auto. Ground breaking genetics have gone into the Triple G range. Grand Heft Auto’s genetics main characteristics is its big composition, and heavy yields. Whilst stabilizing their specially selected Girl Scout Cookies strain with the GHA a number of times, they also crossed this with an amazing Gelato Auto. GGG3’s fruits are ripe with aroma’s and flavor. Yields are approximately 80 gr/plant and the aroma from these flowers are special. The taste from these dense, sticky buds are sure to have you coming back time after time for more of this great tasting flower. The other one is feminized (Purple Punch).
Purple Punch Feminized Seeds By Barney’s Farm.
Purple Punch Feminized Seeds are a 90% indica dominant hybrid. with a combined lineage of Larry OG x Granddaddy Purple this genetic is capable of an indoor yield of up too 700g/m2. Expect aromas of Baked Apple Pie as well as Cherry and caramelised Blueberries. Also expect a short bushy plant with great trichome production and a THC count of 25%. This high yielding, high THC hybrid is an all-round quality genetic with a fast harvest window of 50 to 60 days. Yet another great addition to Barney’s Farms Cali Connection Range. I started counting my day from the day I started germination. 2 different seeds, one is autoflowering (Gelato Cookie D'ohpe) and the other one is feminized from The Bakery Co. called Purple Punch. I started germination by putting them to the water for 12 hours in the evening on Sunday. After twelve hours I put them between paper towels. It started sprouting very quick, the next day I needed to put them to the soil. Purple Punch the feminized one started growing faster, bigger sprout, compare to the autoflowering Gelato Cookie D'ohpe. I started using a 60 W led lamp for the seedling stage this lamp has 2 head 30-30W that was divided for the two plants 30 W each. The next day they came out of the soil and started their life. The Purple Punch was growing faster. First, I had my own made place made of kitchen foil under my computer desk :D, and then I purchased a grow tent which is 140x60x60. I did not use any ventilation the first week and kept the humidity 85-90 percent, and I used trigger spray on the plant also. Watering the first 7 days was 10 ml in the morning and after 12 hours later also 10ml, so every morning and evening 20ml a day. I also used trigger spray to keep the soil wet around and sprayed the plant also. I never use tap water at any stage I buy still water from the shop and they love it. I want 100 percent organic plants so my nutrition will be bat guano mix with acacia honey. My soil mix is Coco coir, perlite mix 70:30 which is mixed with a soil that consists of 20% sphagnum peat moss, 35% garden peat, 10% high-quality organic Worm-Humus, 30% perlite, and 5% Pre-Mix. These two kinds of soil ratio are 50-50 Percent.

Likes
8
Share


@Pearl
Follow
As always with GreenHouseSeeds I had successful germination within 24 hours then potted and placed under 80w LED white strip light and we saw her first set of baby leaves within 72 hours.
With a little help from my trusty greenhouse Bio Enhancer
I live in the UK and I'm lucky enough to have decent tap water at a PH of around 7,
So I lower this to around 5 before adding 0.5g of Bio Enhancer .
I water the coco & seed with this mixture only and I haven't had a failed germination for a very long time.
I really swear by this powder feed, it's also organic and OMRI certified.

Likes
29
Share


Likes
3
Share


@spacetimeman
Follow
At the and of the week all lST supporting thenfs were removed: canopy is formed and all the stems are hardened.
The progress is very slow, but I like how the plant looks, it seems to be healthy and has more flowering points than I've seen on any autos I grew before.
I also adjusted the fertilizers ratios to get more optimal for flowering stage and added pH-down to improve the solution assimilation.

Likes
4
Share

@Chucky324
Follow
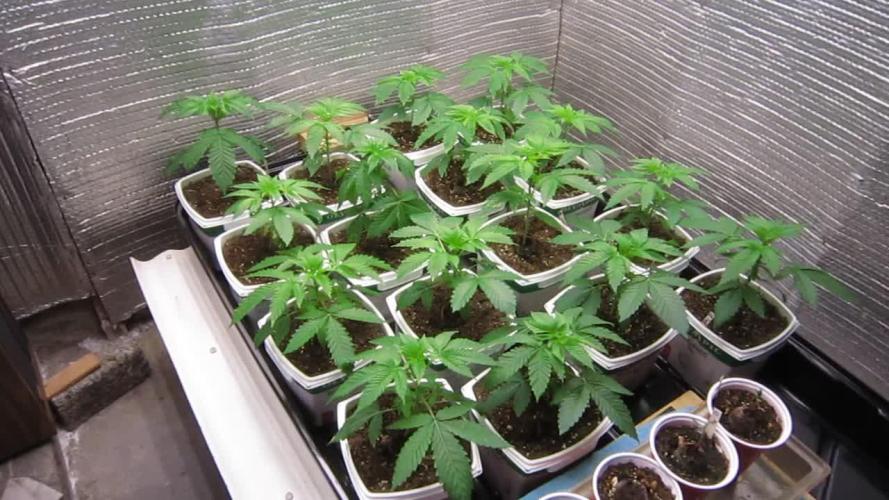
Hello This is the end of week 3 and the beginning of week 4 of veg.
Got them repotted a few days ago and took them off their heating mats. So some of them a looking a bit wilty, because they are cold.
They are doing good otherwise.
Got 5 essential oils coming from Amazon tomorrow. Got Garlic, Clove, Oregano, Rosemary and Cinnamon.
Got those pages off... theindoornursary.com/blog/best-essential-oils-for-plants/
Or try... theindoornursary.com/blog/cannabis-pests/
Just trying to help you fight pests and mold and fungus.
I might have a 50% off your first order, code, from UHKTA Seeds. If your interested check back here next Wednesday to see.
Won some seeds in their contest... Candy House... Then won a 50% off code from their next contest... then won some more seeds in their diary of the month contest. When I know my seeds are coming I'll give out the 50% off code, has to be used by May 1st this year though. Check back if your interested.
OK. Be Great.
Chuck.
Likes
4
Share


@Rele99
Follow
She's still growing up and producing new leaves and her flowers are getting bigger too.
I'm really worried though, because some of her leaves are turning yellow and shows burn signs. I thought it was because of the hot weather, but her leaves should have been all bent down (this is what I read on the internet). Since the plant is overall healthy, I hope it's nothing to worry about.. I found out that it also might be caused by a potassium deficiency, so I'll try and give her some. All been said, I'm still really happy with the results and I love how she's doing


Likes
34
Share


@Kynareth
Follow
Hola!!
Bienvenidos a esta nueva aventura.
En este diario cultivaré la genética de dición limitada del banco GB Strains bajo una luminaria LED de mars hydro, la sp 150, que da unos 140 watts de potencia nominal y en espectro completo. El armario será un trafika de 60x60 y el medio de cultivo 11L de coco en maceta de plástico blanco. El coco va a ser un ladrillo de ugro de 3L hidratado con agua a ph de 5'5 y sin recirculación del agua. La germinación será en papel y usaré el seedboster de plagron ya que he leido varios casos de problemas en la germinación de esta genética y únicamente tengo 3 semillas y me gustaría gastar solamente una.
Como novedad para los seguidores escribiré este diario en español, mi lengua nativa, dado que el banco de semillas GB Strains opera principalmente en España, y creo que también en Francia y me suena que Reino Unido, pero no estoy completamente seguro de eso y la idea es que sea lo más útil posible para otras personas. En cualquier caso recordad que en la parte izquierda de la página se pueden activar opciones de traducción a varios idiomas.
Sobre la genética remarcar que el banco indica unos porcentajes de thc de 30-33%e n condiciones óptimas con un uso recomendado medicinal y con efecto de relajación intensa. Si no tengo problemas durante el ciclo de cultivo y éste se desarrolla correctamente realizaré un análisis de cannabinoides al finalizar el secado y si este no fuera concluyente o diese valores de menos del 20% que es una desviación bastante sustancial, realizaré otro tras el curado para verificar. Hace bastante tiempo (años) que no cultivo una genética fotodependiente pero espero no tener ningún problema
Para los abonos utilizaré GHE/terra aquatica que ya he utilizado con muy buenos resultados (de momento) en mi primer intento con coco y añadiré también fulvic (o diamond nectar) de la misma casa
Germinaré la semilla una vez tenga montado el armario de cultivo en los próximos días o semanas. Tambioén grabaré todo el ciclo y crearé video timelapse global y semanal para apreciar reacciones de la planta a estímulos y seguir mejorando la técnica
La semilla ha germinado en 48 horas. La dejaré un poco más antes de moverla al jiffy de turba
Ha tardado pero finalmente ha germinado la semilla y ya está en el jiffy en el armario. He usado el agua sobrante de mojar el papel para germinar para alimentarla estos primeros días. Cuando muestre sus primeras hojas (no cotiledones) empezaré con el abonado. Finalmente será la serie flora de GHE, no la específica de coco.
Este es mi segundo intento con la genética, en el primero falló un programador de riego y generó problemas irrecuperables en la planta por lo que la deseché.

Likes
10
Share


@MrHightimes
Follow
Well after asking some questions I discovered that all the autopots were 7 or more ph
So I flushed plants down to 6.3ish and dumped entire autopot system.
I had been checking reisvor but not the actual pots.
They are freshly fed and phd down to 5.9. I hope that helps
All the new growth looks green. i'm hoping things are better and just a bit stunted. Definitly FAR from where it should be though
After a few days the res is 5.9 but the damn pots are fucking 7 again! I'm not gonna flush these bitches again. i dropped the res to 5.5 and mixxed in some of that in the autopots and the are now 6.2ish. Fuck it I hope that helps, they seem to be doing ok, so I think it was just on the edge of the spectrum. I hope dropping the PH gradually a bit works 🤷♂️🤷♂️🤷♂️
I have two plants that look good but small. 1 plant that looks small and fucked and one that looks big and fucked. I'm just looking for a game finish achievement
Not much change over the last few days. more of the bottom leaves are yellowing and i can tell the plants are suffering but i think i just have to play this out. PH was 7 again in the res so i lowered it down to 6.2 and finally got a water pump in there. i'm hoping it circulates the water and helps keep the ph in check. The pots are higher again 6.6ish... This next feeding i will blast that down to 5.5 and try and hold it there a week.
I got the tent camera going so i have a live feed up too. Its nice!


Likes
4
Share


@musashi_miyamoto
Follow
Used RootMax mycorrhizae- bacillus + glomus: good root growth
Top dressed with compost


Likes
8
Share


@GreenWalker
Follow
This week, I push PPM too much(1500-1700) leaf start burning so i add pure water for 2 day after that. Bud get a little bigger comepare to last week but not to the point i expected to be. Changing water become bigger problem since they grow so tall. Runtz is flushing first day today but the rest can keep going since runtz flower early than other. Hope you guys enjoy this happy grow everyone.

Likes
23
Share


@SonomaSungrown
Follow
BOOMING.
Have had an unusual amount of thrips and noticed a few Katydid nymphs on Tuesday (7/22), so I hit everything with 1.5tsp Neem Oil and 1 tsp of Dr Brommers soap in a 1 qt sprayer.
I also decided to do my only planned dusting of Diatomaceous Earth.
Executed that on Wednesday, 7/23, and also top dressed with DE to attack larvae.
Thursday 7/24
Mixed up first batch of flowering top dressing.
I put it into a 55 gal garbage can and watered it to get the cooking process started.
Will only let it go for a week or so and then will top dress the girls.

