
Likes
Comments
Share


@Bread_n_Buds
Follow
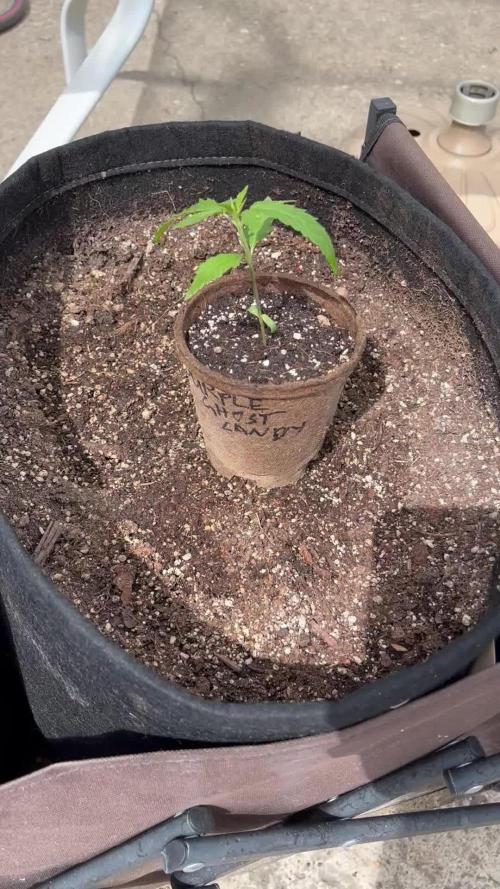
Our Green Crack F1 Hybrid Autoflowering from Zamnesia are really in great shape, better yet there is a small one born recently and one that has arrived so well to grow that I have already done topping
to go and make two plants this time: one worked with the techniques and one left to go also to compare the difference in yield and advise you well based on the strain. If it is very true that the technique always gives a good result, the response times can be greatly extended or if the plant remains too dwarf I prefer to grow the autoflowering straight.
Applied Techniques - Given the numerous requests from growers, we decided to show you what happens by applying topping + Lst to autoflowering plants. It is very important to anticipate it as much as possible, autoflowering plants go into flowering at about the 5th intenodo, you must anticipate that moment to give the plant the chance to vegetate as much as possible. In general, when you see that there are two good side branches, you can do topping, they will go into veg as much as possible and you will have a split plant, I have seen very nice results, especially in warm periods when the plant tends to vegetate a lot, in winter we could have a bit of dwarfism but with a lot of resin for sure.
So I cleaned everything and cut at the top leaving only the main growth line, called Main Lining, the florets will be lowered during growth and the plant will eventually be like "split" in the main line with the various branches.
On photoperiodic plants, however, we will do topping repeatedly, which is not recommended with autoflowering plants so as not to lengthen the times of plants born to finish in 10 weeks.
The second week (including a few days of germination) we gave Power Roots 1 ml/l, Pure Zym 1 ml/l, Sugar Royal 1 ml/l, Alga Grow 3 ml/l -
Plagron nutrients are available at Zamnesia in convenient pack formats for all growing styles. I used this one with a simple search you can find the other products.
---- https://www.zamnesia.io/it/12119-plagron-top-grow-box-100-naturale.html
Try a seed of this strain that drives us crazy...
---- https://www.zamnesia.io/en/10677-zamnesia-seeds-green-crack-f1-automatic.html
Zamnesia Description // Forget what you think you know about cannabis. Green Crack F1 Automatic by Zamnesia Seeds is here to shake up the whole industry. Using F1 genetics, growing cannabis has never been easier. These plants offer uniform and abundant yields. Get ready to harvest high-quality buds, full of flavor and amazing effects.
Growbox and Air System - Secret Jardin DS120w + fans + exhaust fans and DF16 filters kit ---- https://www.secretjardin.com
All the best that mother nature has to offer is at ----www.zamnesia.com

Likes
15
Share


Likes
5
Share


@OnlyTomatoes
Follow
[ Information ]
For all grow information, including strain and room details, please see the first week of veg.
[ Updates ]
(Flower) Day 1 - Light intensity increased to 65%. C02 increased to 1300ppm average. Day temp/humidity 85/70 (1-1.2VPD), night temp/humidity 75/65 (.8-1VPD). Fed a diluted compost tea mixture before lights on. Base water was R/O and tap water mixed lightly with silica and Tribus microbes. Tea was a mixture of Fish Hydrolysate, Bat Guano, Molasses, Fulvic/Humic, Kelp, and Earthworm Castings. 8 gallons of tea were added to 72 gallons of water mixture for an 80gal batch total. The batch was mixed for a half hour before feeding to the room. I did not PH or PPM test the mixture, organic material is hard to get an accurate PPM reading so the numbers are useless to me. I will be working to bring the lights to 100% power over this first week of flower.
Day 4 - Light intensity increased daily, currently at 90%. Will raise to full power tomorrow. C02 increased to 1800ppm average. Temp and humidity for day and night are still the same. Lights were raised slightly to maintain 12 inches from canopy height, and a few growth nodes that were above the canopy got topped. Watered today with an 80gal (1.25gal p/pot) mixture, 10% tap 90% r/o water. 6.8 PH, 2.2ec. Foliar sprayed yesterday before lights off with a neem mixture for weekly IPM. Canopies are stretching relatively evenly, though I will be adding in support nets within a few days to help maintain the even spread. I've run this strain before so I'm fairly confident that I know what to expect during these few stretch weeks.
Day 7 - Lights have been at 100% since day 5. C02 still 1800-2000ppm on average. Plants are stretching quickly into the lights, I have yet to readjust their height. The best growth usually happens when I do nothing, and I've done almost nothing the past couple days besides enjoy the unusually warm spring weather my area is currently experiencing. Watered today, 100gal (1.5gal p/pot) mixture, <1ec. Mainly an organic feeding for microbe health, also wanted a bit more runoff than normal due to the high ec feeding previously.

Likes
34
Share


@pHilosophy420
Follow
Original Auto Amnesia Haze - She is very bushy and growing very well. One more week till flowering so the next watering will be with bloom nutrients :-)

Likes
55
Share


@pifflestikkz
Follow
Day 158
07/10/24 Monday
Feed today using de-chlorinated tap water and calmag, pH to 6.2.
Picture and video update 📸
Day 160
09/10/24 Wednesday
So she has started to seed again in only 3 places I can see on different tops I have one bean.
So flush STARTS NOW,
Using 10L of De-chlorinated tap water pH 6 with flawless finish
Day 162
11/10/24 Friday
De-chlorinated tap water pH 6 only today again pH 6.
Day 163
12/10/24 Saturday
Another Flush today, using 10L de-chlorinated tap water pH 6 with flawless finish.
Day 164
13/10/24 Sunday (End of week)
She is starting to generate a tangy pineapple 🍍 😋.
Picture update 📸💚

Likes
1
Share


@Pestitel
Follow
Amazing experience with the Mix Pack, I will try it again next summer for sure. Love the variety.
Likes
5
Share

@Northern_Ent
Follow
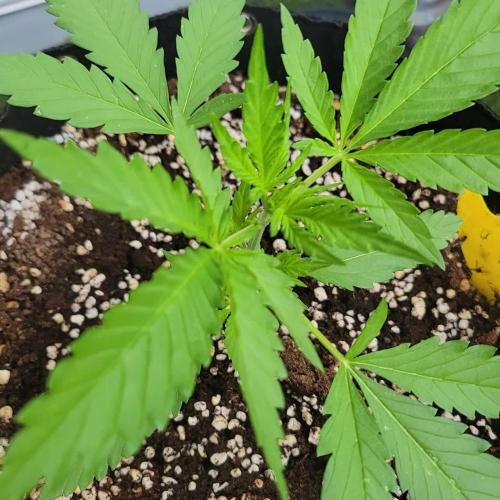
May 23 Day 22: PGC is the biggest seedling so far and is looking great. Transplant day. Soluble seaweed extract at half strength used to water.
May 26 Day 25: did a lazy compost tea which is normal compost tea done for a short time without a bubbler, and 24 h incubation max. If you leave it too long it will go anaerobic and get stinky. Five gallon was spread around whole yard.
May 27 Day 25: foliar spray of Extreme Blend this morning after a few days in the grow bag. Looks like she is growing quickly now.
Likes
6
Share


@flitflitz
Follow
KarmaIntraveritisGrow
Cada vez tengo más claro que este cultivo no será nada del otro mundo. No están creciendo especialmente. Y hay un motivo.
Mi otro cultivo es prioritario y el espacio disponible es el que es.
Reciben muy poca luz directa, apenas un par de horas, están todos el día a la sombra. No puedo luchar contra eso. Y se lo noto, las pobres parece que quieren pero que no pueden.
De todas maneras seguiremos hasta donde sea que lleguemos.
Tnt complex 2 veces/semana a razón de 2.5 ml/l
Powerzyme 1 vez a la semana, 2 ml/l
Supervit 1 vez/semana, a razón de una gota cada 4 litros
Lo estipulado por hesi pero no, me he vuelto a colar y les he doblado la dosis de tnt un dia, se me va la olla, estare pendiente de la reacción. La última vez no pasó nada...veremos
MP - ✅ . ahí va, parece que va a su ritmo
GZP - ✅ . Habrá dos fenotipos distintos, también? uno con la distancia internodal más corta que el otro que parece que tira más pa' arriba. No sé... Apreciación mía🤷🏻, me estaré volviendo loco?.
Seguimos!


Likes
73
Share


@Andres
Follow
she is almost ready ... she has 141 days in the outdoor ... I think she will cut it at the end of the month when she has 100 days just of flowering ... she has already started 10% amber in her ... with a typical smell of .a indica ... mint ... to earthy wood ... under a little temperature and a little cloudy ... but patience.and there is little left ... if I would cultivate it again it is obvious that if .. She will be very generous in her buds ... and she continues to feed herself organically ... and these are her results ... I am happy

Likes
2
Share


@TowersD
Follow
In the beggining of week 4 of flower the phenos are showing differences.
Nanaz x BBC are way toller that the Headbands.
Also, Nanaz x BBC #2 has no pistils but it is a female plant. I have that happened before when I grew the Banana Butter Cups S1

Likes
31
Share


@Kim_Jong_High
Follow
12/11/20 - Was slightly worried I had flipped too early, but the screen is filling out nicely!

Likes
3
Share


@Nxs235
Follow
Hello plant lovers community
The first week of the vega was almost perfect, except for the fact that the leaf is spinning at the Apricot, but these are trifles
The light was on all the time 30 watts, 20/4, watered to a glass weight of 300 grams every day, water 70ppm / 7.8ph with the addition of Tarantula and Piranha
On the 8th day they were transplanted into airpots, the light was set to 60 watts and the mode was 18/6
For transplantation, I use the method of two plastic cups, the video clearly showed

Processing
Likes
7
Share


@DrewbieDoobieNoobie
Follow
Week 5 of flower cotton balls are forming Starting the heavy flower feeding and using the rain rings on the pots see video, so far so good just waiting for these ladies to bulk up I have one light that is getting replaced on the next grow as is has some leds not lighting up so its running at 70% and the plant in the lower left corner is showing it its way smaller than the other 5,,, oh well, till next time be safe.


Likes
2
Share

@El-Ecko
Follow
3
So far, the small guava has been the variety that’s performed the best for me right from the start. 👌
It’s growing quickly and vigorously and looks absolutely healthy. 💪
Unfortunately, the weather is a bit unpredictable again right now. Nighttime temperatures are dropping back down to around 10 degrees.
Likes
33
Share


@Roberts
Follow
Cali Crasher is doing really good under the Hortibloom Solux 350. Everything is doing really good, and fingers crossed for a great finish. Thank you Hortibloom, and Doctor's Choice. 🤜🏻🤛🏻🌱🌱🌱
Thank you grow diaries community for the 👇likes👇, follows, comments, and subscriptions on my YouTube channel👇. ❄️🌱🍻
Happy Growing 🌱🌱🌱
https://youtube.com/channel/UCAhN7yRzWLpcaRHhMIQ7X4g

Likes
7
Share


@KarlsKraut
Follow
Samen am 30.04. getauft und am 02.05. eingetopft.
20g Green House Feeding BioGrow in der Erde eingemischt.
Am 04.05. das Licht der Welt erblickt.
Likes
Comments
Share

@JamesRenato
Follow
Na primeira semana de floração a preocupação aqui no meu grow, é com relação ao espaço. Vou ter que providenciar algum suporte para distribuir melhor as flores dentro do foco de luz e sustentar o peso depois que os buds começarem a engordar. A nutrição segue com a mesma base porem com menos nitrogênio e mais fósforo, potássio, cálcio e magnésio.

Likes
2
Share


@valiotoro
Follow
Hello everyone 😎
Week 2 for my girl it’s time for Topping & some LST
She is doing very well,growing at fast pace and with a beautiful green colour on the leaves.
Have a nice day 😎

Likes
12
Share


@DutchDudeGrow
Follow
18-4-2021 TRAIN TILL SHE BECOMES A BEAST Good progress /branching out its a bushy plant Now thats for sure... Nice ...
still not in flower but i think 1 more week till she change into flower , this week i also give a new batch of nematodes i dont see any fungus gnats flying but just to keep it on the good side for now
ppm im gonna push to 550 PPM the water i use is soft water 100ppm ,
Likes
14
Share

@DogDoctorOfficial
Follow
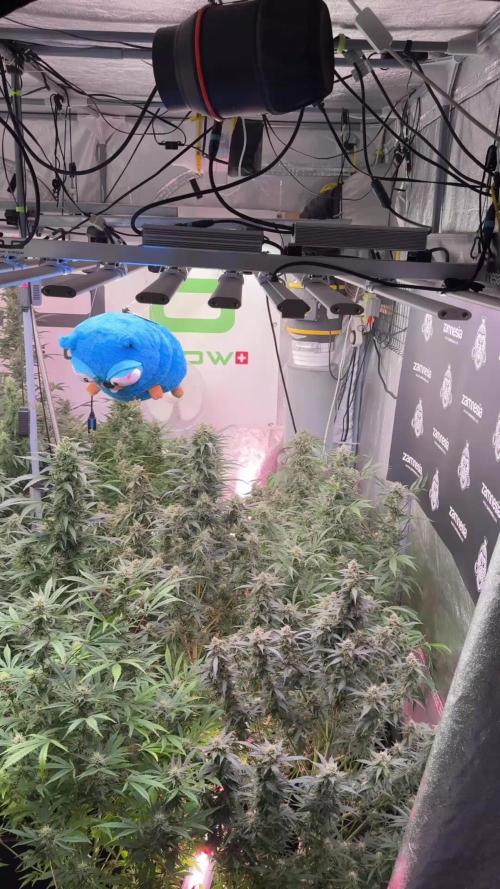
Amnesia Skunk — Week 11 from Seed (Week 7 Flower)
12/12 from seed — structure meets speed.
She’s not asking for anything anymore.
She’s just… becoming.
⸻
Quick Recap — How We Got Here
From day one, this run has been about balance over control.
12/12 from seed set the rhythm early—
No wasted time, no unnecessary stress, just a straight path from structure into flower.
Stable environment.
Consistent feeding.
No chasing, no overcorrecting.
And most importantly—
We let the plants grow towards the light, not the other way around.
What you’re seeing now is not luck.
It’s the result of early decisions compounding over time.
⸻
Week 7 Flower — The Quiet Phase
This is one of those weeks where…
if you’re doing a lot, you’re probably doing too much.
No major changes.
No sudden inputs.
No “let’s try this.”
Just:
– Observing
– Maintaining
– Respecting the process
Environment remains locked:
Same temps, same humidity, same feeding rhythm.
Hand watering continues—intentional, controlled, present.
PPFD sits around 800–1000, depending on position in the canopy.
No chasing perfect numbers—just letting each plant meet the light in her own way.
And she responds.
⸻
What We’re Seeing
– Buds stacking with confidence
– Structure holding the weight
– Resin building quietly, layer by layer
– Aromas starting to speak louder every day
That classic Amnesia expression is coming through now—
Sharp, complex, alive.
This is where patience becomes visible.
⸻
What We’re Watching
This is not a “do more” week.
This is a “pay attention” week.
Eyes open for:
– Excess moisture pockets → bud rot risk
– Airflow consistency through the canopy
– Early signs of mildew
– Any late-stage stress signals
Because at this stage, small issues don’t stay small.
Mr. Baggy is on full inspection duty 🕵️♂️
Nothing slips.
⸻
What to Expect Next Week
We’re entering the refinement window.
– Buds will begin to tighten and swell
– Resin production will accelerate
– Aromas will intensify even more
– The plant will slowly start shifting energy toward final maturation
No rush. No force.
Just guiding her to the finish line.
⸻
Final Note
Sometimes doing nothing…
is doing everything.
Because observation is action.
Patience is technique.
And restraint is part of the craft.
⸻
Gratitude
To everyone following this journey—
The day ones.
The new ones.
The silent watchers.
The loud supporters.
The skeptics.
The believers.
To the platform.
To the community.
To the genetics.
To the partners.
And to every grower out there learning, failing, improving.
This is for all of you.
From grower to growers.
📡 DELETED @ 1K Please stay tuned.we never quit https://www.youtube.com/@TheDogDoctorOfficial NEW 🙏 Thank you for your patience and continued support.
FOR DISCOUNT CODES AND MORE JUST FOLLOW THE LINK https://website.beacons.ai/dogdoctorofficial
📲 Don’t forget to Subscribe and follow me on Instagram and YouTube @DogDoctorOfficial for exclusive content, real-time updates, and behind-the-scenes magic. We’ve got so much more coming, including transplanting and all the amazing techniques that go along with it. You won’t want to miss it.
GrowDiaries Journal: https://growdiaries.com/grower/dogdoctorofficial
Instagram: https://www.instagram.com/dogdoctorofficial/
YouTube: https://www.youtube.com/@dogdoctorofficial Deleted by Youtube - https://www.youtube.com/@TheDogDoctorOfficial NEW
Vimeo : https://vimeo.com/dogdoctorofficial Under construction stay tuned
⸻
Explore the Gear that Powers My Grow
If you’re curious about the tech I’m using, check out these links:
🔆 Lighting & Environmental Control
• Future of Grow — Advanced LED lighting technology
https://www.futureofgrow.com/
DISCOUNT CODE: DOG20
• Lumiflora — Under-canopy LED lighting
https://lumiflorade.com/
• TrollMaster — Environmental controllers and automation gear (past collaboration)
⸻
Genetics
• Zamnesia Seeds — Genetics used in this project
https://www.zamnesia.com/
⸻
🌱 Soil, Substrates, Boosters & Root Support
• Plagron — Substrates, bio mixes, and supportive products
https://plagron.com/en/
⸻
🎒 Storage, Curing & Preservation
• Grove Bags — Curing and storage solutions
https://grovebags.com/
⸻
📸 Photography Equipment & Tools
(Not sponsors, but part of my creative toolkit)
• Sony A6700
• Sony full-frame macro lens + few more
• Stacking photography workflow - learning
• iPhone (for behind-the-scenes shots)
We’ve got much more coming as we move through the grow cycles. Trust me, you won’t want to miss the next steps, let’s push the boundaries of indoor horticulture together!
As always, this is shared for educational purposes, aiming to spread understanding and appreciation for this plant. Let’s celebrate it responsibly and continue to learn and grow together.
With true love comes happiness. Always believe in yourself, and always do things expecting nothing and with an open heart. Be a giver, and the universe will give back in ways you could never imagine.
💚 Growers love to all 💚
📸 P.S. – The Eye Behind the Lens
All photos in this diary (for now — except for the ones showing the camera, which I took with an iPhone) are taken with a Sony A6700 paired with a Sony full-frame macro lens and a few more.
Photography is part of the story — it’s how we share the fine textures, the glow, and the quiet details that words can’t always capture.
I’ve also started experimenting with photo stacking — a technique where multiple images, each taken at a slightly different focus point, are layered together to create one perfectly sharp image from front to back.
It’s not digital enhancement or AI; it’s pure photography — a way to reveal the plant’s beauty in microscopic depth, from trichome to petal.
You’ll even see a few shots of "ghost me" capturing the shots — camera, lens, setup — because every grow deserves not just to be cultivated, but documented like art.
FOR DISCOUNT CODES AND MORE JUST FOLLOW THE LINK https://website.beacons.ai/dogdoctorofficial
NEW DISCORD - Official Server Invite Link : https://discord.gg/ksjAkA5T74