


Likes
3
Share


@macrocefalo
Follow
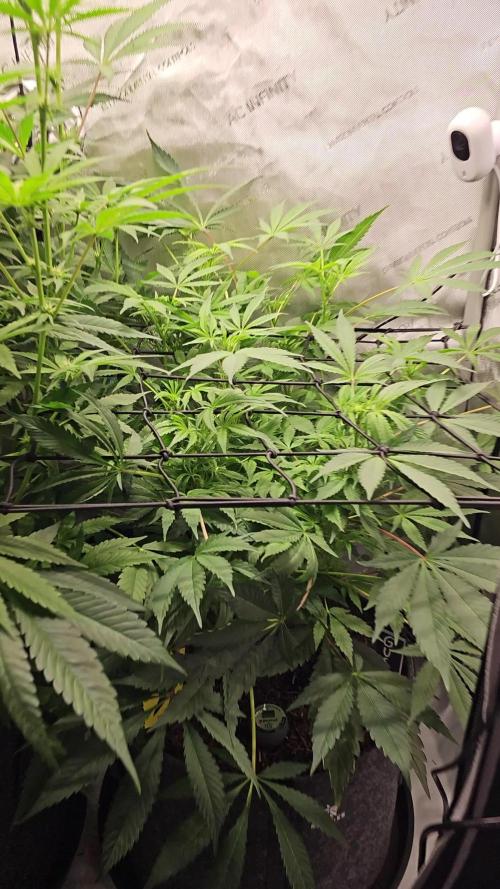
Another week for the first-time sailor. I started doing LST as I'm a beginner unfortunately my lack of skill took 3 leaves but the plants apparently did not feel the stress as they continue to grow and with the birth of new leaves. This week reduces the space for watering before 7 days to 5 days the growth is good but as everything in life can improve but I am happy with my performance and learning from my failures.
Likes
4
Share


Processing
Likes
15
Share


@MG2009
Follow
05/19/2020
All going well, have to grow in containers this season, I might be moving before harvest so only veggies in the ground.
But all are adjusting well 😊
I will give more details on individual plants shortly
#1 is10" tall new growth looks good getting thick.
#2 is 11.5" tall
#4 is 7" tall but healthy
#5 is 16"
Likes
16
Share


@ManikShamanik
Follow
I am glad to see her so well. Every day I water her and give her my love. Not much else needs to be done so no more words just videos and pictures to you guys. Happy new year! ❤️

Likes
8
Share


@TeaTime
Follow
Fastberry Auto is truly a gem among autoflowering cannabis strains! Its rapid growth, delightful berry-like aroma, and beautiful purple buds make it a joy to cultivate. The sweet and fruity flavor is a treat for the senses, and the balanced high leaves me feeling creatively inspired and deeply relaxed. A must-try for any cannabis enthusiast, whether you're a seasoned grower or just starting out! -
Processing
Likes
41
Share


@MadeInGermany
Follow
Welcome to the Sweet Seeds Cup 🏆
Hi everyone 🤗.
Today is day 30 of flowering (day 38 since the time has been changed to 12/12).
It just looks great 😍👍.
@SweetSeeds that's what I call masterful genetics what you conjure up 🤗👍.
It just grows perfectly, the lower shoots have grown to the upper level and have beautiful, steady stems.
They are so robust that I don't have to support them yet 😃.
I increased the Canna Bio Flores food from 3 ml / l to 4 ml / l a week because it now puts all its power into the buds 👍.
It already smells so good that you don't want to wait until it's fermented 🙈.
Of course I took cuttings from this fabulous genetic, and I am already happy to have saved them 🙏🏻.
I'm very excited to see what a taste will develop with these two super genetics by Kosher Kush and OG Kush .
I will go down about 5 cm with the lamp again for a week before I put it a little higher than it is now :-).
I wish you all a lot of fun with the new update, a nice start to the new week 👌, stay healthy and safe 🙏🏻.
Let it grow 🌱
Sweet Seeds Cup 🏆
Type:
San Fernando Lemon Kush
☝️🏼
Genetics:
OG Kush x Kosher Kush
👍
Vega lamp: 2 x Todogrow Led
Quantum Board 100 W
💡
Bloom Lamp : 2 x Todogrow Led
Cxb 3590 COB 3500 K 205W
💡💡☝️🏼
Earth: Canna Bio
☝️🏼
Fertilizer: Canna Bio
☝️🏼🌱
Water: Osmosis water mixed with normal water (24 hours stale that the chlorine evaporates) to 0.2 EC. Add Cal / Mag to 0.4 Ec Ph with Organic Ph - to 6.0 - 6.3
💦💧
You can Buy the Strain at :
https://sweetseeds.es/de/san-fernando-lemon-kush/
Likes
8
Share

@MrGoonai
Follow
10/27/2025 - Day 63
Short Facts:
- 45cm tall
- VPD @ 1.2
- Light @ 60%
- Showing very small flowers
-----------------------------------------------------
It doesn’t look like there’s going to be a big stretch. She’s staying smaller and more compact than the Papayton.
I defoliated her a little bit and tried to remove a few of the very small branches, but she’s just too compact, so it wasn’t that easy. I decided to stop for now.
She grows as she grows. 😎 I can’t change much about it, so I’ll just let her do her thing. Honestly, apart from being smaller and very compact, there are zero problems. Everything else is perfectly fine.
Nothing more to report this week, except that I decided not to switch the normal Blumats to the Blumat Maxi anymore. Instead, I’m watering from the bottom occasionally whenever the Blumat Digital Pro shows a high value, meaning the soil moisture is getting too low.

Likes
39
Share


@Roberts
Follow
Bubble OG Gum auto is doing good. She had a solution change yesterday. The colas have a nice frost on them already. Things are looking really good. Thank you Spider Farmer, Athena, and Ganja Farmer. 🤜🏻🤛🏻🌱🌱🌱
Thank you grow diaries community for the 👇likes👇, follows, comments, and subscriptions on my YouTube channel👇. ❄️🌱🍻
Happy Growing 🌱🌱🌱
https://youtube.com/channel/UCAhN7yRzWLpcaRHhMIQ7X4g


Likes
17
Share


@eldruida_lamota
Follow
Que pasa familia, de nuevo estamos aquí con la cuarta semana de crecimiento, a ver si las aguanto una semana más o las pasamos a flora, se decidirá a lo largo de estos días.
Vaya color más bonito que se marcan están muy sanas y vigorosas, Agrobeta hace sus funciones a la perfección mantienen una planta sana de principio a fin, cubriendo todas las necesidades, palabra que no es la primera vez que los uso.
Agrobeta:
https://www.agrobeta.com/agrobetatiendaonline/36-abonos-canamo
Mars hydro:
Code discount: EL420
https://www.mars-hydro.com/
Bueno las maximas de temperatura no superan los 25 grados y las mínimas no bajan 19, así que no me puedo quejar.
Los niveles de humedad también son los correctos van entre 50%/60% de humedad relativa.
Por supuesto el Ph lo estamos dejando alrededor de 6.
Hasta aquí es todo poco más la verdad ya con ganas de empezar la floración , buenos humos 💨💨💨

Likes
32
Share


@Ganjagrandaddy
Follow
Day 42 flowering: What a start to this update with the #3 Mango cream being ready for harvest NOW!!!. She has been maturing very quickly during the last few weeks and I have been concerned that she was somehow going towards a toxicity issue. Her buds began darkening really early in flower and I thought it looked very different to the others. As the last week has passed I have been looking at her trichrones with the microscope as they oustils had all gone majority brown too. They had mostly clouded and a couple of odd amber spheres were visible too. as the week went on I saw more begin to amber so took her out a day ago too have a dark period before trimmed for drying . She is the first I have ever had this quick in decades of growing !. The video shows her colours off well and her maturity to harvest too. @exoticseeds have a winner here. lol she smells amazing too with a really nice icky sticky feel . I will update her progress once trimmed.
#1 is the smaller of the 3 remaining ladies now ansneven with the #4 beingna week behind her she is still the smallest in height. Her buds are nice and chunky and just as we hit the budswell period too , so shebshould finish with some nice sized colas.
#2 Mango is a beast of a plant and by far the largest. Her main is a beast of a cola already with the side branching really picking up some size now too. A brilliant example of the strain I think. Her main is really tacky to touch and the nice smell it leaves all over my fingers is mouth-watering now. She should yield very well.
#4Mango at day 35 looks very like the #3 plant for her bud appearance. slightly different pheno i think. More like a wedding cake strain but still very nice and colourful. She has been using pellets in the soil mix and just waterings but they are not good in my opinion and I have had to add megacrop to keepnher growing well now I waited as long as I dare to see if the pellets helped in flower but even using the second part of the feed has not helped. The megacrop has already begun to colour them back up to a more healthy green so i am hoping I can keep her happy until harvest now. She is pushing out a very nice fruity smell now too.
I am looking forward to trying the photoperiod strains I have from exotic now and will be germinating Herz Og and Quick sherbet in a couple of weeks time for the summer run.
Top genetics from a great breeder . Thank you Exotic.
###UPDATE###UPDATE###UPDATE###
The Mango cream #3 has been in the dark for the past 48hrs and has now been trimmed and is hanging to dry. She will be dried low and slow now for approx 10-14 days at around 15-17°C in a large cardboard box with a steady air exchange. She has a surprising size and weight to her for such a short time from seed and is as finished as any plant i have harvested before . What an amazing little lady she has been to grow She looked a little stunted initially and soon filled the pot she was in. 20L was way too small for these genetics to flourish and at least a 30L would be my advice. Happy days , let's see what she yields dried while we wait for her sisters to join her. Be well Growmies
Likes
13
Share


@Robeeriegenetics
Follow
Everything is going ok no roots yet on the clones but we got a week b4 we need to worry
Temps steady humidity steady will be topping of res with more nutes todau
Likes
2
Share


@I_Identify_As_A_Dan
Follow
Day 56
Shes really fattened up.. smelling great and super stinky.
Looking forward to seeing how thick she gets.
Shes maybe got another 3 weeks? Maybe 4 if i push her


Likes
8
Share


@Jenda1797
Follow
I'm still struggling with that temperature. unfortunately, the substrate once dried up for me.

Likes
16
Share


@NatureSolutions
Follow
Correct weeknumbers are difficult in a perpetual grow lol🙃
Little update with all the strains.
Runtz XL(more xxxx small lol) was drowned as can be seen, no hole in that pot>drilled them today. As small as she is she is the second plant that entered flowering stage.
Red Gorilla girl XL was in my vertical garden system, didnt respond well its leaves started to wilt, the pot got replaced somewhere a little more temperate. The lsd-25 seems to be okay in the vertical wall.
The Purple punch is well into flower ready to develop nugs in next 2 weeks
Happy growing peeps
Likes
34
Share


@GreenHouseLab
Follow
LST plant on left, Topped plant on right. Note I only topped once and LST for 4 days haven’t done one thing other than watering for several weeks now. These girls are about 10 days into flowering.
My mind is made up on using mycorrhizae along with the Gaia Green and Rhizo Blast as these girls are on fire 🔥. The leaves are silky smooth sign of excellent transpiration and VDP. Consistency is key and I’ve been able to maintain night temps at 69F and day time at 80. RH fluctuating from 45-64 from light on/off. I’m waiting/debating on defoliating this week or the next.
Likes
35
Share


@bioaccessory
Follow
Hello colleagues!
This week I added a lamp with far-red diodes, returned the blue ones, and now I have even brighter colors in my box. 😎
Thin branches begin to bend and break - I tie them up. I'm reaching the finish line.
Thank you for stopping by, and be healthy! 🙏
To be continued... 😶
Processing
Likes
4
Share


