
Processing
Likes
Comments
Share


@Phenohunter88
Follow
Constant LST on these girls. They are so leggy I'm worried that if I let up the canopies will get out of control. I feel like i'm doing a good job with it thought.
The occasional super cropping is needed and I leaf tuck and even take leaves almost everyday. Doesn't seem to slow em' down.
Lights are at about 75% now. Weather has calmed down so temperature in the tent is consistently below 80F. Happened just in time for mid-flower.
Right before the weather changed I build an exhaust to vent everything outside so controlling the atmosphere is a lot easier and I think it shows.
Switched to bloom nutes towards the end of this week. Miracle Berry Remix IMMEDIATELY perked up and stopping being droopy all the time. CDLC woke up and I'm really happy with her now. Phosphorous is really important once pre-flower begins.
Getting impatient....gonna pop some Double Grapes for the Solo Cup competition.
Lowering my PH to 5.5 - 5.7 to accomodate for any salt build up in the coir since they drink water so quickly. Their response was very good. CDLC loved the drop in PH the most I believe.
I cut my veg nutrients (nitrogen) to half because they aren't in full flower but i'm giving them full doses of the Maxibloom and additives.
I've learned that most chlorosis I am experiencing is a nutrient deficiency. PH and increasing PPM steadily is a MUST to be successful I believe. Potassium is what generally causes the "nutrient burn". You'll catch nitrogen toxicity before any chlorosis and phosphorous is really difficult to give your plant too much of. Especially in flower. I'm gettin' the hang of this....
If anyone could answer me this....Why would you use a feeding schedule when your plant is going to require different nutrients than any other plants? There are too many variable to use a feeding schedule correct?
Really not much to see this week besides the plants bulking up. They are gorgeous...except for the CDLC...she's got some work to do.
Day 49 - Watered with some whacked out PH water today...didn't catch it until it was too late. Mango Smile was dropping by the end of watering...hopefully I didn't stall anyone out. Check out the pheno difference between the two Miracle Berry Remixs.


Likes
3
Share


@OrthoGrow
Follow
Week 10
I actually thought it will be ready soon, but the trichomes still need time. I hope to harvest it before the end of the week. Not growing anymore, I’m pretty happy about the size, can’t wait to harvest it!
looks healthy

Likes
2
Share


@For2itous
Follow
After tap root popped. Put directly into soil/seed tray, covered with humidity dome and put on heat mat set at 78. Once I saw roots I transferred them to final 5g fabric pot
Likes
16
Share


@DreamIT
Follow
Sponsored by:
💫PARADISE SEEDS💫-💡VIPARSPECTRA💡-💐GREEN BUZZ LIQUIDS💐-🛠️WEDRYER🛠️
28/7 all good for this delight, which is about to enter into bloom
2/8 the stay in the small vessel begins to show signs of deficiency. Prezto starts flowering without being cloned
__________________________________________
Personal advertising (contains affiliate links)
__________________________________________
🦄 winners and holders of the most prestigious awards, since 1994 they offer genetics of the highest quality! Anonymous shipping!
✅https: //bit.ly/Paradiseseeds_
__________________________________________
Did you know that Green Buzz Liquids fertilizers are 100% vegan? A complete line of products ready to give the best to each of your plants! Visit the site and see my journals to see how they work 🦄
🤯 And with the code "dreami t" you will immediately receive a 15% discount on your purchases
✅https: //bit.ly/GreenBuzzLiquidsPro
__________________________________________
👀 Are you looking for a good lamp to start with? 👀
🌞Viparspectra has something more than the others, take a look at their site.
⏩ Use "GDVIP" for an extra discount or "DREMIT3" for an extra 5 %% discount
👀 Search for it on Amazon
✅Amazon USA: https://amzn.to/30xSTVq
✅Amazon Canada: https://amzn.to/38udUVe
✅Viparspectra UE: bit.ly/ViparspectraUE
✅Viparspectra USA: bit.ly/ViparspectraUS
______________________________________________
🌈 Tired of blowing on your weed hoping it dries quickly? Check out the Wedryer website! You will find a well-made accessory that will help your weed dry in just 8-10 days without the annoying risk of finding mold or other annoyances! (no affiliate links)
✅https: //bit.ly/Wedryer_
______________________________________________
📷🥇Follow the best photos on Instagram 🥇📷
https://www.instagram.com/dreamit420/
Backup
https://www.instagram.com/dreamit4200/
🔻🔻Leave a comment with your opinion if you pass by here🔻🔻
🤟🦄💚 Thank you and good growth 💚🦄🤟

Likes
13
Share


@gr3g4l
Follow
Aunque dejaron de crecer a lo bestia como lo hicieron en preflora, 25-30 primeros dias a 12/12h. han seguido creciendo hasta ahora y esta semana me tocó volver a calzarlas todas para que estubieran a una misma altura.
Esta semana viene bién cargadita de nutrientes con tres riegos , dos o tres dias entre uno y otro, según veo o creo que lo necesitan.
Seguiré regando mitad mitad, agua de grifo / destilada . El primer riego de la semana 3 ml/L de top Candy y un pelin de ácido cítrico para bajar el PH. EC 1,03 , PH 7,00
El segundo riego con Bud y Bloom, 1,5ml/L y 3ml/L respectivamente más ácido cítrico para bajar PH. EC 1,30, PH 6,9
El tercero con Delta9 y callMag. 4ml/L. y 0,5ml/L respectivamente más ácido cítrico para baja PH.
última poda de hojas abanico, 2 o 4 de cada y poda de yemas para que no compitan con los apicales que reciben luz. También me tocó fijar mejor los troncos con alhambre de jardineria para que estos no se doblen por el peso y pierdan por aquí algo de energia.
No tengo claro si fuí capaz de disminuir el exceso de nutrientes por lo que durante toda esta semana y hasta final de flforación se mantiene una EC baja. mezclando mitad agua del grifo mitad destilada y así consigo mantener esa EC .
El haber regado en crecimiento y principio de flora con un agua tan dura y alcalina hizo que las plantas muestren el aspecto que muestran

Likes
5
Share


@negyhusztv
Follow
2 nd time of flushing, also we fimming them and prepare the box and setup for vegetation stage they are just tarting to streching slowly looks nice all off them but one of them is 3 x timex bigger then others...

Likes
27
Share


@Basementganja
Follow
They grow up so fast! ;')
Watered every ~3 days (when dry)
Pour in water quickly/gently so that the soil is covered by 1cm of water.
Not long now, maybe a week, then cloning!

Likes
4
Share


@Autofeather
Follow
So the grow cycle was pretty easy. I work away from home and I sometimes have to leave for 4 days in a row. Before I'd leave for the four days I'd just add 4-6 cups of RO water with some Cal-Mag. When I can back she was always bigger and didn't have any problems. I was lazy this time and never checked the PH of the water. This strain is pretty resilient so props to sweet seeds.
I decided not to LST this plant, it was a little taller than I wanted but grew in a nice shape.
I still cant believe how purple this strain is.
I started to get foxtailing on the top bud not sure what would cause that.
Once again sorry for the lack of pictures. I'll let you know the smoke report later.
Likes
13
Share


@TheKydd
Follow
YEEEEEEAAAH BOOOOOI, my fabric pot arrived as i expected so i re-potted my baby about 8pm tonight, i used the same CANNA TERRA PRO Soil as before to fill the fabric pot (Soaked it in water then let to drain) and the transplant went smoothly. A video and photo have been uploaded showing it in its forever pot, and i also installed a proper oscillating fan. 14/09
Checked in on the baby this afternoon and looks like shes handled the re-potting just fine which is great news! Everything else is as per usual so will just throw some update photos on. 15/09
Today I checked in on the baby as usual and everything's looking great, she grew a noticeable difference although that's hard to tell in the photos. I gave her a good watering so the humidity came up to 70% for a short time but that's nothing to worry about. Temperature sat around 22 degrees Celsius all day. Photo's show the top and side views for reference. 16/09
Once again the LSD baby grew a nice amount over the day and is looking stout and healthy. The stem is already hardening off and very thick for its short size so i decided to begin to pull her over using LST as i will need to focus on keeping my plant growing low and across due to the space available in my cupboard. Everything went well during the LST so i have put photos up showing what i have done. Temp and humidity is usual. 17/09
Today after work i decided to finally get the mylar roll out and patch the ends of my cupboard as it was pretty rough with tinfoil. I cut out cardboard walls to shape of the existing ends and then lined the edges with carpet tape. I had someone help hold one side and we just placed it down swiftly flat onto the card. This mostly pulled it tight but its not perfect. Other than that, everything's going as per usual and i've uploaded some update photos 18/09
Nothing much to update today, everything's looking good. The weathers been pretty shit so the humidity is up but thats not a worry right now and summer coming up will eliminate that problem. Have updated a couple of photos, basically the plan is to train the plant along the cupboard as low as possible before tipping. This way i can utilize the short spaced cupboard. 19/09
Updated the photos! Everything's looking good, the temperature that is showing is the evening temperature 'which is affected slightly as the cupboard is in a garage. A little low but will only get better as spring comes in. 20/09

Likes
29
Share


@Libanese
Follow
The last week for all, i can harverst the pineapple for last but i don’t have space to manage the others cutted plants. I will put all togheter in the grow room to dry, i will stopped for the summer.
I posted last photos, Saturday I’m going to harverst.
I can wait one more week beacouse the tricomes are not at the perfect stage but i satisfieted, i need a break 😅.


Likes
3
Share


@Rock_n_Roll_Randy
Follow
This garbage plant that was supposed to be an autoflower but was a photoperiod turned hermaphrodite on me. Not a few pollen sacks but tons everywhere. I noticed some pollen on some of the closer plants leaves so I hope it didn't fuck em up. I'm hoping that they are so early in flower that it won't pollinate em
FOR EVERYTHING MARS HYDRO VISIT:
www.mars-hydro.com
www.marshydroled.ca
PROMO CODE: rocknroll
VISIT THE ALIEXPRESS STORE:
@marshydro_aliexpress
Instagram: @marshydropenny
https://youtube.com/channel/UChU5ZWwNi-DvnO3oWVU3ceA
(NEW) STRIVE NUTRIENTS 💪

Likes
30
Share


@BrediGreeny
Follow
So my new Mars Hydro FC-E1500 is here. Swaped the very old MarsHydro LED in the middle. Gave them a little bit more CalMag and for the 1st Wedding Cake Bio Grow. Very minimal trimming. I noticed that the leafs from the 2nd Wedding Cake are glossy like. I think it could be too much nitrogen. Stoped giving her Bio Grow 1 week ago.
Thanks for all the answers, i will flush both the weddingcakes out and see how they react. Also measuring the run off EC and PH and also soil PH.
1/10/25
I like this community already 😁 you guys gave me such good answers to my grow question. So I measured soil PH roughly between 7 and 7,5 so alkaline. Not good. I flushed with Phed water 5,3 and measured PH of runoff at 6,6 and ppm at 1480 . Repeated, measured runoff PH 6,3 ; ppm 1210. Repeat, but with PHed 5,0 water, runoff PH 5,9 ppm 1010. Stoped. 1st WddngCake took 3 flushes with total of 30 l of water.
2nd Wddncake got a flush with 25 l of water at the end runoff PH aprox 5,9 ppm 990 . Gave them both Nematodes because i saw a reduction in fungus gnats that is good. Almost none flying around. Fingers crossed. 😊
1/11/25
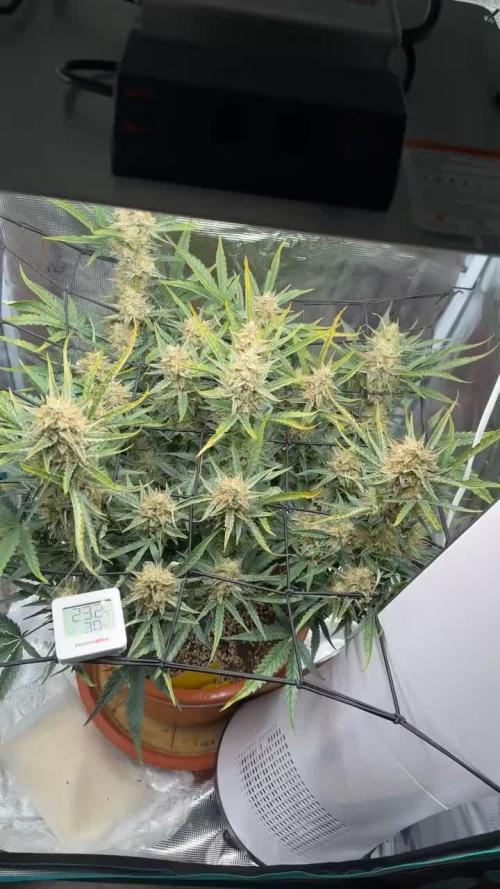
Aprox. 24h from "The Big Flush" 😁 and they seem to be happier. Temp in tent 23 C and RH 44% - 48% . Also added a few photos of them after the flush.
1/12/25
Aprox. 48h after flush. They are doing very good. 1st WddngCake shows off more of her colors with splashes on the calyxes and sugar leafs. 2nd WddngCake stands tall and bulks the buds up. I also noticed that Pheno 1 WddnCake has a fruitty creamy like sweat smell and the 2nd Pheno ,the tall girl, reminds me of a tropical IPA, fruity , fresh and pungent like cousin hops. Also the end of this week, today, looking forward at the week ahead. In the tent 22 C at the moment with 50% RH because i let the mars hydro ventilators off for the day. they are back on now.
Likes
6
Share


@Dairon
Follow
Me están sorprendiendo gratamente las dos genéticas que he puesto, no paran de crecer y eso que llevan 21 días a 12/12, buena ramificación e internudos bien juntos, de momento y hasta que vea que entran en floración seguiré con la misma EC, intercalando riegos con agua de ósmosis, subida de EC a 0.4 con Calmag de Biobizz, un suplemento de Calcio y Magnesio, con el que puedes cultivar en coco de forma orgánica con Biobizz o subir la EC si usas agua de ósmosis ... . Al menos han bajado las temperaturas un poco y las plantas lo agradecen, espero que empiecen a echar flores pronto, buenos humos


Likes
20
Share


@RunWithIt
Follow
I mean, overall this was an extremely painless grow. The test of whether we should or shouldn't top autos is still TBD imo. Our topped candidate produced denser, frostier buds, but weighed slightly less, at 14 grams of bud total. And our lst plant produced 18 grams of bud, not as frosty, and almost as dense as our topped girl. I'll be topping autoflowers from here on out only under the circumstance I have 4+ to grow at the same time. Seems like it could be used to speed up the autoflower grow cycle if done properly, like with right. Since I'm doing a perpetual cycle, it's still a viable option for me in the long run. A few tips I have for anyone growing this strain in organics:
Start feeding bloom nutes a little bit prior to flower transition - this makes the transition more seemless. From weeks 1-3 flower, I slowly dropped the grow dosage until I cut off grow nutes week 3 flower.
Starting the flush around week 6 flower seemed to really bring out this plant's potential. But I think you could get away with starting the flush around week 5. I hope this helps anyone trying this strain out. It's a good one, I hope to see more journals of it, eventually.
Cheers everyone! Time for me to take a well-deserved puff. :) ☁️ 🌼

Likes
4
Share


@PolezGardn
Follow
day 60 flower, ladies look very good, the blueberry has developed nanas... i cut her directly :( but the ChemDog recovered quickly in 12h light!

Likes
170
Share


@nonick123
Follow
Día 47 (03/03) Las señoras siguen su imparable Stretch. Solo mirarlas y disfrutar 😍😍😍🎉🎉🎉
Día 48 (04/03) Riego 1,25 Litro H20 + Wholly Base 2,5 ml/l + Solid Green 1,5 ml/l + Early Flower 0,75 ml/l de Gen1:11
TDS 960 PPMs - pH 6,26
Día 49 (05/03) Se empiezan a formar los erizos! 😍😍😍
Gorilla Cookies FF ha despegado hacia el cielo! 🚀
Día 51 (07/03) Riego 1,25 Litro H20 + Wholly Base 2,5 ml/l + Solid Green 1,5 ml/l + Early Flower 0,75 ml/l de Gen1:11
TDS 950 PPMs - pH 6,37
Día 52 (08/03) Los erizos empiezan a engordar!
Día 53 (09/03) Parece que el stretch se frena un poco...
💦Nutrients by Gen1:11 - www.genoneeleven.com
🌱Substrate PRO-MIX HP BACILLUS + MYCORRHIZAE - www.pthorticulture.com/en/products/pro-mix-hp-biostimulant-plus-mycorrhizae
🎚️Controlled by TrolMaster TCS-1 Tent-X System Main Controller - https://www.trolmaster.com/Products/Details/TCS-1