
GRANNY GROWS Deluxe Sugar Cane


VEG
Uoiuxc Light Emitting Diodes/250W
Uoiuxc
FLO
Uoiuxc Light Emitting Diodes/250W
Uoiuxc

Coco Coir
Custom
Indoor
Room Type
grow naturally for 10 weeks, removing lower shoots for cuttings. 2 weeks before move to flowering room, take the top as a cutting.
weeks 1
pot on in stages to 2.5 gal grow bag.
weeks 1
Dis budding
weeks 1, 9, 15
LST
weeks 13
Defoliation
weeks 15
weeks 16
6 months in jar
weeks 17
Natural Method
weeks 2, 5
Pot on to bigger grow bag
weeks 3
26 l
Pot Size
Start at Harvest
G
Germination4y ago


Nutrients 1

Blossom Booster 10-30-20
2.604 mll
CannaAnna 12-17-22-Seeds arrived. 5:30PM started two.
12-18-22-Checked seeds, added alittle water to keep moist. Labeled grow bags and made room on the heat mat. I'm excited to see what I can do with these genetics!
12-20-22-Nothing yet, I think they are coded for higher temp requirement for germination. 11:00am move to prop mat(75degrees). 5:00pm DSC#1 sprouted-6 hours.
12-21-22-7:30am DSC#2 germinated overnight and both stuck in small grow bags with medium and placed on heat mat with a humidity hood.
12-23-22-7:30am both seedlings emerged overnight, shed their seed coat. Cotyledon leaves pale and closed together. Here in Colorado we have had extreme cold and I credit the bottom heat and dome for the good germination results. My basement Veg area is drafty and cold.
7 likes
6 comments
Share
Used method
Paper Towel
Germination Method
1
Week 1. Vegetation4y ago


Nutrients 1
Blossom Booster 10-30-20
2.604 mll
CannaAnna 12-24-22 Both seedlings unfurled overnight and look great! I uncovered and moved them closer to the led light. The container has perlite on the bottom so seedlings are not directly on mat.
12-25-22-The seedlings look great, standing tall with dark green cotyledon and true leaves. Watered medium with mild Peter's Bloom booster 10-30-20. I use the same fertilizer for duration of grow. I remove the humidity dome a couple time a day to let leaf surface a chance to dry out every 8 hours or so. i opened the sliding vents halfway on the top too to increase air circulation. and breathed into the chamber several times deeply, CO2. I like a stocky seedling, so i'm keeping them right under the light.
12-28-22 DSC #1 still bigger than #2. I cover with the tall humidity dome at night, uncover during the day. Seedlings are tall and standing without support. I dribbled some water with a trace of fertilizer today then poured the excess off. Even though the seedlings are directly under the prop light, I give then a quarter turn a day.
12-30-22 Today is last day of Veg week 1. The seedlings look like what I expect. The first ture leaves grew alittle bigger and second set of leaves emerged but not big changes. I noticed some streaching even though the light was correct. I thought 'Maybe the dome is collecting enough heat that it forces growth at the same time the lights are off, therefore I'm getting some streaching.' Anyone one else had that thought? No more need to cover because they are getting bigger, I put the dome away.
4 likes
3 comments
Share
Used techniques
grow naturally for 10 weeks, removing lower shoots for cuttings. 2 weeks before move to flowering room, take the top as a cutting.
Technique
pot on in stages to 2.5 gal grow bag.
Technique
Dis budding
Technique
2
Week 2. Vegetation4y ago


Nutrients 1
Blossom Booster 10-30-20
2.604 mll
CannaAnna 12-31-22 I have the heat mat set at 75 and it's been running full on most nights. The rising heat pulls moisture out of the grow bag in additions to the roots. That is good. But I keep and eye on them cause they can dry out too much quickly. Today a watered, dribbling along the sides and middle. Though I was careful the seedling washed out alittle and flopped over. I staked them up using my favorite loop d'loop with tread. Provide perfect support. DELUXE SUGAR CANE#1 SPROUTED ROOTS out the bottom of the grow bag. I removed the seedlings from the pyrex dish and placed them direclty on the perlite covering the hear mat.
1-1-23 Both seedlings sprouted mulitple roots from bottom of grow bag. I turned the pyrex dishes upside down next to grow bags and placed row cover to catch rising heat and keep roots evenly warm.
1-2-23 Gently fertilized both seedlings with Peter's Blossom Booster 10-30-20 @ 1 tea/gal.
3 likes
comments
Share
Used techniques
Natural Method
Technique
3
Week 3. Vegetation3y ago


No Smell
Smell
30 %
Air Humidity
10 °C
Solution Temp
24 °C
Substrate Temp
13 °C
Night Air Temp
0.04 l
Pot Size
38.1 cm
Lamp Distance
Nutrients 1
Blossom Booster 10-30-20
0.326 mll
CannaAnna 1-6-23 First day of week 3. The Deluxe Sugar Cane seedlings look good. So good that I I can almost see them glistening in my flowering room. I'm going to keep doing more of the same. The photos show top growth and branching at opposite nodes, getting taller, bigger and nice root system. From here, I feel confident enough to write down the production schedule on my caleand I lost trnder. I've got the next size grow bags cut to size and labeled, I'll probably POT ON both later this week. Having never grown this strain or any strain from IN-HOUSE, I'm happy I've got these seedlings to this point. The bottle cap sprinkler waters evenly, no compaction or wash out. i think it helped. The seedlings will go on a constant feed of leak 10-30-20 starting with the next water. Veg till March 20, growing taller, taking the lower shoots as cuttings, potting on to bigger and bigger grow bags before moving to the flowering room. I'm planning on 70 days before harvest End Of May.🙏
1-8-23 They are getting big and shading each other. 5:30pm I POTTED ON the seedlings and wathered with 0.5 tea/gal of 10-30-20, grouped together on the heat mat. I dimmed the lights a bit and covered with remay(row cover) to collect the rising heat. They look great.
1-9-23 My son said the photos of little plants doing nothing is boring, most people go right to the harvest photos first. So I added alittle eye candy from the flowering room. I can't rmember which variety the coala is, and I lost track of the labels.
2 likes
2 comments
Share
Used techniques
Pot on to bigger grow bag
Technique
4
Week 4. Vegetation3y ago


No Smell
Smell
30 %
Air Humidity
10 °C
Solution Temp
24 °C
Substrate Temp
13 °C
Night Air Temp
0.04 l
Pot Size
38.1 cm
Lamp Distance
Nutrients 1
Blossom Booster 10-30-20
0.326 mll
CannaAnna 1-13-23 First day of week 4-BEAUTIFUL
1-15-23 I'm egar to get cuttings rooted of both my DELUXE SUGAR CANE. I 'm going to take the lower 6-8 nodal shoots cause I want to limb it up a bit before I top it. To get the best light driven, carbo filled cuttings that will root quickly, I remove the 'thumb & pinkie' leaflet from each cannabis leaf. Because the light is directly overhead, it will penetrate down to the shoots now. Once I have rooted cuttings they can go into the flowering room when space is available. I harvested the Flo OG from Rare Dankness. Clean up and move new girls in ASAP. That makes room in the VEG area to pot on my new seedlings!
1-16-23 Prepare to pot on: Cut to size, punch additional drainage holes and label PANDA bags(black inside white outside). They will be too big for the propagation bench after transplanting. I harvested the Flo OG and moved the giant veg specimens into the flowering room. Now there's room on the floor.
1-18-23 These are the last photos from the kitchen counter, the plants have out grown my makeshift studio. I'll have to figure something out
1-19-23 End of week 4- Amazing Plants! They are starting to strut their stuff. I moved them off the heat mat but I still cover with row cover at night. The training is producing very nice shoots for cuttings.
2 likes
3 comments
Share
5
Week 5. Vegetation3y ago


No Smell
Smell
30 %
Air Humidity
10 °C
Solution Temp
24 °C
Substrate Temp
13 °C
Night Air Temp
5.68 l
Pot Size
60.96 cm
Lamp Distance
Nutrients 1
Blossom Booster 10-30-20
1.302 mll
CannaAnna 1-20-23 First day of week 5. Plants show nice, compact, dark green growth. They are still throwing opposite leaves, no pistels yet.
1-22-23 Potting on today into panda bags and placed in a tray on the floor with a heat mat set at 75 degrees.
1-24-23 I dialed down the lights to 75% and thinking about covering with row cover to shade. I watered with 0.3 tea./gal 10-30-20 with a fine spout watering can the area on top of the original root ball, slowly and gentily. Bottom heat*feather light shade*NOT overwatered.
1-25-23 Removed nodal buds from future cuttings, rotated, start feeding once a week and clear water the rest of the time. Getting set up ready to take cuttings next week.
1-26-23 I noticed the first alternating branching, still no pistils. The seedlings are becoming mature.
2 likes
1 comment
Share
Used techniques
Natural Method
Technique
6
Week 6. Vegetation3y ago


No Smell
Smell
30 %
Air Humidity
10 °C
Solution Temp
24 °C
Substrate Temp
7 °C
Night Air Temp
5.68 l
Pot Size
45.72 cm
Lamp Distance
Nutrients 1
Blossom Booster 10-30-20
1.302 mll
CannaAnna 1-27-23 First day of week 6-I took the lowest 4 shoots as cuttings from DSC#2. I CONDITION cuttings before sticking them in hormone/sponge. Once I removed all but the top three leaves I trim by 1/3rd remaining leaves and cut stem at an angle and pop them in a jam jar with water like a cut flower. They will sit on the kitchen counter for up to two weeks supported by the under cabinet LED tape light. They receive no direct sun and the counter top is cool. Mostly I just wait 3-5 days then stick them. I expect new growth on the seedlings after the potting on last week. I raised the light as well and that will encourage some stretching. The ultimate canopy must unfold just above the support wires. Now that I have beautiful cuttings, I'm training up by removing shoots not leaves.
1-29-23 Stick the DSC#1 & #2 today
1 like
comments
Share
7
Week 7. Vegetation3y ago


No Smell
Smell
30 %
Air Humidity
10 °C
Solution Temp
24 °C
Substrate Temp
7 °C
Night Air Temp
5.68 l
Pot Size
45.72 cm
Lamp Distance
Nutrients 1
Blossom Booster 10-30-20
1.302 mll
CannaAnna 2-4-23 Second day of week 7. The plants have sprouted roots out of the panda bag. It's been cold in the veg so the heat mats' been on and it drys them out. I watered with 1 tea/gal fertilizer. Still no sign of pistils and all opposite branching, DSC#1 displays a couple shoots that could be male flowers. I will post a photo, and keep and eye on it. It won't be long before they become mature. I removed two big fan leaves from the top to allow more light to penetrate down and stimulate branching.
2-7-23 DSC#1 & DSC#2 I took the top 4" off the top as a cutting.
1 like
comments
Share
8
Week 8. Vegetation3y ago


No Smell
Smell
30 %
Air Humidity
10 °C
Solution Temp
24 °C
Substrate Temp
7 °C
Night Air Temp
5.68 l
Pot Size
45.72 cm
Lamp Distance
Nutrients 1
Blossom Booster 10-30-20
1.302 mll
CannaAnna 2-11-23 Week 8 DSC#2 ROOTED CUTTINGS IN 14 days first of all 5 seedlings: 2 out of 4. Anytime there is room in the flowering room I will transfer DSC#2 without worry. If it turns out fantastic I have a clone and I can grow it again. Both plants look fantastic but have not developed pistils yet. The big, forest green unbrella leaves are being replaced with secondary growth. and the side shoots show atlernating branching habit.
2-12-23 I put DSC#2 in the flowering room. NOTE: All the DSC#2 cuttings have rooted, 4/4 while 0/5 DSC#1 cuttings have rooted out. For this diary, I'll be following DSC#1 only going foreword.
2-14-23 Potted On DSC#1 to largest & final bag, watered in with fertilizer water, turned down lights to below 50% and covered with row cover for a few days. This is not necessary, thought I believe it encourages by reducing demand by shoots till new root growth beconmes established. The seedling ended up with 7 shoots and is scheduled to go to flower March 16-20. In a month it will be fully rooted out into the new pot and twice the size.
2-15-23 PISTILS
4 likes
comments
Share
9
Week 9. Vegetation3y ago


18 °C
Day Air Temp
No Smell
Smell
40 %
Air Humidity
10 °C
Solution Temp
24 °C
Substrate Temp
16 °C
Night Air Temp
26.5 l
Pot Size
45.72 cm
Lamp Distance
Nutrients 1
Blossom Booster 10-30-20
1.953 mll
CannaAnna 2-17-23 First day of week 9 The 20/4 hour light schedule delayed maturation but at week 9 I have pistils. Only once or twice have I had feminized seed produce a male. I always check and if it is I toss it and all the associated cuttings. DSC looks settled after the potting on. Now I focus on training the seven branches to fit the flower room space by not removing leaves, ONLY side shoots. I gentily roll the shoot out of the leaf axis or use trimming snips. I don't defoliate until the leaves naturally yellow during 3 phases of natural leaf drop. My instincts tell me if I defoliate before, the plants responds with more leaf growth. I want flowers. Furthermore, by removing all side flowering shoots under 8" below canopy, the energy of all the leaves and a big root system travel to the top resulting in a high proportion of top quality bud. I don't like edibles so fluff is only a waste of energy. I remove all flowering growth that is not in direct light. I grow to smoke and distribute at no cost no obligation thru a network in my community. PhilPLANTopy. DISBUDDING is a pratice in the rose growing industry.
2 likes
comments
Share
Used techniques
dis budding
Technique
10
Week 10. Flowering3y ago


50.8 cm
Height
12 hrs
Light Schedule
23 °C
Day Air Temp
No Smell
Smell
40 %
Air Humidity
10 °C
Solution Temp
18 °C
Substrate Temp
16 °C
Night Air Temp
26.5 l
Pot Size
45.72 cm
Lamp Distance
Nutrients 1
Blossom Booster 10-30-20
1.953 mll
CannaAnna 2-26-23 Week 10. I made a hard choice today. This plant was perfect for going into the flowering room. No room in the flowering room. Choice? either cut back the DSC or cut down a plant I've spent months growing before it is ready. I made room. It's going into flowering today!
2-27-23 DSC#1 Starts under 12/12! I'm scheduling 10 weeks in the flowering room-70 days. May 8 +/- 5 days
2-27-23 I'm happy with the result of my 10 week investment=1 big plant in 7 gal grow bag.
DSC#1- 3 clones, I threw away 3.., DSC#2- 4 clones and threw away 4 = Total 7 clones in medium and fiber grow bags
2-27-23 Started training plant after three hours. I use large unfolded paperclips, somethings daisy chained together to gently pull down and train stems. I deploy the big clips for serious tie down against the wire. As I pull in down and open, my disbudding handiwork becomes apparent: perfectly spaced shoots fill the center void and few shoots now facing down(out o the light). I've been removing ever 4th shoots, in essence creating the future down(out of direct light) side. The remaining shoots will be bigger and better spaced AND the distribution of auxins among more shoots evenly will reduce plant height. Remember I grow in a cellar basement of Coal Room with low ceilings, VERY EXCITED TO SEE IT BLOOM
2-28-23 I removed 7 fan leaves, one from each stem. I removed the leaf toward the top that orients(faces) in ward toward the center crown. By removing these large leaves I hope to stimulate more leaf growth on side shoots filling the area created by the opening and bending of LST
3 likes
2 comments
Share
11
Week 11. Flowering3y ago


50.8 cm
Height
12 hrs
Light Schedule
23 °C
Day Air Temp
No Smell
Smell
40 %
Air Humidity
10 °C
Solution Temp
18 °C
Substrate Temp
16 °C
Night Air Temp
26.5 l
Pot Size
45.72 cm
Lamp Distance
Nutrients 1
Blossom Booster 10-30-20
1.953 mll
CannaAnna 3-5-23 After a week in the flowering room DSC looks great. I fertilized with 1.5 tea/gal yesterday and I'll continue to fertilize once a week till three weeks before harvest.
3-8-23 I removed 3 fans leaves that faced toward the center and shaded desired side shoots. As a side note: the DSC#2 that went to flowering room JUST THREE ago showing trichomes. 3=trichomes see photo
1 like
comments
Share
12
Week 12. Flowering3y ago


50.8 cm
Height
12 hrs
Light Schedule
24 °C
Day Air Temp
No Smell
Smell
44 %
Air Humidity
10 °C
Solution Temp
18 °C
Substrate Temp
19 °C
Night Air Temp
26.5 l
Pot Size
45.72 cm
Lamp Distance
Nutrients 1
Blossom Booster 10-30-20
1.953 mll
CannaAnna 3-11-23 The canopy is even and full. I sifted thru and removed 11 shoots and 5 fan leaves. The shoots failed to thrive: the tip was below the canopy in the shade, the orientation was down toward the wire and would be shaded during ripening or crowded other shoots. I left the subtending leaf. The 5 fan leaves I sniped off were shading new shoots and were above the wire mesh
3-15-23 Now that it is warming up outside, the garden and the veg room stay warmer. That's good. The plants grow stronger with alittle more heat. I can turn off some heat mats in the veg and save $ on electric. It won't be long. OH the DSC#2 that went in 2-12-23 is flocked. I already wish I had grown it on to 8+ weeks before flowering. And I'm glad I have a big DSC#1 coming 2 weeks behind.
3 likes
comments
Share
13
Week 13. Flowering3y ago


50.8 cm
Height
12 hrs
Light Schedule
26 °C
Day Air Temp
No Smell
Smell
44 %
Air Humidity
10 °C
Solution Temp
18 °C
Substrate Temp
20 °C
Night Air Temp
26.5 l
Pot Size
45.72 cm
Lamp Distance
Nutrients 1
Blossom Booster 10-30-20
1.953 mll
CannaAnna 3-21-23 DSC#1 Turned in t a nice big plant with near flat topped canopy. I removed 5 fan leaves that blocked light from buds. I fertilizing once a week and continue to pull branches down, leave for a week then let them loose. I added CO2 in form of sugar+water+yeast+fan. This will be the routine till the bid shed. Somewhere around 5 weeks, the plant will NATURALLY start to shed the lowest fan leaves. They'll change colors and droop. That's my signal to go in and groom the lowest leaves with simple pressure down or sideways at the axil of the petiole, they pop right off cleanly. That's my signal to cut back fertilizer by 30%. I posted a picture of Cannarados' Chem Haze hybrid I call Radio Chem. It's been in the flower garden for 5 weeks and is shedding it's lower leaves.
3-25-27 i removed the lowest 5 leaves, all were yellow or brown and 10 flower buds that were forming deep in the canopy with no light.
2 likes
comments
Share
Used techniques
LST
Technique
14
Week 14. Flowering3y ago


50.8 cm
Height
12 hrs
Light Schedule
26 °C
Day Air Temp
No Smell
Smell
44 %
Air Humidity
10 °C
Solution Temp
18 °C
Substrate Temp
20 °C
Night Air Temp
26.5 l
Pot Size
45.72 cm
Lamp Distance
Nutrients 1
Blossom Booster 10-30-20
1.953 mll
3 likes
comments
Share
15
Week 15. Flowering3y ago


50.8 cm
Height
12 hrs
Light Schedule
26 °C
Day Air Temp
No Smell
Smell
44 %
Air Humidity
10 °C
Solution Temp
18 °C
Substrate Temp
20 °C
Night Air Temp
26.5 l
Pot Size
45.72 cm
Lamp Distance
Nutrients 1
Blossom Booster 10-30-20
1.302 mll
CannaAnna 4-4-23 This week I removed the large fan leaves from the soil level to above the wire screen and some higher up on the cola stems. Now that I can see any buds below the rack or in deep canopy shade, I'll remove them too. I'll cut back on the fertilizer to 1 tea/gal and water over all. Some flowering stems were bent over, others adjusted, allowing more light to lower buds. Look very good.
4-6-23 Removed a handful, aprox 30 of the lowest buds, some above the rack but deep in the canopy. They were sticky and formed a good size 'snowball' that stayed together when I chucked it in the trash.
3 likes
1 comment
Share
Used techniques
Defoliation
Technique
dis budding
Technique
16
Week 16. Flowering3y ago


50.8 cm
Height
12 hrs
Light Schedule
26 °C
Day Air Temp
No Smell
Smell
44 %
Air Humidity
10 °C
Solution Temp
18 °C
Substrate Temp
20 °C
Night Air Temp
26.5 l
Pot Size
45.72 cm
Lamp Distance
Nutrients 1
Mendocino Avalanche
1.321 mll
CannaAnna 4-28-23 I harvested the Deluxe Sugar Cane #1 @ 58 days. Depending upon your tastes, it could go to 65. I had a good leaf fade, plenty of amber trichomes, the buds were 'dryer' to touch and changed from reflective white to a dull creamish white, the stems hollowed out and the plant was using less water. It had three treatments of Mendocino Avalanche over two weeks with water in between. The breeder calls for 60+ days. I need the space and I'm real happy with the harvest. I have it hanging in a dark closet till is dries enough to handle, then I'll trim and dry some more. After a week or so I'll weigh it as it goes in glass jars for further drying and a slow cure. I'll report back in a month once I sample this cultivar that was a blast to grow.
Note: The Black Shuga phenotype, DSC#2 was harvested at 60 days, 2.25 sq. ft. = 90 grams all tops in the jar. It will continue to dry but more slowly and I like leaving the top colas intact which adds weight. I've rooted some cuttings and am giving as gifts. BEAUTIFUL
2 likes
2 comments
Share
Used techniques
0
Technique
17
Week 17. Flowering3y ago

50.8 cm
Height
12 hrs
Light Schedule
26 °C
Day Air Temp
No Smell
Smell
44 %
Air Humidity
10 °C
Solution Temp
18 °C
Substrate Temp
20 °C
Night Air Temp
26.5 l
Pot Size
45.72 cm
Lamp Distance
Nutrients 1
Mendocino Avalanche
1.321 mll
CannaAnna It's been 6 months since harvest and curing. I give all leftover cannabis away and have first hand and second had feedback.
1. I'm growing DSC again this year
2. The seedling is slow to germinate compared to others and placing the tray, paper towel seed set up on 72 degree heat mat helps
3. Moderate size plant with proportionately sized colas
4. 63-66 days
5. Beautiful trichomes
6. Smooth smoke
7. Uplifting high that lingers and doesn't sour
8. Worth every penny my son paid for the seeds
1 like
2 comments
Share
Used techniques
6 months in jar
Technique
18
Week 18. Harvest3y ago
Happy Harvest Day!


9/10
Rated
Because I grow under LEDs my plants have no heat stress and I think that helps them finish on the early side. I grew two seedlings and ended up with two distinct phenotypes. The one thing they had in common was a precociousness that made me giggle. The plants were not just frosty but flocked. So much fun to grow! 9/10
Show more
Translate
Spent 121 days
Ger Veg Flo Har
1
Plants
0.51 m²
Grow Room size
Normal
Difficulty
Height
Day air temperature
Air humidity
Light schedule
Solution temperature
Night air temperature
Substrate temperature
Pot size
Lamp distance


CannaAnna 4-28-23 I'll post when the plant is dry and going in the glass jars to cure. Then again after 3 week cure for the ultimate test: a smoke looking at the mountains. A BIG thank you to my son and his friend Big B for sending me the seeds, there's a world of wonderful genetics and they brought it to life for me. I hope you enjoy your share.
5-3-23 Plant is dry and in the large gal. glass jar to start cure. I weight when it goes into the jar. 261.2 grams from 5.5 sq. ft. plant that's roughly 520 grams/meter square. All nugs, small, hard, frosted, pale green, almost Desert Storm Tan. After a week in the large gallon jars, continuing to dry, I'll move the nugs and colas to the half gallon amber jars for two weeks of serious cure.
11 likes
2 comments
Share
Equipment Reviews


24 comments
Sort by
popularity
popularity
newest
oldest

Anonymous_2022 commentedweek 04y ago
Wishing you good growth Growmie 🌱
likes 4

Herbinski commentedweek 04y ago
Nice strain Have fun growing👊
likes 2

CannaAnna commented4y ago
@Herbinski, My high tech son and his 20 something friends picked it out for me. i think it's going to wow my friends here in Colorado. Christmas Beans. Have you smoked it? grown it?
likes 3
Herbinski commented4y ago
@CannaAnna, I have had SugarCane but not the delux version. I also had Slurricane from in house, both strains were fantastic. I just got a pack of Garlic Sherb S1 but i will grow it in the spring time as my boxes are full at the moment. I am a fan of the terpene profiles and power od the In house genetics strains. I will keep my fingers crossed for your grow,( Just a heads up, they are not easy to grow 😉)
likes 3
CannaAnna commented4y ago
Herbi, any tips? I plan on growing the seedlings for at least 10 weeks before flowering. Pot on to gallon then a 2.5 gal grow bag. I'll take the lower branches off and make cuttings. try to get a heafty root system before flowering. My peeps around here want flavor, smell and high. it's legal so no need to hide. I guess that's why I got In House genetics for Christmas.
I got Freebie Atomic jelly In House seeds as a bonus. Have you heard, tried, grown it?
likes 2

PersonalSmok3s commentedweek 103y ago
She’s looking🌱🌱L u s h🌱🌱!
Hope she gives you a decent return 💚
I ‘had’ two Jelly Breath S1’s I recently put into flower and I’m glad I popped two, because one of them has just hermed on me, right off the bat.
I’d heard whispers of IHG’s plant stability, but I always assumed it was grower error on the most part.
Looking forward to following your grow as I plan on doing a big IHG run in the near future 🌱💚
likes 2
CannaAnna commented3y ago
@PersonalSmok3s, did u c the difference in the two seedlings? I may a recognizable phenos. Hard to know because not a big enough population has been grown. I took cuttings of AJ#2 just in case its dope. Any seed from In House has that potential. I need to collect a few cuttings from the beautiful AJ#1. It won't be long, March 20 they both go to flowering room! And check out Granny Grows Deluxe Sugar Cane. My sweet high flying techie son and his buddies know my grow, love it and had delivered the seeds for strains they wanted to try this past Christmas. I got 8 Atomic Jelly freebees. It's given me great joy!
If you're interested, I am also growing Platinum Garlic along side the other two from In House Genetics. She'll probably make cameo appearances in photos of Atomic Jelly. It is strong, twice as strong as AJ, started at same time. This would be an issue for commercial growers. Exceptional cannabis compensates for lack of quantity in my hobbie grow.
likes 2

brens commentedweek 53y ago
This is looking so good. big chunky dark green girls.
likes 2

love_2_grow commentedweek 04y ago
Happy Growing, Buddy! 🌱🌱🌱
like 1
CannaAnna commented4y ago
@love_2_grow, Fingers crossed
like 1

Krisis commentedweek 182y ago
Where’s the smoke report granny
like 1

farah4weed commentedweek 172y ago
The best company I cultivated was inhousegenetics by a wide margin.
Of course, I grew cakes n cream.👽🛸
like 1
BlueGrass commentedweek 162y ago
Looks yummy, bro!
like 1
BlueGrass commentedweek 182y ago
Looks yummy, bro!
like 1

Lilith81 commentedweek 03y ago
Feliz crecimiento
like 1
Lilith81 commentedweek 33y ago
Veo un buen crecimiento
like 1

MagicoVerde commentedweek 43y ago
Looking nice ☺️good luck bro 😉🤞
like 1

TheFattyMcCoy commentedweek 33y ago
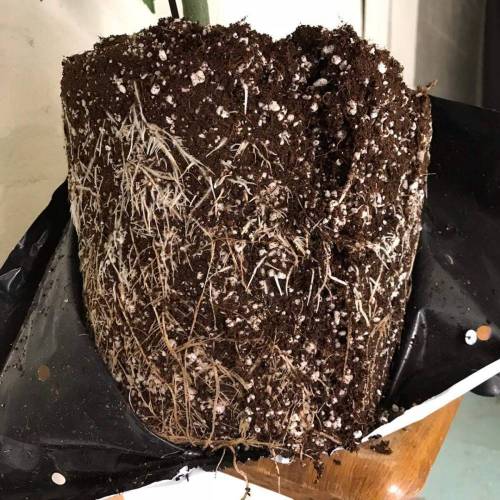
Love those roots!
❤️
like 1

BreedBros_Testing commentedweek 04y ago
Good Luck with the grow💪
like 1
Lilith81 commentedweek 43y ago
Siguen creciendo bastante bien,espero que sigan ese buen ritmo
likes
CannaAnna commented3y ago
@Lilith81, I'm obsessed with the seedlings mainly cause my son and his high flying tech buddies picked In House and the variesties to grow, and had them sent to me for Christmas. They are asking how they are doing. Then, doing a diary exposes oneself. I reflect, think about the grow more than normal. The rate they are growing, I'm anticipating how I'm going to train them to fit in my cellar type basement. I'm going to veg them, get a big root system before moving to the flowering room. I think the genetics are going to wow me. 🙏
likes

BearBuds commentedweek 162y ago
Amazing grow!! I am looking to use Mendocino Avalanche for my next grow. What were your thoughts with it? I tried Overdrive my last two grows and it seemed to just burned the plants.
likes

Wastent91 commentedweek 172y ago
Looks hummy 😋i Like so much this genetic! I want to try one time in my life! 👊😸
likes

Pepeu420 commentedweek 153y ago
Beautiful plant brother! next cycle I think to cultivate it, how does it smell?! haha
I'm evaluating whether it's worth buying the seeds, as they are quite expensive when converted to Brazilian currency =/
likes

the end.
Enjoying this diary? Follow for more updates!


Prefer the old Diary view?
Go back to the old Diary view