


RQS Easy Bud – German Outdoor Grow | Low Effort Run


Soil
Custom

Outdoor
Room Type
Defoliation
weeks 10-11
12 liters
Pot Size
2 liters
Watering
Start at Harvest
G
Germination2y ago
L1lium I decided to germinate directly in the BioBizz Light-Mix. With a bit of luck, all the seeds germinated as expected.
The germination took a bit longer, approximately 2-3 days, until the first seeds peeked out of the soil. I just made sure that the seeds were always nice and warm and moist, seemed to work - spraying them every now and then - then everything looked good.
At the beginning, the pots were at home to ensure it was warm enough.
likes
comments
Share
Used method
Directly In Substrate
Germination Method
1
Week 1. Vegetation2y ago
10 cm
Height
18 °C
Day Air Temp
No Smell
Smell
10 °C
Night Air Temp
12 liters
Pot Size
0.2 liters
Watering Volume
L1lium In the first few weeks, you couldn't complain. The weather mostly cooperated, and the young plants had good growing conditions.
likes
comments
Share
2
Week 2. Vegetation2y ago
15 cm
Height
20 °C
Day Air Temp
No Smell
Smell
10 °C
Night Air Temp
12 liters
Pot Size
0.2 liters
Watering Volume
L1lium Here you can see in the video slight mold formation on the substrate.
Obviously, I watered too much at the beginning and didn't take the high humidity into account.
likes
comments
Share
3
Week 3. Vegetation2y ago


15 cm
Height
20 °C
Day Air Temp
No Smell
Smell
10 °C
Night Air Temp
12 liters
Pot Size
0.5 liters
Watering Volume
L1lium So this is how things have been in the third to fourth week.
Up until that point, normal growth, some nice leaves, but still a somewhat unstable and thin main stem.
1 like
comments
Share
4
Week 4. Vegetation2y ago


20 cm
Height
20 °C
Day Air Temp
No Smell
Smell
10 °C
Night Air Temp
12 liters
Pot Size
0.5 liters
Watering Volume
L1lium Here you can still see: too much water, the substrate was permanently moist. I tried to fix this mistake in the following weeks by watering less.
2 likes
comments
Share
5
Week 5. Vegetation2y ago

40 cm
Height
20 °C
Day Air Temp
No Smell
Smell
10 °C
Night Air Temp
12 liters
Pot Size
0.5 liters
Watering Volume
L1lium Here the fun is slowly starting, you can tell that the growth is really picking up. Every day new pairs of leaves and easily 1-3cm of daily growth.
2 likes
comments
Share
6
Week 6. Flowering2y ago


65 cm
Height
20 °C
Day Air Temp
Normal
Smell
10 °C
Night Air Temp
12 liters
Pot Size
0.8 liters
Watering Volume
L1lium Extremely fast and strong growth. The transition to the flowering phase is done. The plants have easily doubled in size in a week. The buds are still very sparse and small. I hadn't fertilized up until that point. However, this week I used homemade organic fertilizer made from banana peels and boiled vegetable water :D
6 likes
2 comments
Share
7
Week 7. Flowering2y ago


70 cm
Height
20 °C
Day Air Temp
Normal
Smell
10 °C
Night Air Temp
12 liters
Pot Size
0.8 liters
Watering Volume
L1lium The first yellow leaves are coming in below, and you can tell that the energy is going into the flowering; the buds are getting thicker and stickier. I estimate about 1 1/2 weeks until harvest. Unfortunately, the weather is catastrophic; I'm hoping for an improvement.
1 like
comments
Share
8
Week 8. Flowering2y ago




85 cm
Height
20 °C
Day Air Temp
Strong
Smell
10 °C
Night Air Temp
12 liters
Pot Size
0.8 liters
Watering Volume
Nutrients 1

Bloom/Flower 2-5.5-5.5
1 mll
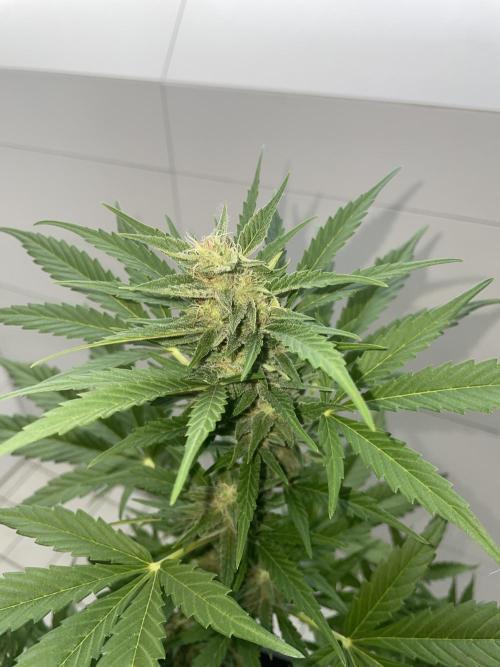
L1lium Week 8:
- At the beginning of the week, I lightly started to trim some plants.
- Yellow leaves or leaves that are far down have been evened out.
- Three out of five plants are developing super well.
- Little to no fertilization with a random flower fertilizer that I received as a gift.
I think next week or the week after, I will start flushing the three more advanced ones: Luzia, Frieda & Greta.
The plants on the outer side of the tent: Frieda & Hermine are lagging behind, developing well, but still need at least another week longer than their sisters.
The smell is slowly taking on some sweet and strong notes.
The sizes of the plants are quite different, Luzia at nearly 90cm is right at the top, while the others range between 70-100cm, MUCH bigger than expected.
The biggest problem at the moment: space.
The seedlings for the next run have already been planted, this time there will only be 4 plants and definitely a bigger setup.
I'm excited :)
Final stretch!
3 likes
5 comments
Share
Grow Questions

L1liumstarted grow question 2y ago
Hi y'all!
I need some help with judging the harvest time of my plant.
It's the 10th Week of Life for this plant.
I was thinking about flushing this plant starting next week.
What do you think?
Thanks in advance 😀😎


Solved
Buds. Not fattening
Other. Drying
Other. General questions
1 like

modmyplantsanswered grow question 2y ago
I would flush when u see slight signs of amber color. You should end up with 10-20% amber trichomes if you flush at that point. i would guess flush in 2 weeks, harvest 3 weeks. Flowering is pretty much about 8 weeks for all strains, some bit more, some bit less, but its around that time.
Growth and seedlingphase takes 3-4weeks if you dont grow photoperiods. so atleast 12, would say 13 weeks overall.
I also checked your diary now before sending the message. Looks like 3 weeks growth and 5 weeks flowering on your plant, so atleast 3 weeks till harvest. 2 till flushing.
9
Week 9. Flowering2y ago


100 cm
Height
16 hrs
Light Schedule
20 °C
Day Air Temp
Strong
Smell
10 °C
Night Air Temp
12 liters
Pot Size
1 liters
Watering Volume
Nutrients 1
Bloom/Flower 2-5.5-5.5
1 mll
L1lium Hi!
Week 9:
- Slight purpling on the leaves, indicating cold protection (very cold temperatures at the moment). But I think they'll manage! :D
- No fertilizer, just pure, clear water in preparation for the harvest.
- After some consideration, I've decided to harvest all the plants at the same time so that I have plants in different stages of their flowering, which I find really interesting.
- I'll cut down the three ripe ones in 2 weeks; by that time, the outer plants will probably still have very milky trichomes, but that's exactly what I want.
Addition:
The plants are currently only getting regular tap water for flushing. There's also more water than usual.
Shortly after uploading this week, I pruned all the plants further since some plants have started to drop more leaves.
This coming Sunday, I'll decide whether to harvest the plants or wait another week.
PEACE
That's the current plan.
2 likes
comments
Share
10
Week 10. Flowering2y ago


110 cm
Height
17 hrs
Light Schedule
22 °C
Day Air Temp
Strong
Smell
14 °C
Night Air Temp
12 liters
Pot Size
2 liters
Watering Volume
Nutrients 1
Bloom/Flower 2-5.5-5.5
1 mll
L1lium FINALE!!!
Just in time for the start of the Euro Championship, my five Easy Buds from RQS are entering the final phase of their flowering. This week I've already started to water and flush extensively, prune the plants one more time, and preparations for drying have been made. I'm really looking forward to the drying process because the buds can really show what they're made of, and the smell is very promising—earthy, spicy, and skunk-ish.
I believe this week the pictures and videos speak more than my words. As you can easily see, two of the five girls are still in an earlier flowering stage, but that doesn't bother me.
In the coming weeks, I will happily be trimming the little trees, which means next week you'll already find the report about the harvest here.
See you then! =)))
2 likes
comments
Share
Used techniques
Defoliation
Technique
11
Week 11. Flowering2y ago


120 cm
Height
17 hrs
Light Schedule
22 °C
Day Air Temp
Strong
Smell
14 °C
Night Air Temp
12 liters
Pot Size
2 liters
Watering Volume
Nutrients 1
Biodünger Homemade
1 mll
L1lium It's time! On Friday, I cut and harvested the five Easy Buds after almost 11 1/2 weeks.
Unfortunately, I had to notice that one plant was quite heavily infested. I suspect a type of mite or possibly fly eggs. Underneath the leaves, there were several dark yellow and dark brown eggs that were hardly noticeable at first glance. However, upon closer inspection, you can see that the infestation had spread to the whole plant.
Fortunately, the other four plants were spared. For this reason, I am drying the plants separately. I didn't want to throw away the infested plant right away; I wanted to let it dry first. Afterwards, I'll see how I can possibly mitigate the damage.
The four healthy plants are being dried in a closed tent in a drying bag.
I hung the infested plant in the plastic tent and covered it with a tarp. After a few days of drying, everything actually looks good so far. The eggs seem to no longer be hatching but are falling off the buds or shriveling into compost. I hope it stays that way.
The smell has changed significantly after cutting. Even after the short drying time, I can notice a more intense smell that is hard to describe. The buds were heavily intertwined with the so-called "Sugar Leaves," which is why I roughly trimmed them to hang them up for drying. Once the buds are completely dry, I will trim them individually again and run them through my trimming machine from Vevor.
The harvesting process took about an hour with two people. The plants were still very healthy and vigorous at the time of harvest. The root system was very good despite the closed pot.
The prettiest bud definitely came from the central plant, Greta. When wet, I would have estimated the bud at least 12 g.
I did not determine the total weight of the wet plant material. Once everything is dry and properly trimmed, I will update the diary with the dry amount. As of now, I would estimate that the yield from all plants is around 40-50 g, which makes me quite satisfied for my first grow, especially considering this really very simple strain.
More info and photos will follow shortly when the curing begins.
See you soon! :)
likes
comments
Share
Used techniques
Defoliation
Technique
12
Week 12. Harvest2y ago
Happy Harvest Day!


10/10
Rated
- - - - - - - - - - -
Smoking Review:
- - - - - - - - - - -
(8/10)
It's a pleasant lightweight smoke with citrus notes and a stronger earthy note.
The Buds are all nice size, no real popcorn buds, but also no thick gluey buds.
The effect is also very lightweight. but noticeable - opening up, similar to drinking your after work beer. No knockout high - just a little small buzz!
- - - - - - - - - - -
Growing Review:
- - - - - - - - - - -
(10/10)
It was a fantastic growing experience with these plants.
They where healthy throughout the whole grow, without a single over-the-counter nutrition supplementation.
No nothing - just my tapwater and some soil and the sun - thats pretty much all they.
For these circumstances I'm more than happy with what they became, great, strong restitant, outdoor strain, especially for european countries with colder summers!
Show more
Translate
Spent 79 days
Ger Veg Flo Har
10 g
Bud wet weight per plant
5
Plants
1 m²
Grow Room size
Easy
Difficulty
Height
Day air temperature
Light schedule
Night air temperature
Pot size


L1lium It's time! On Friday, I cut and harvested the five Easy Buds after just under 11 1/2 weeks.
Unfortunately, I had to notice that one plant was quite heavily infested. I suspect a type of mite or possibly fly eggs. Underneath the leaves, there were several dark yellow and dark brown eggs that were barely visible at first glance. However, upon closer inspection, you can see that the infestation had spread to the entire plant.
Fortunately, the other four plants were spared. For this reason, I'm drying the plants separately. I didn't want to throw away the infested plant right away, but rather let it dry first. Afterwards, I'll see how I can possibly mitigate the damage.
The four healthy plants are being dried in a closed tent in a drying bag.
I hung the infested plant in the plastic tent and covered it with a tarp. After a few days of drying, everything actually looks good so far. The eggs seem to no longer be hatching but are falling off the buds or shriveling into compost. I hope it stays that way.
The smell has changed significantly after cutting. Even after the short drying time, I can notice a more intense smell that I can't quite describe yet. The buds were heavily intertwined with the so-called "Sugar Leaves," which is why I roughly trimmed them to hang them up for drying. Once the buds are fully dried, I will trim them individually again and run them through my trimming machine from Vevor.
The harvesting process took about an hour with two people. The plants were still very healthy and strong at the time of harvest. The root system was very good despite the closed pot.
The prettiest bud definitely came from the central plant, Greta. When wet, I would have estimated the bud at least 12 g.
I did not determine the total weight of the wet plant material. Once everything is dry and fully trimmed, I will update the diary with the dry amount. As of now, I would estimate that the yield of all plants is around 40-50 g, which makes me quite satisfied for my first grow, especially considering this really very simple strain.
More info and photos will follow shortly when the curing begins.
See you soon! :)
2 likes
1 comment
Share
Equipment Reviews

2 comments
Sort by
popularity
popularity
newest
oldest

user111 commented2y ago
Looks good.
I like that you're just letting them grow as nature intended. :-)
likes 5
modmyplants commented2y ago
@user111, Hey, you should definitely do that outdoors too 👍
I don't know if you're interested, but the sunlight that's millions of kilometers away doesn't notice differences of meters, so the lower and upper buds get the same light intensity. With grow lights that are only 50cm away, an extra 30cm in depth means 60% more distance. Would those 30cm translate to sunlight + outdoor be like growing on Mars? 😂 That's why you have to trim things and bring everything to the same height. Plus, the sun changes position and shines on multiple angles of the plant, while with lights, the path to the buds always has to be clear.
like 1

LongLiveLance commented2y ago
Very nice to look at. Happy Grow🌱
likes 3

the end.
Enjoying this diary? Follow for more updates!

Prefer the old Diary view?
Go back to the old Diary view