
Limon Blanco V3, organic no-till living soil


VEG
320W LED panel
Light
FLO
320W LED panel
Light

Filt
Vent outside
Air Filter

Drip
Blusoak

Soil
Custom

Perlite
Custom

compost Other
Custom
Indoor
Room Type
ScrOG
weeks 1, 9, 16-20
No-till Organic
weeks 17
clone
weeks 18
Defoliation
weeks 18
Transplantation
weeks 2, 18
265 l
Pot Size
Start at Harvest
G
Germination1y ago


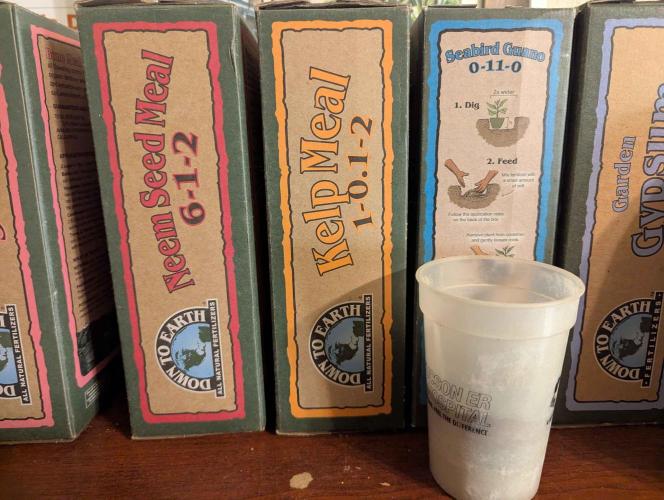
Yabadabadoo Every no-till grow in begins with a soil test, so I know exactly what the plants need. Anything else is guess work. My Soil Savvy soiil test gives me a recommended amount per 100sqft, but I only have 9sqft (3x3ft soil bed). So I simply divide by 10. I find that doubling the recommendation works well because cannabis is a hungry plant. I went with 100g Seabird Guano, 30g Neem Seed Meal, and 20g Kelp Meal. Then 2 cups of basalt for micronutrients.
The great part of no-till is that I only have to fertilize once per grow!
I move the mulch aside, and top-dress the amendments onto the soil, along with some cover crop seeds. I gently stir the top 1 inch of soil just to help the seeds get in there, careful not to disturb the deeper fungal networks in the soil. Then I water with my reverse-osmosis filtered drinking water. I cover the soil to help the cover crop germinate while the cannabis germinates.
For this grow I will only germinate one seed of Limon Blanco V3 by Khalifa genetics. I sprinkle a little mycorrhizal fungi powder onto the seed to inoculate the roots from an early age.
1 like
comments
Share
Used method
Paper Towel
Germination Method
1
Week 1. Vegetation1y ago


24 hrs
Light Schedule
24 °C
Day Air Temp
No Smell
Smell
90 %
Air Humidity
24 °C
Solution Temp
24 °C
Substrate Temp
24 °C
Night Air Temp
0.11 l
Pot Size
0.11 l
Watering Volume
15.24 cm
Lamp Distance
Yabadabadoo I see the seedling's root through the paper towel. I do just one layer of paper towel, so I can see if there's a root without disturbing the seed.
My seedling soil mix is 2:1 peat moss:perlite. I prepare it in a bowl with water to get it to "field capacity". Field capacity is the ideal level of soil moisture. If you take a handful of soil, squeeze it hard, and only a few drops of water come out, that's field capacity.
The moist soil goes into the starter tray, and I leave some water under the tray to maintain humidity. I VERY CAREFULLY bury the seed 0.5~1 inch (1~2 cm) deep with the tap root pointed down. Lightly cover with soil and apply about 1-2 tsp (5~10 ml) of water.
Now we wait a few days for it to sprout up.
My light is just a screw-in LED lightbulb. There's no need for a fancy grow light, that's in the grow tent.
1 like
comments
Share
Used techniques
ScrOG
Technique
2
Week 2. Vegetation1y ago


5.08 cm
Height
24 hrs
Light Schedule
24 °C
Day Air Temp
7.0
pH
No Smell
Smell
40 %
Air Humidity
24 °C
Solution Temp
24 °C
Substrate Temp
24 °C
Night Air Temp
0.11 l
Pot Size
0.11 l
Watering Volume
60.96 cm
Lamp Distance
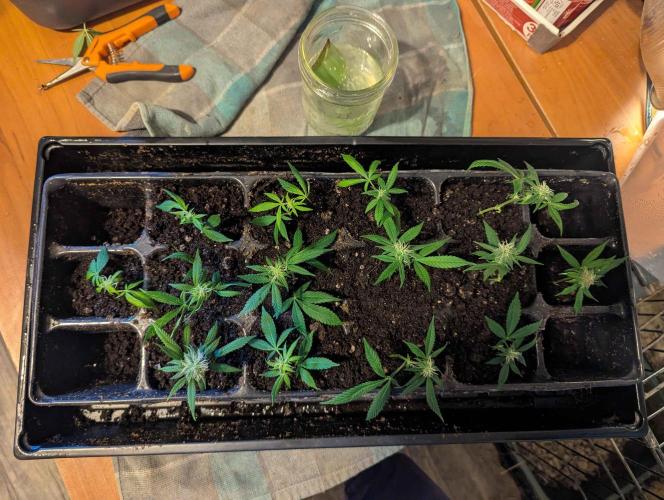
Yabadabadoo The seed has sprouted! So I dig a hole in the garden bed, sprinkle some N fertilizer amendment (neem seed meal), and use tongs to put to cube in the soil. Pat the soil flat.
1 like
comments
Share
Used techniques
Transplantation
Technique
3
Week 3. Vegetation1y ago


5.08 cm
Height
18 hrs
Light Schedule
24 °C
Day Air Temp
7.0
pH
No Smell
Smell
40 %
Air Humidity
24 °C
Solution Temp
24 °C
Substrate Temp
24 °C
Night Air Temp
0.11 l
Pot Size
0.11 l
Watering Volume
60.96 cm
Lamp Distance
Yabadabadoo The cover crop got a lil tall, so I chopped it! This will add coverage (act as mulch) to the soil to help retain moisture, as well as break down and become additional N fertilizer for future crops.
1 like
comments
Share
9
Week 9. Vegetation1y ago
50.8 cm
Height
18 hrs
Light Schedule
24 °C
Day Air Temp
7.0
pH
No Smell
Smell
40 %
Air Humidity
24 °C
Solution Temp
24 °C
Substrate Temp
24 °C
Night Air Temp
0.11 l
Pot Size
0.11 l
Watering Volume
60.96 cm
Lamp Distance
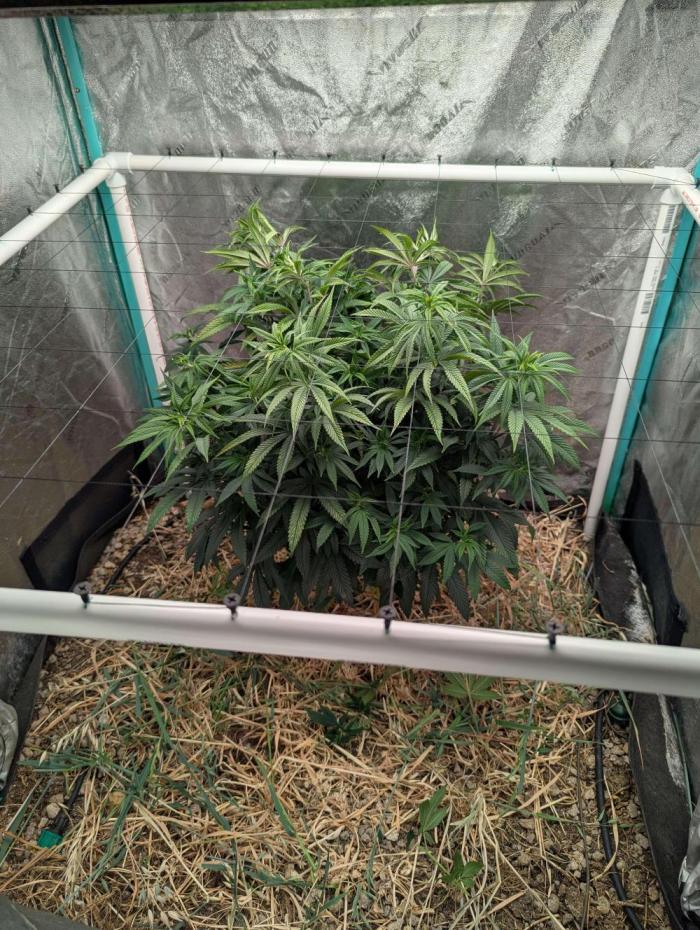
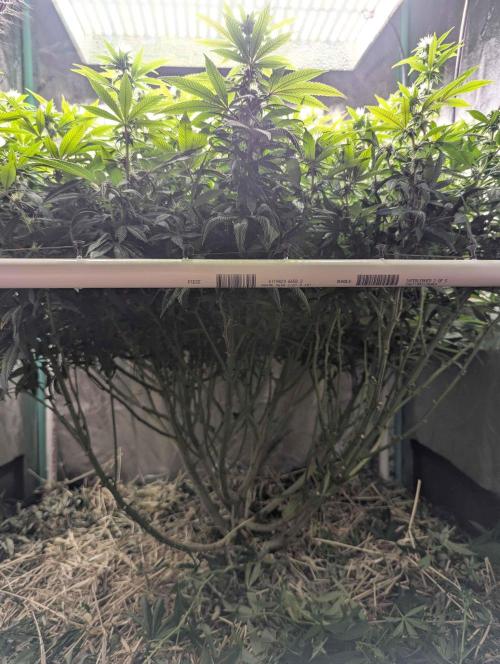
Yabadabadoo The plant is big, beautiful, and green. No-till is quite low maintenance, all I've had to do is add water. The plant is a good height for ScrOGging, so I've added the net.
2 likes
comments
Share
Used techniques
ScrOG
Technique
16
Week 16. Flowering1y ago

76.2 cm
Height
12 hrs
Light Schedule
24 °C
Day Air Temp
7.0
pH
No Smell
Smell
20 %
Air Humidity
24 °C
Solution Temp
24 °C
Substrate Temp
24 °C
Night Air Temp
0.11 l
Pot Size
0.11 l
Watering Volume
60.96 cm
Lamp Distance
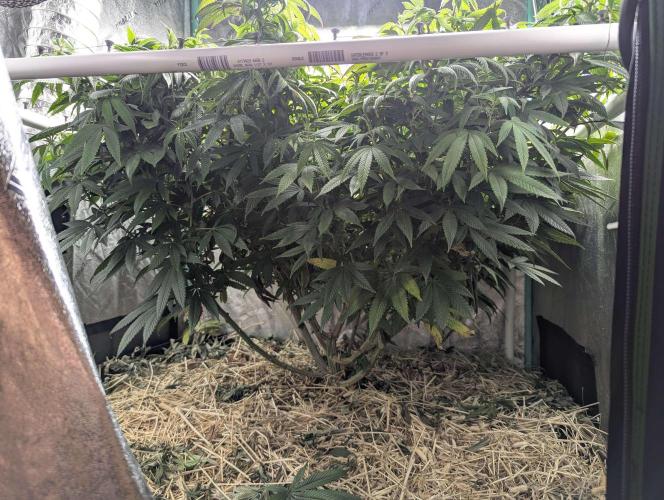
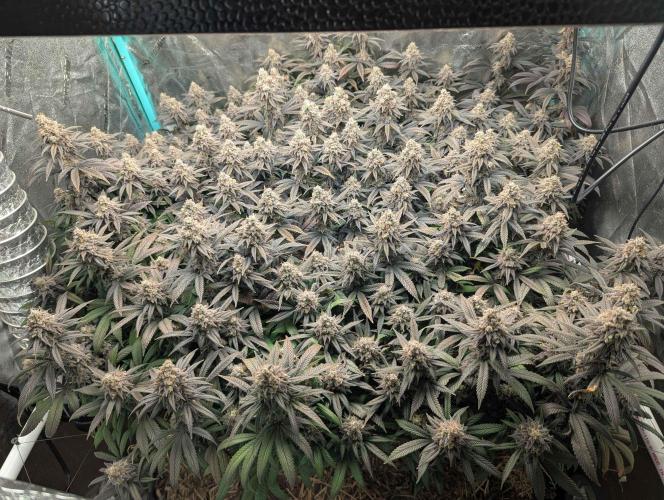
Yabadabadoo The scrog has filled out the entire 3'x3' (90cmx90cm) tent. Now it's time to flip to flower! I cut away any branches and leaves underneath the screen, because I don't want any nutrients being wasted on low quality low-light buds. Only the fattest nugs will do.
1 like
comments
Share
Used techniques
ScrOG
Technique
17
Week 17. Flowering1y ago
76.2 cm
Height
12 hrs
Light Schedule
24 °C
Day Air Temp
7.0
pH
No Smell
Smell
20 %
Air Humidity
24 °C
Solution Temp
24 °C
Substrate Temp
24 °C
Night Air Temp
264.98 l
Pot Size
0.11 l
Watering Volume
60.96 cm
Lamp Distance
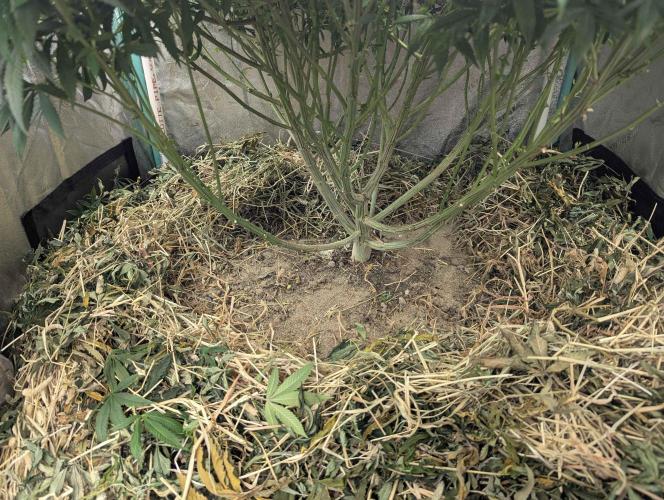
Yabadabadoo When flipping to flower, we want to make sure the plant has everything it needs to make big buds. So we move the mulch layer aside, sprinkle some dry amendments with a focus on phosphorous, water them in, move the mulch back over.
Mulch is a critical for water efficiency, and maintaining a healthy evenly moist soil.
3 likes
comments
Share
Used techniques
ScrOG
Technique
No-till Organic
Technique
18
Week 18. Flowering1y ago

76.2 cm
Height
12 hrs
Light Schedule
24 °C
Day Air Temp
7.0
pH
Normal
Smell
20 %
Air Humidity
24 °C
Solution Temp
24 °C
Substrate Temp
24 °C
Night Air Temp
264.98 l
Pot Size
0.11 l
Watering Volume
60.96 cm
Lamp Distance
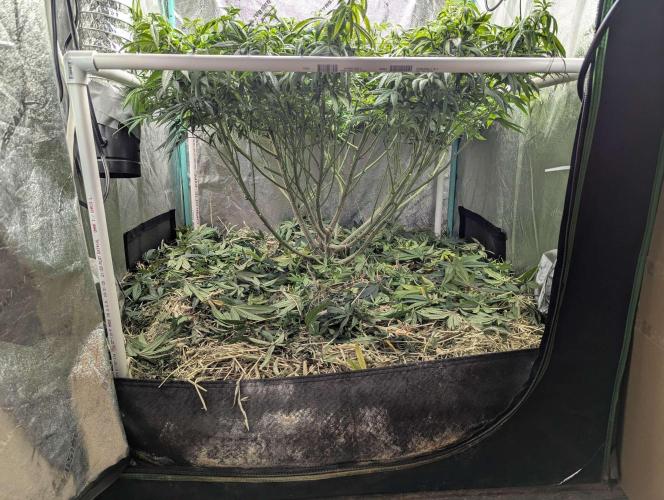
Yabadabadoo A few weeks into flower and the buds are coming in! There's a lot of unwanted foliage and buds showing up under the scrog net so it needed to be cleaned up a bit. I removed all leaves and buds below the net, and any small branches that i know won't produce big buds. We only want the biggest and best buds in my house!
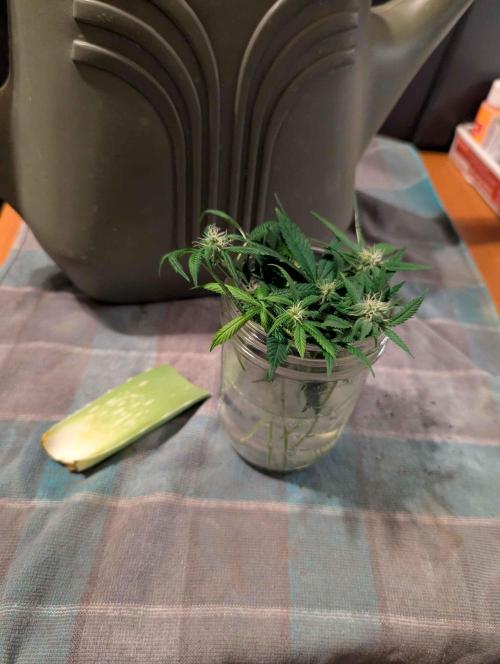
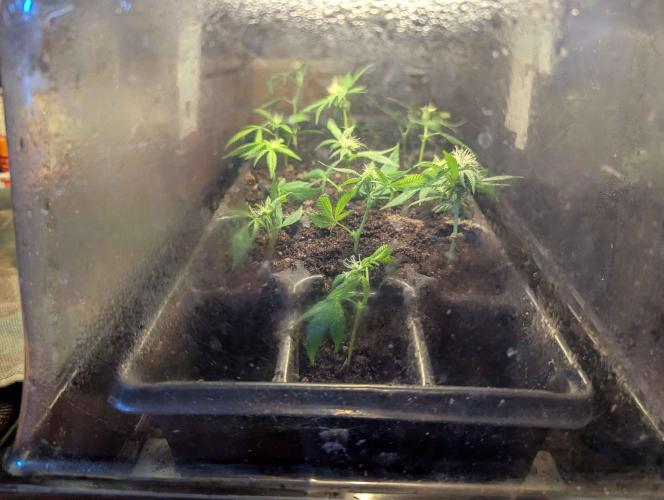
I saves some unwanted branches for cloning. I followed Khalifa Genetics guide to using Aloe for cloning. Aloe vera gel contains natural rooting hormones. I actually live in the desert, and my yard is FULL of aloe, so this cloning method is just perfect for me. I soak the cuttings in a mixture of aloe vera gel and water for 24 hours, then dip them in some more aloe before transplanting to a rooting tray. I keep the humidity high by putting the dome on with the vents closed. I've had about 95% success with this method in the past.
You can see the original guide here: https://khalifagenetics.com/the-wonders-of-aloe-vera-for-cannabis/
3 likes
comments
Share
Used techniques
ScrOG
Technique
Defoliation
Technique
Transplantation
Technique
clone
Technique
19
Week 19. Flowering1y ago
76.2 cm
Height
12 hrs
Light Schedule
24 °C
Day Air Temp
7.0
pH
Strong
Smell
20 %
Air Humidity
24 °C
Solution Temp
24 °C
Substrate Temp
24 °C
Night Air Temp
264.98 l
Pot Size
0.11 l
Watering Volume
60.96 cm
Lamp Distance
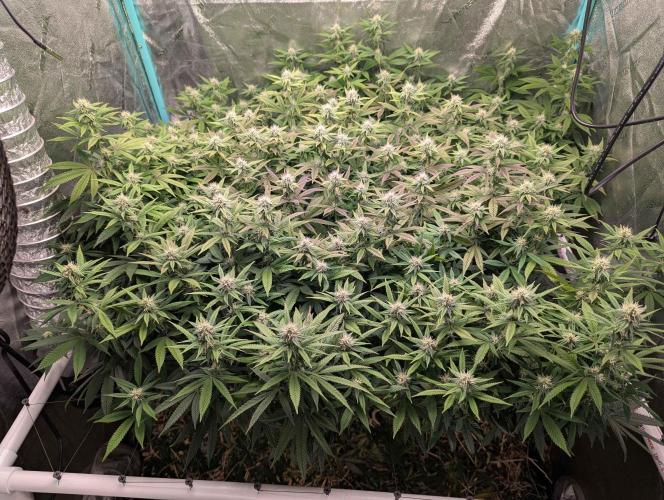
Yabadabadoo Every time I open the tent it smells like straight candy! Not much to do at this point besides water until harvest. Organic gardening is cheap and easy.
4 likes
1 comment
Share
Used techniques
ScrOG
Technique
20
Week 20. Flowering10mo ago
76.2 cm
Height
12 hrs
Light Schedule
24 °C
Day Air Temp
7.0
pH
Strong
Smell
20 %
Air Humidity
24 °C
Solution Temp
24 °C
Substrate Temp
24 °C
Night Air Temp
264.98 l
Pot Size
0.11 l
Watering Volume
60.96 cm
Lamp Distance
Yabadabadoo Not much to do except add water. Living soil is easy. This is a 10/10 plant. Can't wait for the first joint.
6 likes
3 comments
Share
Used techniques
ScrOG
Technique
21
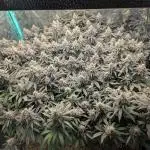
Week 21. Harvest10mo ago
Happy Harvest Day!


10/10
Rated
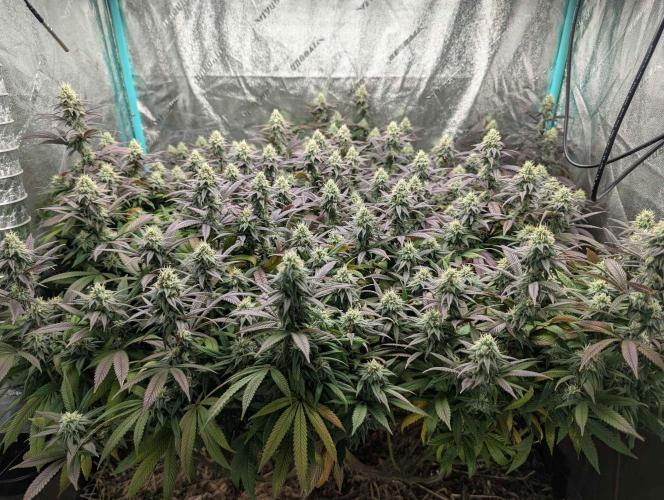
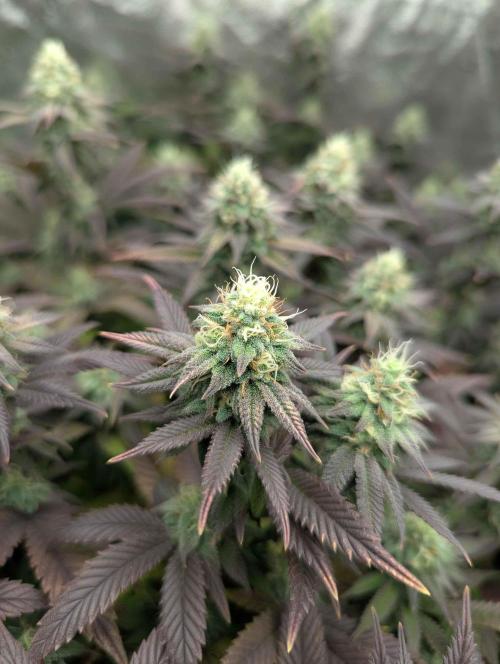
Not one health issue since germination. Produces plentiful dense nuggets purple nuggets that smell like a candy store.
Show more
Translate
Spent 65 days
Ger Veg Flo Har
Easy
Difficulty
Height
Day air temperature
Air humidity
PPM
PH
Light schedule
Solution temperature
Night air temperature
Substrate temperature
Pot size
Lamp distance
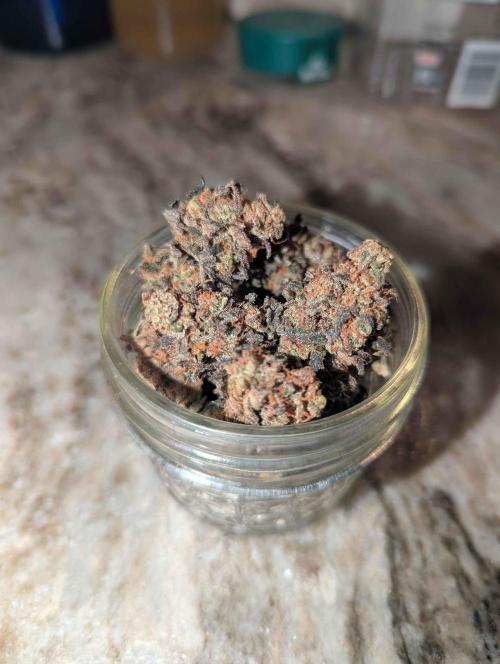
Yabadabadoo By far my best harvest yet. Never had any health or pest issues. Just a weekly spray of neem oil/soap/water mix in veg, nothing in flower. Incredible colors and dense nuggets. Smells like a candy store.
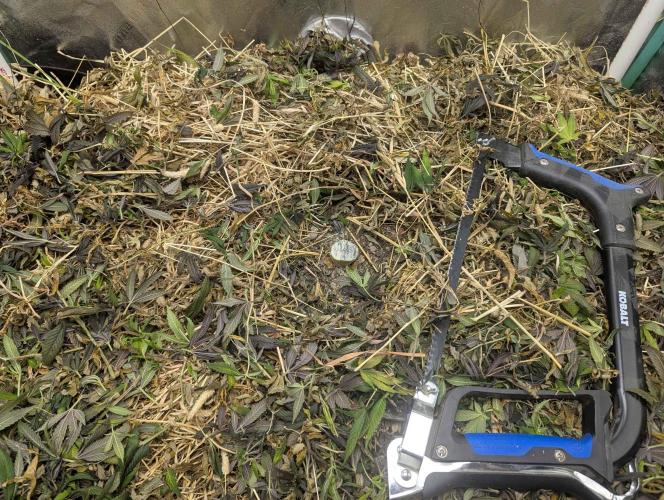
In no-till living soil, we do not remove the roots. The worms will eat them and poop out nutrients for future plant roots. The layer of hay helps to retain moisture and keep the soil evenly wet. No drainage.
Here is my guide to growing in no-till living soil:
Just about everything in this guide can be found at local shops!!! Try not to buy online.
1:1:1 by volume, peat moss: aeration: compost. All can be found for cheap and bulk from local shops. Pumice, perlite, or lava rocks are great aeration options. To that I add the KIS organics Clackamas Coots blend, but other blends should be fine. Mix well with a shovel.
After the soil cooks plant cover crop and add worms and other beneficial bugs.
After every grow, top dress with dry amendments according to a soil test. My favorites for reammending are: kelp meal (K+micronutrients), seabird guano (P+Ca+Mg), neem seed meal (N), gypsum (Ca+S), bone meal (P+Ca+Mg). I like the brand Down To Earth Organics for those fertilizers. Water after top dressing.
Water only, no need to pH. Soil beds are preferred, but 15gal is the absolute minimum size pot.
Compost tea: use if you have problems. Mix a spoonful of unsulphered molasses, handful of compost, and a few gallons h2o. Top dress with dry amendments before watering the tea if you want a quick fertilizer. Stir for 1min, wait 10min, stir again, use immediately. You don't have to strain it.
Blumats from sustainable village are a great automatic watering setup for indoor.
Mibeneficials has all the beneficial bugs needed in one cheap package.
My Soil Savvy has great soil tests for cheap.
5 likes
2 comments
Share
Equipment Reviews
6 comments
Sort by
popularity
popularity
newest
oldest
GolliGrows commentedweek 218mo ago
Nice job!
like 1

ElNass commentedweek 2010mo ago
living soil is insane
like 1

StickyHands commentedweek 191y ago
looking good bro. beautifully even canopy
like 1

Khalifa_Genetics  commentedweek 2010mo ago
Hello, You have won the growdiaries competition, please send me an email: florent.khalifagenetics@protonmail.com
likes

Yabadabadoo commented9mo ago
@Khalifa_Genetics, I sent you an email.
like 1
Khalifa_Genetics commentedweek 219mo ago
Beautiful session !! Congratulations !
likes

the end.
Enjoying this diary? Follow for more updates!

Prefer the old Diary view?
Go back to the old Diary view