By continuing to use the website or clicking Accept you consent to our cookies and personal data policy and confirm that you are at least 18 year old. For details please see Privacy Policy and Terms
Accept

First Living Soil Grow - King Juice


Soil
DopeSoil Mix
Indoor
Room Type
Topping
weeks 1
Defoliation
weeks 3, 5-6, 8-11, 15
LST
weeks 1-3, 5-8
Main-Lining
weeks 1-3
ScrOG
weeks 8-10
120 liters
Pot Size
Start at Harvest
1
Week 1. Vegetation4mo ago

5 cm
Height
18 hrs
Light Schedule
20 °C
Day Air Temp
6.8
pH
No Smell
Smell
60 %
Air Humidity
0 °C
Solution Temp
19 °C
Substrate Temp
18 °C
Night Air Temp
120 liters
Pot Size
25 cm
Lamp Distance
Nutrients 1
Soil RE-AMEND Mix
25 mll
MyLittleGarden Veg Week 1 – The Beginning of Living Soil
Period: April 5th to April 12th
This week marks the start of my new project – an organic grow in a living soil bed, following the motto: "Soil is alive – and everything starts beneath the surface."
On April 5th, I prepared the bed using the Almicanna Rearmament Mix to build a rich and fertile base. I also sowed companion plants (a.k.a. cover crops) to support soil structure, encourage microbial life, and naturally boost nitrogen levels. I watered the bed with 6 liters to help activate the soil biology – now it’s nature’s turn to do its thing.
King Juice Cutting
That same day, I planted a King Juice clone into the bed. I topped the cutting to promote bushier growth right from the start. I also began LST (Low Stress Training) by gently bending the side branches down and fixing them to the soil surface to encourage horizontal growth.
Light & Environment
Lights are running on an 18/6 cycle – turning on at 6:00 PM and off at 12:00 PM the next day.
For now, I’m using a 35-watt seedling light setup, soft enough for the early phase but enough to kickstart healthy photosynthesis.
Lets Grow 😋
3 likes
comments
Share
Used techniques
Main-Lining
Technique
Topping
Technique
LST
Technique
2
Week 2. Vegetation4mo ago


5 cm
Height
18 hrs
Light Schedule
23 °C
Day Air Temp
6.8
pH
No Smell
Smell
60 %
Air Humidity
0 °C
Solution Temp
20 °C
Substrate Temp
18 °C
Night Air Temp
120 liters
Pot Size
25 cm
Lamp Distance
MyLittleGarden Veg Week 2 – The Soil Army Moves In
Period: April 12th to April 19th
This week brought a serious boost of life into the system – quite literally!
I switched the grow light to full spectrum, so the plant can now benefit from a broader range of light for stronger, healthier development.
King Juice
The King Juice cutting is doing well. I continued to gently bend the branches sideways and fixed them close to the soil – aiming for a wide, bushy structure and better light exposure for the lower shoots.
Cover Crops
The companion plants (cover crops) are thriving! Within a few days they’ve grown rapidly, greening up the surface and supporting soil structure and microbial life.
Worms Incoming
A big move this week: I introduced 450 earthworms into the bed!
They're here to loosen the soil, improve nutrient cycling, and support the whole underground ecosystem.
DIY Worm Hotels
To make the worms feel at home, I built two small worm hotels using clay pots with holes. These act as feeding and retreat zones.
Each hotel was filled with a bit of soil, leaf scraps, eggshells, and organic waste – the perfect buffet for worms and microbes alike.
Watering
I added 4 more liters of water to keep the moisture level stable and help the worms settle in.
Lets Grow 😋
2 likes
comments
Share
Used techniques
LST
Technique
Main-Lining
Technique
3
Week 3. Vegetation4mo ago


10 cm
Height
18 hrs
Light Schedule
25 °C
Day Air Temp
6.8
pH
No Smell
Smell
60 %
Air Humidity
0 °C
Solution Temp
21 °C
Substrate Temp
20 °C
Night Air Temp
120 liters
Pot Size
25 cm
Lamp Distance
MyLittleGarden Veg Week 3 – Mulch, Light & Blumat
Period: April 19th to April 26th
Week 3 was all about bringing a little order into the jungle and setting up the system for long-term stability.
Blumat System Installed
I installed the Blumat automatic watering system, giving the plants a consistent and steady supply of moisture without the need for daily hand-watering. The first drips are flowing – the soil now stays evenly moist and balanced.
Cover Crops Trimmed & Mulched
The cover crops went wild this week! To keep everything in harmony, I trimmed them back and used the cuttings directly as living mulch.
On top of that, I added some dried trim from past cannabis grows to create a hemp mulch layer. This helps regulate moisture, feeds the microbes, and supports a healthier soil structure.
Defoliation & Light Optimization
To improve light penetration and airflow, I selectively defoliated both the King Juice and some of the cover crop. Now more light reaches the inner and lower parts of the canopy – setting the plant up for stronger, more balanced growth.
Additional Watering
Besides the Blumat, I also added 3 liters of water by hand to make sure all areas of the bed are evenly saturated, especially after the new mulch was applied.
Worm Hotel: First Guest Arrived
Exciting news – the worm hotel is officially open for business! This week I spotted the first earthworm inside the clay pot, confirming that the structure is working and being accepted.
A small but important sign that the underground life is active and exploring its new home.
Lets Grow 😋
4 likes
comments
Share
Used techniques
LST
Technique
Main-Lining
Technique
Defoliation
Technique
4
Week 4. Vegetation4mo ago


15 cm
Height
18 hrs
Light Schedule
25 °C
Day Air Temp
6.8
pH
No Smell
Smell
55 %
Air Humidity
0 °C
Solution Temp
21 °C
Substrate Temp
20 °C
Night Air Temp
120 liters
Pot Size
30 cm
Lamp Distance
MyLittleGarden Veg Week 4 – Mulch, Microbes & Monitoring
Period: April 26th to May 3rd
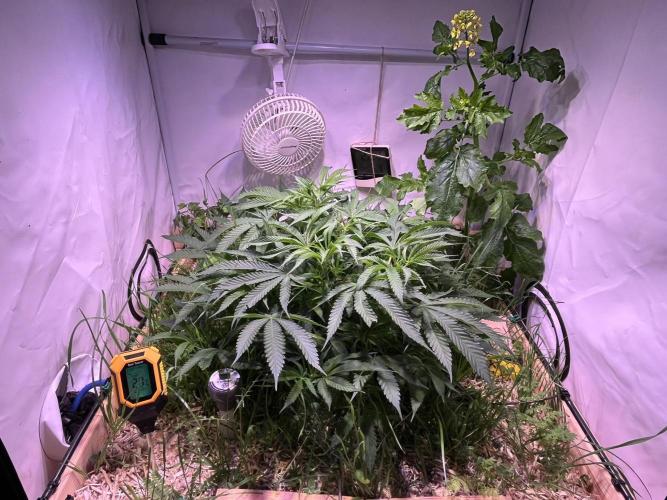
In the fourth week, the bed continued to thrive. The King Juice plant looks healthy and vigorous, steadily growing with strong leaves. The cover crops are also getting bigger, bringing plenty of life and diversity to the bed.
Pruning & Mulching
The cover crops were pruned again, and the clippings were spread out as a mulch layer over the soil and lightly moistened. It’s fascinating to see the microorganisms actively breaking down the old leaf material — the mulch system is visibly working. The nutrient cycle is kicking in.
Hemp Mulch & Moisture Management
Towards the end of the week, I trimmed the cover crops once more, chopped them up, and scattered them across the bed. On top, I added a layer of coarse hemp mulch to help maintain consistent moisture in the upper soil layer and support a stable soil climate.
Worm Hotel Replenished
Both worm hotels were replenished with fresh organic material like leaf litter and kitchen scraps — providing food for the worms and boosting soil life.
Yellow Sticky Traps Against Fungus Gnats
As a preventive measure against fungus gnat infestation, I hung yellow sticky traps to catch any early signs before the problem escalates. So far, everything looks green and healthy.
Lets Grow 😋
4 likes
comments
Share
5
Week 5. Vegetation4mo ago

25 cm
Height
18 hrs
Light Schedule
25 °C
Day Air Temp
6.8
pH
Weak
Smell
55 %
Air Humidity
0 °C
Solution Temp
21 °C
Substrate Temp
20 °C
Night Air Temp
120 liters
Pot Size
30 cm
Lamp Distance
MyLittleGarden Veg Week 5 – Letting Go & Observing
Period: May 3rd to May 10th
In the fifth week, I mostly let the bed do its thing and just allowed nature to take its course. Sometimes, giving the plants and soil some time to work on their own is exactly what they need.
The King Juice plant continues to look quite vital, has unfolded nicely, and become noticeably bushier. You can really feel that it’s gaining significant volume now — there’s definitely more growth to come!
The coarse hemp mulch kept the soil surface nicely moist, which is visible in the soil structure. The cover crop is starting to poke through the mulch here and there, making the bed look lively and healthy.
In between, I applied a bit of low-stress training (LST) to gently shape the plant and promote even growth.
Additionally, I applied another round of EM1 microorganisms to support soil life further. I also watered the soil again with 4 liters to keep everything flowing smoothly.
Lets Grow 😋
4 likes
comments
Share
Used techniques
LST
Technique
Defoliation
Technique
6
Week 6. Vegetation4mo ago


35 cm
Height
18 hrs
Light Schedule
25 °C
Day Air Temp
6.8
pH
Weak
Smell
55 %
Air Humidity
0 °C
Solution Temp
21 °C
Substrate Temp
20 °C
Night Air Temp
120 liters
Pot Size
30 cm
Lamp Distance
Nutrients 1
EM1 - Microorganisms
50 mll
MyLittleGarden Veg Week 5 – Growth and Care
Period: May 10th to May 17th
In the fifth week, I let the King Juice continue to grow and spread out across the area. The plant is getting denser and wider — a real bushy marvel! The cover crop is also spreading under and alongside the King Juice, creating a lively green carpet.
For aesthetics and ecological balance in the grow box, I left one plant standing in the right corner — just for the eye and the environment, following the motto "It can't hurt."
Additionally, I diluted EM1 microorganisms with water and watered with a total of 4 liters to boost the microbial life in the substrate and further stimulate soil activity.
It’s simply a joy to look into the box and watch the plants grow bigger and bigger.
Towards the end of the week, I thinned out and defoliated the King Juice, so it now looks a bit wild and ragged — but that’s part of the care to allow more light and air inside the plant.
Unfortunately, I had to remove the ivy that was standing in the left corner because it didn’t fit well into the environment and didn’t harmonize optimally with the other plants.
Lets Grow 😋
3 likes
comments
Share
Used techniques
LST
Technique
Defoliation
Technique
7
Week 7. Vegetation4mo ago
45 cm
Height
18 hrs
Light Schedule
25 °C
Day Air Temp
6.8
pH
Weak
Smell
55 %
Air Humidity
0 °C
Solution Temp
22 °C
Substrate Temp
20 °C
Night Air Temp
120 liters
Pot Size
30 cm
Lamp Distance
MyLittleGarden Vegetation Week 7 – Calm Before the Next Chapter
Period: May 17th to May 22nd
During this short but significant week, I simply let the King Juice grow undisturbed. She continued to adjust to her environment, unfold her potential, gain strength, and thrive at her own pace. It was a joy to watch her looking so healthy and full of energy – lush, green, and strong.
The plant is developing beautifully, and it’s becoming clear that she’s ready for the next big step. With space in the grow box getting tight, I decided to mark May 22nd as the final day of the vegetation phase.
The transition to flowering was initiated overnight from May 22nd to May 23rd,
making May 23rd the official first day of the flowering stage – an exciting new chapter begins.
Lets Grow 😋
3 likes
comments
Share
Used techniques
LST
Technique
8
Week 8. Flowering4mo ago


50 cm
Height
12 hrs
Light Schedule
26 °C
Day Air Temp
6.8
pH
Weak
Smell
55 %
Air Humidity
0 °C
Solution Temp
22 °C
Substrate Temp
20 °C
Night Air Temp
120 liters
Pot Size
30 cm
Lamp Distance
Nutrients 2
EM1 - Microorganisms
50 mll
Top Dress
20 mll
MyLittleGarden Flowering Week 1 – The Starting Signal
Period: May 23 to May 29
(Light cycle switched from 18/6 to 12/12 on the night of May 22 to 23)
With the switch from 18/6 to 12/12 lighting during the night of May 22 to 23, the flowering phase officially began on May 23 – marking the first official day of bloom.
To kick things off, I applied between 50 and 100 grams of Almicanna Drop Top Dress as a powdered top dressing across the surface of the soil. The goal was to provide a vital nutrient boost right at the start of flowering, giving the plant everything it needs to transition smoothly into this new phase.
Throughout the week, I watered twice with EM1 (Effective Microorganisms) – 5 liters at the beginning and another 6 liters toward the end. This keeps the microbial life in the substrate active and thriving, which is especially important now.
I also defoliated the King Juice once to improve airflow and light penetration into the inner parts of the plant. She continues to look healthy and vibrant, spreading out nicely across the grow area.
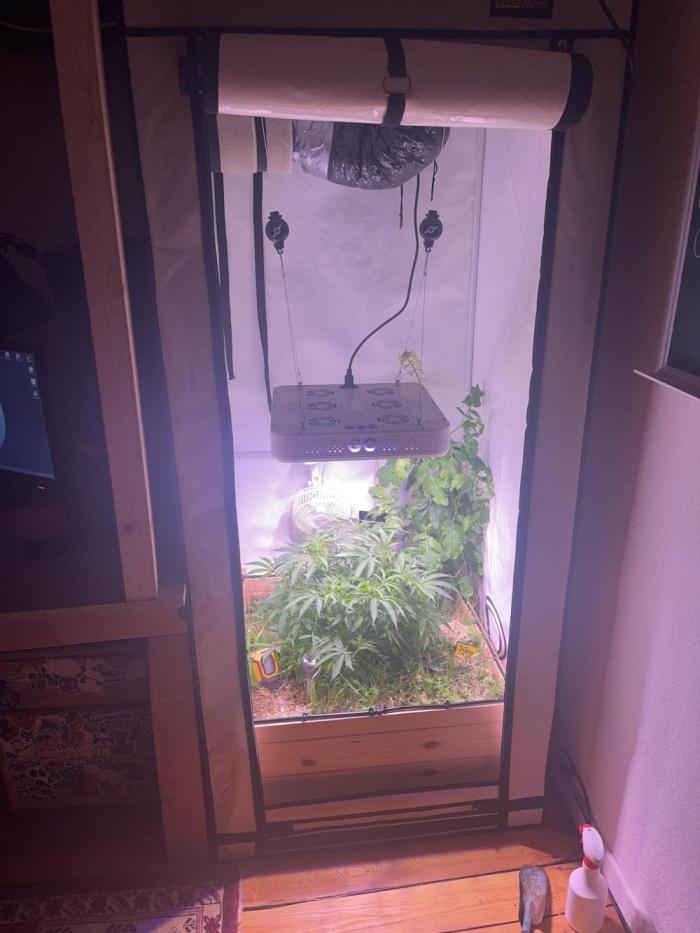
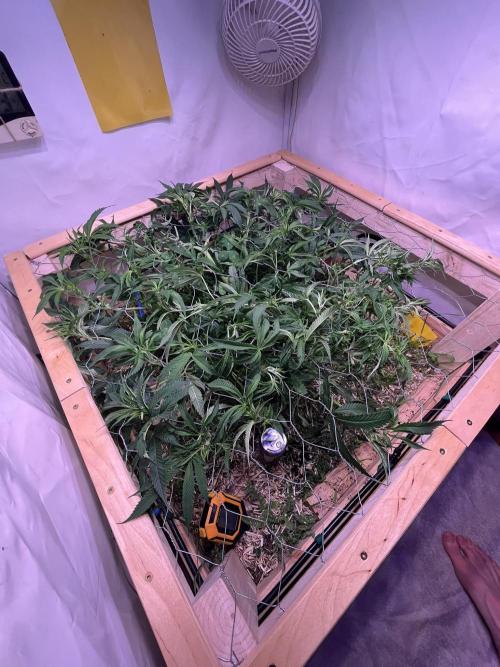
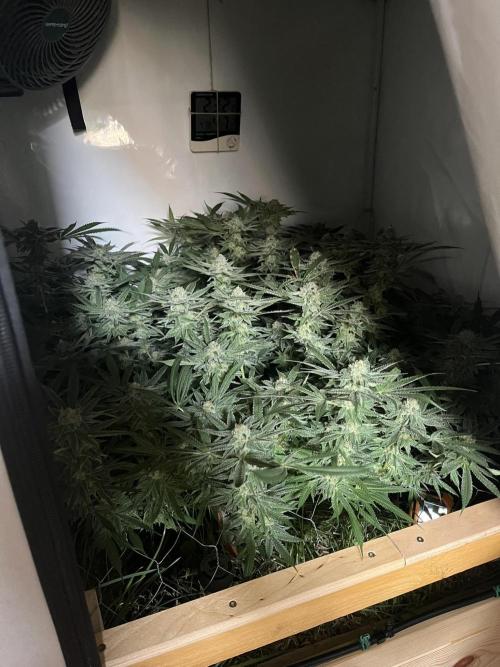
To support lateral growth and maximize light exposure, I built a ScrOG net using leftover wood and rabbit wire, and I’ve started threading the individual branches through the mesh.
The LED light has been set to full spectrum at maximum power, providing the plant with all the energy she needs going forward.
Lets Grow 😋
1 like
2 comments
Share
Used techniques
LST
Technique
ScrOG
Technique
Defoliation
Technique
9
Week 9. Flowering4mo ago


55 cm
Height
12 hrs
Light Schedule
26 °C
Day Air Temp
6.8
pH
Weak
Smell
57 %
Air Humidity
0 °C
Solution Temp
22 °C
Substrate Temp
19 °C
Night Air Temp
120 liters
Pot Size
30 cm
Lamp Distance
MyLittleGarden Blütewoche 2 – Blattpflege, ScrOG & Biologischer Pflanzenschutz
Zeitraum: Vom 29. Mai bis 05. Juni
Moin zusammen!
Ich habe mir mein bisheriges Grow-Tagebuch angesehen und beschlossen, künftig auf Deutsch weiterzuschreiben, damit ich mir das ständige Übersetzen spare und gleichzeitig einen Beitrag zur deutschsprachigen Grow-Community leisten kann.
Entlaubung & ScrOG-Fädeln:
In dieser Woche habe ich die King Juice großflächig entlaubt, um Licht und Luft besser ins Innere der Pflanze gelangen zu lassen. Die Äste wurden durch das ScrOG-Netz gefädelt, damit sie sich gleichmäßig über die Fläche verteilen. Zu Beginn war sie etwa 55 cm im Durchmesser – zum Ende der Woche war sie auf ca. 60 cm angewachsen.
Biologischer Pflanzenschutz – Nützlinge:
Zum Schutz gegen Schädlinge habe ich zwei Koppert-Produkte eingesetzt:
- Swirski‑Mite Plus – enthält Amblyseius swirskii, eine Schlupf‑ und Raubmilbe, die sich besonders gegen Larven von Thripsen und Weißen Fliegen richtet
- Spical Plus – beheimatet Neoseiulus californicus, eine generalistische Raubmilbe, ideal gegen Spinnmilben, aber auch gegen andere Blattmilben
Diese Nützlinge werden in langsam freisetzenden Beuteln angebracht und helfen präventiv im biologischen Schädlingsmanagement – damit es gar nicht erst zu größeren Problemen kommt.
Pflanzenzustand:
Die King Juice hat sich zügig erholt, wirkt vital und wächst kräftig weiter. Das Blattwerk zeigt ein sattes Grün, ohne Anzeichen von Mangelerscheinungen. Sehr zufriedenstellend!
Bewässerung & Mikrobenkultur:
Das Substrat ist noch gut feucht. Deshalb werde ich wie gewohnt erst zu Beginn der nächsten Woche erneut gießen. Nochmals mit EM1 (Effektiven Mikroorganismen), um das Bodenleben weiterhin zu unterstützen.
Liebe Grüße aus Norddeutschland – bis zum nächsten Wochen-Update!
2 likes
comments
Share
Used techniques
ScrOG
Technique
Defoliation
Technique
10
Week 10. Flowering4mo ago


60 cm
Height
12 hrs
Light Schedule
26 °C
Day Air Temp
6.8
pH
Weak
Smell
57 %
Air Humidity
0 °C
Solution Temp
22 °C
Substrate Temp
20 °C
Night Air Temp
120 liters
Pot Size
30 cm
Lamp Distance
Nutrients 1
Effektive Mikroorganismen - EM1
50 mll
MyLittleGarden Blütewoche 3 – Radikale Entlaubung & Pflanzenpflege
Zeitraum: Vom 05. Juni bis 12. Juni
Zu Beginn dieser Woche habe ich mich an eine großflächige Entlaubung gemacht, da sich das Blätterdach der Pflanze sehr üppig entwickelt hatte. Diesmal war es ein richtiger Radikalschnitt – es ging ordentlich Blattmasse verloren. Ziel war, mehr Licht an die unteren Triebe zu bringen und die Luftzirkulation zu verbessern.
Um der Pflanze bei der Regeneration unter die Arme zu greifen, habe ich 6 Liter Wasser mit EM1 (Effektive Mikroorganismen) gegossen, um das Bodenleben zu stärken und die Pflanze vital zu halten.
Verlust von Trieben:
Leider sind mir beim Entlauben drei Äste abgebrochen. Zwei davon haben es nicht überlebt – eine jedoch hat sich erstaunlicherweise wieder erholt. Trotz des Verlusts konnte ich keine ernsthafte Beeinträchtigung der Gesamtstruktur erkennen.
Beobachtung möglicher Mangelerscheinung:
Zwischenzeitlich sah es kurzzeitig nach einem leichten Mangel aus. Blätter wurden von innen heller, am äußeren Rand dunkler, und wölbten sich etwas nach innen. Doch schon einen Tag später sah die Pflanze wieder völlig normal aus, also alles im grünen Bereich.
Wurmhotel & Spezialfutter für die Würmer:
Um das Bodenleben zusätzlich zu fördern, habe ich meinen Würmern etwas hochwertiges Wurmfutter gegönnt, bestehend aus:
- gemahlenem Pilznährmalz
- Kälbmehl
- Neemcake
- Algenkalk
- Naturpur Grieß
Davon streue ich wöchentlich eine Hand voll über die Erde sowie gezielt in die Wurmhotels. Und siehe da, zwei Tage später war alles restlos verschwunden! Die Würmer waren deutlich aktiv und sichtbar am Futtern. Sehr erfreulich zu sehen, wie lebendig und gesund das Mikrobiom im Boden ist.
Allgemeiner Zustand & Wachstum:
Im weiteren Verlauf der Woche habe ich die Äste weiter nach außen gezogen, um die Fläche optimal auszunutzen. Durch die Entlaubung kam nun spürbar mehr Licht an die unteren Bereiche, die Triebe entwickelten sich prächtig und schossen sichtbar in die Höhe.
Maße am Ende der Woche:
Breite: ca. 65 cm
Höhe: ca. 15 cm
Blütenentwicklung:
Die Pflanze befindet sich jetzt klar in der Anfangsphase der Blüte. Die Blütenansätze sind deutlich sichtbar und zeigen ein gleichmäßiges, gesundes Wachstum. Die Pflanze wirkt insgesamt sehr vital und kräftig.
Bis zur nächsten Woche!
1 like
comments
Share
Used techniques
ScrOG
Technique
Defoliation
Technique
11
Week 11. Flowering4mo ago


65 cm
Height
12 hrs
Light Schedule
27 °C
Day Air Temp
6.8
pH
Normal
Smell
52 %
Air Humidity
0 °C
Solution Temp
24 °C
Substrate Temp
21 °C
Night Air Temp
120 liters
Pot Size
40 cm
Lamp Distance
Nutrients 1
Effektive Mikroorganismen - EM1
50 mll
MyLittleGarden Blütewoche 4 – Blütenpower & Gärtnerfreude
Zeitraum: Vom 12. Juni bis 19. Juni
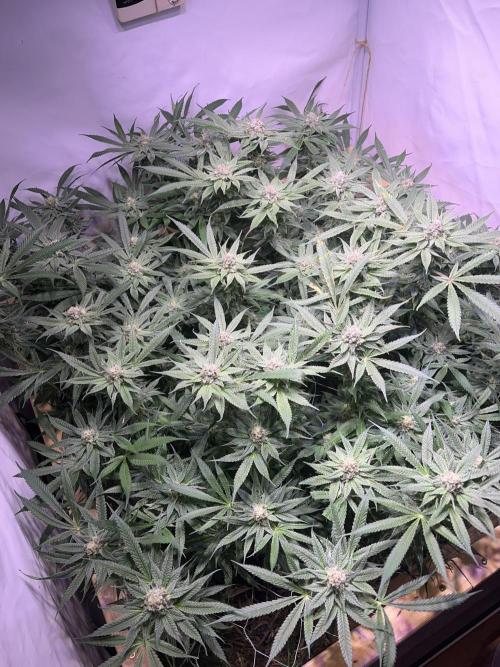
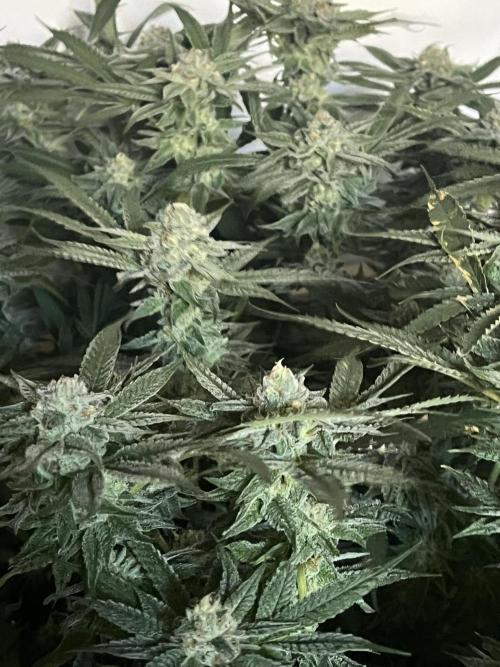
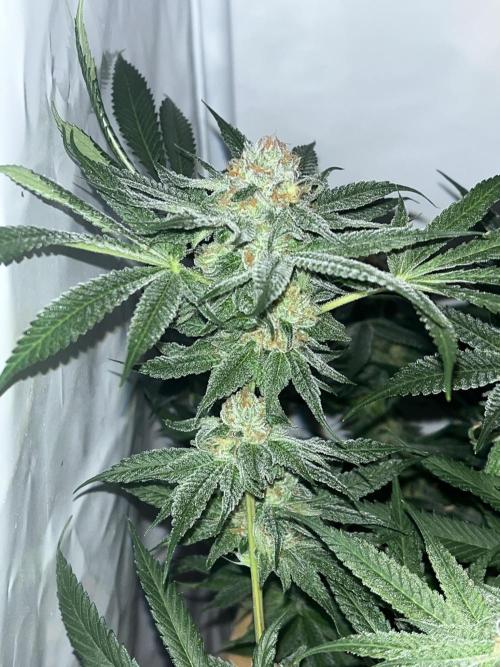
Wenn ich aktuell meine Box öffne, geht mir jedes Mal das Herz auf. Ohne Scheiß, dieser Grow bringt mir richtig Freude! Die Entwicklung in dieser Woche war enorm. Die King Juice hat einen kräftigen Stretch hingelegt, ihre Blütenstände sind deutlich gewachsen, kompakter geworden und fangen langsam an, wirklich Fülle zu zeigen. Das Blätterdach sieht kräftig und vital aus, die Farbe der Blätter ist ein sattes, dunkles Grün.
Zu Beginn der Woche habe ich nochmal 6 Liter EM 1 gegossen. Außerdem habe ich Wurmfutter für die Kompostwürmer erneut über das Beet verteilt
Ansonsten wenig Eingriffe, die Pflanze durfte einfach machen, was sie am besten kann, wachsen und ihre Energie in die Blüte stecken. Am Ende der Woche (Tag 28) habe ich eine leichte Entlaubung zur Verbesserung der Lichtdurchdringung durchgeführt und nochmal 6 Liter klares Wasser gegossen.
Es gab ein kleines aber sehr wirkungsvolles Upgrade. Ich habe mir zwei neue oszillierende Ventilatoren gekauft. Ein wirklich großer Unterschied zu meinen alten Ventilator. Deutliche Verbesserung der Luftzirkulation.
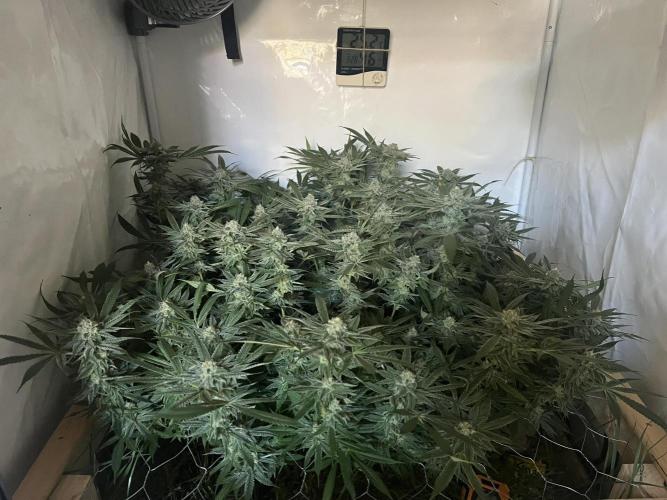
Die Fläche im Zelt ist nun meiner Meinung nach wirklich gut ausgenutzt. Die Pflanze wächst breit, kräftig und stabil. Das Blütenmeer, das sich da langsam bildet, ist einfach wunderschön mit anzusehen. Auch die unteren Triebe bekommen jetzt wieder mehr Licht und zeigen ordentlichen Wuchs.
In dieser Woche hat sich auch der Duft deutlich intensiviert. Die King Juice verströmt inzwischen einen fruchtig-süßen Geruch, der sich mit jedem Tag etwas stärker bemerkbar macht, zwar noch nicht so stark wie am Ende der Blüte, aber der Charakter ist schon gut erkennbar. Oft sitze ich einfach gemütlich vor der Box und schaue der Pflanze beim wachsen zu. Einfach ein Traum!!! 😍
Ich muss schon sagen, ich bin gehypt. Mein bislang schönster Grow. Die Pflanze zeigt sich von ihrer besten Seite, entwickelt sich prächtig, das Mikroleben läuft, die Blüten explodieren und ich bin einfach happy. 😊
Ich bin gespannt, was die kommenden Wochen noch bringen, die spannendste Phase beginnt jetzt so richtig.
Habt viel Spaß beim Bilder anschauen und bis nächste Woche!
3 likes
1 comment
Share
Used techniques
Defoliation
Technique
12
Week 12. Flowering3mo ago


65 cm
Height
12 hrs
Light Schedule
28 °C
Day Air Temp
6.9
pH
Normal
Smell
55 %
Air Humidity
0 °C
Solution Temp
24 °C
Substrate Temp
22 °C
Night Air Temp
120 liters
Pot Size
40 cm
Lamp Distance
MyLittleGarden Blütewoche 5 - Einfach wachsen lassen und zusehen
Zeitraum; 19. Juni bis 26. Juni
Moin Moin,
wir sind jetzt in der fünften Blütewoche, also Tag 29 bis 35, und was soll ich sagen: Ich bin einfach wieder nur happy! 😊
Ich habe diese Woche so gut wie gar nichts gemacht und das war auch völlig in Ordnung so. Die Pflanze hat einfach weiter ihr Ding durchgezogen.
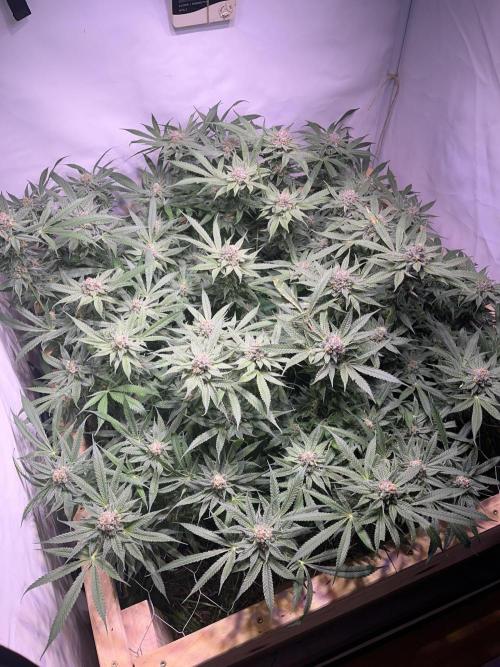
Die Blüten entwickeln sich prächtig, sie werden dichter, kompakter und fangen langsam an, richtig schön zu glitzern. Die Trichome verteilen sich über die Zuckerblätter und das Harz klebt wie Sau. Wenn ich den Kopf in die Box stecke, kommt mir ein richtig süßlich-fruchtiger Duft entgegen. Richtig lecker! 😍
Viel mehr habe ich auch nicht gemacht. Ich habe meinen Würmern noch etwas Wurmfutter gegönnt und am 35. Blütetag wieder mit 6 Litern Wasser gegossen.
Worüber ich mir gerade Gedanken mache…
Manche Buds stehen ganz schön nah beieinander. Ich hab ein bisschen die Sorge, dass mit zunehmender Dichte auch das Schimmelrisiko steigen könnte. Deshalb überlege ich, in der kommenden Woche nochmal etwas zu entlauben, damit die Luftzirkulation besser wird.
Außerdem würden sich die unteren Buds bestimmt freuen, wenn da wieder ein bisschen mehr Licht und Luft rankommt. 😜
Ich hab natürlich mal wieder viel zu viele Fotos gemacht. Es war echt schwer mich zu entscheiden, welche ich hochlade will 😅
Viel Spaß beim Anschauen!
In dem Sinne:
Habt ein schönes Wochenende, lasst es euch gutgehen und bis nächste Woche! 🙌
likes
comments
Share
13
Week 13. Flowering3mo ago


65 cm
Height
12 hrs
Light Schedule
30 °C
Day Air Temp
6.9
pH
Strong
Smell
55 %
Air Humidity
0 °C
Solution Temp
24 °C
Substrate Temp
24 °C
Night Air Temp
120 liters
Pot Size
40 cm
Lamp Distance
MyLittleGarden Blütewoche 6 – Heiße Tage & durstige Pflanze
Zeitraum; 26 Juni bis 03. Juli
Die Temperatur ist teilweise bis an die 30 °C geklettert, was sich natürlich auch auf die Pflanze ausgewirkt hat. Sie säuft aktuell ordentlich was weg, daher musste ich öfter mal nachgießen, damit der Boden nicht zu trocken wird.
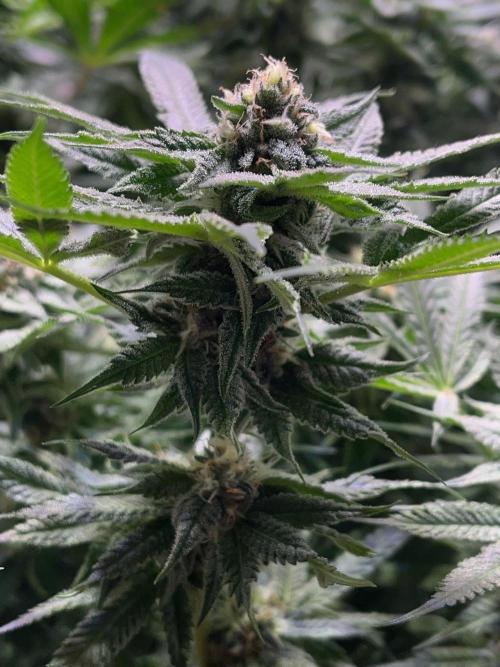
Die Blüte schreitet weiter gut voran, alles läuft ziemlich rund bisher. Keine großen Mängelerscheinungen, bis auf ein paar braune Flecken auf einzelnen Blättern.
Die Buds werden immer dichter und kompakter und der Geruch wird immer stärker... Mittlerweile erkennt man auch ganz klar den charakteristischen Duft der King Juice, fruchtig, süß, aromatisch mit einer guten Zitrusnote 😍
Das Blätterdach ist inzwischen wieder sehr dicht. Bisher habe ich mich noch nicht dazu durchgerungen erneut zu entlauben. Ich lasse der Pflanze jetzt erstmal einfach ihre Ruhe und ihre Zeit. Sie scheint sich wohlzufühlen, also mische ich mich gerade nicht groß ein.
Ich gieße weiterhin mit klarem Wasser, ohne Zusätze. Die Würmer bekommen regelmäßig ihr Futter, damit auch im Boden alles weiter aktiv bleibt.
Mehr mache ich im Moment nicht. Einfach wachsen lassen, beobachten und genießen. 😉
4 likes
comments
Share
14
Week 14. Flowering3mo ago
65 cm
Height
12 hrs
Light Schedule
26 °C
Day Air Temp
6.9
pH
Strong
Smell
55 %
Air Humidity
0 °C
Solution Temp
23 °C
Substrate Temp
22 °C
Night Air Temp
120 liters
Pot Size
40 cm
Lamp Distance
MyLittleGarden Blütewoche 7 – Reife, Glitzer & Vorfreude
Zeitraum: 3. Juli bis 10. Juli
Blütetag 42 bis 49
Blütewoche 7. Ich habe nicht viel gemacht. Ich lasse die Pflanze einfach weiter in Ruhe reifen.
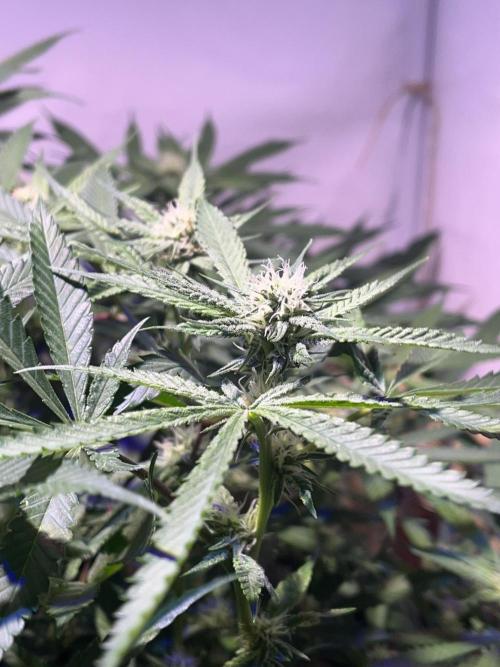
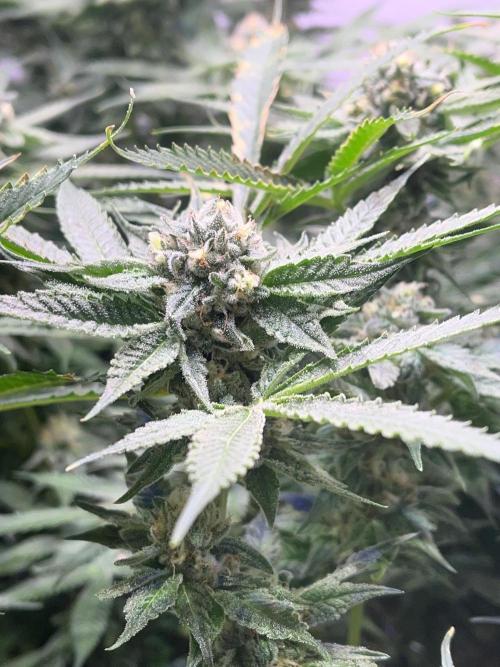
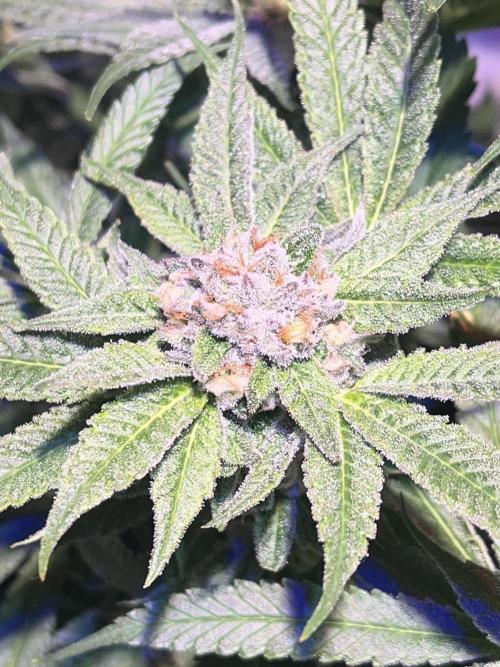
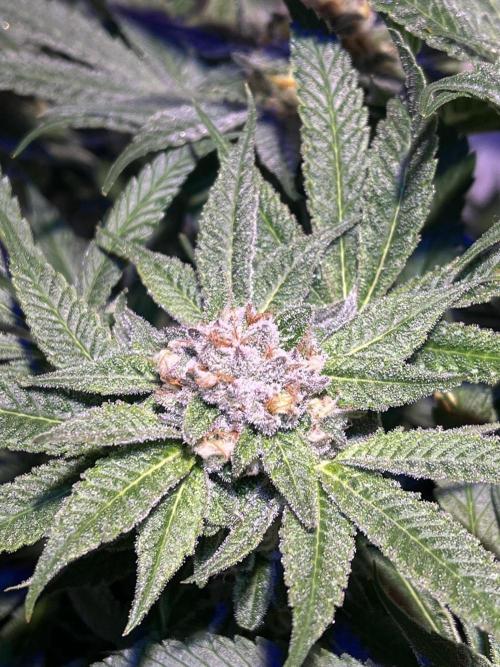
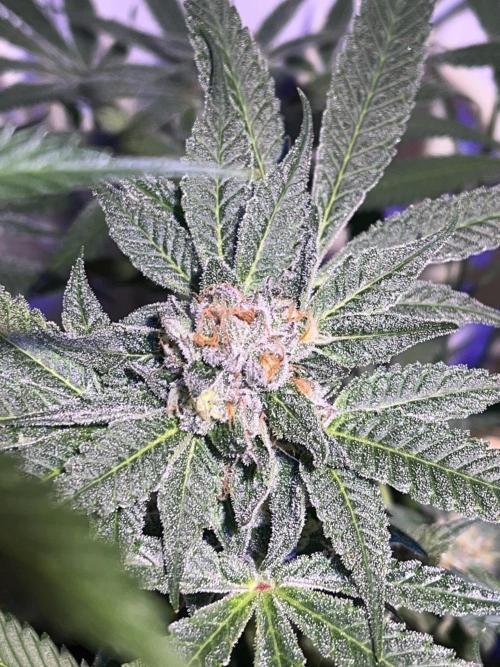
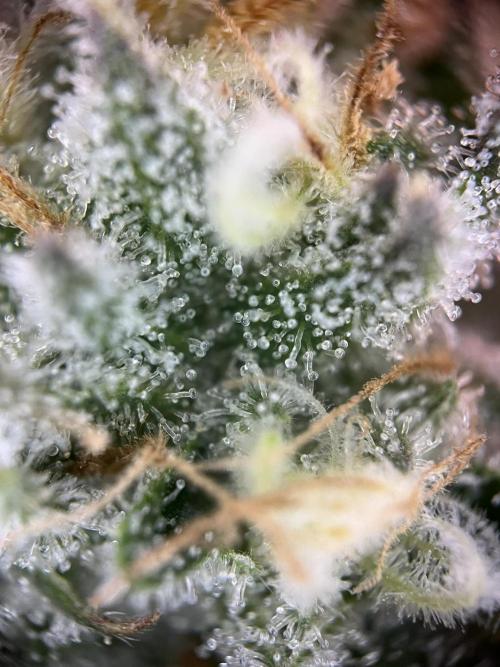
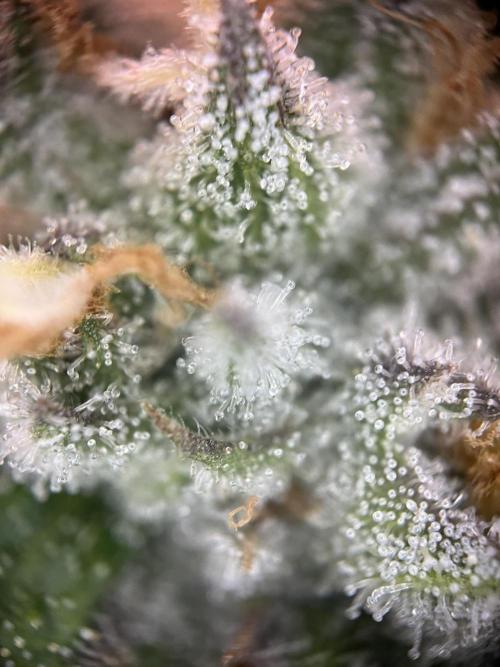
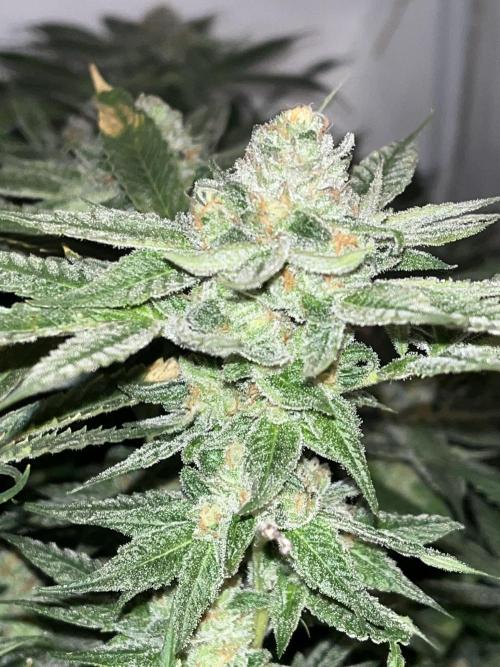
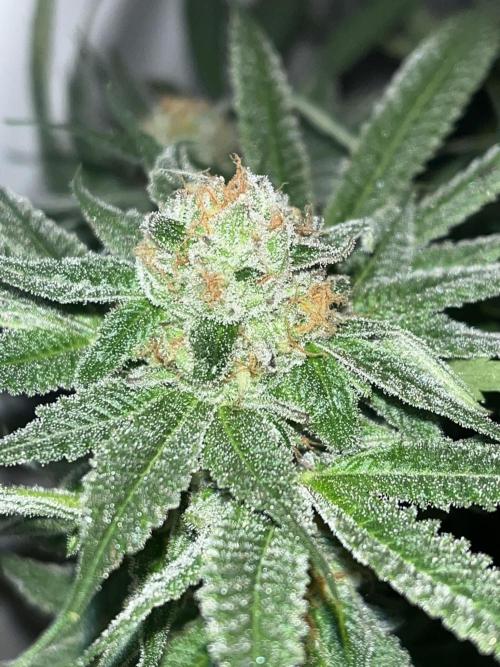
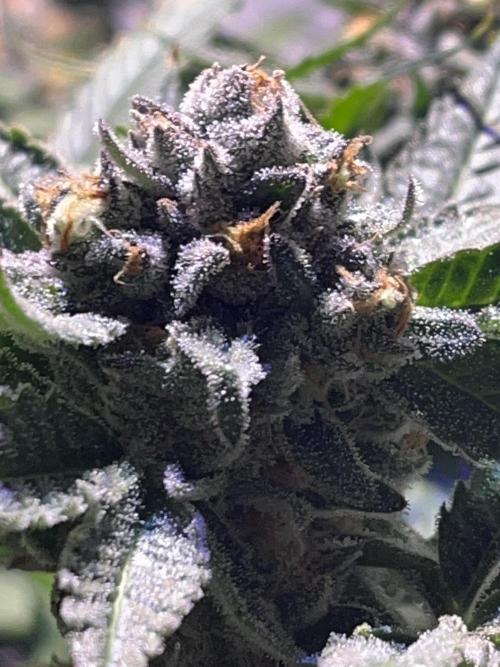
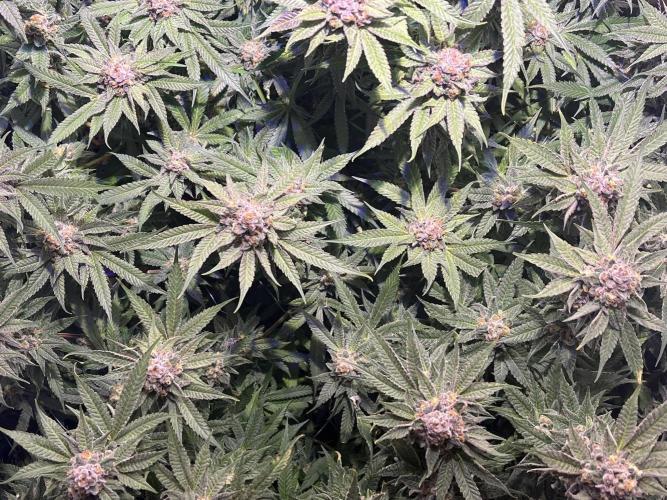
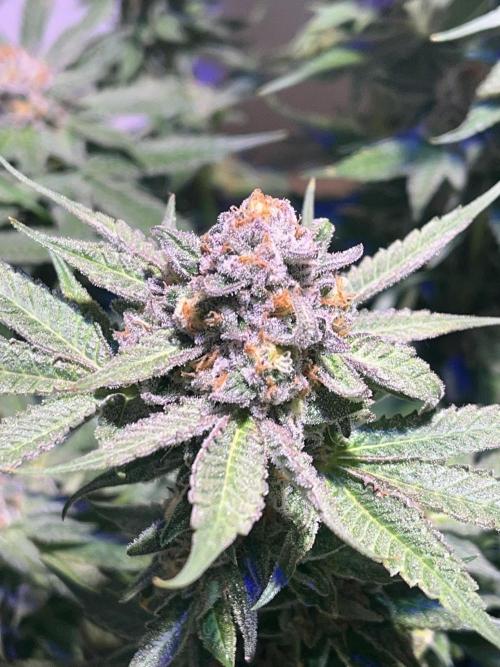
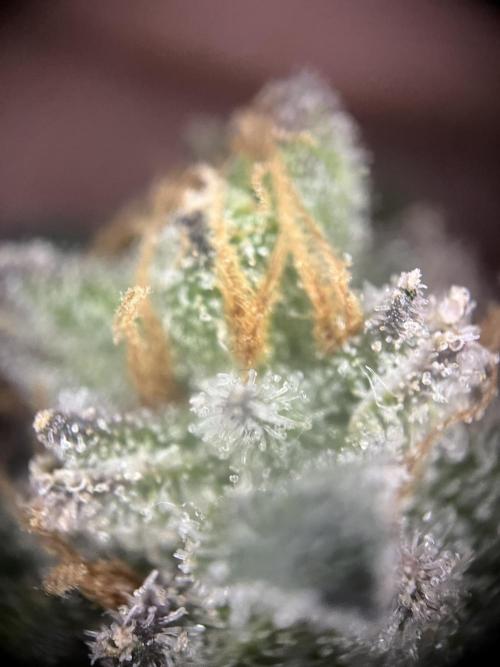
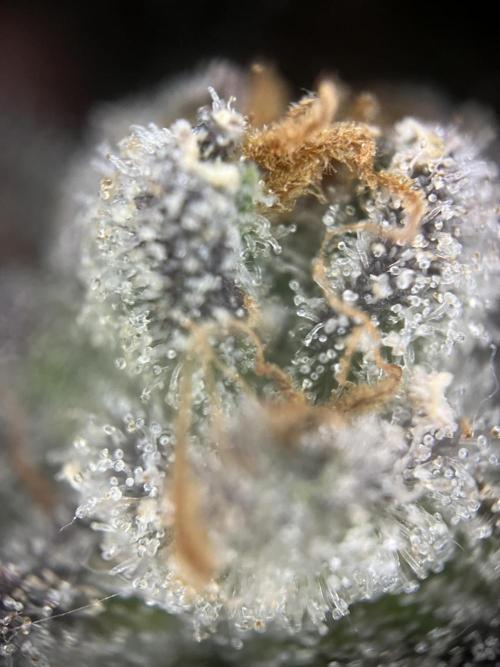
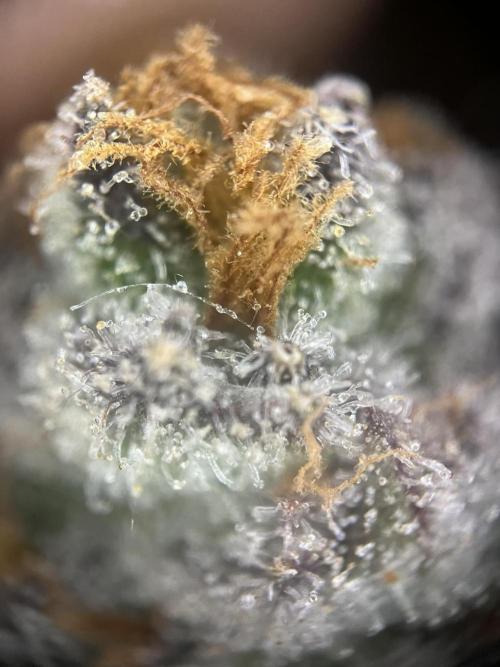
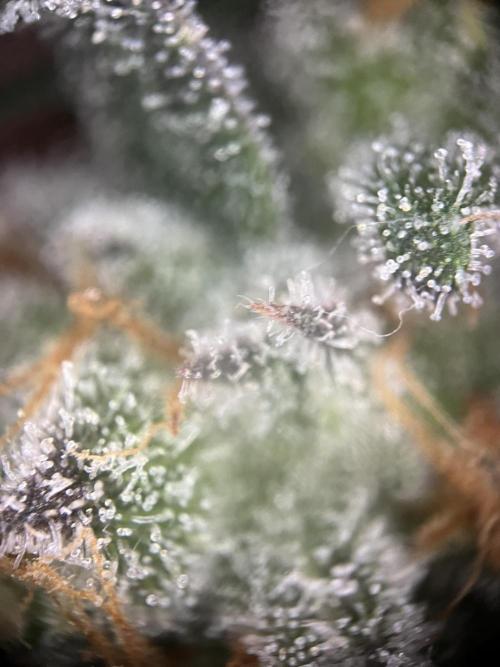
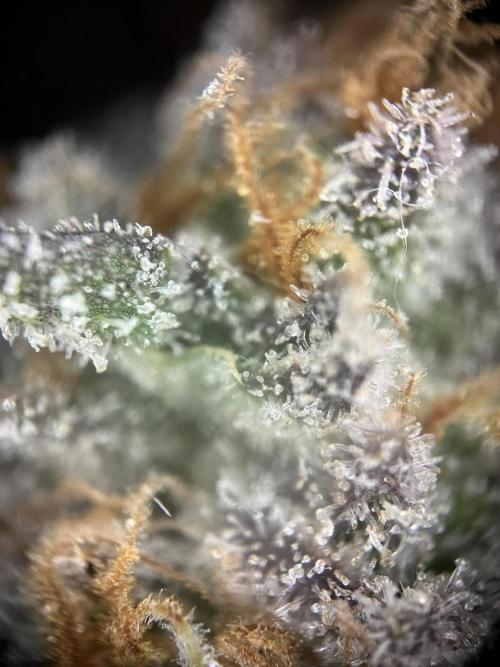
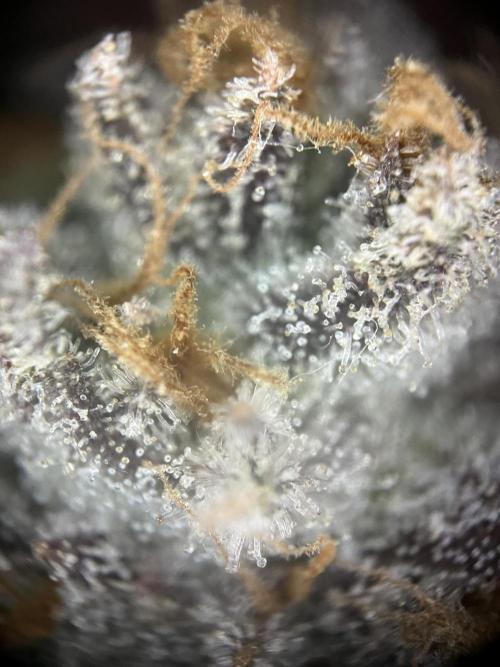
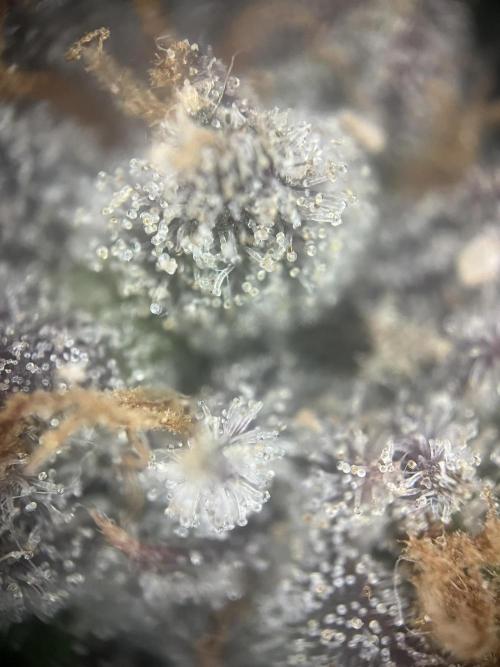
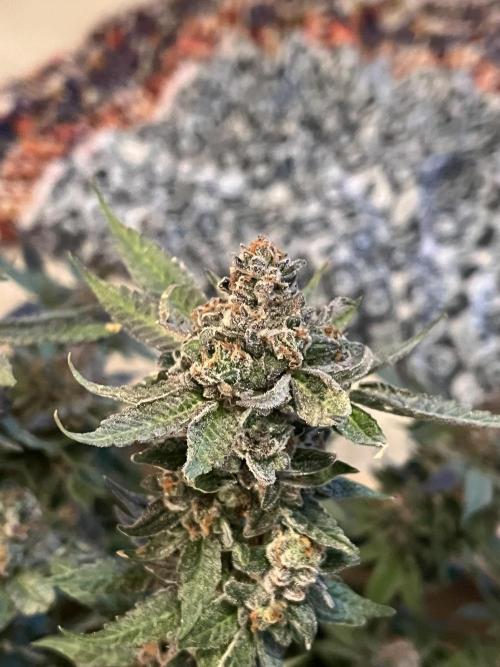
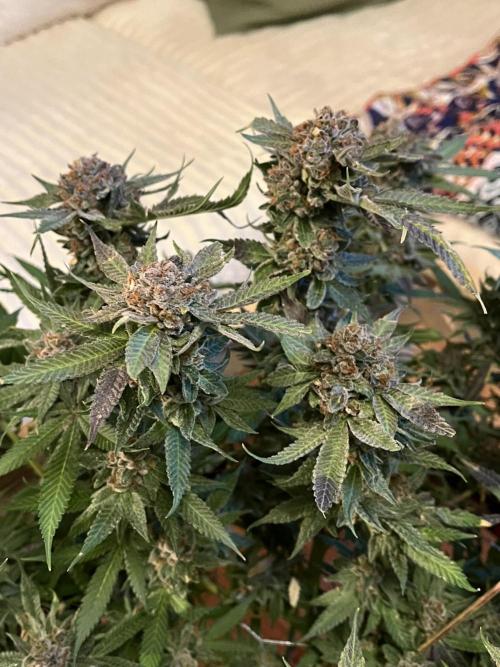
Die Buds füllen sich weiter aus, der Geruch wird immer intensiver und die Trichome nehmen spürbar zu, es glitzert mittlerweile über die ganze Pflanze, als hätte jemand eine feine Schicht Kristallstaub darübergestreut.
Die Budstruktur ist inzwischen Daumenbreite, Daumengröße groß. Sie werden langsam richtig massiv und fühlen sich ordentlich stabil und fest an. Es macht einfach Spaß, dem Prozess zuzugucken... Woche für Woche sieht man, wie alles noch dichter, noch reifer wird 😍
Auch diese Woche habe ich wieder mit meinen 6 Litern Wasser gegossen, mehr nicht. Keine großen Eingriffe, einfach weiter beobachten und wirken lassen.
So langsam sieht man, dass es aufs Finale zugeht. Ich schätze mal, in etwa zwei Wochen ist es so weit, dann ist die gute King Juice ready für die Ernte. Ich bin richtig gespannt, ob sich die Blätter zum Schluss vielleicht noch lila verfärben, so wie bei ihrer Mutter vom letzten Grow 😇
5 likes
comments
Share
15
Week 15. Flowering3mo ago
65 cm
Height
12 hrs
Light Schedule
28 °C
Day Air Temp
6.9
pH
Strong
Smell
57 %
Air Humidity
0 °C
Solution Temp
23 °C
Substrate Temp
23 °C
Night Air Temp
120 liters
Pot Size
40 cm
Lamp Distance
MyLittleGarden Blütewoche 8 – King Juice kurz vorm großen Finale
Zeitraum: 10. Juli bis 17. Juli
Blütetag: 49 bis 56
Blütewoche 8 ist durch und langsam wird's ernst. Die King Juice steuert ganz klar auf die Zielgerade zu. Ich hab diese Woche nicht viel verändert. Ganz entspannt gegossen. Temperatur und Luftfeuchtigkeit kontrolliert. Der Wert lag zwischen 50 und 64 %, also alles im grünen Bereich.
Einmal hab ich leicht entlaubt, damit die Luft besser zwischen den Buds zirkulieren kann. Zusätzlich hab ich noch einen Mini-Luftentfeuchter in die Box gestellt. Nicht das die Luftfeuchtigkeit doch nochmal höher wird als gewünscht. Gegen Ende der Woche gab’s dann nochmal eine ordentliche Ladung Wasser, insgesamt 8 Liter und auch die Würmchen haben was zu knabbern bekommen.
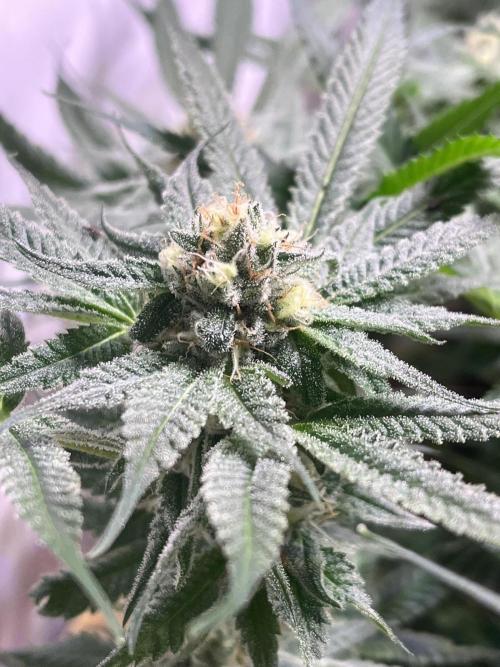
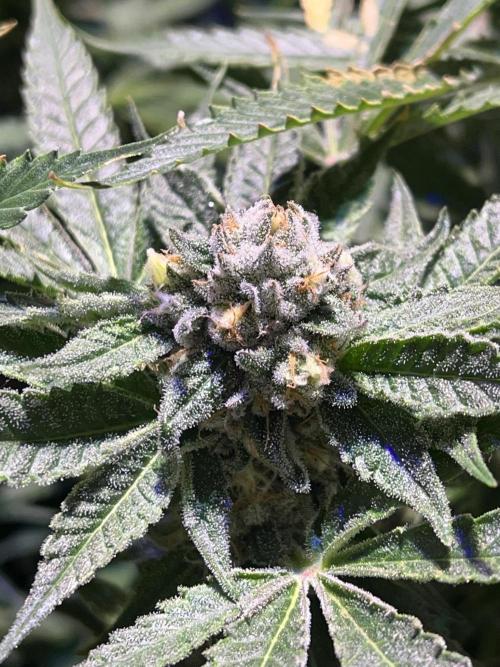
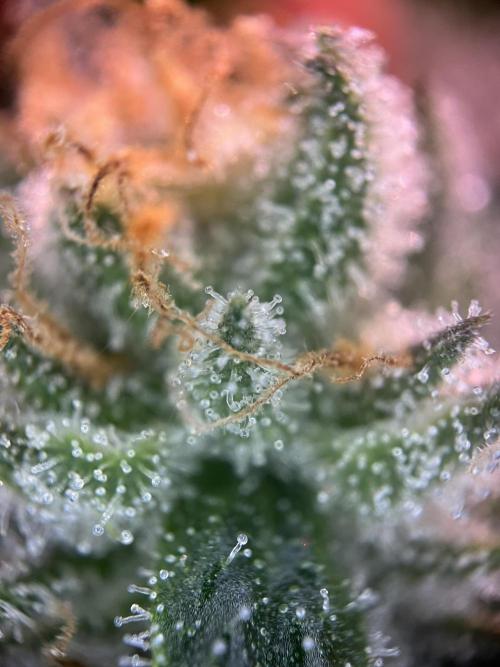
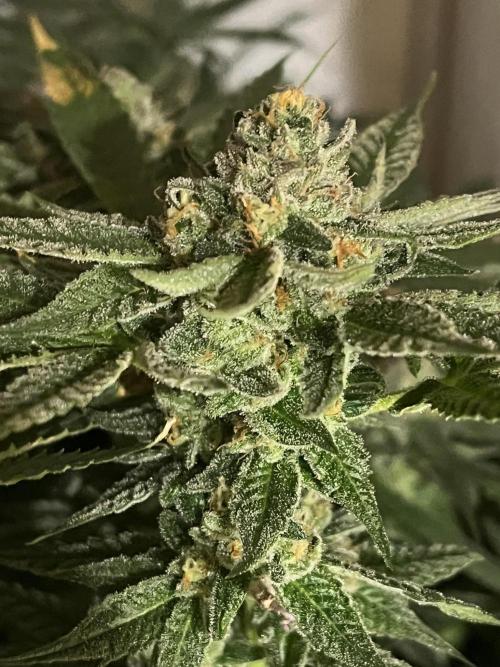
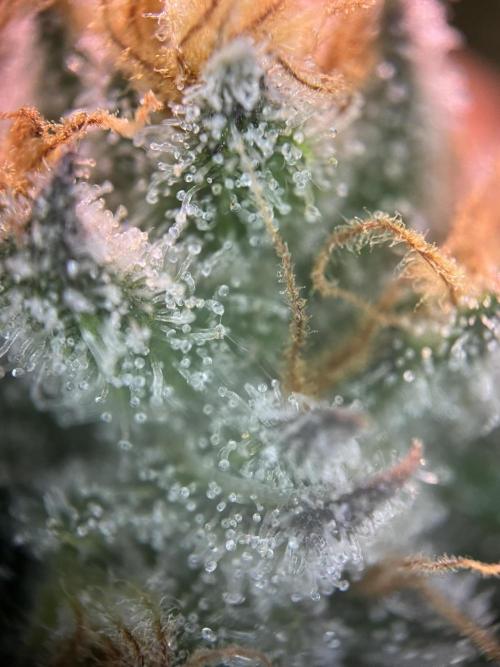
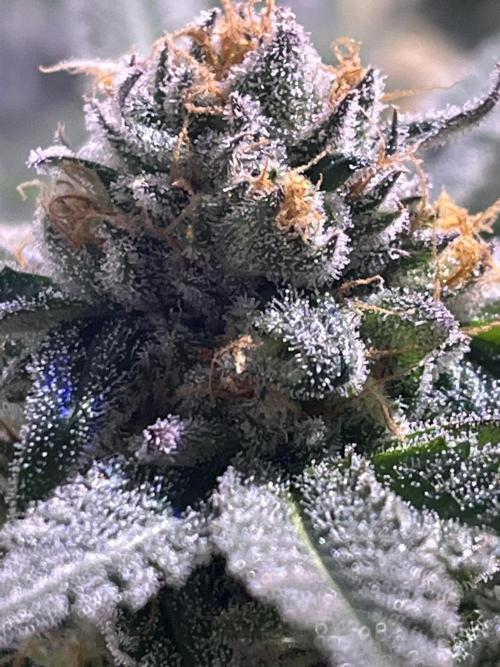
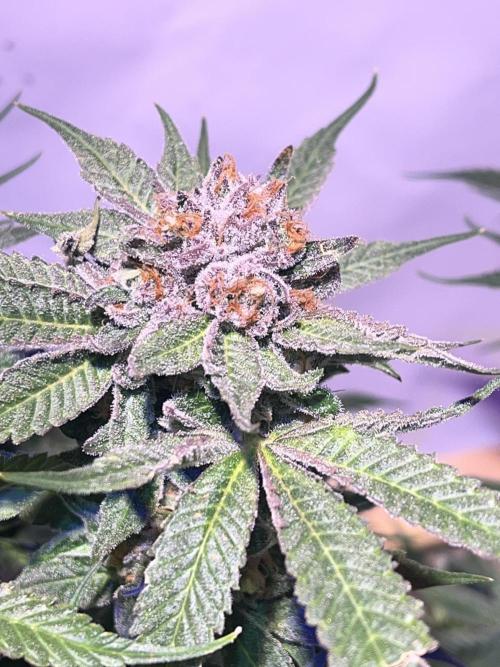
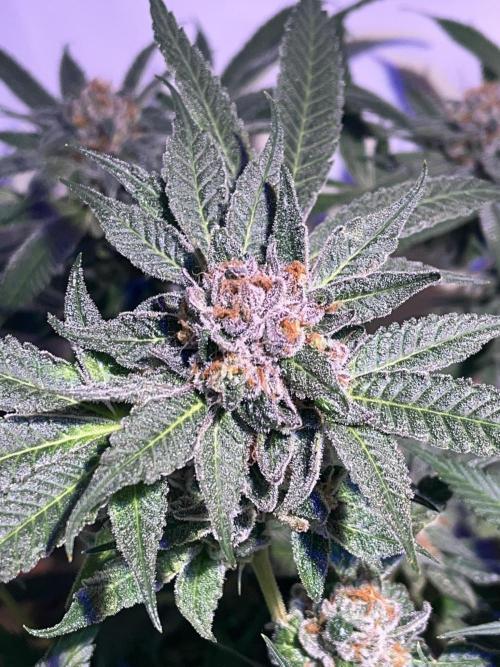
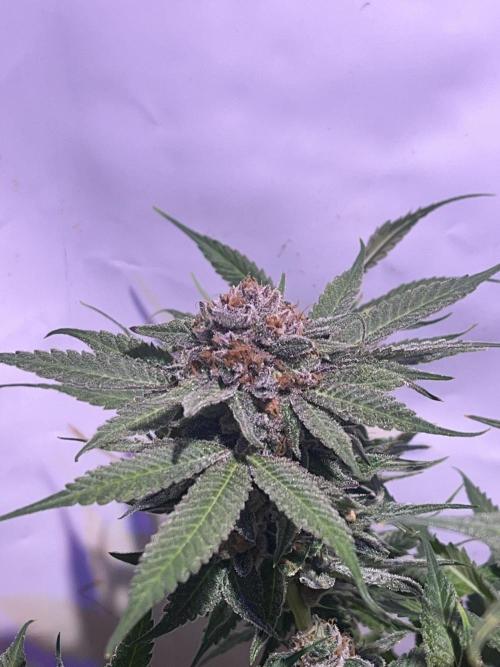
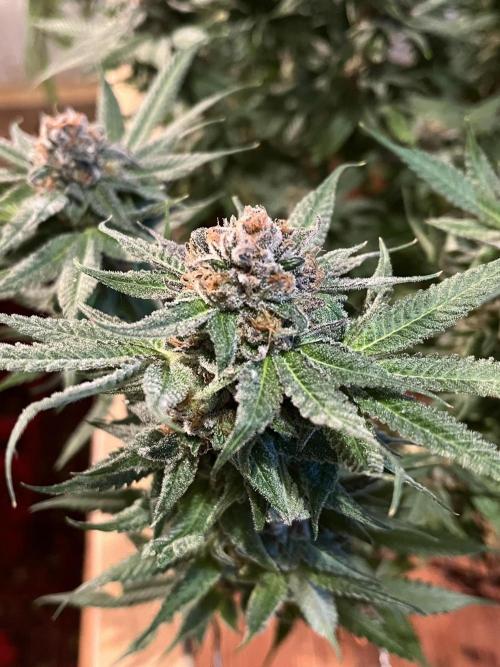
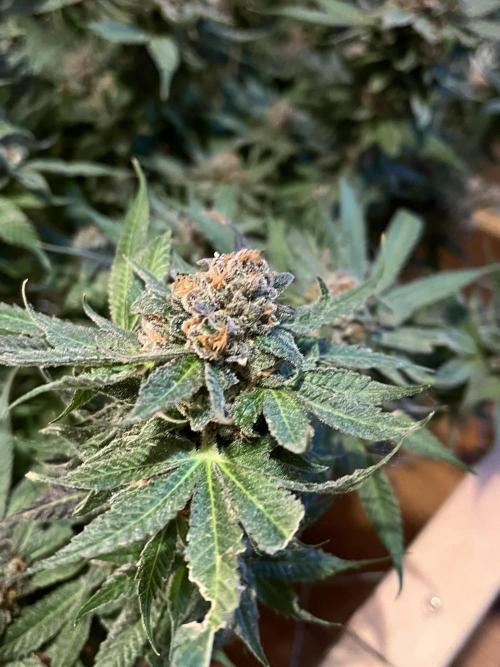
Die Buds reifen weiter aus, und unter dem Mikroskop sieht man schon was. Einzelne Trichome verfärben sich von klar zu milchig und zum Teil schon leicht bernsteinfarben. Es ist noch dezent, aber der Prozess ist ganz klar im Gange. Ich schätze, eine Woche braucht sie noch, um richtig fertig zu werden.
Wenn alles so weiterläuft, wird nächsten Donnerstag geerntet. Ich werde das natürlich noch ein paar Tage weiter beobachten und mich dann endgültig entscheiden aber mein Gefühl sagt, nächste Woche ist es so weit.
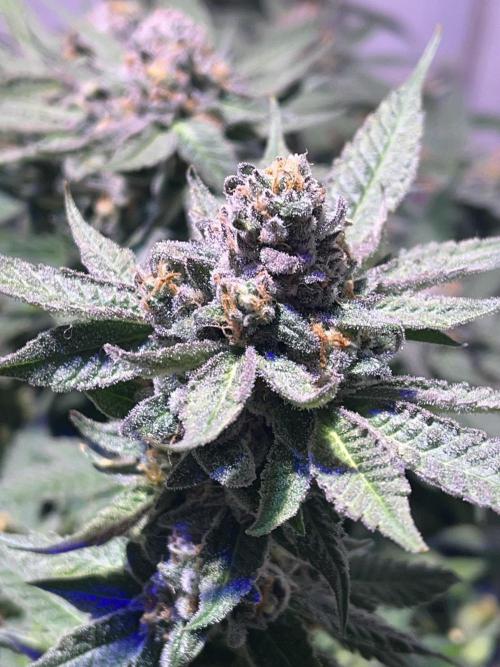
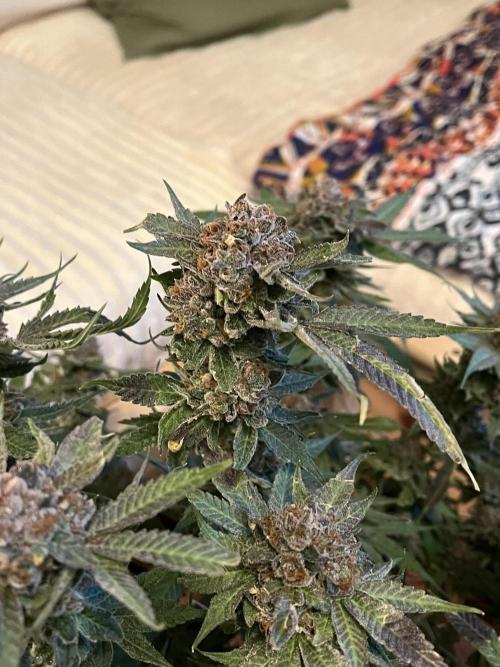
Die Buds sind der Wahnsinn, richtig schön fett, kompakt, steinhart und voll mit Harz. Sie glitzern, kleben wie Sau und verströmen einen unfassbar fruchtig-süßen Duft 😍
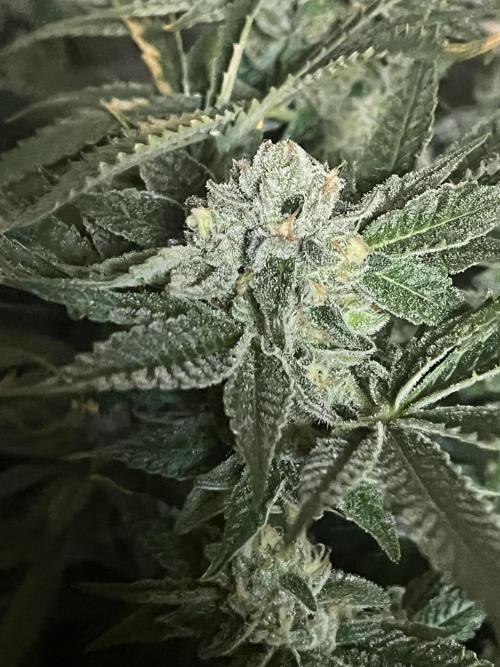
Und was auch cool ist, ein paar Blätter haben sich leicht ins Lilane verfärbt, nicht ganz so stark wie bei ihrer Mutter, aber da geht vielleicht in der letzten Woche noch was. Mal sehen, bin gespannt.
Ich kann mich ehrlich gesagt kaum sattsehen. Es ist einfach jedes Mal wieder ein Genuss, die Box aufzumachen und diese Pracht zu bestaunen. Ich bin super happy mit der Entwicklung und freu mich riesig auf die letzte Woche 😊
2 likes
comments
Share
Used techniques
Defoliation
Technique
16
Week 16. Flowering2mo ago
65 cm
Height
10 hrs
Light Schedule
29 °C
Day Air Temp
6.9
pH
Strong
Smell
58 %
Air Humidity
0 °C
Solution Temp
25 °C
Substrate Temp
23 °C
Night Air Temp
120 liters
Pot Size
50 cm
Lamp Distance
MyLittleGarden Blütewoche 9 – Ernte in Sicht?
Zeitraum: 17. Juli bis 24. Juli
Blütetag: 56 bis 63
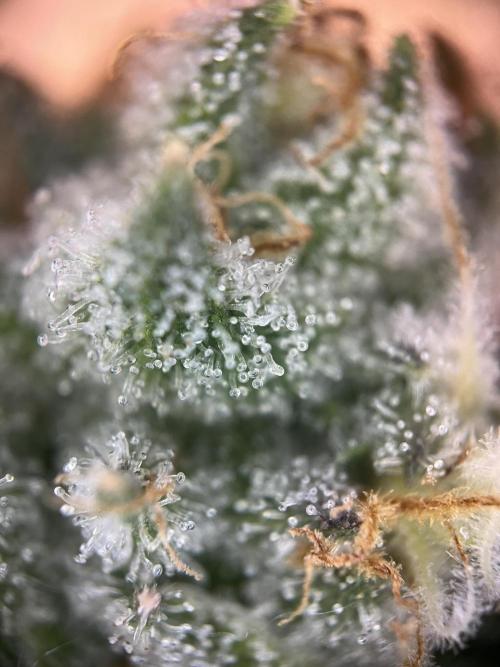
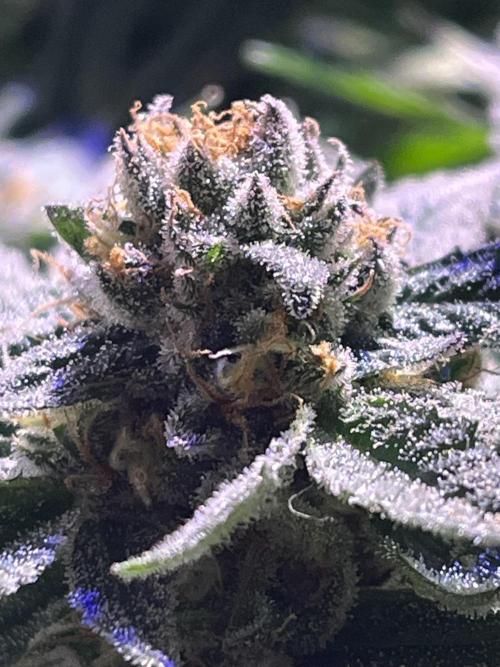
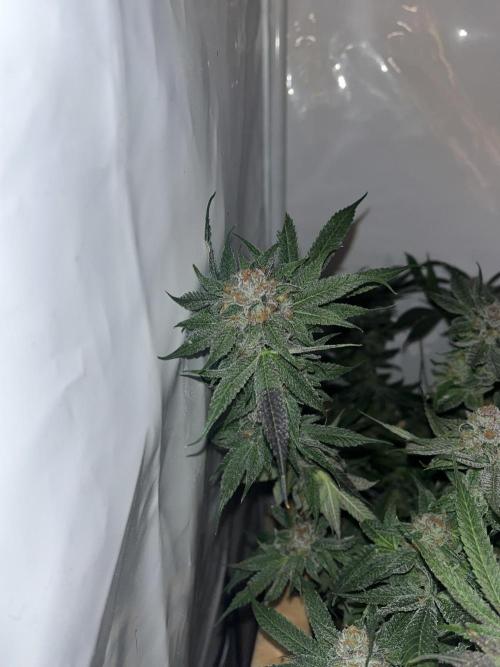
So langsam geht's wirklich dem Ende entgegen, die neunte Blütewoche ist rum. Ich hab mir diese Woche regelmäßig die Trichome unter die Lupe angeschaut. Einige sind noch glasig, viele schon schön milchig, und vereinzelt zeigen sich auch die bernsteinfarbenen. Es sieht also sehr vielversprechend aus, aber ich warte vielleicht noch ein bis zwei Tage, um noch etwas mehr Reife rauszuholen. Heute checke ich sie nochmal gründlich und entscheide dann, ob geerntet wird oder ob ich ihr noch ein kleines bisschen Zeit gebe.
Was ich in der letzten Woche gemacht habe. Ich habe den Lichtzyklus nochmal angepasst. Vom 18. bis zum 21. Juli lief sie unter 11/13, danach hab ich auf 10/14 runtergeschaltet. Damit wollte ich ihr signalisieren, dass es Zeit wird fertig zu werden. Zusätzlich habe ich die Lampe nochmal 10 cm höher gehängt, um die Lichtintensität etwas zu reduzieren und den Stress zum Ende hin minimal zu halten.
Gegossen habe ich nicht mehr. Man merkt deutlich, dass sie in der Endphase nicht mehr so viel Durst hat, das Substrat bleibt deutlich länger feucht.
Etwas Sorge hat mir die Luftfeuchtigkeit gemacht. Die war wetterbedingt ein wenig erhöht, lag aber mit 56–66 % noch im vertretbaren Bereich. Die Temperaturen waren nachts bei 22–25 °C, tagsüber bei 28–30 °C, also alles im grünen Bereich. Bisher sieht alles gut aus, keine Spur von Schimmel.
Jetzt steht also die finale Phase an. Die Ernte und das Trocknen. Auch das wird nochmal spannend, aber wenn das Wetter halbwegs stabil bleibt, sollte es gute Bedingungen dafür geben.
Das nächste Update kommt dann nach der Ernte, wenn die Buds getrocknet sind und ich ein erstes Fazit ziehen kann. Ich freu mich drauf!
5 likes
1 comment
Share
17
Week 17. Harvest2mo ago
Happy Harvest Day!


9/10
Rated
Absolut genialer Strain!
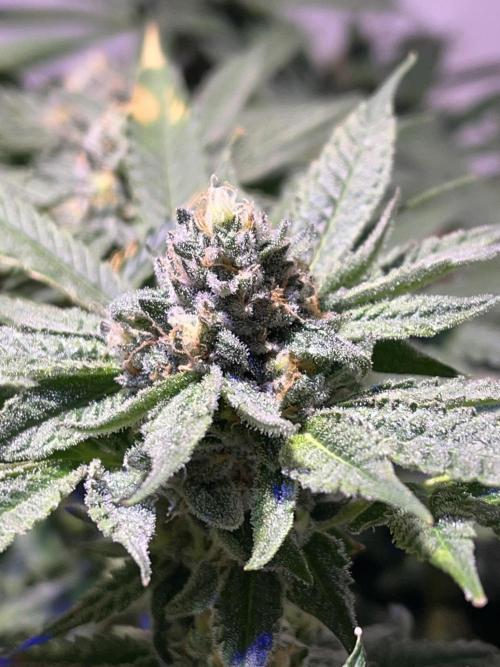
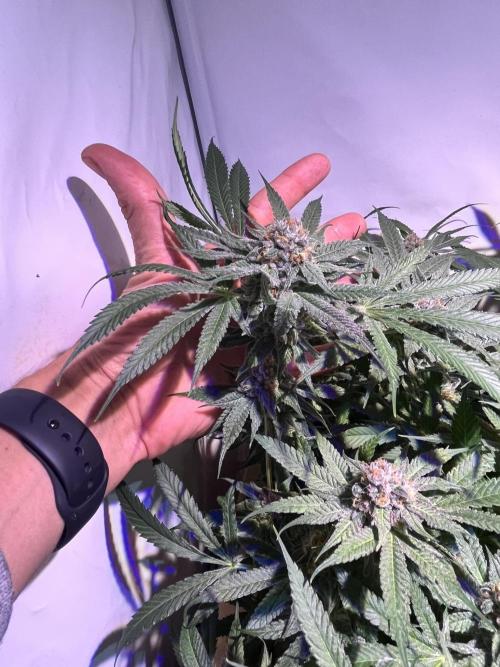
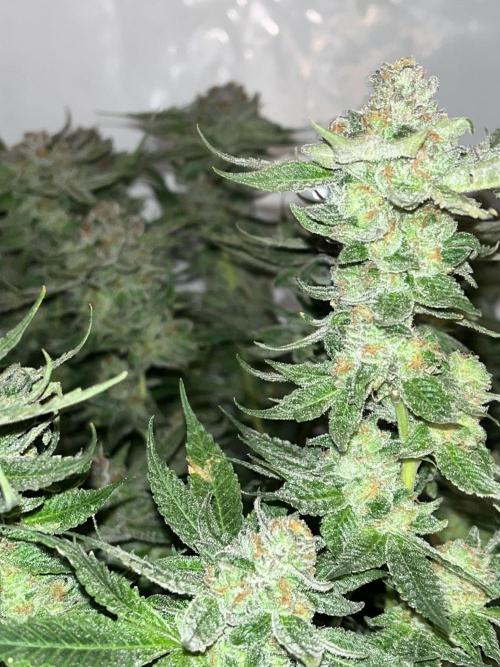
King Juice (Mimosa x King's Kush) ist ein stabiler, 60/40 Sativa-Indica Hybrid, der sich bei mir im Living Soil wohlgefühlt hat. Der Steckling war sehr stark und hat sich schnell an den Raum gewöhnt und prächtige, kompakte, steinharte Buds mit lila Verfärbungen gezaubert.
Schnelles Wachstum, gute Regeneration, starker Geruch schon in der Blüte: fruchtig, süß, blumig. Optisch, extrem harzig, wunderschön funkelnd.
Beim ersten Testen war ich direkt überzeugt: erdig, würzig, leicht süßlich-zitronig. Weicher Rauch, angenehm zu konsumieren. Die Wirkung kam schnell, Fokus, rote Augen, glasiger Blick, entspannter Kopf mit leichtem Druck an den Schläfen, aber kein Couchlock. Klarer Kopf, aktiver Körper.
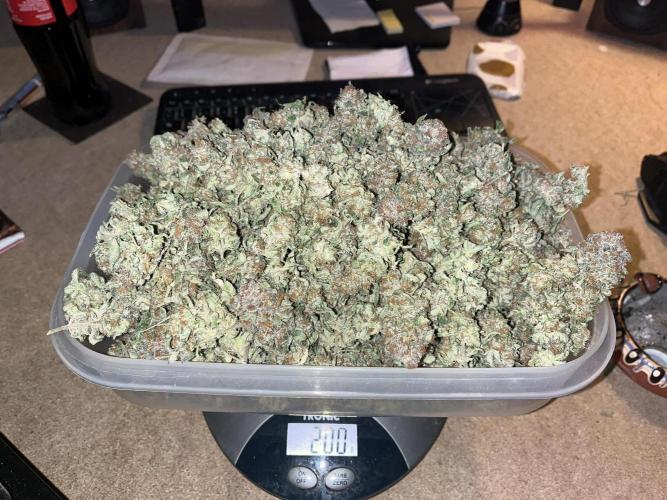
Ertrag: 0,6 m², 200 g mit ScrOG, mehr als zufriedenstellend!
Show more
Translate
Spent 113 days
Ger Veg Flo Har
750 g
Bud wet weight per plant
200 g
Bud dry weight per plant
1
Plants
0.6 m²
Grow Room size
Normal
Difficulty

Uplifted, Creative, Relaxed
Positive effects

Dry mouth
Negative effects

Stress, Insomnia, Anxiety
Medical effects

Earthy, Sweet, Fruity
Taste
Height
Day air temperature
Air humidity
PH
Light schedule
Solution temperature
Night air temperature
Substrate temperature
Pot size
Lamp distance
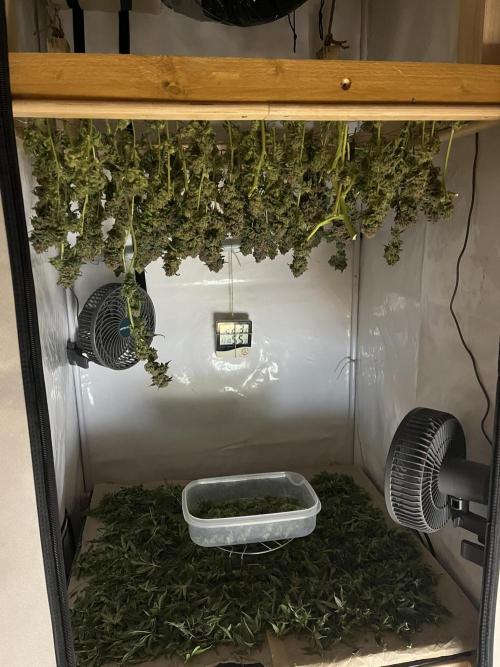
MyLittleGarden Blütewoche 10: Die letzten Tage
Zeitraum: 24.07. bis 28.07.
Blütetag: 63 bis 67
Nach rund 9,5 Wochen Blüte war es so weit, Erntezeit!
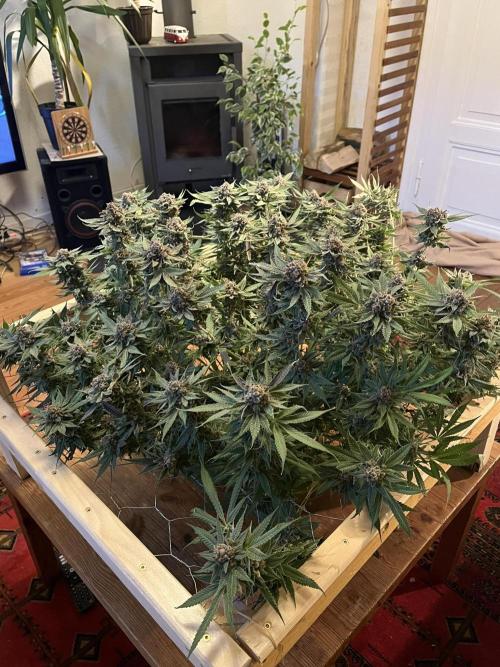
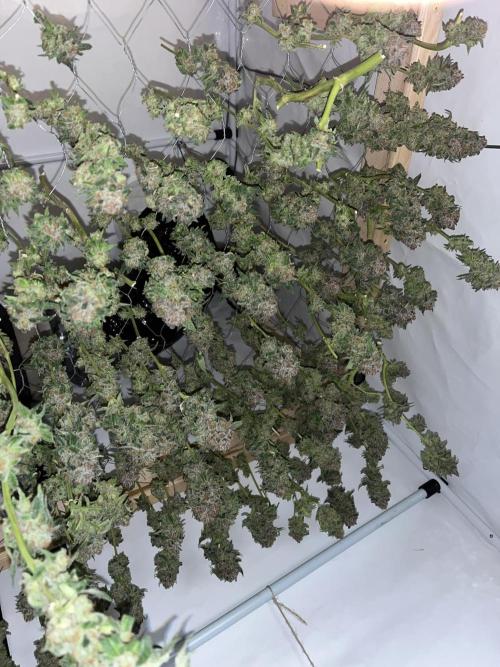
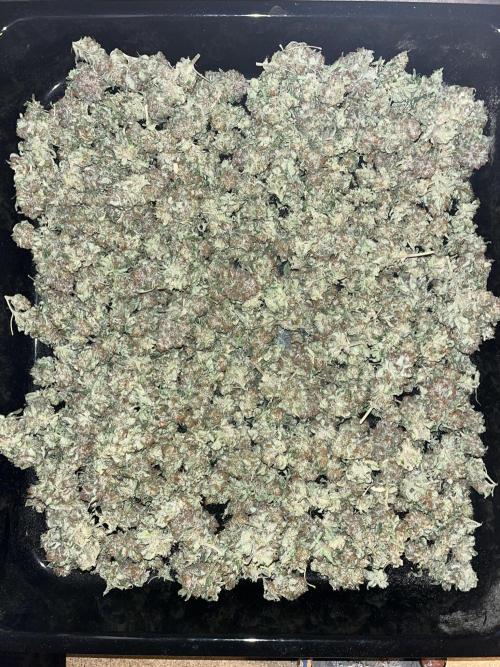
Die Trichome hatten genau das Verhältnis erreicht, das ich mir gewünscht hatte. Ich hab mir meine Japansäge geschnappt und die King Juice kurzerhand am Stamm durchtrennt.
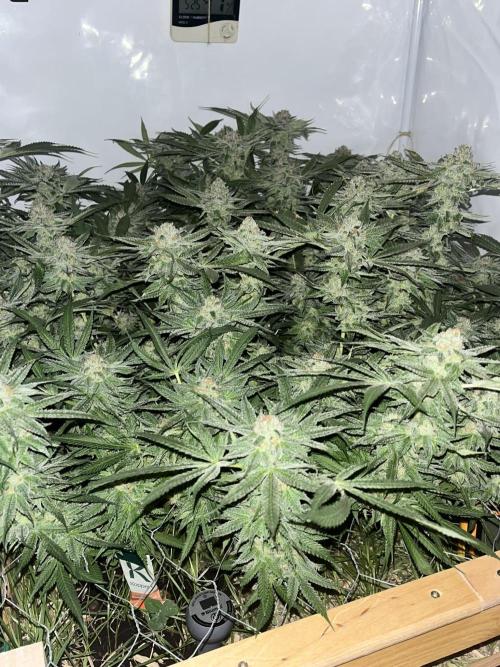
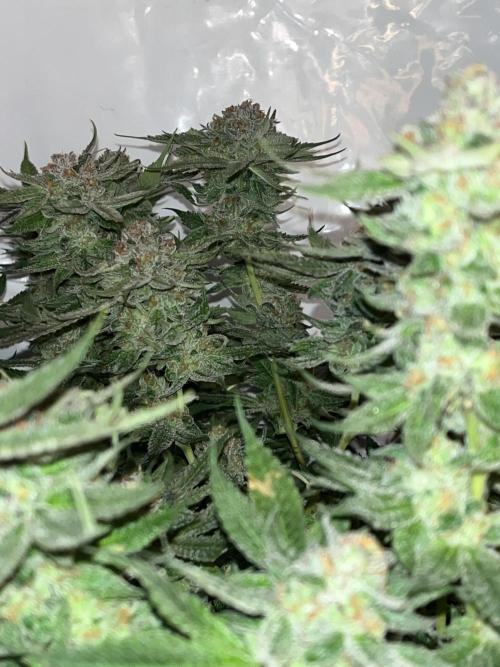
Danach hab ich sie vorsichtig samt ScrOG-Netz aus dem Zelt gehoben und sie mitten im Wohnzimmer platziert. Erst da wurde mir das ganze Ausmaß bewusst. Eine richtig große Pflanze, viele Triebe und eine Menge schöner, harziger Buds. Die Headbuds oben waren kompakt und groß, weiter unten gab’s viele kleinere Popcornbuds aber auch die waren fest und klebrig.
Nach rund 4 Stunden Trimmen hing das ScrOG-Netz wieder im Zelt, dieses Mal verkehrtherum und vollgepackt mit den einzelnen Ästen. Ein regelrechter Himmel aus Buds 😍
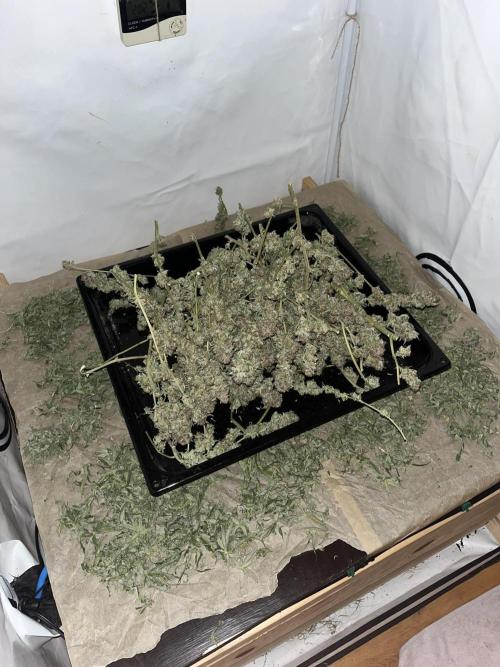
Die Trocknung lief optimal, Temperaturen lagen konstant bei 20–21 °C und die Luftfeuchtigkeit zwischen 54–65 %. Nach 10 Tagen habe ich die Buds am 07.08. final abgenommen.
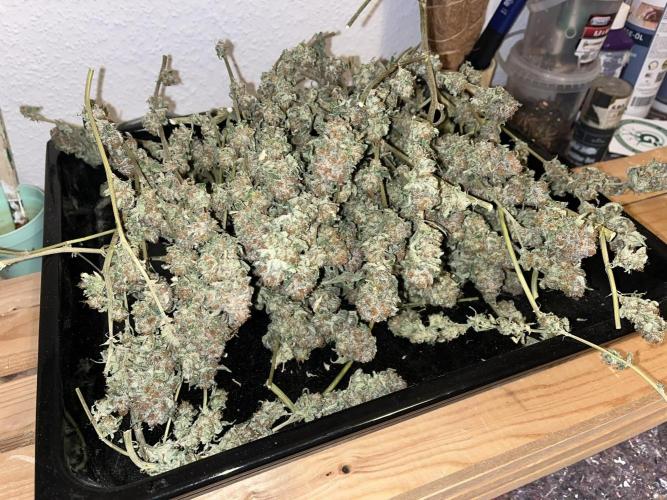
Ergebnis:
Nassgewicht: ca. 750g
Trockengewicht: 200 g
Optik: Kompakte, daumengroße Buds, viele kleine Harzbomben mit lila Farbtönen
Geruch & Geschmack: Fruchtig, süß, würzig, pfeffrig.
Wirkung: Sie knallt gut, ist aber trotzdem klar im Kopf. Sehr angenehm!
Fazit:
Ich bin mega zufrieden mit dem gesamten Grow.
Keine Ausfälle, kaum Mängel, Temperaturen und LF meistens stabil und das Beet hat wirklich gut funktioniert. Die Pflanze hat sich wunderbar an ScrOG angepasst, und ich konnte mir damit echt einen kleinen Traum erfüllen. Eine Pflanze komplett durchziehen, schön ausgebreitet im Zelt. genau so hab ich mir das vorgestellt. Es hat richtig viel Spaß gemacht! 😊
Die Vorbereitungen für den nächsten Run laufen bereits, das Beet wird wieder frisch begrünt und ich freu mich auf den nächsten Grow!!!
7 likes
comments
Share
Equipment Reviews


4 comments
Sort by
popularity
popularity
newest
oldest

555ABKY555 commentedweek 84mo ago
I like your indoor country style😁😁😁 it's fantastic compliments I also have a king juice but it's still dwarf just thrown out the door, good luck for the harvest, for the light excellent choice I like these beautiful LEDs they do their job😍😍
likes 2

Comfrey commentedweek 84mo ago
That‘s cool. Nice Garden to chill. Happy growing.
likes 2

Inganjawetrust commentedweek 162mo ago
Nice frosty looking nuggets, looks like it won't be long now.
like 1

cultivars commentedweek 113mo ago
@MyLittleGarden, what an amazing grow so far. I'm really quite intrigued by your approach to organics. Looks like you are on your way to a marvellous harvest. Best of luck to the finish line!
like 1

the end.
Enjoying this diary? Follow for more updates!


Prefer the old Diary view?
Go back to the old Diary view