
First Grow, Jack Herer Auto


VEG
Whosled Light Emitting Diodes/200W
Whosled
FLO
Whosled Light Emitting Diodes/200W
Whosled

Tent
Homemade
Homemade

Soil
Custom
Indoor
Room Type
LST
weeks 4-6
26 l
Pot Size
Start at Harvest
1
Week 1. Vegetation6y ago


2.54 cm
Height
16 hrs
Light Schedule
22 °C
Day Air Temp
6.5
pH
No Smell
Smell
51 %
Air Humidity
21 °C
Night Air Temp
26.5 l
Pot Size
0.72 l
Watering Volume
86.36 cm
Lamp Distance
Nutrients 1

Big Bloom
5.208 mll
Jerry101 Seed was soaked for 10 hours (until it sunk) then placed into rapid rooter in seedling tray. Used 16 hour light cycle with small clamp on 200 watt Full Spectrum LED Grow Light right above cover once sprouted. Took about 10 days for sprouts to be big enough to transplant. Soil is a mixed of 50/50 Miracle Grow potting soil and Miracle Grow Garden Soil. Added Summit Responsible Solutions Mosquito Bits into the top 3 inches of the grow bag soil to control any gnats and other insects that may infest below ground.
Jack Herer was transplanted into the 7 gallon grow bags. Grow bags were watered with 36 oz of water. Drip irrigation was set to 30 secs every 3 hours. System draws water directly from the dehumidifier reservoir. Drippers were set about 3 inches from plant. Set 1200w LED grow light to veg (blue) 16 hour cycle 34" from plants. 200w Full Spectrum LED Grow Light in front of seedling as well as 1200w led from above. Soil was too moist after 2 days so increased dripper interval from 30 seconds every 3 hours to 30 seconds every 4 hours.
Plant looks very healthy.
1 like
1 comment
Share
2
Week 2. Vegetation6y ago


5.08 cm
Height
18 hrs
Light Schedule
26 °C
Day Air Temp
6.5
pH
No Smell
Smell
65 PPM
TDS
49 %
Air Humidity
23 °C
Solution Temp
22 °C
Night Air Temp
26.5 l
Pot Size
0.42 l
Watering Volume
76.2 cm
Lamp Distance
Nutrients 2
Big Bloom
3.906 mll

Grow Big
1.302 mll
Jerry101 Soil moisture is high on the Jack Herer. Changed water cycle to 30 seconds every 5 hours. Water pH is 6.3. Soil moisture was still a little high by the end of the week. Plant was misted twice per day. Plant appears to be getting plenty of light.
Jack Herer still looks like a seedling. Not much height to it.
1 like
comments
Share
3
Week 3. Vegetation6y ago


5.08 cm
Height
18 hrs
Light Schedule
27 °C
Day Air Temp
6.1
pH
No Smell
Smell
65 PPM
TDS
49 %
Air Humidity
23 °C
Solution Temp
22 °C
Night Air Temp
26.5 l
Pot Size
0.34 l
Watering Volume
76.2 cm
Lamp Distance
Jerry101 Moved 1200w grow light from 34" above soil level to 30" and switched to full spectrum. Moved drippers on Jack Herer 180 deg. and closer to edge of grow bags. Rotated bag 90 degrees. Plants misted 2 times a day with water. Emptied dehumidifier and did not add nutrients. Dripper still feeds from dehumidifier tank. Assuming there are still plenty of nutrients in the soil. Soil still a little too moist. Changed drippers to 30 seconds every 6 hours.
Plants are starting to look less like seedlings. Taken on a deep green color. Almost doubled in height this week from 2" to 4".
1 like
comments
Share
4
Week 4. Vegetation6y ago


12.7 cm
Height
18 hrs
Light Schedule
27 °C
Day Air Temp
6.2
pH
Weak
Smell
250 PPM
TDS
49 %
Air Humidity
23 °C
Solution Temp
24 °C
Substrate Temp
23 °C
Night Air Temp
26.5 l
Pot Size
0.3 l
Watering Volume
63.5 cm
Lamp Distance
Nutrients 2
Big Bloom
2.604 mll
Grow Big
2.604 mll
Jerry101 Went back to adding a light amount of nutrients this week. Two tsp of Fox Farms Big Bloom and 2 tsp of Fox Farms Grow Big. Nutrients were added to a full dehumidifier reservoir and expected to last the week of watering from the drippers (about 2 gallons per week for 3 plants being watered). Soil moisture is still a little high. Increased dripper interval from 6 hours to 7 hours. Soil moisture was pretty much perfect by the end of the week. Temps in the grow room are remaining consistent at 72 deg F. lights off and 78 degrees when lights are on. Humidity got away from me (65%) when lights were off (cooler temps). Was letting the dehumidifier fill and shut off because the nutrients were in the dehumidifier reservoir. The dehumidifier is currently pulling more water from the air than 3 plants need. Began removing about 1/4 of the water from the dehumidifier reservoir every day and humidity came back under control in the 45% range with lights on and 50% range when lights off. Will need a scheme for adding nutrients to the tank reservoir while still removing water every day.
The plant is well out of the seedling stage now. It has a deep green color to the leaves and doubled in height from last week. Appears to be a very healthy plant. Vegetation is staying low, but bushing out nicely. Starting to get a little bit of smell in the grow area. Started LST this week on main stem with no ill effects on the plant. She is healthy and thriving. Will start focusing on odor control next week.
1 like
comments
Share
Used techniques
LST
Technique
5
Week 5. Vegetation6y ago


19.05 cm
Height
18 hrs
Light Schedule
26 °C
Day Air Temp
6.1
pH
Normal
Smell
252 PPM
TDS
50 %
Air Humidity
22 °C
Solution Temp
23 °C
Substrate Temp
22 °C
Night Air Temp
26.5 l
Pot Size
0.3 l
Watering Volume
55.88 cm
Lamp Distance
Nutrients 2
Big Bloom
2.604 mll
Grow Big
2.604 mll
Jerry101 So far so good. Soil moisture has come in perfect over last week. Will be keeping a closer eye on the dehumidifier this week not letting the reservoir fill up. Target humidity in the grow room is between 47% and 52%. this week. I moved this plants position in the grow room and rotated it 90 deg. clockwise to ensure even light. Still moving a 100w full spectrum gooseneck grow light to fill under the canopy where needed. Now that the plant is growing healthy I misted with Sevin Insect Killer. The plan is light misting once a week for a couple weeks until flowering. There are no signs of insects on the plants. It is preventative.
Odor control is becoming an issue because the plants are maturing and the grow room is open on top. There is a three stage HEPA air purifier in the grow room (rated to 200 sq ft) that has activated charcoal in stage 2, but that will not be enough. I ran an ozone generator for 30 minutes outside the grow room and it took care of the problem so far. I'm not worried so much about the ozone generator because it is in an unfinished basement where no people or pets go and it is not being run in the grow room itself. My plan is to run the ozone generator once per week or if the odor becomes overpowering. I also placed some Ona Gel Pro in a coffee can with holes punched in the lid outside the grow room. I also hung two Earth Care Janitorial and Industrial Odor removers in the grow room. With only 3 plants in the grow room and the basement being somewhat isolated from the rest of the house I don't anticipate odors to be a problem in the living areas. We will see.
Overall, the Jack Herer looks really healthy at begining of the week. All the leaves are a deep green. The is no evidence of disease, bugs, or stress. Will be in flower next week.
OZONE DAMAGE
Running the ozone generator like I did was a mistake. It was too much, too close, for too long. The ozone generator was run on Saturday. By Monday morning the damage on some of the leaves was evident. At first I wasn't sure if it was nutrient burn so I immediately flushed the dripper reservoir with clean water. I then went online to figure out what was going on. I researched possible affects of Sevin bug killer and found no real concerns. I found a picture of ozone damage that matched perfectly. Once I realized what it was and what to look for it was obvious. I ran a commercial grade ozone generator for 30 minutes pointed at the grow room about 8 feet away. There are 3 plants in the grow room. The plant closest to the generator was affected the most while the plant furthest was not affected at all. This Jack Herer plant was in the middle and moderately affected. I trimmed off all the affected leaves (see picture above), Mid week pictures are of the plant a day after ozone damaged leaves were removed.
I consider myself fortunate. Overall, it looks like the plant is still very healthy once the damaged leaves were removed. I added some of the water with nutrients back to the dripper water. Given the dose of ozone, any mold and bacteria that could have been in the grow area are probably gone. I still plan on using the ozone generator once a week to help control odor, but will be moving it 20 feet away from the grow room and only running for 10 minutes. I will obviously be monitoring it closely.
2 likes
comments
Share
Used techniques
LST
Technique
6
Week 6. Flowering6y ago


30.48 cm
Height
18 hrs
Light Schedule
28 °C
Day Air Temp
6.3
pH
Normal
Smell
272 PPM
TDS
51 %
Air Humidity
22 °C
Solution Temp
23 °C
Substrate Temp
23 °C
Night Air Temp
26.5 l
Pot Size
0.68 l
Watering Volume
45.72 cm
Lamp Distance
Nutrients 3
Big Bloom
1.302 mll
Grow Big
1.302 mll

Tiger Bloom
1.302 mll
Jerry101 Soil was a little dry at the start of the week. Reduced watering frequency from 30 seconds every 7 hours to 30 seconds every 6 hours. Added small amount of nutrients to water. Started using Tiger Big Bloom (just 1 tsp per gallon. Placed a bigger air purifier in the grow room. This one is rated for 840 sq ft. Should be plenty for a 24 sq ft room. Ran ozone generator for 10 minutes (20 feet away from grow room) at beginning of week. Added more Ona Gel to the coffee can outside the grow room. Spray a few spritzes of Fresh Wave outside the grow room. There is a faint smell in the basement where the grow room is located. No smell at all through the rest of the house. Odor mitigation at the beginning of the week worked well. There is virtually no smell in the basement where the grow room is located. Plant was turned 90 degrees clockwise at the beginning of the week to ensure even lighting. Removed yellowing leaves from the bottom of the plant. Plant was lightly misted with Sevin bug killer at the beginning of the week as a preventive measure. This is the last week for applying Sevin. Performed LST on 2 branches early in the week. Removed all LST wires on the plant at end of week. Plant is adequately trained. No other grow techniques are planned for this plant.
The Jack Here is the largest of the 3 plants in the grow room. On day two of the week, the plant looked healthy but the soil moisture is running critically low. It seems to be using more water than the other two. I don't want to overwater the other two by adjusting the dripper further so I added 60 oz of additional water to the Jack Herer on top of the 80 oz from the dripper by the end of the week with a light amount of Big Bloom and Tiger Bloom (1tsp per gallon of each). I think all the plants in the grow room will be calling for more water by next week. I will increase the dripper frequency for next week.
This plant continues to look good at the beginning of the week. Very bushy It doubled in height last week. It is fully recovered from the ozone damage last week. I will be watching it closely for any further damage. The plant is well into flowering this week. The plant continues to look very heathy at the end of the week.
1 like
comments
Share
Used techniques
LST
Technique
7
Week 7. Flowering6y ago


40.64 cm
Height
18 hrs
Light Schedule
27 °C
Day Air Temp
6.5
pH
Weak
Smell
557 PPM
TDS
49 %
Air Humidity
21 °C
Solution Temp
23 °C
Substrate Temp
22 °C
Night Air Temp
26.5 l
Pot Size
0.83 l
Watering Volume
45.72 cm
Lamp Distance
Nutrients 3
Big Bloom
1.302 mll
Grow Big
0.651 mll
Tiger Bloom
1.302 mll
Jerry101 Raised grow lights to 34" above soil. Soil moisture has been low all last week. Reduced dripper interval from 30 seconds every 6 hours to 30 seconds every 5 hours. Checked dripper and it is still pumping fine. Rotated the plant 90 degrees clockwise. Added more Ona Gel to the coffee can outside the grow room. Ran Ozone generator for 15 minutes 20 feet away from the grow room. Smell in grow area is still only faint with all the odor control techniques being used.
This plant looks really good. Plant is flowering fine. I will be watching some bottom leaves that are a little yellow this week.
By midweek, the Jack Herer Auto was still running a little dry. Added 24 oz of nutrient water each day on top of the water added through the dripper. A total of 96 oz of water with nutrients was added during the week on top of the moisture through the dripper. Began drawing water from a bucket instead of the dehumidifier reservoir to better ensure consistent nutrients.
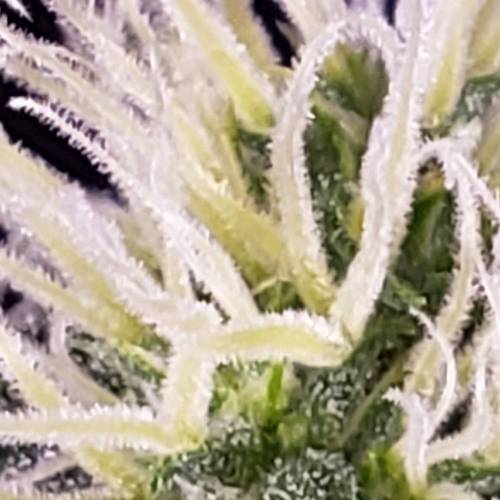
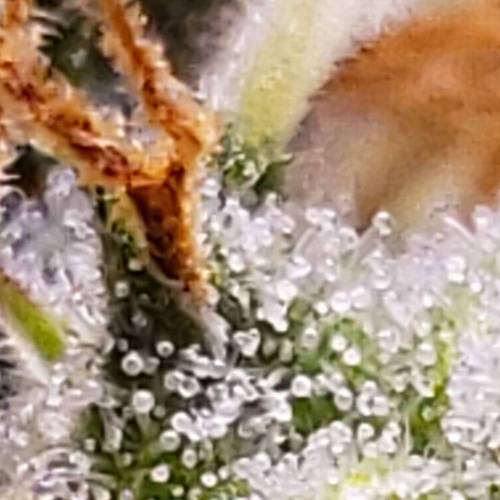
Removed a couple of the bottom leaves that had turned yellow. Trichomes are still clear. Pistals are barely starting to brown. I think it is about two weeks away from harvest. The odor controls in place are working.
2 likes
comments
Share
8
Week 8. Flowering6y ago


48.26 cm
Height
18 hrs
Light Schedule
25 °C
Day Air Temp
6.0
pH
Weak
Smell
307 PPM
TDS
45 %
Air Humidity
21 °C
Solution Temp
22 °C
Substrate Temp
22 °C
Night Air Temp
26.5 l
Pot Size
0.64 l
Watering Volume
43.18 cm
Lamp Distance
Nutrients 3
Big Bloom
2.604 mll
Grow Big
1.302 mll
Tiger Bloom
1.302 mll
Jerry101 Plant continues to be thirsty. Decreased dripper frequency from 30 seconds every 5 hours to 30 seconds every 4 hours. Rotated the pot 90 degrees clockwise to ensure even lighting. Flowers are still fairly immature but they are filling out. It looks to be at least 3 weeks out until harvest. Overall, this plant looks very good.
Mid week update: Soil moisture was running low early in the week. Added 62 oz of water in 2 days on top of what the dripper is delivering. I suppose efficient use of water indicates a healthy plant. There is no sign of distress. The buds are filling out, but still very immature. Pistils are just starting to change color.
2 likes
comments
Share
9
Week 9. Flowering6y ago


48.26 cm
Height
18 hrs
Light Schedule
27 °C
Day Air Temp
6.0
pH
Weak
Smell
18 PPM
TDS
60 %
Air Humidity
23 °C
Solution Temp
23 °C
Substrate Temp
22 °C
Night Air Temp
26.5 l
Pot Size
0.64 l
Watering Volume
43.18 cm
Lamp Distance
Jerry101 I didn't get to this until midweek. Humidity was higher than I like and Soil moisture was low. Rotated this plant 90 degrees clockwise to ensure even light. Added 48 oz of water on top of what the drippers are delivering. Drippers were also moved 90 degrees to ensure even soil moisture. Humidity was lowered to 45%. There were a few yellowing leaves removed from the bottom of the plant.
The tips of the fan leaves are turning brown with some curling. Water pH is good, soil pH should be good so I'm assuming the nutrients may be a little much. Began with pH'ed water only in the dripper. Will be adding water only with no nutrients for the rest of the week. Plant is still very bushy with many green fan leaves. Pistils are all still white and the trichomes are clear. There aren't as many trichomes as on the other plant. Buds are still filling out. This plant still has two or three weeks until harvest.
By the end of the week the buds are clearly still immature. The pistils are still mostly white, but about 80% of the trichomes are milky. The buds are not filled out. This plant still has a couples weeks before harvest.
2 likes
comments
Share
10
Week 10. Flowering6y ago


48.26 cm
Height
12 hrs
Light Schedule
24 °C
Day Air Temp
6.2
pH
Normal
Smell
15 PPM
TDS
48 %
Air Humidity
20 °C
Solution Temp
23 °C
Substrate Temp
22 °C
Night Air Temp
26.5 l
Pot Size
0.49 l
Watering Volume
20.32 cm
Lamp Distance
Jerry101 Plants were showing signs of nutrient burn on the leaf tips. Discontinued nutrients. Adding 6.2 pH water only through the dripper. I will most likely not add any more nutrients for the duration. There has been no height growth so I assume the plant is in full flower now. I switched the overhead lights to red only. Still using two full spectrum gooseneck lamps as well. The overhead lights were lowered. Overall, I want the plants to receive plenty of light, but I also want the temperature in the 75 degree range with lights on. The light schedule was switched to 12 hours. Turning off the blue light has brought the temps in the grow room down from about 80 degrees to about 75 degrees. Humidity in the room was brought down to 45% until harvest. Even though this is an auto-flower, the goal is to get the best conditions for the buds to fatten up now.
Just like at the beginning of every week, the plant was rotated 90 degrees clockwise to ensure even light on the plant. The plant is looking good. the buds are still immature and the pistils are still mostly white. The trichomes are turning milky. I think there is still two more weeks until harvest.
By mid week soil was a little too moist. Dripper frequency was increased from 30 seconds every 4 hours to 30 seconds every 6 hours. Leaves are starting to yellow a little bit. Buds look good. Flushing with water at 6.2 pH and 17 ppm total dissolved solids. No more nutrients will be added until harvest. Focus is solely on bud growth now.
End of week: The leaves on the bottom are starting to yellow. They will be removed as they turn color. Probably not much I can do about the nutrient burn. The miracle grow soil I used has time released nutrients (nitrogen). It is a race between the leaf damage and bud growth now. I don't anticipate it causing any problems. The buds should mature well before the leaves get too damaged. The next grow in this soil should do much better once the nutrients in the soil are used up. Still looking at 1 to two weeks until harvest.
3 likes
comments
Share
11
Week 11. Flowering6y ago


48.26 cm
Height
12 hrs
Light Schedule
23 °C
Day Air Temp
6.3
pH
Normal
Smell
14 PPM
TDS
46 %
Air Humidity
21 °C
Solution Temp
23 °C
Substrate Temp
21 °C
Night Air Temp
26.5 l
Pot Size
0.53 l
Watering Volume
20.32 cm
Lamp Distance
Jerry101 This plant is doing well. There is nutrient burn probably due to the time released nutrients in the soil. The plant is being flushed with 6.1 to 6.3 pH water. There are no more nutrients being added. Humidity is being controlled well between 40% and 50%. Temperature in the grow room is holding between 70 and 75 degrees F. Soil moisture is optimum. The overhead light is set to red light only. The gooseneck lights are still full spectrum, The only focus right now is just letting the buds fatten up.
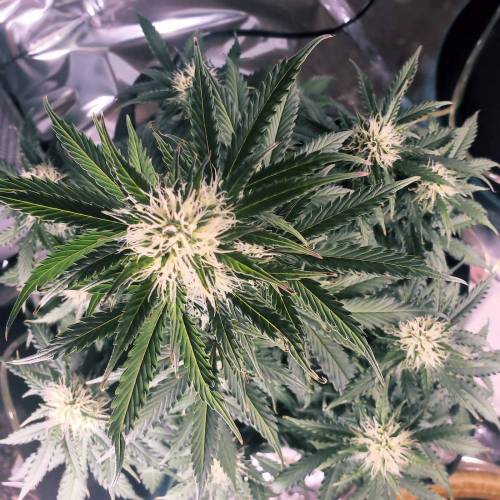
Beginning of week: Some of the leaves are becoming a deep purple. It should make some pretty buds. I am removing other fan leaves as they yellow. The trichomes are starting to turn milky and the pistils are turning a golden color. It still looks like this plant is about 1 to 2 weeks from harvest.
Mid week: Leaves are turning, but the buds are still fattening up. Pistils are still about 50% white. The trichomes are about 50% cloudy. Just waiting for buds to fully ripen now.
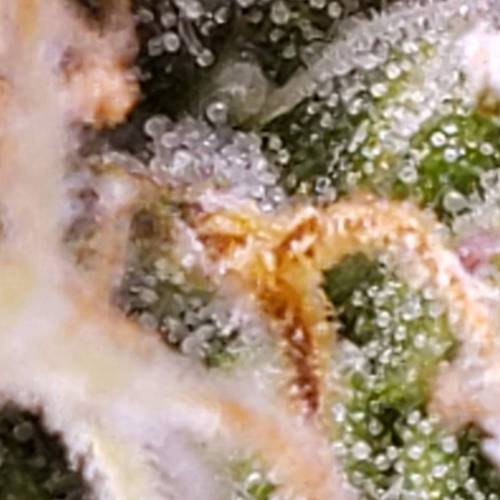
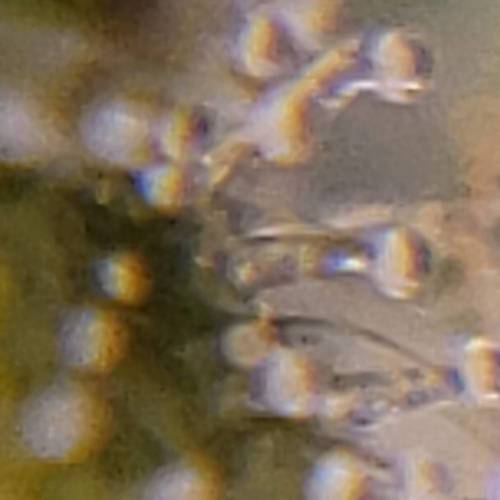
End of week: Removed a few more yellowing leaves. Soil moisture is about perfect. The plant is still taking in water. Humidity has been holding between 40% and 47%. Buds are fattening up. A few more cloudy trichomes are coming in. Starting to see some amber trichomes. More pistils are turning brown. I think this will be ready to harvest at the end of next week.
likes
comments
Share
12
Week 12. Flowering6y ago


48.26 cm
Height
12 hrs
Light Schedule
23 °C
Day Air Temp
6.4
pH
Normal
Smell
17 PPM
TDS
45 %
Air Humidity
19 °C
Solution Temp
23 °C
Substrate Temp
21 °C
Night Air Temp
26.5 l
Pot Size
0.34 l
Watering Volume
20.32 cm
Lamp Distance
Jerry101 Beginning of week: Rotated the plant 90 degrees clockwise. Soil moisture is right where I want it. Humidity is holding between 40% and 48%. Temperature is staying between 68 and 77 degrees F. The overhead lights are still set to red only. Still using the 2 full spectrum gooseneck LED for additional light. No nutrients are being added.
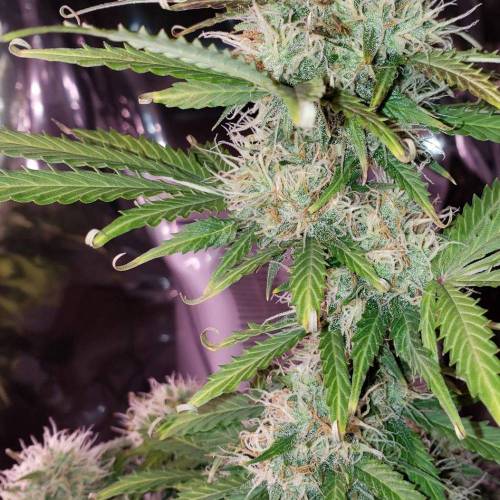
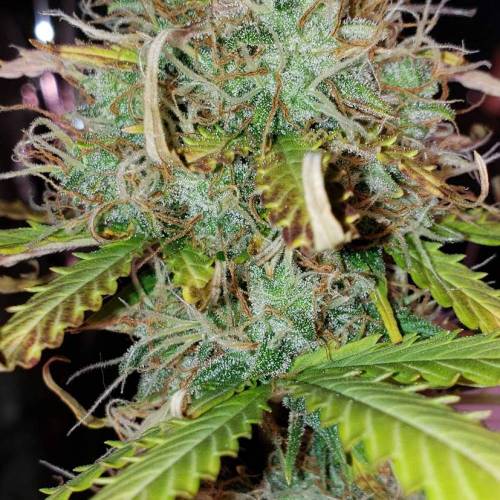
There are still about 50% white pistils. About 30% of the trichomes are cloudy. Very few if any are amber. I will probably harvest this one next week. More leaves are yellowing every day. The leaves are removed as they become completely yellow. The plant is still taking up water. The buds are still getting fat.
Mid Week: Plant looks good. More trichomes are turning amber. This one will be harvested at the beginning of next week.
End of week: Not much went on this week. Buds fattened up. No nutrients have been added for 3 weeks. Removing leaves as they yellow. This plant will be harvested tomorrow. It is ready.
3 likes
2 comments
Share
12
Week 12. Harvest6y ago
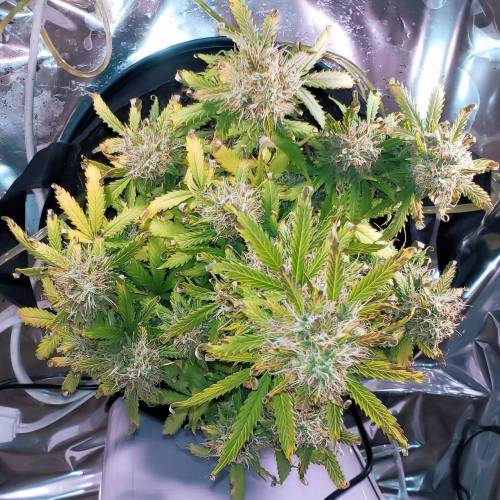
Happy Harvest Day!


7/10
Rated
This seed grew well. There were no real issues. I kept a disease free environment with growing conditions tightly controlled.
Show more
Translate
Spent 85 days
Ger Veg Flo Har
184.27 g
Bud wet weight per plant
35.44 g
Bud dry weight per plant
1
Plants
0.74 m²
Grow Room size
Easy
Difficulty

Creative, Relaxed, Uplifted
Positive effects

Dry eyes
Negative effects

Nutty, Sweet, Woody
Taste
Height
Day air temperature
Air humidity
PPM
PH
Light schedule
Solution temperature
Night air temperature
Substrate temperature
Pot size
Lamp distance


Jerry101 The buds were wet trimmed and put into a drying rack. Dry temperature is 70 degrees F with 45% humidity. Took 4 days to dry. Dry buds were trimmed and placed in sanitized mason jars for cure.
After a 2 month cure I did one hit. The smell in the jar is different. I'm not sure if that has to do with the drying process or the plant. It's a mild sweet earthy smell. It is an EXTREMELY smooth smoke. Loading my one hitter once was plenty. Very pleasant and relaxing high. There really weren't any negative effects. It lasted for about 2 hours.
4 likes
3 comments
Share


6 comments
Sort by
popularity
popularity
newest
oldest

amon_grows commentedweek 126y ago
Congratulations on your harvest @Jerry101! You rocked it!
like 1

Ferenc commentedweek 126y ago
Happy Growing! @Jerry101
likes

Jerry101 commented6y ago
@Ferenc, Thanks. So far it has been a good experience. Still need to make it through harvest, dry, and cure.
likes

BlazingSaddles commentedweek 125y ago
What schedule did you feed the nutrients?
likes

heizen commentedweek 126y ago
Nice grow mate, plants are looking good, keep it up, imma follow this one upclose.
likes
Jerry101 commentedweek 16y ago
Grow Room
The grow room is made from ¾” Schedule 40 PVC Pipe frame. Corrugated cardboard boxes lined with black duct tape on the outside and Vivosun Horticulture Highly Reflective Mylar Film (Roll 4’ X 50’ 2 Mil for $32) inside adhered to the cardboard with two-sided carpet tape. The cardboard panels were mounted to the frame using wire ties. Reflective mylar was also placed on the floor of the room. There are two shower curtains hung from the front with a white shower curtain facing inside and a black shower curtain to the outside. The white shower curtain should reflect some light back into the room with the black shower curtain absorbing any light getting through the white curtain. It is literally PVC pipe, cardboard, duct tape, wire ties, and a couple shower curtains. Since the room is in a dark unfinished basement it is open at the top (about 1 ft head space to ceiling). This should allow for adequate ventilation without the need for separate exhaust. See the Air/ Temperature Control section. The room is 4’ x 6’ but can be easily expanded with little investment. The room cost about $70 to build. It can be expanded to 12’ x 4’ for an additional $20.
Moisture Control and Watering
Humidity in the room is controlled by a Vremi 3,000 Sq. Ft. Dehumidifier ($280) for the 700 Sq. Ft basement where the grow area is located. The dehumidifier sits just outside the grow room. A Moistenland Automatic Drip Irrigation System ($48) is fed directly from the dehumidifier reservoir. Both duration and interval of watering is controlled. The ¼” dripper line feeds through the wall of the grow room. The moisture collected out of the air is used to automatically water the plants. No other water source is used. The water from the dehumidifier is about 6.1 pH with 65 ppm total dissolved solids (before nutrients). Nutrients are added directly to the dehumidifier reservoir each week as required. The dehumidifier is thoroughly cleaned and sanitized between each grow… including the filters. See Air/ Temperature Control for how mold and bacteria are controlled.
Air/ Temperature Control
The grow area is in a 700 sq ft unfinished basement. The home HVAC system is also in this space. The temperature remains consistent between 70 and 75 deg F. (21-24 deg C.) outside the grow room. Inside the grow room remains between 70 to 80 deg F (21-27 deg C.) depending on the time of day and whether the lights are running. There is about a 10-degree difference between lights on and lights off. There is no need for extra temperature controls. There is a Pure Enrichment PureZone Air Purifier - True HEPA Filter ($100) with a 3-stage filter that includes activated charcoal to reduce odors. The filter is rated for 200 sq ft so it should be enough for the 24 sq ft in the grow room. The air purifier is placed on the floor. It brings in air from the grow room blowing the filtered air up from the top of the unit. The fan in the purifier is set on high and expected to be the only thing needed to move air, eliminate mold and bacteria, and provide odor control in the room. The air purification filter is changed out for each grow. Again, the top of the grow room is open, so ventilation should not be a problem. I have a coffee can with hole punch in the lid Ona Gel Pro inside to help control odor along with a Earth Care Janitorial and Industrial Odor remover hung inside the room.
Lighting
The 6’ x 4’ grow room has 2 WHOSLED LED 1200W (230w actual) Dual Switch Dual Chip Plant Lamps ($110 ea) attached to floor joists above the room with a rope. They have blue, red, and full spectrum settings. They can be easily adjusted for height. There are also 2 Relassy 200w (45w actual) Full Spectrum Grow Lamp, Dual Head Gooseneck Plant Lights ($30 ea) used. Put another way, there are 4 100w full spectrum LED that can direct light as needed under the plant canopy. All lights are connected to a timer. Light cycle matches natural day/ night cycle.
Soil and Planting
The first grow with this setup is 3 autoflower plants (Bubblegum, Jack Herer, and OG Kush). A 6’ x 4’ grow room should be plenty of room for 3 plants. They are planted in JERIA 7 Gallon, Plant Grow Bags (12 for $26) with Hydrofarm 14” plant saucers (10 for $41) under them. The soil is a 50/50 mix of Miracle Grow Potting Soil and Miracle Grow Garden Soil. About 2 oz of Summit Mosquito Bits - Quick Kill (30 oz for $17) was incorporated into the top 3 inches of soil in each grow bag. This should control gnats and other soilborne insects. Plants were started in rapid rooter and seedling trays for the first 10 days before being transplanted directly to the 7 gallon grow bags.
Monitoring Grow Conditions
There are several parameters being monitored during the grow. Soil moisture and light are measured using a Kensizer Soil Tester ($14). The soil mixture used is known to have a 6.5 pH so the water pH is monitored using a Vivosun High Accuracy Pen Type pH Meter ($10). A General Hydroponics pH test kit ($23 includes pH Up and pH Down) is also used for the water pH to ensure accuracy. A Vivosun TDS sensor ($10) is also used on the water. Temperature and humidity inside the grow room are monitored using a Govee Indoor Temperature Humidity Sensor with Bluetooth ($13).
Nutrients
The watering schedule is about 12 oz per day per plant. It will fluctuate between 10 and 15 oz per day depending on soil moisture measurements. For 3 plants that comes out to about 2 gallons per week. Since the fresh soil mixture already has nutrients, the liquid nutrients are added directly to the dehumidifier reservoir once per week at about ¼ recommended strength. Fox Farm Big Bloom, Grow Big, and Tiger Bloom are used per the ratios recommended for growth stage. Used the Fox Farm Feeding Schedule as a guide (1/4 of recommended amount).
Overall Comments
There should be good control on grow room temperature and humidity. There is probably enough light for a grow room twice the size… or twice the plants using about 2800w LED total (600w actual usage). Light leaks are naturally controlled by being in a basement room with no windows and light schedule follows actual day/ night hours (the first grow is all autoflower anyway). The air in the room is purified with good ventilation. Watering is fully automatic with proper pH water and nutrients are added per schedule. The soil is the proper pH starting out in is protected against insects.
Grow room temperature and humidity is continuously monitored and charted via Bluetooth. Soil moisture is monitored daily and controlled through automated dripper settings. Light intensity is monitored and controlled via adjustable lighting. Water pH is measured daily using a probe and titrated weekly to verify accuracy. Total dissolved solids in the water with nutrients is measured daily. The grow journals for each plant can be found here.
likes

the end.
Enjoying this diary? Follow for more updates!


Prefer the old Diary view?
Go back to the old Diary view