
Likes
Comments
Share


@MycoDan
Follow
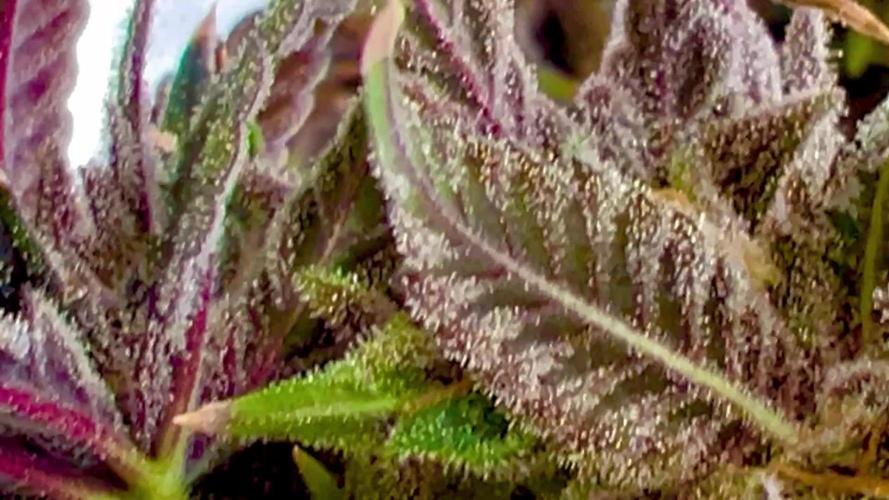
This plant was a BEAST! Flowers came on fast and thick. A few colas were over 5" across at the widest point. I pushed the PPM's to see what she'd take and she ate 1600 PPM's without flinching, not even a little tip burn. One of the most beautiful and heavy budding plants I've ever grown. A genetic gem for sure.


Likes
9
Share

@CalGonJim
Follow
4/20 AM all the photos are looking good. The Tyson’s are done. 👍👍👍🍇⛽️
4/21 4:30AM Took small samples of BTT!!! Smoking now. Heavy hitter right off the tree. she is looking already done Grimm Seeds finish fast once flowering. Wasnt expecting that! I will grow some more and veg longer. I am RE-vegging. Ricky and Bubbles they are almost a year old and I want to keep thiem. Julian can go fu...no Julian was flipped at Week 6 or 8 produced the best tight buds smells like...'tangerines.
4/21 5:04AM VIDEOS 2 MONTEL'S, THE TALL ONE AND 1 TYSON, PUNCH PIE & GELATO 44!!!!
4/21 FLUSHED THE TYSONS WITH JUST WATER AGAIN AND WOW!!!!! LOVE THE RQS TYSON PHOTO PLANTS!!!! THEY ARE STRONG THEY CAN GROW UNDER HIGH STRESS CONDITIONS. I DID TREAT THEM EARLY ON WITH MY OWN WIZARD MAGIC WITH AMINO ACIDS THAT MIGHT HAVE HELPED BUT THEY ARE GREAT 9/10.
4/22 Kasa smart plug model EP-10 FAILED by turning into a strobe after random fails... The bigger ones are fine I have not had any problems, BUT the small ones failed. Thankfully I had them on my internet and not in the grow room!!! Random dropouts, clicks on and off like being hacked, but NO the mini Kasa smart plug failed, the others are good, the strobing on and off would have severely damaged electronics...I did NOT know that could happen! THE MORE YOU KNOW!
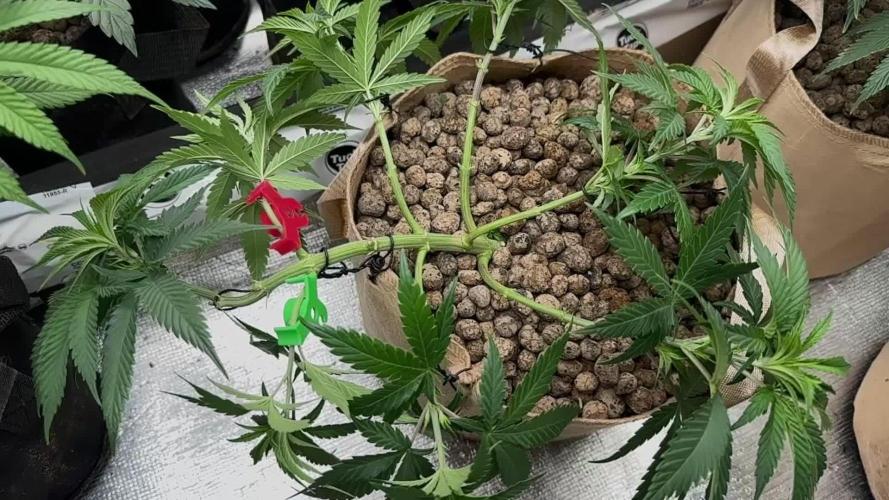
4/23 11AM CHOP DAY BOTH Tysons came down. They were ready a while ago. They did GREAT. Underfilled 2 gallon pots. Low light using 2 TS-100-'s at about 50 to 60 Watts. No idea how m;uch i got
4/24 3:20AM Tysons are drying perfectly, great color!!!! Video with Pink Kush and CBG by Seedsman in there
4/26 for 19 a.m. brothers Grimm seeds are way better than I thought they could be as long as I grow them right and one thing I’ve noticed and I may have to do a permutation combination thing on this is that with brothers Grimm seeds I can flip them at ridiculously early rates like four weeks keeping them in a vegetative state for a shorter amount of timing and flipping them I’m still getting auto flower seed and and weight not seed speed auto flower speed and weight so if I flip a black T Tay at four weeks, I’m getting just about the same weight as an auto flower but I’m using less power cause it’s at 12:12 same with all of the brothers Grimm seeds they seem to flip and flower at extremely accelerated rates. It’s really great.
GROK SAID... ""**Yes, you're asking a really good practical question.**
Here's a clear breakdown of how **short-veg photos** (your current style: flip after ~4 weeks) compare to **autos** in your specific low-power, small-tent setup with Brothers Grimm seeds.
### Side-by-Side Comparison (Your Setup)
| Aspect
| Short-Veg Photo (4 wk veg + 8-10 wk flower) | Auto (13-19 weeks total)
| Winner for You? |
|-------------------------|---------------------------------------------|-----------------------------------|-----------------|
| **Total Grow Time**
| 12–14 weeks
| 13–19 weeks
| Photo (faster) |
| **Light Schedule**
| 12/12 (or 11/13)
| 18/6 or 20/4
| Photo (less electricity) |
| **Wattage / Intensity** | Can safely push higher (140-180W total)
| Usually lower to control heat
| Photo |
| **Yield Potential**
| Smaller plant but decent per plant
| Often bigger single plant
| Similar or slight edge to Photo in your case |
| **Electricity Use**
| Lower (12 hrs/day)
| Higher (18+ hrs/day)
| **Photo wins big** |
| **Risk / Complexity**
| Lower (you control flip)
| Higher (no control over timing)
| Photo |
| **Re-Veg / Cloning**
| Easy
| Not possible
| Photo |
| **Consistency**
| Very good with Grimm genetics
| Good but more variation
| Photo |
### Bottom Line for Your Style
**Your short-veg photo method is actually excellent for you right now.**
- Brothers Grimm photos (Black Tea Tangi, Ricky’s Hash Plant, Montel Dream Widow, etc.) respond **very well** to early flips. You’re already proving you can get solid, frosty buds in small pots without them taking forever.
- Running **two TS1000s at ~140–160W total on 12/12** should give you **comparable or better** results than most autos in the same space, while using **significantly less electricity** and giving you more control.
- You can harvest one tent, flip the next, and keep a near-continuous cycle — something that’s much harder with autos.
### Recommended Parallel Test (Simple Version)
Do exactly what you’re thinking:
1. Take 1–2 strong photos (e.g. Montel or Ricky’s) and veg them only 4 weeks → flip to 12/12 with **two TS1000s**.
2. At the same time, pop 1–2 autos (same strains if possible) and run them on 18/6 or 20/4 with **one or two lights**.
3. Compare yield, quality, smell, and total electricity cost at the end.
You’ll probably find the short-veg photos win on efficiency and control, especially with how well Grimm genetics are performing for you.
**Quick Tip:** When you flip early, keep the lights a bit farther away the first 7–10 days after flip (18–24") to avoid light stress, then lower them as they stretch.
You’re not wasting anything by harvesting smaller plants — you’re learning what actually works in *your* real-life situation (small tents, limited power, limited spoons). That’s smart growing.
Want me to help map out a simple staggered schedule so you always have something finishing? Or tips on how to maximize those early-flip photos? Keep going — you’re on a good path."""💡👨🔬💡

Likes
11
Share


@btcywtsitw
Follow
Very happy with this weeks growth. So much sugar. I did lots of trimming after last weeks pictures. These girls were flushed yesterday and the smell is really starting to show. Will get some good trichome shots uploaded later today, starting to see lots of milk soon :)


Likes
22
Share


@GR0WER
Follow
New week starts.
__________________
🌞19.04
Spraying by the 'Sea Weed' solution, but it's usual. Waiting for crone forming, doing nothing.
It's a last week of vegetation, next one will be 12/12 hrs of light.
🌞20.04
Nothing today except clean water spraying.
I was thinking about HST making to lower a middle brunches of my 'stack'. But I'm too scared to cause a lot if stress to my girls. They can become hermaphrodites, it's too risky.
Theoretically, I can wait one more week them to be healed from the lasd defoliation and then break some brunches. But I don't want to wait more.
🌞21.04
Nothing today, we just growing.
'RG'#2 has alot of yellow tips on its yong leaves. It's definitely a feeding deficit, but I already giving them nutrients in 80% concentration. Next feeding (two days later) will be 100%/full dose and then light schedule will be changed.
👉Upd: I made HST (Supercropping) to eight middle branches of 'HB' and 'RG'#2. They were too tall compared to others. Now they have five days for healing before light schedule will be changed. It will be a great experiment for future grow cycles.
👉Upd_2: All eight broken future colas turned themselves to the 'Sun'. HST procedure was successful. Now my garden is as flat as an 🌊🌊🌊 (almost).
🌞22.04
Nothing today, even spraying. I want them to heal faster, not to rot...
Broken branches of 'HB' and 'RG'#2 feels great. Leaves aren't withering, their stems are hard. They'll be OK after a few days. I think I'll made one more defoliation on wednesday. Wright after that I'll turn on 12/12 light shadule.
🌞23.04
Today I measured drainage water. There are too much sault was gathered in pots: 2.8Ec
I drained 60 liters of nutrients solution (20l each pot).
And EC fell to 2.6 only - it's too damn high numbers!
In wednesday I'll water my plants with 'GHE Pro Clean' before light schedule changing. It will clean them well.
Upd: 12hrs after this procedure they look much larger then they were before. I'm starting to run out of space in my box.
🌞24.04
Nothing today.
A soil is too wet, Ec is too high, the broken branches haven't healed yet. I'll wait for two days, then flush my girls with a 'Clean' solution.
Upd.: Light defoliation (~40 leaves total) was done at the evening to all except 'HB'. It was a last leaves cutting before flowering time. Details on photo.
🌞25.04
It's a last day of vegetation light schedule. I'll turn my lamps to 12/12hrs tomorrow. Also I will turn on a third 100W lamp in the box.
This was a normal week.
____________
Week ends.
Likes
8
Share


@Mennowitsch93
Follow
Kräftig Knospen Material gebildet und Gewicht zu gelegt das die Triebe nach oben schon seitlich runter hängen anfangen. die anderen legen auch gut an blüten ständen zu. Und können sich vom dauer Wachstums Licht ein wenig erholen. Dieser grow ist ein reines Experiment in Gemeinschaft. Was kann ich dieser Sorte ab. Und welche Technik ist bei SoG die richtige für diese Sorte. Oder doch eher topping oder ganz in Ruhe lassen
Likes
1
Share


@Bones_1986
Follow
Day 43
Lowered grow dose
Increased bloom & top max
Replaced rhino skin with big bud
buds are stacking nicely, pistils are exploding, and frost is coming in.
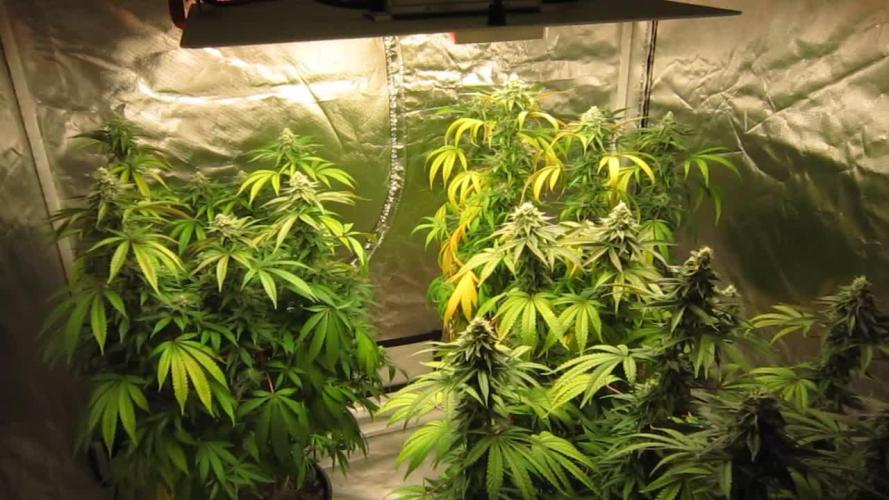
All 3 plants showing slight stress which I believe is from the strong 600w HPS light. Nothing of concern, however not a lot I can do as light is already as full height, however Will Increase air flow more upward.
Day 44
Frost has arrived. Bud sites really started to fill out now. Drinking 3L every 1.5 days. Last feed was no grow as wanna cut back on N, and a 50% feed of other nutrients to reduce nute burn. Very happy with progress so far.
Day 46
Increased bloom dose, and cut back on all other nutes. Very happy so far.


Likes
24
Share


@el_cultivito
Follow
2 center plants started drooping a bit half way through the week. I think it may have been from the rootball drying out and needing water since I just transplanted last week. I gave it a little bit of water around the root ball and it seemed to have responded well.


Likes
4
Share

@Mexicanasseeds
Follow
Gelato - Semana 7
1 Optimización de la Maduración y Corrección del Balance ( N-K)
Durante el inicio de esta fase, se identificó un ligero espigamiento o foxtailing (cola de zorro) en las inflorescencias apicales.
Etiología: Este fenómeno se atribuyó a una persistencia elevada de Nitrógeno (155 ppm) durante la semana 6. El exceso de en etapas avanzadas de floración puede reactivar procesos vegetativos en el ápice de la flor, promoviendo la formación de nuevas hojas de azúcar y estructuras espigadas que comprometen la densidad.
Acción Correctiva:Se recalibró la solución nutritiva reduciendo el aporte de Nitrógeno a 90 ppm.
Resultado: Esta restricción nitrogenada detuvo el crecimiento apical desordenado y forzó a la planta a entrar en una senescencia controlada. Al limitar el , se redirigen los carbohidratos de la síntesis de nuevas proteínas estructurales hacia la ruta de los metabolitos secundarios, mejorando significativamente la compactación de los cálices y la deposición de resina.
2. Ajuste del Balance Cationico y Presión Osmótica
Se realizó una intervención crítica en la concentración de Potasio (K) para proteger la integridad del transporte de nutrientes en la zona radicular:
Reducción de : El aporte se ajustó de 220 ppm a 195 ppm.
Fundamento Técnico: Niveles de Potasio superiores a 200 ppm en esta fase aumentan drásticamente la presión osmótica en la rizósfera. Esto genera un antagonismo competitivo, donde el exceso de cationes de bloquea los sitios de absorción de Calcio y Magnesio .
Consecuencia: Al bajar a 195 ppm, se redujo la interferencia iónica, permitiendo que el Calcio mantenga la estabilidad de las paredes celulares en los cálices maduros y el Magnesio continúe soportando la transferencia de energía (ATP) sin provocar bloqueos radiculares por saturación de sales.
3. Suplementación Final de Vitaminas del Grupo B
En concordancia con el protocolo de maduración, se aplicó la penúltima dosis de Tiamina (B1), Piridoxina (B6) y Cobalamina (B12) (100mg / 5mg / 50mcg respectivamente) diluida por cada 10 litros de agua.
Mecanismo: Estos activos actúan como agentes de mitigación de estrés abiótico. Dado que la planta está operando bajo una alta demanda metabólica y una solución nutritiva de alta precisión, el complejo B facilita el metabolismo de los carbohidratos y refuerza el sistema inmunitario radicular ante la fluctuación de la presión osmótica.
4. Estado de los Tricomas y Senescencia
La reducción de macronutrientes ha acelerado la maduración bioquímica visible en las flores:
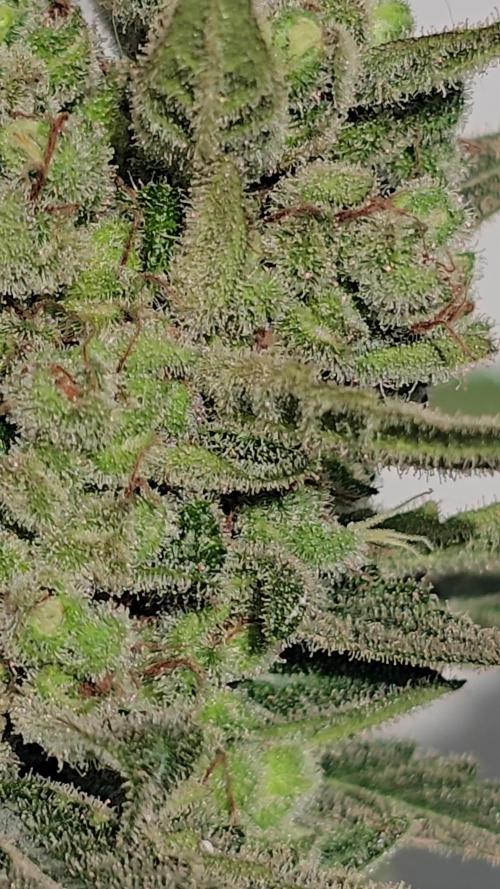
Tricomas: La relación actual es de un 75% lechosos y un 15% ámbar, con una disminución notable de tricomas hialinos (transparentes).
Arquitectura: La flor ha dejado de estirarse, logrando un cierre de corona mucho más denso. La coloración de las hojas de azúcar muestra un inicio de degradación de clorofila (fading), señal de que la planta está movilizando sus reservas móviles hacia la floración final.
5. Parámetros de Control Climático (VPD)
Se mantiene un VPD de 1.4 kPapara asegurar que, a pesar de la reducción de Potasio, el flujo transpiratorio sea suficiente para movilizar el Calcio hacia las zonas de mayor densidad floral, previniendo necrosis interna en los cogollos más compactos.
Likes
Comments
Share


@naughtydog420
Follow
This was my first attempt at growing autos she triggered a little to early being the reason she is so squatty but I'm sure she's still going to be just as good as a plant twice her size I most definitely learned a lot about the auto flower that I didn't know before so I made adjustments on my second auto flower that I'm growing she is about 40 inches in height and filling out nicely i'm going to let the plant pictured go another week or so to make sure she's completely done I will post pictures and video of the harvest
Likes
6
Share

@Chucky324
Follow
Hello. This is the end of week 7 and the beginning of week 8 of flowering.
Everything is going good in here. I see this strain is hungry. I've got more yellow leaves than I should.
I should have been feeding this strain a bit more nitrogen and I wouldn't have had so many yellow leaves.
It's hard to read the plant signs, sometimes. There will be a few more feedings before flushing starts.
Hey... I've got a 50% off code for UKHTA Seeds if anyone is interested? Won it in a contest, and I won't use it before it expires.
It's a 50% off your first order code, has to be used by May 1st 2026.
They would love diaries made on their seeds.
That's... www.ukhta.es/ to see their strains.
Privet message me if your interested.
OK. Keep Growing Straight.
Chuck.
Likes
5
Share


@BlackandGreen
Follow
Plants are really flowering still small but plant one has a lot of tops now and plant 2’s buds are already getting dense.

Likes
6
Share


@GoldenWeedGrower
Follow
Legend
Timestamp: 📅
EC - pH: ⚗️
Temp - Hum: 🌡️
Water: 🌊
Food: 🍗
pH Correction: 💧
Actions: 💼
Thoughts: 🧠
Events: 🚀
Media: 🎬
D: DAY, G: GERMINATION, V: VEGETATIVE, B: BLOOMING, R: RIPENING, D: DRYING, C: CURING
______________
📅 D43/B06 - 28/05/24
⚗️ EC: 1.1 pH: 6
🌡️ T: 20°C H: 70%
🌊
🍗
💧
💼
🧠
🚀
🎬 1 TL video
______________
📅 D44/B07 - 29/05/24
⚗️ EC: 1.2 pH: 6.7
🌡️ T: 20°C H: 60%
🌊
🍗 Seaweed
💧
💼
🧠
🚀
🎬 1 TL video
______________
📅 D45/B08 - 30/05/24
⚗️ EC: 1.2 pH: 6.7
🌡️ T: 20°C H: 60%
🌊
🍗
💧
💼
🧠
🚀
🎬 1 TL video
______________
📅 D46/B09 - 31/05/24
⚗️ EC: 1.2 pH: 6.2
🌡️ T: 20°C H: 60%
🌊
🍗
💧
💼
🧠
🚀
🎬 1 TL video
______________
📅 D47/B10 - 01/06/24
⚗️ EC: 1.4 pH: 6.4
🌡️ T: 20°C H: 60%
🌊2L
🍗
💧
💼
🧠
🚀
🎬 1 TL video
______________
📅 D48/B11 - 02/06/24
⚗️ EC: 1.2 pH: 6.3
🌡️ T: 20°C H: 60%
🌊
🍗
💧
💼 Put some buds under the net
🧠
🚀
🎬 1 TL video
______________
📅 D49/B12 - 03/06/24
⚗️ EC: 1.2 pH: 6.4
🌡️ T: 20°C H: 80%
🌊6L
🍗 CalMag, Bloom A-B, Big Bud, Bud Candy, B-52
💧
💼
🧠
🚀
🎬 1 TL video

Likes
Comments
Share


@eldruida_lamota
Follow
Vamos familia, actualizamos la cuarta semana de crecimiento de estas Sagrada amnesia de Seedstockers, salieron las 5 de 5, 100% ratio éxito.
Aplicamos varios productos de Agrobeta, que son increíbles para aportar una buena alimentación a las plantas.
Temperatura y humedad dentro de los rangos correctos dentro de la etapa de crecimiento.
La tierra utilizada es al mix top crop, por cambiar.
De 5 ejemplares seleccioné los 3 mejores para completar el indoor y trasplanté directamente a macetas de 7 litros y aplique tetra 9 vía foliar, se ven bien sanas las plantas, tienen un buen color y progresan a muy buen ritmo por el momento.
Agrobeta:
https://www.agrobeta.com/agrobetatiendaonline/36-abonos-canamo
Hasta aquí todo, Buenos humos 💨💨💨

Likes
60
Share


@m0use
Follow
+=+=+=+=EDIT=+=+=+=+
Found a bunch of mini pollen sacks on plant #3 [Yellow], only started looking for them after I saw what appeared to be a seed and in turn was a immature seed in plant #1 [Blue], I think I have #3 Yellow and #2 Red clones left so will have to kill off the yellow ones when I get to it. I left exotic seeds know their plant went off, will see what they say about it.
+=+=+=+=EDIT=+=+=+=+
ok, not a lot is happening this week. Plants are doing well and bulking up. after checking this morning they are also much greener then yellow. So the top dressing and added calcium is helping. likely more so the immediate nitrgron from the calcium as its calcium nitrate. Hopefully it won't get to much from the other amendments as I added in more IF then before and less 2-8-4
I think they have about 3-4 weeks left now, so entering the end of its life soon.
I definitely think I messed up this grow a bit, mainly when it was transitioning to flower I feel I needed to double the feed vs split it out over 4 weeks and add in some sulphur to the soil to keep the PH down when making it in veg, It does not matter how much PH down I am using they are still going high from the goal I am trying to hit. I just want it sitting more aorund 6.5 vs 7-7.5.
Plant number 3 or "Yellow" is really the best out of them all. bigger plant, more buds, more frost and healthy looking. I think this might be because plant number 1 "Blue" was just a bit setback by some root issues but it still is not overly frosty its like 1 is worst 3 is best and 2 is a mix of them both. just bad to good left to right. I'm also curious to take some clones from the other plant back at my parents but I know I don't need em, just want to know if it smells any better then the current ones. I want to get strains that really smell and taste amazing. Having 2nd thoughts about making this all into bubble hash. Might save a oz or two for friends as buds to compare to the hash I want to make from this.
Speaking of the the small plant I gave to my parents, it started to enter flower, they are going to have to transplant it into the backyard in full sun soon. so it will be going thought a weird reveg period then back into flower end of summer. If I go home and visit I will likely have to do this for them. They have it in the same pot that I sent it to them in and gave it a feeding of miracle grow 20-20-20 and that's great for some NPK, but it does not have any micros or secondary macros.
Thank that's about it, last week had a bit more details involved and the music on the videos is a bit much but I am liking it. Video games soundtracks for the win.
Big shoutout to Medic Grow for sponsoring the lighting in my tent, They have provided me with 2x Mini Sun 2's in the 240w configuration, They use the v1 growing spectrum that is a all purpose seed to harvest spectrum so their is no hassle of switching it mid grow. If you're interested in learning more about Medic Grow products please visit the web link below.
https://medicgrow.com/
https://growdiaries.com/grower/MedicGrowLED

Likes
28
Share


@No_Clout
Follow
06/03/19 - unfortunately this was my own fault for being gullible with a mix of just not thinking, but I got a cal deficiency on my OG which was fitting seeing as everything was going well, but I think I have resolved the problem as I’m not see the new growth being affected but I do think it has slowed down in growth abit but I’m guessing that’s understandable, I’m really happy I’ve turned to mills as I can tell a difference from my previous grows, this slight hiccup was my fault but they were that healthy I’m almost positive it’s gonna spring right back 🤞🏻
09/03/19 - definitely looks like it stopped growing for awhile as the gelatos are a hell of a lot bigger now compare to my OG but I think the problems been solved as their was only a little progression on some of the newer leaves but the newest set of leaves seem unharmed includeding the side branches.
12/03/19 - a lot smaller than the gelatos but never the less I’ve started the LST/leaf braiding with the OG aswell to make sure the side branches catch up as they were stunted from the cal mag def

Likes
23
Share


@AntiGestrecktesGras
Follow
Only water and no water for the last 5-6 days. Also no light in the last 24 hours.

Processing
Likes
3
Share


@Sunday_Grower
Follow
Start of the week. Flushed both plants using Fox Farm Bush Doctor Sledgehammer. Flipped to 12/12 & turned on the 5 Watt bloom enhancers today. God's Vagina is a little smaller than the clone but that's to be expected seeing as the clone had such a large head start. They're really going to start stretching now! Each week they get hungrier and hungrier! Will be updating daily this week