The Grow Awards 2026 🏆 


Likes
Comments
Share
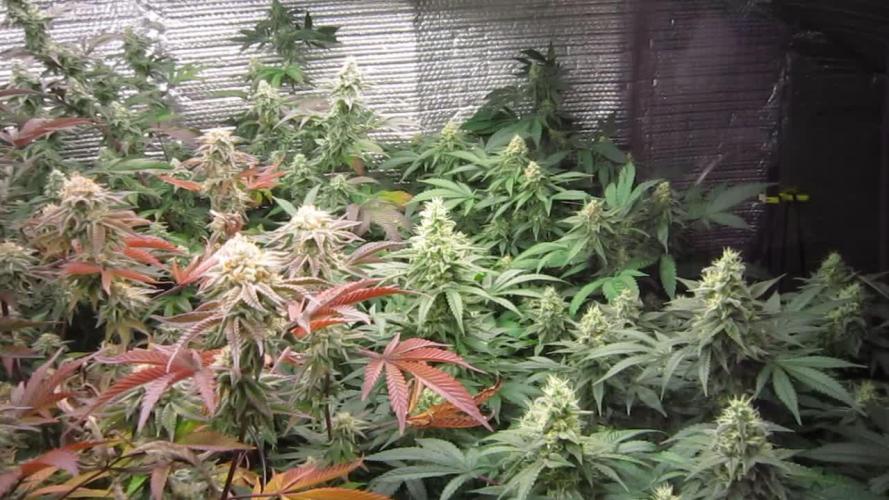
@roro_204
Follow
For about a week now the nights have gone 12/12
I put them at 1000w in the beginning but they became too hot as they grew taller and started burning the tops of my plants.
I switched the lights to 750w until i finish setting up the inline fans bringing in the natural cool air from outside.
im hoping that way the lights wont burn my babies.
With some help I did some light, minor "lollipopping" and defoliation on all plants.
I want to see how the plants react then next week I may continue.
So far the plants are enjoying their new feeds.
Likes
1
Share
@Chucky324
Follow
Hello This is the end of week 6 and the beginning of week 7 of flowering.
These plants will go for Meds as well as smoking.
Showed some pictures of the Rick Simpson Oil I've made and I made a gallon of tincture too. Pics are for the extract contest.
I take the tincture when I forget to take my oil or I need a break from the oil.
I try not to eat much acidic food and drink... That helps too.... try to eat alkaline as much as possible.
But all the good tasting food is acidic. I try to avoid sugar too. Cancer likes sugar.
One of the Pink Kush plants leaves are going a yellow a little early.... Wonder what's wrong.... got to look into that...
3 More weeks to go before harvest.... Lots of Fun...
OK. Be Great.
Chuck.


Likes
20
Share
@Hashy
Follow
Week 4
Light cycle=18/6
Light Power=120w
Extractor controller settings
High temp= 25c
Low temp= c
Temp step=0c
High Rh= 58%
Low Rh= %
Rh step=0%
Speed max=7
Speed min=1
Smart controller settings (during lights on).
Lights on=06.00am
Radiator on= below 21c
Radiator off= above 22c
Smart controller settings (during lights off).
Lights off=00.00am
Radiator on= below 18c
Radiator off= above 19c
VPD aim=0.6-1.3
DLI aim=28-34
EC aim=1.7
PH aim=6.3
Thur 18/1/24
#2 (Day 22)
📋
💧💧💧💧💧💧💧💧💧💧💧💧💧💧💧💧
Method= manual
Total volume made=10L
Neutralise=0.1ml/L
Roots=0.25ml/L
Easy Ph down=0ml/L
Feed=Water
Volume=2.5L
Ec=0.2 PH= 6.5/6.6
Time=8.00pm
Runoff.
Total runoff=120ml
Ec=2.28 PH=5.6/
💧💧💧💧💧💧💧💧💧💧💧💧💧💧💧💧
11.00pm Increased light power from 100w to 120w.
Fri 19/1/24
#2 (Day 23)
📋 Looks ok
Cold spell seems to be going now.
Sat 20/1/24
#2 (Day 24)
📋 Lst the 4 colas.
H=26cm D=45cm DLI=29.5
Sun 21/1/24
#2 (Day 25)
📋 Broke a cola off and stuck it back on.
💧💧💧💧💧💧💧💧💧💧💧💧💧💧💧💧
Method= automatic
Feed=nutes
Test run while setting drip rates.
Total volume made=12L
Total volume left=1L
Neutralise=0.1ml/L
Silicon=1.0ml/L
Calmag=1.0ml/L
Terra grow=3.0ml/L
Roots=0.2ml/L
Easy Ph down=0.125ml/L
Volume=2.75L (Est)
Ec=1.7 PH=6.3/6.4
Time=7.00pm
Runoff.
Total runoff=3L
Ec=4.6 PH=5.6/5.7
💧💧💧💧💧💧💧💧💧💧💧💧💧💧💧💧
Mon 22/1/24
#2 (Day 26)
📋 H=31cm D=40cm DLI=36.2
Raised light 8cm
H=31cm D=48cm DLI=29.0
Snapped cola is recovering.
Tues 23/1/24
#2 (Day 27)
📋
Wed 24/1/24
#2 (Day 28)
📋 H=36cm D=43cm DLI=32.2
She is doing OK considering what she been through. So the cola I broke off and grafted back on looks like its going to be fine, I'll have to be careful with it from now on.
Back soon.
Take it easy.

Likes
18
Share
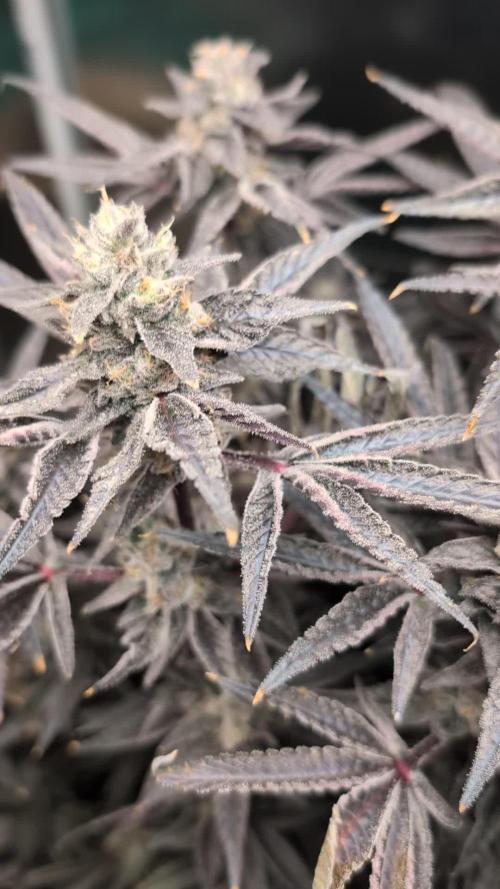
@SintrexGrow
Follow
This is my first coloured cannabis strain and this red critical Autoflower from BSF seeds is an amazing strian.
The smell of the buds is so fruity. Cant wait to harvest this red plant.

Likes
132
Share
@Crashoverite
Follow
Hi all👨🌾👋
Welcome to my another week update
Hope everyone keeping well 🧑🌾
Week 6
Mar 8 - Mar 14
It was another easy and exciting week. Everything going absolutely great. Both girls stretched nicely despite selective defoliation on Mar 9. They bounced back almost immediately. Started adjusting mixtures towards removing fish mix completely and replacing with Bio grow. In coming week will adding bio bloom and top max to mixture. There was 2 waterings of 3ltr on Mar 9 + last foliar feeding and second on Mar 13 and it was first large feeding 6 ltr beetwen both. Surprisingly only a few drops of runoff. Watering in stages of approx. 500ml every 20-30min. Decided to not install a scrog this time as want to have opportunity to apply more old school methods of training and to be able to remove/rotate girls easily. Let's see if this will pay me off. So far girls enjoying my care very much 😁🧑🌾
Thank you very much for all your likes, follows and comments. 🙏💚❤️💜
Wishing you all amazing rest of the week✨🍀
Peace and love brothers and sisters 👨🌾✌️💚
Stay tuned for new week update soon
Links
https://2fast4buds.com/seeds/TROPICANA-COOKIES-AUTO
https://www.biobizz.com/
https://fishheadfarms.com/
Likes
8
Share
@Dabking
Follow
Plant 1: 2.40 Oz dry (chopped day 84)
Plant 2: 4.85 Oz dry (chopped day 88)
Happy with them so far. Will update post cure and smoke report.
Likes
5
Share
@GermGrowFox
Follow
3. November
Alle drei Pflanzen weiterhin topfit.
Trauermücken aufgetreten. Habe das abgelaufene Päckchen nematoden für die runtz genutzt. Hoffe es bringt was
4. November
Cookies Gelato hat den harten Mainlinecut bekommen. Spitze wurde entfernt, Seitenteile wurden direkt danach abgeschnitten. Sie wird’s schon wegstecken.
Tropimango und runtz geht’s gut :)
Cookie gelato hat bereits wenige Stunden später die Blätter wieder hoch gestreckt. Stagniert.
5. November
Alles gut. Die Schnitte wurden gut verkraftet. Triebe wachsen wieder
Cookies gelato ist nun 21 Tage alt.
Tropimango ist nun 18 Tage alt.
Runtz ist nun 7 Tage Alt.
7. November
Cookies gelato wächst. Sobald die Klammern da sind wird sie runtergebunden
Tropimango hat schnitte und Lst bekommen. Topping werde ich noch abwarten.
Runtz wächst
8. November
Cookies gelato hat LST + mainlineschnitte erhalten. Wurde nicht mit gießen kombiniert da ich gestern gegossen habe.
Tropimango erneut LST.
Runtz wächst. Sieht aus als würde sie langsam ins Wachstum wechseln. Erster Triebe am einzahnblatt kommen. Dreizahnblatt erst frisch entwickelt.
9. November
Cookies gelato wurde das erste mal zusätzlich mit Sugar Royal und calmag versorgt. Hab’s davor vergessen 😅 Shit Happens.
Wurzeldünger gibt es konstant weiter.
Runtz wurde mit wurzeldünger und calmag versorgt
Tropimango hat noch sehr feuchte Erde. Keine Ahnung wieso.


Likes
13
Share
@Ledbelieve
Follow
Really good week with this lady. She is putting on weight in all the right places. Sprayed with BT and neem oil last night. Gave her 1 feeding this week and 3 waterings. Gave her a little hair cut to allow more air flow. Getting close and super excited!! Happy growing!!

Likes
4
Share
@Filiaes
Follow
18.06
A way more late update of this grow as I usually provide for two reasons - first I didn't had any time to control or keep care of this grow during the last weekend, second: due to the first point I run into a problem I needed to identify before I update my journal. As you can see in the video there is one plant with some kind of brown leave tips and yellow sugar leaves. I am not 100% sure why this happened but I think it could be some kind of wind burn. I didn't noticed that one slot of my power strips wasn't working anymore, this slot was turning on and off some fans. So the fans just blow straight at least for two days in a row against the plants. Beside that I raised the speed of my main fan a bit a week ago and the plant that is the nearest to this fan show the signs on the leaves I notice here. So I fixed the fans and observed the plants a bit more in detail the last days. The problem didn't developed further so I think this is fine now. There can also be some other reasons, as I wrote last week I changed a bit my nutrient scheme but since I wasn't above EC 2 at all I am not really comfortable with this theorie. Anyway, I closed the tank from sunday to monday so the plants just had what was left in the autopot system and used that until the next light schedule. Afterwards I changed my nutrient scheme back to the classic Hesi scheme. The plants are really well, the trichomes are still clear so I think we have at least until 3 weeks to harvest. The plants will become next week full scheme, afterwards I will check the trichomes again and decide if I start to reduce the scheme or not as we come closer to the harvest.

Likes
9
Share
@pzwags420
Follow
On day 1 the rez is at 6.2. The highest cola is 8.5" from the light.
On day 2 the rez is at 6.2. The highest cola is 7.75" from the light.
On day 3 the rez is at 6.1. The highest cola is 7.5" from the light.
On day 4 the rez is at 6.3. The highest cola is 7.125" from the light.
On day 5 the plants are smelling and doing well.
On day 6 I changed out the rez and PH to 6.1. The highest cola is 7" from grow light stretch is deff slowing down and should be over shortly. My avg PPFD at canopy is around 800.
On day 7 the rez ph is 6.0. The highest cola is still 7" away from light 😅 close but not too close in my small space.

Likes
6
Share
@SelfmadeRu
Follow
week 3, the whole family is here
3-gal: Runtz from un-feminized seed - showing female!
3 - gal: Grape Stomper from un-feminized bagseed - showing female!
1 gals:
two are black ice gelato from un-feminized bagseed - hoping female!
remaining are all fem from SeedSupreme
5 gorilla zkittlez
2 amnesia haze
1 bubblegum
last two photos show our 720W Ion LED from Grow Gen that came in yesterday! Note that if you purchase this beasty light you should get S-HOOKS from Amazon or wherever for the tallest hanging option.
We are on our way.
my 10ml dosing syringes just came in as well as my pH calibration kit.
I am running a hybrid philosophy when it comes to Medium and feeding.
70/30 Coco/perlite with the following added in for a "living coco" environment: worm castings, bat guano, kelp meal, alfalfa meal, mycorrizhae, and then I'm giving keyword LOWDOSE GENERAL HYDROPONICS FloraGro,FloraMicro,FloraBloom to supplement any nutrients the amended coco can't or isn't providing. Anyone with experience with this?

Likes
134
Share
@DogDoctorOfficial
Follow
One more week and this Girl is just fantastic, i can already see the great genetics on her, and let me tel you, despise the fact that her next door got infected wit freaking thrips and on this side so far i have seen none , that also means she is stronger than the rest on that field, and that she is healthy and it all, non so ever i ordered a bunch of beneficial bugs and some nematodes and i will apply a IPM ( integrated pest management ) just in case, as soon as the mail arrive and i apply them i will take pictures and explain the all process and why is so important to do it , the pros and what may or may not happens wen not applied and growing in organics.
Any way she is doing great, she still growing and stretching if you guys prefer the term, and her inter node is just perfect, this one will produce great fruits i can already see them in my mind , lets keep giving her love and see how she keep reacting to it.
For this week no changes on her food recipe but if she keeps at this pass i will start adding extra K , but for now i believe she still doesn't need that extra K boost, i want her to finish completely her grown and after i will start working on her fruits <3 <3 <3
As always thank you all for stoping by, for your time, your love and for it all, i am truly blessed with you all.
All info and full product details can be find in can find @
https://dutch-passion.com/
https://aptus-holland.com/
#aptus #aptusplanttech #aptusgang #aptusfamily #aptustrueplantscience #inbalancewithnature #trueplantscience #dutchpassion #dogdoctorofficial #growerslove
With true love comes happiness , Always believe in your self and always do things expecting
nothing and with an open heart , be a giver and the universe will give back to you in ways you could not even imagine so
More info and full updates @
https://growdiaries.com/grower/dogdoctor
Growers love to you all
P.S. reminder no emogies other way the text just puff and its gone lol 😆💚

Likes
35
Share
@Eryan
Follow
Day 42 - Kinda crazy how fast it's gotten to be day 42 (the meaning of life - *) in the grow. Haven't watered yet. Plan on doing that with the above nutrient schedule tomorrow or the day after. And I think that might be the last time I give any nutrients to the plant. Pistils are beginning to curl, and I've seen (just a few) amber tirchomes on one bud. I want to harvest on the earlier side because I don't want this harvest to have a big couch-lock effect. Prefer a more cerebral high, although some bodily relaxation is nice too.
So I think I will be harvesting at the latest by April 10th (Day 56). Of course I will continue to watch how the plant develops and if no further trichomes are turning yellow/brown in a week, I'll wait longer.
The trichomes on the sugar leaves have a wonderful lemon citrus smell by the way. Not what I was expecting, but that's fine 😛
Day 45 - Made a video of the trichomes. They definitely look cloudy enough to me. No more nutes for sure, harvest in 10 days max I think.

Likes
35
Share
@Ganjagrandaddy
Follow
Hi all.
So here we are at the end of another week and its now time to admit a slight defeat with the recovering ladies !!!!.
I am not under any illusions that they will fly and take over now so need to flip to 12/12 for the sake of the Amnesia and time constraints.
I am impressed they survived the root rot at all so a small stunted bud on a stick is better than no bud at all. I am hopeful the Amnesia will showcase how good the genetics from Sweet seeds are and not damage their reputation with my heat damaged and root issues.
Red Hot Cookie has been struggling to get over her rot. She does not look too good but is alive. I will keep her happy and see how she comes through.
Sweet Afghani Delicious has done well to grow this week but she has now taken a small christmas tree appearence. I expect she will also remain a midget for the finish , heres to hope.
Amnesia Haze is stomping it in her Soil pot. Her week has been very productive. She is covered in mains and even the middle of the plant is forming another ring of mains. I have put them into different positions now and moved the lights around to get the best out of the new SP3000.
She is spread out to get even more light as the stretch period takes hold. With decent raining out , i am hoping to get a very good yield from her. Her limbs are solid in strength but still bendable so should help train her out more. I also have the sp250 to give additional side lighting with the tsl2000 forneven more par if needed later in flowering. She is feeding well bybjer looks and takes about 8L before any runoff. I plan to add another round of amendments this week to boost the soil life for flowering.
Likes
9
Share
@Herbie
Follow
A good week.
Then again any week that doesn't have problems is a good week.
Which is what I have just had.
I have trimmed some lower dying leaves that were no longer getting any light..
I have super cropped 2 stems just to help shape her in the small environment.
I have tucked away (rather than remove) any leaves that are blocking bud sites.
I have noticed she is a very thirsty girl perhaps just noticeable next to her white widow sister.
She's stiffened up like a tree, she probably won't change much now except for stretching upwards so this will be her final shape really for the next few weeks, while she buds up nice and fat.
Crystals are showing around the bud sites
A fair few week off yet unfortunately

Likes
13
Share
@MrPott
Follow
With the switch of 18 hours of light, Aimee is definitely growing well. She is looking a bit skinny but I won't get myself into paranoia and just give her time. I think this will be the last time I LST her as I'm satisfied with the flat canopy. Now it's just about feeding her and enjoy watching her grow (:
Likes
9
Share
@greenthumb86
Follow
day one of flush for most of these girls 😁 : update the only one not in flush is the afghan mass

Likes
10
Share
@Beancultiv8r
Follow
Here we are into the beginning of true flowering! Stacking has begun, flower development is coming along beautifully, both plants are loving the 900PPFD & 2.0EC feed without signs of stress.
Co2 is being implemented this week & leaf tucking will continue.
The Bride Cake has surprised me with its stretch during this last week or 2, Growing nearly an inch every other day.
No real serious trichome development yet so only a faint smell when first opening the tent.
Both plants are drinking quite a lot which I’m very happy to see.


Likes
13
Share
@valiotoro
Follow
Hello everyone 😎
Week 7 of flower for the Amnesia HazZzzze🤯
All the tops buds are ready✂️
3 different pheno🤩
Purple : the smell is citrusy & earthy very strong!🍋
Green : tropical 🤤 it reminds me the Pablo Escobar !
Max 2 more weeks & finito ✔️
Likes
17
Share
@Madd_Rez
Follow
Tapered off feedings and did a small flush. About a foot difference between the 2 plants. Smells like candied dirt!