
Likes
Comments
Share


@2fast4grow
Follow
I'm practicing a lot of LST from the main ranch and practing the defoliation for creating a Cannabonsai.
It's my first bonsai
I'm using a led lamp grow the jungle "the smith" 150w full spectrum.

Likes
57
Share


@Canna96
Follow
This week went well, not much to do, just hoping she grows fast in the next few weeks, thanks for stopping by, be safe and blaze on!

Likes
183
Share


@OrganicNature420
Follow
Germination date 🌱 12/07/2021
Day 50 02/09/2021
Strain 🍁 Ethos Genetics Banana Hammock R1
(Mandarin Sunset x Grapegod)
THC% • Unknown
💡 Mars Hydro FC4800
• Power draw 480W + 5%
• Max coverage 5 x 5
• LED 2070pcsSamsungLM30B1&Osram660nm
• Max Yield 2.5g / watt
• Noise level 0 DB
• Removable Driver +2m cable
• Daisy chain (multiple lights)
https://marshydroled.co.uk/products/mars-hydro-fc-4800-led-grow-light-samsunglm301b-commercial-greenhouse-medical-indoor-kit 🇬🇧
https://www.mars-hydro.com/buy-fc-4800-480w-4x4-energy-saving-full-spectrum-commercial-led-grow-light-mars-hydro-for-sale 🇺🇸
PROMO CODE • (ORG420) DISCOUNT 👍🏻 marshydroled.com
⛺ Mars Hydro 120 x 120 x 200cm
📤📥 AC infinity 6inch
💧 10lt dehumidifier
❄️ 3.1kw air con system
💉 Nutrients GreenBuzzLiquids
Organic Grow Liquid • 1-4ml until 2wk flower
Organic Bloom Liquid • 2-4ml flower stage
Organic More PK • 2-4ml +wk3 of flower
Organic Calmag • 1-2ml/lt whole grow
Fast Plants Spray • first 3days at night lights off
More Roots • 2-5ml veg +2wks flower
Fast Buds • 5ml +wk2 of veg until 1wk flower
Humic Acid Plus • 2-5ml whole grow
Growzyme • 2-5ml whole grow
Big Fruits • 2-5ml flower stage
Clean Fruits • 5ml flush 1wk
Ph powder
Root Gel
Living Organics
PROMO CODE • organicnature420 15%off ✌️🏼
https://greenbuzzliquids.com/
🥥 Growing Media • Coco Coir
Notes 📝
Again some nice improvement on this girl. The only one I haven't really given a haircut after it's massacre. Just a small amount of undergrowth chopped. Nets working well as all the undergrowth is catching up and the 4 main heads are evenly apart. This mistake could potentially work at well. Definitely keep an eye out on this girl 💚
Remember PROMO codes for both GreenBuzzLiquids and MarsHydro.com in the grow bio above 🖕🏼
Happy growing fam ❤️🌱🍁👍🏻


Likes
32
Share


@GrowingTime
Follow
here we are guys in the middle of week 8.
the grow has been pretty good lately, just messed up some refilling but corrected immediately.
as you can see from the pictures i did some mild defoliation to expose the lower buds.
what do you guys think?
to be honest I am pretty proud of the grow the girl looks beautiful.
I am thinking about getting a 600w led and probably a bigger tent (100x100x200, 3"x3"x6")
as always guys, advices are always welcomed
keep growing 👍

Processing
Likes
5
Share


@EUPHORIC
Follow
Seeds all successfully sprouted, The first 2 seeds already emerged through the surface within a night. I used zero nutrient supplements or any additives in this germination phase. You'll notice in the beginning i had 5 seeds and end up with 3 plants, Basically one i gave away; but the other i fucked up somewhere planting them (never gonna do that high again).
EDIT: I forgot i received some Auto Lemon Haze in my package order, that will make up to 4 plants that completes the R-DWC.

Likes
46
Share


@Mrs_Larimar
Follow
Saturday, Feb. 20th
What a Funride....
I looovwe that Egghunt... Thank you again @Silky_smooth...
I learned "Sheeploads" about Growing in small Containers
But back to the " Eggs"
Shheps contain 10g ( in meatime less) of Soil
and they are Bathing into Feedingsolution up to 2 Times a Day
Getting sprayed with Fast Plants Spray
All showing tiny Flowers, and there is much more to come
I changed the Fertiliser to " Organic more PK"... 1ml/l
and the Beneficals stay
I think 4 more Weeks and we are done
Likes
9
Share


@wheedtobeus420
Follow
Day 76 she got the chop. Shes hanging in the dark drying. She smells divine blueberry and sweetness. I cant wait till she dries and i can give her a test smoke. She had 5 days in the dark and a flush. Cant wait to taste her.

Likes
14
Share


@KGrow
Follow
During the first period of flowering they seemed a little bit slowed down..Now they're starting to swell pretty good! :D Atami products work very well!

Likes
22
Share


@MonsieurDeLaRuche
Follow
day 15 of flowering (day 62): the stretch continues!! the plants are beautiful... I can't even frame them in the photo anymore!! the pictures you see are after the defo.. i completely forgot to take one before!!! Sorry
I did a defoliation and moved my pots afterwards, so it's not the same arrangement as the previous week!!
I tried to put the small ones behind, and the big ones in front!
my cherry gar see clone is reborn from its ashes!! it almost seems like it was with the others from the beginning!
I'm impatiently waiting for the smells
day 17: trichomes are slowly appearing!! still no signs of deficiency!! truly my best run since I started
I will launch my flowering TCO day 17 and I will apply it day 18
in my flowering TCO, I put:
- kelp hydrolysate
- epsom salt
- bat guano
- mealworm guana
- castor bean shell ash
- palm ash
- vermicompost
- blackstrap molasses
- elycitor
-Yeasts Saccharomyces Cerevisiae
Bottom right: LA Vanilla Cake #2
Bottom middle: Code Red #2
Bottom left: Code Red #1
middle right: B45
middle: cherry gar see ya #4 clone
middle left: Papaya bang bang #1
Top right: Papaya bang bang #2
Top middle: White runtz x Hollywood
Top left: LA Vanilla Cake #1


Likes
4
Share


@smoking_hills9
Follow
These cali genetics are blowing my mind 🤯 super sticky, very frosty rock dence buds with extra strong smells. All 3 strains are 10 out of 10, very impressed. Done last defoliation few days ago, preparing for the harvest so it's much easier. Stalks are super fat, same as buds.
Got big surprise from Atami, plant food, and many extras. Crazy. Thanks a lot guys. 💚 Start adding you Bloombastic food already. They love it. Smell is mad. I think most of plants ready in week or so.

Likes
2
Share


@KeemBboomin
Follow
This Week On KeembBoomin
The smells are amazing walking into the room no the mention once I actually open the tent, a very sweet tropical aroma at first sniff should I say. In tent 1 on the right there are two Bubble Gums(from seedsupreme) are growing completely different at the bottom right she is very orange but not as frost, but the girl in the back right is not so orange but very frosty.
And then there is my favorite Amnesia Haze (Also from Seedsupreme) I always keep one of those girls growing never fails extremely frosty smells like gassy orange citrus and smokes just perfect for me and a nice yield girl for sure last time I got a little over a quarter pound just from one plant
Tent 2
Now these plants were me having a little fun as well as testing some strains the see if I will grow again. So I’m the front I have a Peanut ButterPie x Royal Kandy(Won it on 420) this was a grow again I just have to many seed so I grow them 4 at a time, BUT this is the orangest most frostiest MOST dense flower I have ever seen. To the back right I have a GMO Cookies I found the seed in a shake bag from the dispensary I’m not really a fan of the buds are frosty the the nugs are so tiny looks like I’m going to have nothing but popcorn but anyway, And last we have in the back left corner some random bag seed I took off my friend hands cause I could not stand to see it look the way it did I SHOULD HAVE LEFT IT she is so shitty the only thing I like about her is that all her buds look like a amazing shape and size BUT no frost just plant like what????
Likes
59
Share


@JeyGanesha
Follow
Un altra settimana è passata e tutto procede bene.per fortuna non ho più trovato nessun nanners 🙏✌️💪..belle piantine mie, continuate così che farete delle belle pannocchie....
30/8/24 gente ho combinato una bella cazzata.pur avendo esperienza, mannaggia a me,mi sono portato a casa dentro il box, il cazzo di ragnetto rosso... fanculo...
Ho già iniziato a ripulire tutto, box e piante con Neem...li sterminerò tutti 😂..

Likes
20
Share


@420DeepGrow
Follow
Gracias al equipo de Divine Seeds, Marshydro y XpertNutrients sin ellos esto no seria posible.
💐🍁Fractal:
La semilla de marihuana Fractal es una cepa especialmente psicodélica que Semillas Divinas desarrolló para experiencias esotéricas y místicas, meditación y creatividad. La potente y vívida Skunk#1 fue cruzada con una pegajosa Afghani Indica, y el resultado es ahora conocido como Fractal. Este exótico híbrido es resinoso, picante y productivo. La mejor opción para el cultivo comercial: un compromiso entre mayores rendimientos y maduración rápida.
En interiores se espera una altura de 1,70 m, en exteriores las plantas crecen hasta 2 m. Fractal se adapta a todo tipo de entorno de cultivo: cajas de cultivo, instalaciones hidropónicas o aeropónicas, plantaciones exteriores, balcones, terrazas e invernaderos. Para un mejor rendimiento se recomienda entrenar a las plantas de Fractal para ampliar su estructura y limitar su crecimiento vertical. Usar ScroG o SoG, LST, FIM o topping.
Fractal tiene una inmunidad inherente al moho y a las plagas de insectos, pero como sus colas son gruesas, proteja sus plantas del aire viciado. También durante las semanas de lluvia su plantación puede necesitar ser cubierta. Listo para la cosecha al aire libre en octubre. Grandes y densos cogollos.
Los cogollos de marihuana de la variedad Fractral huelen a hachís y algo a tierra, desprenden cedro y notas afrutadas al romperse. Mida su porción con cuidado: su potencia está por encima de la media. Con Fractal experimentas un apedreamiento general que te hace sentarte o frena tu movimiento. Perfecto para pasar una noche junto a una hoguera. Es mejor consumirlo por la noche.
🚀🌻 Consigue aquí tus semillas:
https://divineseeds.net/es/fractal-fem/
💡FC6500: Eficiencia líder en el mercado: la lámpara de cultivo LED FC-E6500, que ostenta un estatus líder en el mercado, es una solución rentable con un PPE de 2,8 µmol/J y un rendimiento máximo de 2,5 g/vatio. Ofrece un PPF alto de 2026 umol/S y es adecuada para una cobertura de vegetación de 1,50 m x 1,50 m y una cobertura de flores de 1,20 m x 1,20 m.
Iluminación versátil y uniforme.
https://marshydro.eu/products/mars-hydro-fc-e-6500-730w-commercial-led-grow-light/?gad_source=1&gclid=Cj0KCQjw1qO0BhDwARIsANfnkv9IIrYSbmJqz8PqpJOIyWwJfp5bc3SGJgUV68USLQ4tjmXDYwoBuAsaAue3EALw_wcB
🏠 : Marshydro 1.50 x 1.50 x 1.80, carpa 100% estanca con ventanas laterales para llegar a todos los lugares durante el grow
https://marshydro.eu/products/diy-150x150x200cm-grow-tent-kit
🌬️💨 Marshydro 6inch + filtro carbon para evitar olores indeseables.
https://marshydro.eu/products/ifresh-smart-6inch-filter-kits/
🍣🍦🌴 Xpert Nutrients es una empresa especializada en la producción y comercialización de fertilizantes líquidos y tierras, que garantizan excelentes cosechas y un crecimiento activo para sus plantas durante todas las fases de cultivo.
Consigue aqui tus Nutrientes:
https://xpertnutrients.com/es/shop/
📆 Semana 5:
Gran semana , he eliminado las ramas bajas y a algunos ejemplares se les ha practicado poda apical.
Voy a dejarlas unos dias mas en crecimiento antes de pasarlas a floración para asi ocupar mas espacio en la carpa.
Continuo con las dosis de nutrientes recomendadas por el fabricante.
Se vuelve a aplicar tierra de diatomeas para evitar plagas indeseadas.
Potencia del foco: 42%
Extra UV: 5min x dia


Likes
17
Share
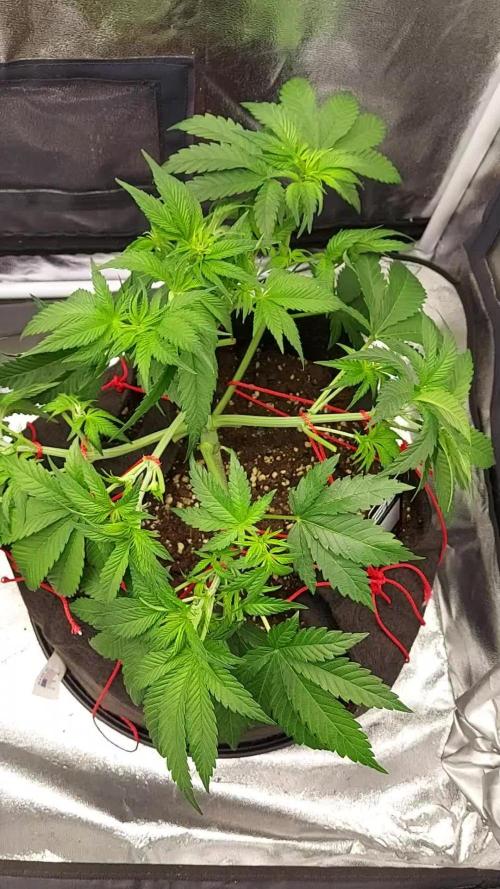

@squalino
Follow
🌿 Journal de Culture : Cherry Cola (Auto)
Date aujourd'hui
20/02
Date de sortie de terre : 22/01/2026
Âge : 29 jours (Semaine 5 - Fin de phase végétative / Début de stretch)
📊 Paramètres de Culture
Température : 23.3°C (Idéal pour cette étape)
Humidité : 55% (Parfait pour éviter les moisissures tout en gardant une bonne croissance)
Éclairage : Lumatek remis à 75%
Technique : LST (Low Stress Training) visible avec les attaches rouges pour ouvrir la canopée.
📏 Suivi des Plantes
Plante #1 (La Grande)
Taille : 26 cm
Observations : Elle présente une structure très robuste. Les entre-nœuds sont serrés, ce qui annonce une plante compacte mais productive. Le palissage (LST) semble bien fonctionner, la lumière pénètre bien jusqu'au centre de la plante. Les feuilles sont larges, typiques d'une dominance Indica.
Plante #2 (La Petite)
Taille : 16 cm
Observations : Bien qu'elle soit plus courte de 10 cm, elle est extrêmement dense. Elle a un aspect très "buissonnant". Elle semble prendre un peu plus de temps pour s'étirer, mais sa santé est excellente. Les nouvelles pousses au centre sont d'un vert clair bien vif, signe d'une croissance active.
📝 Journal de Culture - Mise à jour du 21/02
Âge : 30 jours (Semaine 5 - Transition vers Floraison)
🛠️ Maintenance effectuée :
LST Ajusté : Renforcement du palissage avec les attaches rouges pour maintenir une canopée plate. Les branches secondaires sont maintenant bien dégagées.
Défoliation légère : Retrait stratégique de quelques grandes feuilles d'ombre sur les deux plantes pour maximiser la pénétration lumineuse au centre.
🌿 Observation des Plantes :
Plante #2 (La Petite) : Malgré sa taille compacte, la défoliation a révélé un nombre impressionnant de départs de branches. Elle répond très bien au palissage et reste d'un vert très sain.
Plante #1 (La Grande) : Elle continue de dominer mais l'ouverture de sa canopée est maintenant optimale. Les entre-nœuds reçoivent une lumière directe, ce qui limitera l'étirement excessif ("tigeage") lors du stretch.
💡 État du setup :
Lumatek à 75% : Intensité parfaite pour soutenir la poussée de croissance post-défoliation.
humidité de 55% à 60%
temperature 23 degrés celcius
aujourd'hui le 23/02/2026
uniquement plante 1 (pot léger)
1,5 litres d'eau PH 6,3
plante 2
pot encore humide

Likes
7
Share


@Momentum
Follow
I'm growin' on,
and i'm prepared to growin' alone. 🎺
Ist ganz kurz davor aus dem Zelt zu fliegen und freiland weiter zu machen. Hab sie ziemlich groß bekommen. Jetzt ist sie kurz vor der Dachspitze.

Likes
7
Share


@rhodes68
Follow
10/20 week 5
We have no complaints on the grow, at all. Literally nothing to address.
God has been kind indeed
Top dress nuets at next feed.
Just maintenance, keeping the low end clear etc.
Due to falling temps think the watering/feed will wait another day.
Gold Leaf - Finally going vertical, two inches in two days so keeping an eye on it
Green Crack - Close to topping day for her will take care of it on the top dressing
Bruce Banner - finally hitting her growth as well watching
Gor Glue - Just looks great not sure on topping here either
GSC - Man what a turn around may regret that 3 gal pot. Cutting back on the special kanga she was getting to help the roots, seems to have worked.
10/21
Fed and top dressed - topped
10/22
GC-BB-GL all recovering from topping
Plan to flip tent in a few days about the time they finish recovery
Dialing back Nitrogen by switching from Fish Mix to Bio-Grow think we at the upper range of it.
Had some mag spotting on the leaves of the BB think its due to the heat getting out of hand the other day (90 F for about 1/2 hour ) going to keep cal-mag in the mix just the same
10/23
After looking at the tent this morning I am seeing some small signs of Nitrogen being a tad high so ending for now the bio-grow but will continue the Bio-bloom
Have to head these things off at the pass so trying
Last run of kangaroots its done what its going to do by now since we aint fighting root eating critters
10/24
Fed as shown, basically its just a watering
Watching leaves flipping within a day or two
10/25
Tent flipped to 12-12
10/26
Looks just great god willing and the creek dont rise we on the right path
Video is on the Green Crack Diary only net is slow today
Running some Big Bloom see how it does

Likes
17
Share


@Coopmc
Follow
Start week 6 large and happy last big feed before flush Thursday and starting Ripening formula next Monday
COMMENTED BY
Coopmc Coopmc 27 January 2022
Out for flush her drop tanks are full and she is ready to pack on some bud mass. Monday week 7 full ripening formula to trigger her to
start feeding of her energy stores she worked so hard to build. Bulk phaz is over now we start high phosphorus cut diet
Week 6 almost over she is large and I charge 3-4 weeks ripening to swell that cola up


