
Likes
Comments
Share


@R1pp3r
Follow
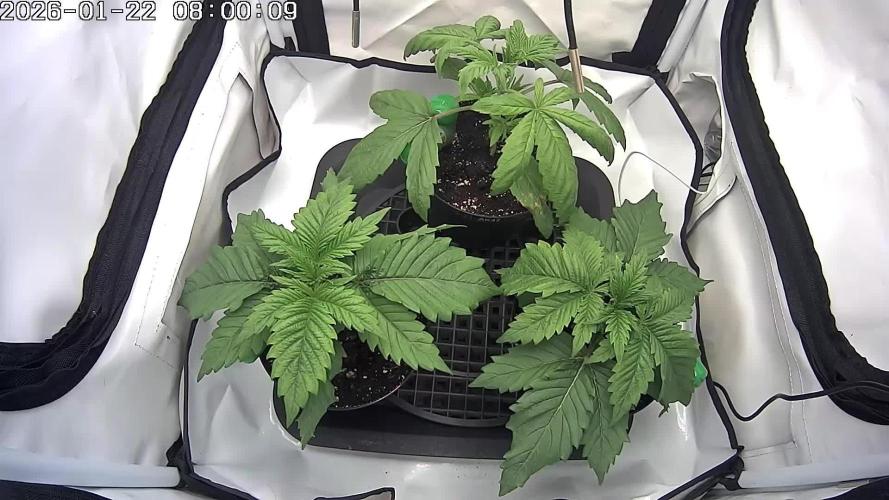
Una rama quebró por mucha tensión pero se recuperará.
Se regó de forma foliar con jabón potasico y tierra de diatomeas para reforzar la planta contra plagas y hongos

Likes
11
Share


@TooMedicatedToThinkOfOne
Follow
Well week 3 went by pretty good! I flushed my soil twice because i was starting to see what looked like nutrient burn and since flushing twice it seems to have amended the soil and issue. I waited until the soil was fairly dry and watered yesterday with a new set of nutrients and will be keeping it on a schedule of feeding nutes once a week until i know it can handle more and im not burning it again. I bought stuff to help me LST the branches and during doing so bent one too far and it started tearing off. I put some support under it to hold it in place and now im just hoping and praying it heals up and can resume growth instead of me having to get rid of the whole thing. We will see but im excited either way!

Likes
13
Share


@Robeeriegenetics
Follow
Ooops I made some mistakes lol all gravy teachable moment …I really think I got a ghost in my grow op lol….anyone recommend an exorcist …im scared lol
Likes
7
Share


@Annakonda
Follow
Je commence la deuxième semaine de strech
J'ai modifié la puissance de la led et la hauteur pour pouvoir changer le "dli" (dli week 2= 35)
JAI ENFIN RECU LE CALMAG après 10 jours🙄 wtf.
Cette semaine , j'ai fait une erreur , j'ai laissé mes plants 5 jours sans boire 😔😔 (je n'avais pas le choix).
J'ai changé ma manière d'arroser.
Les 6 premières semaines a chaque arrosage (additifs et/ou engrais)
A partir de cette semaine , j'arrose 1 fois avec les additifs et les engrais , 1 x juste avec le calmag et 1 x juste à leau.
Je suis à flo+13 , donc normalement la fin du stretch, mais je m'étonne de voir que les plantes sont petites. La plus grande fait maximum 70 cm.🤔🤔🤔.
Demain normalement le stretch devrait être fini.
Et puis on verra .
Le reste la semaine prochaine...

Likes
21
Share


@KrautFabrik
Follow
Day 56: nutrients like plan
Last feeding
Pictures are taken on day 56
---------------------------------------------
Nothing to say, she is growing good👍
Happy growing 🕷️🌱

Likes
Comments
Share


Likes
11
Share


@wiz4rd
Follow
The plants look really happy, with a rich and vibrant color. They are now growing taller more slowly, but the side branches are getting thicker. The buds are becoming really fat and are completely iced out with trichomes. The calyxes continue to swell, and more trichomes are visible, starting to turn slightly milky. Some of the white hairs are slowly turning brown. I estimate about 2-4 weeks until harvest. The scent is simply delicious, with a pleasant creamy berry aroma. The buds are also incredibly resinous, making your fingers sticky as soon as you touch them.
The plants are only lightly defoliated, with dead leaves selectively removed and small shoots trimmed only at the bottom of the plant.
The ladies are also extremely thirsty. Besides the regular fertilized watering, they also receive tap water from the bottom, which they usually absorb within a few minutes.
I also made an extra video to better show the size of the buds, and using the flash at night highlights the trichomes even more.

Processing
Likes
9
Share


@MG2009
Follow
11/07/20
Was gifted a
(It's MENDO DOPE)
She has been sexed but not sure what pheno, but they're all good.
Going to veg for a week then flip to
12-12.
Ps.
Took some clones for saving this is some crazy terpy shit!😍
Clones are on 12-12 schedule, in my experience they will root faster this way. This girl is potted in big roots soil and its time to pot up and flower.She is in florecent light tent for one more week than to LED to finish her off under11-14 schedule.
Ps.
Clones are looking happier than first pic 5 days ago.
Likes
7
Share


@Ezzjaybruh
Follow
Smart 8 from medic grow
Flipping within days here.
amazing growth from all these clones
Check out MEDICGROW website
https://medicgrow.com/
Really excited to see what it can do I’m flower. Love the Bloom button which increases red spectrum when wanted/needed…
Currently running at 40%
Official Website:
https://medicgrow.com/
Facebook:
https://www.facebook.com/medicgrowled
Twitter:
https://twitter.com/medicgrow
Instagram:
https://www.instagram.com/medicgrow420/
YouTube:
https://www.youtube.com/channel/UCNmiY4F9z94u-8eGj7R1CSQ
Growdiaries:
https://growdiaries.com/grower/medicgrowled
https://growdiaries.com/grow-lights/medic-grow
Likes
Comments
Share

@AlpenZilla
Follow
🌸 Flowering – Week 2 | Day 10 (Day 47 overall)
Strawberry AK – Current Status
The plant is currently at flowering week 2, day 10, which marks 47 days since germination.
Height is approximately 33 cm. A significant stretch has not started yet, but it is expected to begin soon.
🌿 Early Issue – Resolved
The initial concern observed earlier was not a genetic failure but rather a CalMag deficiency combined with slightly underpowered feeding.
After applying CalMag as a foliar spray and slightly increasing the nutrient strength, the leaf condition stabilized within a few days. Since then, the plant has shown healthy progression.
💧 Feeding & EC
This run clearly shows that the Strawberry AK has a relatively high nutrient demand compared to previous grows.
Current EC: ~1.5
A few leaf tips are slightly lightened.
This is not classic nutrient burn, but rather an indication that the plant is being pushed close to its optimal limit.
At this stage, increasing EC further would not be advisable.
🌸 Structure & Development
The canopy is dense, overall color is healthy and rich, and flower sites are forming cleanly.
The upcoming stretch phase will be an important indicator of how the plant continues to respond to the current feeding level.


Likes
21
Share


@Cali_Grown_420
Follow
Day 78, I switched plant #2 to an all PK diet with FloraFlex Full Tilt. She’ll take up the whole 3.5 gals of nutes by Wednesday. I’m then going to begin my 3 day flush Wednesday evening. And I will chop her on Saturday evening.
I also took a little sample nug off plant #2 just want to compare non-flushed to flushed weed. Also see how much they shrink in size.
Day 79, Plant #2 is on schedule to start flush in 2 days. And I will give her the chop this coming weekend. Going to try a ice flush using frozen water bottles to see if I can help bring out more color.
The other plants #1 and #3 are still a two weeks or so away from being chopped.
Day 81, started the 3 day flush on Plant #2. And took some more photo shots of her buds and a 360° view video.
Day 84, Plant #2 got the chop. Wet weight, before light trim and removing large stems is 760 grams!!! I will update once they finish drying, and then again once I finish the trim and about to jar them for cure.
Plants #1 & #3 are still flowering, probably another week or two before they are ready to be chopped.

Likes
97
Share


@AsNoriu
Follow
Day 30. Girls are starting to look very good !!!
No preflowers yet, but think transition will start this week.
Leaves are a bit too green, but I still will feed them this week.
Changed light cycle to 18/6
Day 33. Girls are happy and all looks very promising !!! Applied BioBizz Leaf Coat before this morning and girls finally loved the stuff !!! You get most with this product when plant is bigger and have loads of foliage, so perfect for last few weeks of veg period.
Happy Growing !!!

Likes
3
Share


@biggreens420
Follow
was a weird one in flower got some issues and never came back really think she needed more n in her first weeks of flower but she finished up well considering she took a beating wouldnt recommend to newbies as shes a bit needy and has a wild stretch thanks for reading happy growing guys

Likes
48
Share

@AsNoriu
Follow
Day 92. Girls will get 30 Yoyos and will be watered later. Still can't make my mind :
A. Defoliate next watering
B. Defoliate light and clear bottoms, too many airy buds, not enough light at bottom level.
C. Just leave them alone, they know what they are doing ;)))
All look too good, light are too close and i don't need any stress, but i want solid buds, still see chances in all ways and will make my decision during this week.
Day 92. Late evening. Time has come, cleared some worthless bottoms mostly from Blue Dreams, installed 26 YoYos, took like 50-60 Top fan leaves to open secondary crown and thats last training.
Notice : if you ever buy YoYos, theirs line is very important, mine is soft, but still thin like fishing line, cotton rope would be 10 times better.
Day 95. Girls got feed, think to push one more feed and then start only water them till the end.
Missing light a lot, too tall girls for my setup, but i am still more than happy !!!
Think 3 weeks left till the end of journey !
Mini Runtz has nice structure as a plant and bud, next to him under fresh outside air ( cold now most of the time ) is Frosty Runtz, very potent and i think earliest finishing plant with other Frosty NoColour Asia Kalini. Other two Runtz are missing light, but are heavier producers too , so bud development could take longer.
Two Asia Kalini, who show colour, look like twins, stacking very nice and frost is good.
All Blue Dreams miss light and proper distance from light, top buds will be most airy buds on all plant, but i just ran out of space with those giants ;)))
Happy Growing !!!

Likes
9
Share


@Headies
Follow
This is the beginning of each week. So I flushed them and switched nutrients. They were mag deficient, nitro toxic. Not PH actually. I'm adding co2 next week after I seal the room. I think I need to back the PAR down to 800 but they are still alive and it's over half way done.
How any more weeks? I thought this was a 65 day auto. Hydro in a 5 gallon pot could add up to three weeks I heard with Autos. could these go 12 weeks total?
Likes
30
Share


@ArtisticGrown
Follow
Sooooo this has been an amazing and exciting week! Ive been patient with this last plant and really checking the trichomes i inly wanted a few amber caps on the nugs, was looking for milky on this one! Shes smelling amazing and the color change was such a sight to see! She did so well with the nutrients and loved the 2 week flush i did! I cut her down did a wet trim and have em in the drying rack! Im excited to see how she cures and drys ready for the smoke reveal! Much love and happy growing!!!
*check out the examples of the rewards from the traing i did with lst, hst, desolation love seeing this!!* learning this craft and style of growing is a blast! And everyone should try it!

Likes
3
Share


@Unculti_responsable
Follow
Unos días antes de mandar a flora hiciamos las últimas podas de bajos y apicales la dejamos recuperarse unos días y hicimos el último trasplante a 10 litros , con eso ya listo empezamos con los nutrientes de preflora , hicimos unos riegos foliares 15 días antes de mandar a flora , el mismo día q mandamos a flora y lo tenemos que hacer 15 días después de mandar a flora , con esto ya estamos más que bien para las primeras semanas de floración después de la segunda semana vamos a empezar a fertilizar con guano de murciélago y unas cucharaditas de melaza , después ya con el engorde , pero para eso faltan unas semanas , ahora vamos a ir viendo como le va en sus primeras semanas de floración


Likes
2
Share

@Janerussel
Follow
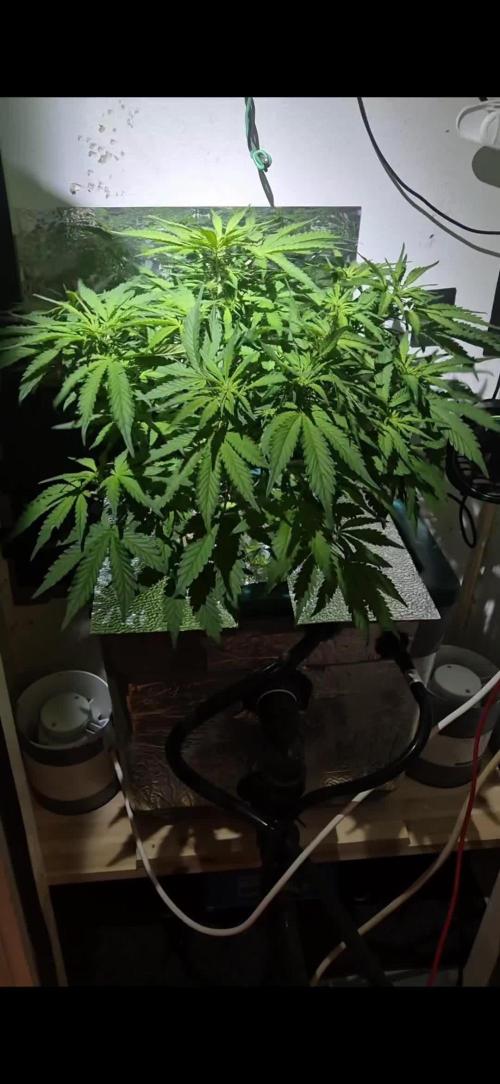
F week 3. It gets really bushy. I had to do a second defoliation. At this point everything seems to go well.
Processing
Likes
7
Share


@Kushizlez
Follow
Day 49-56
(Day 50) I hooked up my carbon filter to the humidity controller and it is keeping the room exactly at 65-70% RH night and day. It looks like it turns on about every 45 minutes for about 5 minutes so it allows me to run the co2 bag properly. I don’t even have to use my dehumidifier. The room is 100% dark now too. Even the small red lights on the space heaters.
Not going to feed anything other than foliars this week.
(Day 51) Blackberry #4 & #8 #9 and white widows #2 & #3 are all confirmed males. Chopped them down and recycled the soil. White widow #1 is the first official female and I’m starting to see pistils on the m39/zkittlez too.
Plants seem to be responding to the light fairly well. It’s hung 32 inches above the canopy which is as high as it can go without strapping it to the roof, which may have to happen one day. The plant can get within 6 inches of the light so I’m probably good. The ppfd output is 1800umols which is super high so I want to hang them as high as possible in veg. I wish I could rent a ppfd meter to see if I’m in range at 32”.
(Day 52) Blackberry breath #3 is the first official bbb female to show. I decided to scrap BCTG #2. It sounded like a good strain but after looking at pictures of people who have grown it online, it doesn’t look up to my standards. I found a very small patch of powdery mildew on one of the leaves so I’m not even going to start with that shit again. I’m really thinking about scrapping the m39/zkittlez and the white widow too. I’m praying that I get at least 4 females of BBB.
I tried super cropping for the first time today. A few of the branches I definitely squished a bit too much as they turned quite brown and looked dead within a day.
(Day 53) Despite the m39/zkittlez vigorous growth, I know it will be a shitty strain that will most likely herm as it’s from a bag seed of low grade weed. I’ve decided instead of scrapping it, I will use it for experimenting with a new chemical powdery mildew preventative. If it dies oh well. I doused it and chopped a limb off a few hours ago during lights on and it seems fine.
(Day 54) I’m about 90% sure BBB 6&7 are both female. #2 & #5 are looking like males but too early too tell. #1 is really tough to say. Just gotta be patient I guess. #3 has a great spread out structure, I hope it doesn’t stretch too much. The scrogging is a priority. I put up the scrog net just to see how it fits. It’s a little small around the edges but that’s fine. So it’s looking like out the 9, I would be lucky to get 4 fems if #1 & 7 would show forsure already. If #1 is a female I have my 4 and I can throw out the white widow. The white widow is just insurance at this point.
Super cropped plants have recovered nicely. Going to continue doing this more.
I’ve noticed that the plants that were put into my custom soil mix have very small fan leaves compared to the fabric pots of straight promix and dry amendments. Could also be the fabric pot is helping dry downs too.
(Day 56) I’m seeing some yellowing so I’m going to give a foliar spray just too keep some deficiencies at bay. All of the plants are stunted except the m39 and bbb#3. Node spacing has also reduced significantly. I can’t help but feel it’s from the intensity of my lights but maybe they just need a transplant into some new soil something. Luckily the stunt and droop is only really happening to what I suspect are male plants anyway.
Leaves are looking twisted and gnarled on #5. Going to move it into the veg tent for a while.
I’m going to mix up and amend my Destiny/coco blend today and transplant bbb#3 and 6 & 7 in a few days.
I mixed them up in contractor bags making sure to toss and turn vigorously.
Here is my blend:
2 bags 40L Destiny soil
2 bags 40L coco
700ml glacial rock dust
700ml oyster shell flour
700ml nature’s pride bloom
300ml basalt rock dust
150ml langbeinite
150ml nature’s pride veg
I am also going to try the Destiny top dress as it’s only 13 bucks a bag and full of good shit. I’m trying to not feed heavy in flower other than 2 or 3 top dresses and 2 teas and nothing after week 5. Because it’s taken so long for the plants to show sex, when I transplant into the 10 gallon pots, they should have more than enough nutrients too keep them going strong all the way through flower with just water. I’m a little skeptical about that though. Besides teas and dressings are fun. Everything should be broken down by week 8 or so.
Will transplant in a few days.