
Likes
Comments
Share


@cal917
Follow
Starting to ease up on the nutrients with week 7 coming to an end. Starting week 8 plants will only be fed ph water and molasses until plants finish.


Processing
Likes
29
Share


@CanadianFillmore
Follow
Week 6 begins for LSD, week 5 was a great trip! This lady looks healthy and happy, buds sites are bulking up and getting frosty! She also has a sweet aroma.
Thanks for stopping by, tune in next week for another episode of growfessor theatre. 👽🌳🔥

Likes
32
Share


@Tha_Greenroom
Follow
Segunda semana a 12/12 para estas CREAM 47®️
De 35 a 46 cm aprox de altura a final de semana.
Están cogiendo buen porte, olor y ya comienzan a salir preflores
Hemos descartado 1 planta para incorporar el deshumidificador
por la alta humedad ambiente.
La solaris pro regulada al 100% potencia a 50/55 cm de distancia


Likes
27
Share


@eldruida_lamota
Follow
Vamos actualizar la cuarta semana de floración de estas Biscotti de RoyalQueenSeeds.
Un SOG que empezó mal pero que se ven con un buen color y avanzan progresivamente, se marcan un color increíble y las flores van formándose, así que a estar atentos.
La humedad es perfecta, la temperatura la e podido corregir y ya la tenemos entre 24/25 grados.
Añadi la base,Blue line B de Agrobeta.
Esta semana añadí tucán, gold joker, silver, tetra 9, beta shark, mega Pk, tricoma, y terminator también de Agrobeta.
Estoy controlando el ph está alrededor de 6- 6,5.
Mars hydro:
Code discount: EL420
https://www.mars-hydro.com/
Agrobeta:
https://www.agrobeta.com/agrobetatiendaonline/36-abonos-canamo
Hasta aquí todo. Buenos humos 💨💨💨


Likes
13
Share


@cookingwithninja
Follow
Day 14, some supercropping
Day 15 .. it’s under control 😂🤣
Day 19 lights almost maxed to tent height unless I zip tie led to the top ceiling frame, last bit of monster cropping. Lost 2 top nugs to physical led burn but it’s ok. Everything is fine. Still going very hard on soluble N, and Pk along with b+, fishsh!t, microbial mass, humic acid. Carbs every day with organic booster
Likes
Comments
Share

@311Budz
Follow
Die Orange Creampop hat nach nur drei Tagen vom Samen das Licht der Welt erblickt – das fängt ja schon mal super an! Mein Plan ist ein Scrog, bei dem das Netz zu 80–90 % ausgefüllt sein muss, bevor ich die Blüte einleite.

Likes
7
Share


@XoticGROW666
Follow
Gushers cake 🍰 🍬
Clone hunted from seeds
Seeds made by k1 kreationz
Gushers x cake crasher

Likes
5
Share


@blacknpearl
Follow
dec 6. megacrop 1.06gr/litre ph'ed at 6.28. ~500 ml
dec 8. megacrop 1.06gr/litre ph'ed at 6.28. ~500 ml
dec 8. pretty heavy defoliation and some light LST
dec 10. megacrop 1.06gr/litre ph'ed at 6.35. about 500 ml
LED is about 85%
Processing
Likes
2
Share


@Qaggy
Follow
Lst went well. She was all in the hips and limboed with ease.
Gave her a top feeding of ecothrive charge for the intense training in the next few weeks.
She bounced back from lst the next day and I topped her for the first time on the 5th node.
It was a bit daunting as this is my first time topping. Looking forward to the next few weeks with all the girls. Seeing them grow into thick lush women.
I am considering scrogging all these girls. It will be my first time doing this so any advice would be really appreciated.
Also I will be super cropping them as I have never done that either. You can’t really do many things with autos, apart from watch them and lst.
Photos are way more forgiving and I think I will be doing this type of growing from now on.
Likes
Comments
Share


@8_SafeMode
Follow
Biological fermentation of guano good!
#organic #livingsoi Friendly to nature

Likes
20
Share


@RonnieB
Follow
The differences between sativa and indica really surprised me..I had no idea they were so different. I thought 2 of my plants were just bad seeds LOL!! but they are mostly sativa and my other 2 are mostly indica...Talk about a difference!!! WOW!!!


Likes
17
Share


@ButterfliesLittleFarm
Follow
Hello Diary.
This time on the Farm there are two new strains from Royal Queen Seeds, Watermelon Auto and Purple Punch Auto.
By the way, there are always three plants on the Farm, this time there are two Purple Punch and this diary will be dedicated to them.
I would like to thank James of the Royal Queen Seeds for sending me these strains.
LET'S START FIRST WITH THE FARM SET-UP:
Box - Secret Jardin DS120W 120x60x178
Lights - MIGRO 200+
Ventilation - Blauberg Turbo - E 100
Filter - Primaklima filter PK 100/125
Fan - Oscillating Koala Fan
Humidifier - Beurer LB 45
Soil - BIOBIZZ Light - Mix
Pot - 11L AirPot
Seed - Royal Queen Seed
Nutrition - BioBizz and RQS Organic nutrition
A few words about Purple Punch Automatic.
The astonishing Purple Punch, famous for her sweet berry and candy flavors, received the long-awaited autoflowering treatment. The breeders from RQS created the automatic version of this popular dessert strain by crossing her with Old Skunk Auto. Out came Purple Punch Automatic, a mighty, moreish strain made up of 75% indica, 20% sativa and 5% ruderalis genetics.
Being an autoflower of the latest generation, Purple Punch Automatic doesn’t need to hide from photoperiod cannabis varieties when it comes to potency and flavor: With 19% of THC, it delivers a powerful effect. The high is mostly physical and stoning, perfect for relaxing at night. Her candy flavors, a mix of berries and grapes with tart and fresh notes, make for a highly enjoyable smoke.
These are the characteristics listed by the team from RQS, now we will see what it will look like on my small farm.
LET THE DIARY START OFFICIALLY:
14/01/2021.
Planting. After cleaning the Farm (GrowBox), I prepared everything I needed. Earth is a Light-Mix from BioBizz, Air-Pot's, Organic Additives that I mix with Earth. From the beginning of this hobby, I use only organic fertilizers.
I used 11L pots, to which I added 50g Easy Boost Organic Nutrition, 10g Easy Roots Rhizobacter and 5g Easy Roots Mycorrhizza Mix to the ground and mixed everything well.
After that I soaked the soil well with water, made a small hole, laid the seed inside and lightly covered it with soil.
After planting is completed, they enter their new home. As I wrote earlier, in addition to the two Purple Punch on the Farm, there is also one Watermelon Automatic plant that will keep them company. The temperature in the Box at that time was 23 degrees and the humidity was slightly below 45%, so I will have to put a humidifier to raise the humidity.
I set the lights 35cm from the pots as Migro recommends.
14 - 17/01/2021
I sprayed the surface of the soil with water a couple of times to keep the soil moisture at the surface.
18/01/2021
The first Purple Punch sprouted. The other is still not peeking out. If it doesn’t sprout tomorrow, I’ll put new seeds on a wet paper towel to speed up the germination of new seed.
Farm: 23 degrees - 60% humidity
19/01/2021
I put new seeds on a wet makeup remover pad :), and let it germinate.
21/01/2021
I put the germinated seed in the ground. They are now officially Purple Punch # 1 and # 2
Farm: 24.7 degrees - 55% humidity
22/01/2021
I watered the plant with a small amount of water to which I only regulated p.H at 6.4.
Farm: 24.5 degrees - 54% humidity
23/01/2021
Purple Punch # 2 has sprouted.
I'm quite late with the publication of the diary, the reason is the large number of photos I take and then I need to find time to put everything in a pile, along with the notes and type everything nicely. No matter how much time I spend on the diary, it relaxes me and makes me happy.
See you soon.
Likes
19
Share


@EeyoreTheHomie
Follow
So she started herming. Guess I'll have to change her name to Big Barry instead 😅 Wish I could grow a testicle everytime I got frustrated, geez. Kids these days. Anyways, I've been really good about any light leaks, and the internal temps have been consistent, so I'm blaming the 'bagseed' genetics. As soon as I saw the pollen, I started misting the plant with regular RO water, and then went in and removed as many pollen sacks as I could find. But I seriously doubt that I was able to find them all, since they're so deeply hidden within the budsites, and will likely be finding more pollen over the coming weeks -___-
My first grow, so it's disappointing but Im still proud of her. Might just spread any seeds I find in the buds, out in the yard and see how they do. I certainly won't be TLC-ing mystery genetics again, aside from the clones I took off her-- which are my first clones as well (with 100% success rate 😎). Ive never had a greenthumb so please ignore my horn-tooting lol
Processing
Likes
63
Share


@AsNoriu
Follow
Day 71. Yesterday girls got 950 ppm, its my first attempt to feed them full so early, but Gorillas looked to bright and i dont care about Cookies anymore.
At the moment Cookies are overfed and with biggest inner nodes that i ever grew. I knew that this strain is far from being compact, but not like this....
Tomorrow they will be striped, just not the NotFloweringCookie and all girls from control garden.
Lets see...
Day 72. Defoliation and all related...
Hope they will like it...
If all 4 Cookies you would put into one bundle, any Gorilla would be bigger.... Waist of time... Check Control Garden size, its 3 weeks veged plants vs Cookie.....
Day 73. Girls are happy and hopefully will start to bulk up, smell is getting stronger... They took defoliation as champs! Heavy feeding for next two weeks, with only one pure watering inbetween...

Likes
3
Share

@birdmountain
Follow
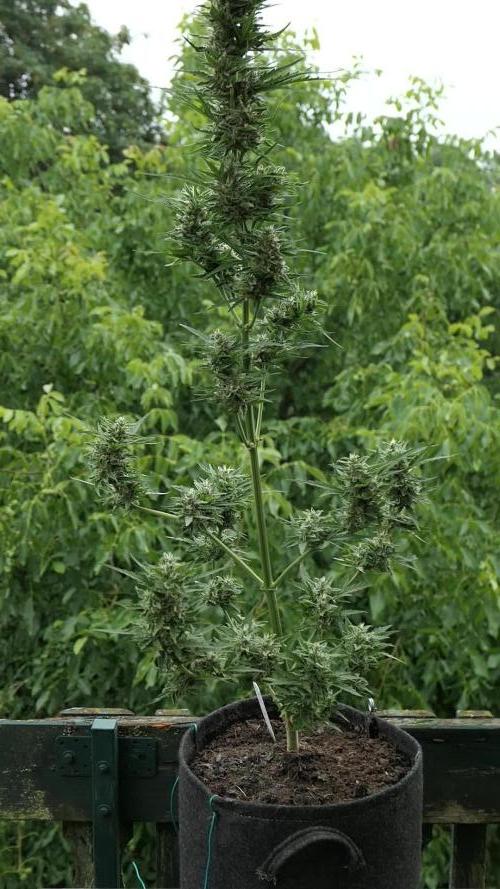
Die extrem hohe Luftfeuchtigkeit, verursacht durch die vielen Regen dieser Woche hat auch bei ihr Spuren hinterlassen. Ich musste eine daumennagelgroße Stelle aufgrund Budrot säubern. Der Ventilator lief zwar die ganze Zeit im Folienzelt, aber oszillierend, ich habe auf Dauergebläse direkt auf den Haupttrieb gestellt (Etwas ernten möchte ich schon noch.). Die Luftfeuchtigkeit war teilweise nachts bei 91%, der Ventilator kann es auf 74-81% herunterdrücken. Es sollen zwei regenreiche Tage kommen, danach solle wieder wärmer werden und damit höhere Temperaturen und auch hohe Luftfeuchtigkeit.
Ansonsten ist sie auf dem Höhepunkt der Blüte, nur die kleinen unteren Buds sind noch im Wachstum. Der Duft ist stark und sehr süßlich geworden, die Buds werden harzig.
Auch um Schimmelbildung zu minimieren habe ich die Wasserversorgung sehr eingeschränkt, sie wird von nun an auch ohne Dünger für die letzten zwei Wochen auskommen.
Wenn sie es bis zur Ernte in ca. zwei Wochen schafft, ist noch eine gute Ernte für Outdoor zu erwarten. Aber bis dahin kann viel passieren.
Wünscht mir viel Glück, ich kann es diesen Sommer gebrauchen.
---
The extremely high humidity caused by the heavy rainfall this week has also left its mark on her. I had to clean a thumbnail-sized area due to bud rot. The fan was running continuously in the foil tent, but oscillating, so I set it to continuous operation directly on the main shoot (I would still like to harvest something). The humidity was sometimes 91% at night, but the fan can reduce it to 74-81%. Two rainy days are forecast, followed by warmer weather with higher temperatures and high humidity.
Otherwise, it is at the peak of flowering, with only the small lower buds still growing. The scent has become strong and very sweet, and the buds are becoming resinous.
To minimize mold growth, I have also greatly restricted the water supply, and from now on it will have to manage without fertilizer for the last two weeks.
If it makes it to harvest in about two weeks, a good outdoor harvest is still to be expected. But a lot can happen between now and then.
Wish me luck, I can use it this summer.

Likes
3
Share


@GreeneScene
Follow
She is still an ABSOLUTE BEAST. Still vegging out . If she hasn’t switched herself in one more week i may have to manipulate the light schedule to force her . I just don’t know how it will affect the other autos in my tent right now 🤷♀️