
Likes
Comments
Share


@hooolian
Follow
24/02: Colas again have become real heavy in places and have had to strap them together to prevent the stalks from falling and snapping. Over all blooming well have been on maximum dose of nutrients now for a few weeks. lots of orange hairs. water now for a week and then to harvest. the topping in this grow really paid off.

Likes
8
Share


@ThatsmyGrow
Follow
Frostbanger really impressed me; I think you can clearly see the Gorilla Cookies cross. I would love to grow this strain again and again.

Likes
2
Share


@TOMI08
Follow
Sziasztok
9.héten vagyunk
A sütinek adok melaszt+canna flush
Az ak47 valami szörny imádom
Processing
Likes
22
Share


@eldruida_lamota
Follow
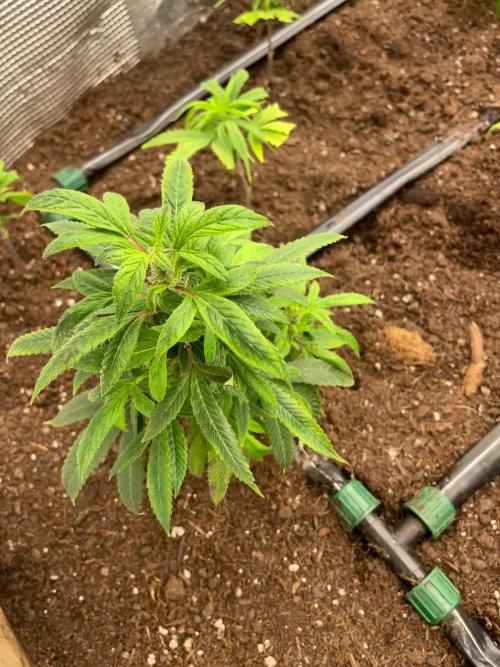
Que hay familia, de nuevo hemos acabado con la segunda semana de crecimiento y llevan un gran ritmo, su crecimiento se va viendo día tras día, están bastante sanas el alimento lo están aceptando muy bien.
No es nada nuevo es la primera variedad que cultive en indoor allá para el 2010, con lo cual siempre que e podido e puesto algunas critical en mi armario.
.
Vamos con parámetros, ya está segunda semana baje un poco la humedad pero poco , anda entre 60/70% la temperatura está entre 22,24 grados, el led es increíble , y como siempre el ph , ya que es de lo más importante,está en 5,8/6,0.
.
AgroBeta:
0,8 ml x L Piramid , vía radicular.
0,6 ml x L Growth black line , vía radicular.
0,1 gr x L Cancerbero , vía radicular.
0,1 ml x L Tucán , vía radicular.
0,1 ml x L Flash Root , vía radicular.
0,4 ml x L Great Green , vía foliar.
0,05 ml x L Gold Joker, vía radicular.
.
así concluye esta segunda semana y estoy bastante contento con el resultado hasta ahora, buenos humos fumetillas.

Likes
200
Share


@Ferenc
Follow
Day 79, 28th of November 2020:
Hi there! Here we go let's say half way. Plants are pretty these Original Sensible Seeds genetics are fantastic! The 2 OG and the Runtz Gum is very strechy.
Black Ghost is pretty shorter bushier plant. Runtz Gum and Do-Si-Dos OG approx the same height Do-Si-Dos OG is taller a bit.
Wedding Gelato is really cool little, bushy anf nice buds forming not problem with her all she is quiet.
Do-Si-Dos OG has some deficiency and leaf gets dry but nothing very serious.....
Fertilization is still the same every second day with the rationand mixture above stated.
The lamp is on 11.15 min and off 12.45 min.
Last week was 15 min longer light cycle....
So every week 15 min shorter light cycle until the 5th week. So far -45 min. It switches on at 6 am and off at 17.15 pm.


Likes
23
Share

@MyLittleGarden
Follow
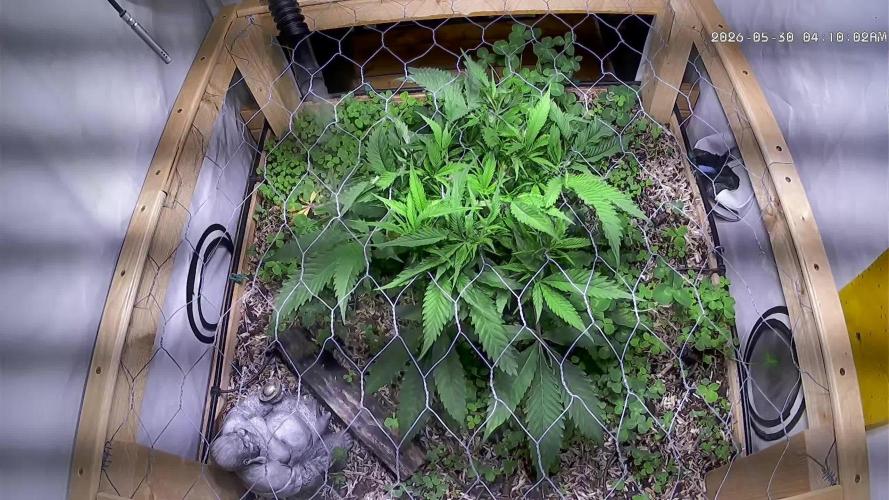
Vegetationswoche 8 - 30.05. – 05.06.2026
Diese Woche lief alles ziemlich entspannt. Einmal leicht entlaubt und die Triebe weiter unters Netz gespannt, damit sich die Utopia Haze langsam über die Fläche verteilt.
Die Pflanze wächst aktuell richtig gut, sieht gesund aus und hat schöne satte grüne Blätter. Der SCROG füllt sich langsam und das Cover Crop verwandelt das Beet mittlerweile in einen kleinen Dschungel.
Ansonsten habe ich nicht viel gemacht und der Pflanze einfach ihren Raum gegeben.
Blumat-System läuft stabil, Klima passt ebenfalls.

Likes
101
Share


@morganfreeman420
Follow
El frio se ah anticipado bastante, el dia dura 12hs y la planta esta empezando a ponerse cada vez más morada cosa que me gusta mucho, ya que hace mucho que no cultivo una variedad morada

Likes
7
Share


@Grass_castle2020
Follow
Day 8 we have one girl looking like she won’t make it :( but other then that all is good
Day 9 girls got a cup of veg nuts for the first time so far so good
Day 10 girls are showing signs of burn to much to soon will back off of the nuts
Day 11 girls got flushed with ph water today all looks good
Day 12 growing so good
Day 13 girls got a little water today

Likes
3
Share

@carlitoshaze44
Follow
nuestra pequeña vuelve a la vegetación!
acompañada de sus hermanas amnesia Haze selección
Día 1/3/26
Todo perfecto la pequeña avanza bastante hien


Likes
2
Share


@710Lino
Follow
Going well shes a longer then normal flowr around 75 days terps are finally starting to come out! Kerosene and pinnaples with hints on Pina colada doing some major defolation today of the lower parts
Likes
10
Share


@InnerCityGardens
Follow
Week 8, looking great. Really putting on some size now, soon to introduce some plant bends. Stay tuned


Processing
Likes
37
Share


@MG2009
Follow
Happy gardening.
07/21/2018
Wow unseasonably cold last night got down to 48° brrrr. No signs that the cold bothered the girls posting photos in a min.. And video. Phew took me awhile to upload.
07/24/2018
Mid week update
Back to hot and, steamy summer weather.
#1, tops are just about 39.5", going to try to get all super cropped to about 30", I expect that they will be double their size at harvest.👍.
On a side note hours of light will soon be at 14.5 hope they initiate flowering,as it will give me almost 3 months of flower!👊
#2 is 43.5" looking like a Christmas tree,still some supercropping to spread out the lower layers.
#3, is 35.5" And no training just picking her dead,yellowing leaves
#4, is 41.5" also no training #5, is 30" , and still stinkiest 😎 of all gonna take a clone today.
Likes
3
Share


@Kushizlez
Follow
Day 54-64 (June 14th-24th)
(Day 55) I got a good look at all of the plants in the dark and all of them are quite faded out except for black garlic and the blueberries. Running multiple different strains that all feed differently would be a nightmare on a larger scale!
(Day 56) Everything is looking on point and happy. Plants are drinking about a liter of water every 36 hours.
(Day 59) Jack Herer #1 has some of the most wild looking foxtails I’ve ever seen. Not a very desirable trait but it’s cool to grow. It’s smell is pure bliss, it’s now matured to a mango funk. I will do a more in depth look at each strain after dry.
Jack #2 is starting to pop fresh nanners. I think it is from stress due to lack of nutrients and/or heat stress from where it is in the tent. Both jacks are feeding really hard I’ve noticed. If these bananas get any worse I will just harvest early.
Blueberry #1 is developing miniature seeds in its calyx’s and is starting to foxtail like crazy. It almost looks like it’s reveging. Earlier in the season I pulled off an entire bud that was covered in developing seeds but I couldn’t find anymore after that. I will likely find a few bag seeds in this pheno and Jack #2.
Blueberry #2 is still terpless and frostless but it’s really starting to fill into it’s structure now. It’s getting impressively dense but that all it has going for it. This one needs to go 65-70 days at least.
BAOGC #1 is so beefed up and chunky I love it. The main cola will be a good 6 grams and the lowers are thick gram nugs too. I will let this one go until day 65
BAOGC #2 is much smaller but a super hard feeder. It was one of the first to start yellowing. This pheno is pretty average in my opinion. It stacks a little tighter but has small buds
TWOG #1 has this strange velvety look to it’s frost, something I’ve never really seen before. Although it’s a little on the leafy side. It filled out super early and is ready to harvest now. Both are fading out with black streaks on the leaves.
TWOG #2 checks every box for quality so far. This might be the perfect strain and I’m sad I didn’t get a clone of it. The only thing wrong with it is the long trichome stalks and lack of resin heads. It is also an early finisher. I will probably take both TWOGs down on the 21st.
Black garlic is just mouthwatering. This plant literally looks wet with resin. It was super airy at first but slowly filled out to the point it’s one of the denser plants in the tent. Cant wait to smoke this stuff.
(Day 63) Well, every plant in here is looking done except the jacks and blueberry #2. Since I’m harvesting my other tent tomorrow I might as well give everything the chop before I risk bagseeds. I’m going to give a final watering right now and harvest tomorrow. I’m going to be drying in my flower tent kept between 60-65F and 60-65% RH. I will do a full plant hang to extend the dry time for as long as possible.
Guess that’s a wrap then. I will give a detailed breakdown of my errors and final thoughts on the run next week after the dry is completely done. ✌️


Likes
49
Share


@Roberts
Follow
Green Cure cbd auto has been doing some stretching this week. Everything has been doing good. I started to shift her feed to a blooming mixture. I have been feeding her twice a day to keep her wet. I did trim out some of the bottom growth. Everything is going great. Thanks again Medic Grow, and Zamnesia seeds. 🤜🏻🤛🏻🌱🌱🌱
Thank you grow diaries community for the 👇likes👇, follows, comments, and subscriptions on my YouTube channel👇.
❄️🌱🍻 Happy Growing 🌱🌱🌱
https://youtube.com/channel/UCAhN7yRzWLpcaRHhMIQ7X4g


Likes
3
Share


@Babaorhum
Follow
Petit problème sur un de mes plant je pense à un blocage nutritif
Je vais donc leur donner 5l à chacune histoire de leur faire un runoff et enlever les sdk minéraux accumulé dans le Substrat
A part sa le strech commence et la bonne odeur se fait sentir 👃

Likes
22
Share


@medicalhydro
Follow
Seed to harvest day 67
Sticky buds
Fruity smell
Good strees performance
Total Used power 400w
Processing
Likes
24
Share


@MadeInGermany
Follow
Today is day 48 since the time change to 12/12.
Hi everything 🤗.
I can't describe how good it smells this week .
This week she will be flushed, so that after the flush she still has 10-13 days to utilize the remaining energy.
Until then, I wish you a lot of fun with the new update, stay healthy 🙏🏻 and let it grow 🌱🍀
You can buy this Strain at :
www.Zamnesia.com
Type:
Runtz
☝️🏼
Genetics:
Zkittlez x Gelato
👍
Vega lamp: 2 x Todogrow Led
Quantum Board 100 W
💡
Bloom Lamp : 2 x Todogrow Led
Cxb 3590 COB 3500 K 205 W
💡💡☝️🏼
Soil : Canna Bio
☝️🏼
Nutrients : Canna Bio
☝️🏼🌱
Water: Osmosis water mixed with normal water (24 hours stale that the chlorine evaporates) to 0.2 EC. Add Cal / Mag to 0.4 Ec Ph with Organic Ph - to 6.0 - 6.3