The Grow Awards 2026 🏆 


Likes
Comments
Share
@s99mrgreen
Follow
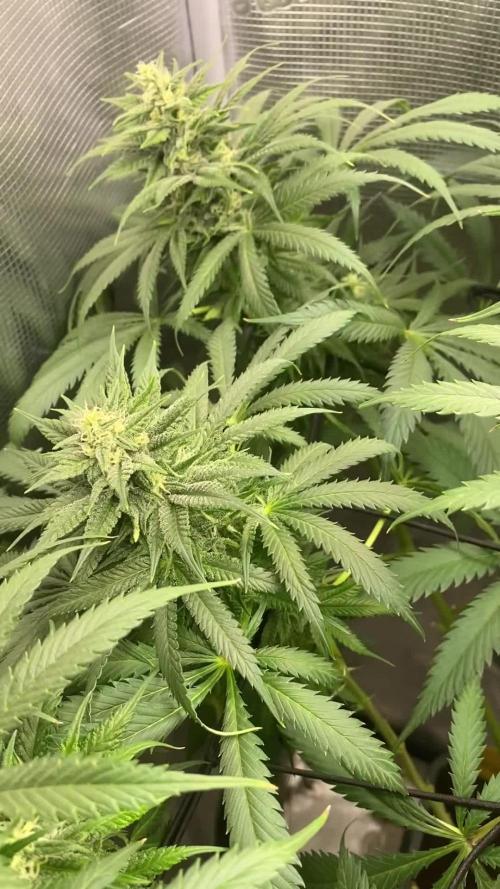
It's really hard to get started with conditions and insufficient knowledge. but i did it.
OG Kush really hard to grow, but it's really worth. ill grow this girl again
I added more pictures of Super silver haze, she's baby and only 3 weeks to veg. Just showing

Likes
18
Share
@thenotillwizard
Follow
At day 20, I can see that the strech phase is almost over.
The girls are now expressing a more specific nose, even if they share a similar aromatic profile of exotic fruits.
They all share that same tropical funk back ground (myrcene/terpinolene), but some of them (#2 and 4) got a solid punch of sour lemon.
Pheno #1
65%Indica
Bushy/compact structure
Smaller buds, tightly disposed on the branches
Sweet/tropical/Pine
Pheno #2
65%Sativa
Sturdy structure/ Very fat branches
Good size buds, medium internodes
Sweet/tropical/Sour citrus
Pheno #3
65%Sativa
Sturdy structure/ good size branches
Good size buds, medium internodes
Sweet/tropical/skunk
Pheno #4
65%Sativa
Sturdy structure/ medium size branches
Good size buds, short internodes
Sweet/tropical/Sour citrus
Pheno #5
80%Sativa
leggy structure/small size and long branches
Good size buds, long internodes, it stacks
Sweet/tropical

Processing
Likes
29
Share
@Reaper
Follow
Day 22 - december 26
The hydro goes really fast now we can see the difference in growth vs the soil
ppm 500 Ph 6.1
day 23
water change - 730ppm
day 25
i cut off the 2 top fanleaves of the hydro and soil plant wich are blocking light on the stems underneath, now both plants have 6 main stems so both plants will have the same structure. nothing needs to be cut from here its just veg a bit longer and wait for flowers.
also did LST on all 6 branches each has a string on them with a pencil attached to them to bend the young stems gently as you can see in the final video of this week.
day 28:
the hydro plant recovered from the too light nute mix new growth is healthy again theres just brown spots on the oldest water leaves. temps are also a bit low when lights turn of (15ceclius) in the res. i put the timer of the light now at 20/24 to keep it 2h warmer.

Likes
24
Share
@el_cultivito
Follow
TOTAL YIELDS wet weight
Blue Dream 1 - 600.2 G
Blue Dream 2 - 552.9 G
Blue Dream 3 - 565.3 G
TOTAL Blue Dream - 1718.4 G
________________________________
Chemdog 1 - 616.9 G
Chemdog 2 - 598.1 G
Chemdog 3 - 558 G
TOTAL Chemdog - 1773 G
________________________________
TOTAL OVERALL - 3491.4 G
7.7 pounds wet

Likes
10
Share
@extraterrestrial1
Follow
-------------------------------------------------
Day 43
Water: 0.75 Gallon TT Water w/ 0.75 TBSP Blkstrp Mlsses 6.5 pH
Humidifier: 50% (LOW-MIST)
Dehumidifier: On
Fan Speed: High
Light on @ 19:00 (27.2° celsius @ 49% RH)
Light off @ 13:00 (23.2° celsius @ 47% RH)
-------------------------------------------------
Day 44
Water: N/A
Humidifier: 50% (LOW-MIST)
Dehumidifier: On
Fan Speed: High
Light on @ 19:00 (27.8° celsius @ 45% RH)
Light off @ 13:00 (23.2° celsius @ 44% RH)
-------------------------------------------------
Day 45
Water: N/A
Humidifier: 50% (LOW-MIST)
Dehumidifier: On
Fan Speed: High
Light on @ 19:00 (28.4° celsius @ 44% RH)
Light off @ 13:00 (22.5° celsius @ 48% RH)
-------------------------------------------------
Day 46
Water: N/A
Humidifier: 50% (LOW-MIST)
Dehumidifier: On
Fan Speed: High
Light on @ 19:00 (28.2° celsius @ 47% RH)
Light off @ 13:00 (23.3° celsius @ 49% RH)
-------------------------------------------------
Day 47
Water: N/A
Humidifier: 50% (LOW-MIST)
Dehumidifier: On
Fan Speed: High
Light on @ 19:00 (28.4° celsius @ 42% RH)
Light off @ 13:00 (22.8° celsius @ 49% RH)
-------------------------------------------------
Day 48
Water: N/A
Humidifier: 50% (LOW-MIST)
Dehumidifier: On
Fan Speed: High
Light on @ 19:00 (28.4° celsius @ 42% RH)
Light off @ 13:00 (22.8° celsius @ 49% RH)
-------------------------------------------------
Day 49
Water: 1 Gallon TT Water w/ 1 TBSP Blkstrp Mlsses + 0.75ml/L Alaska Morbloom 5.7 pH
Humidifier: 50% (LOW-MIST)
Dehumidifier: On
Fan Speed: High
Light on @ 19:00 (28.6° celsius @ 49% RH)
Light off @ 13:00 (22.7° celsius @ 49% RH)
-------------------------------------------------
Likes
50
Share
@DogDoctorOfficial
Follow
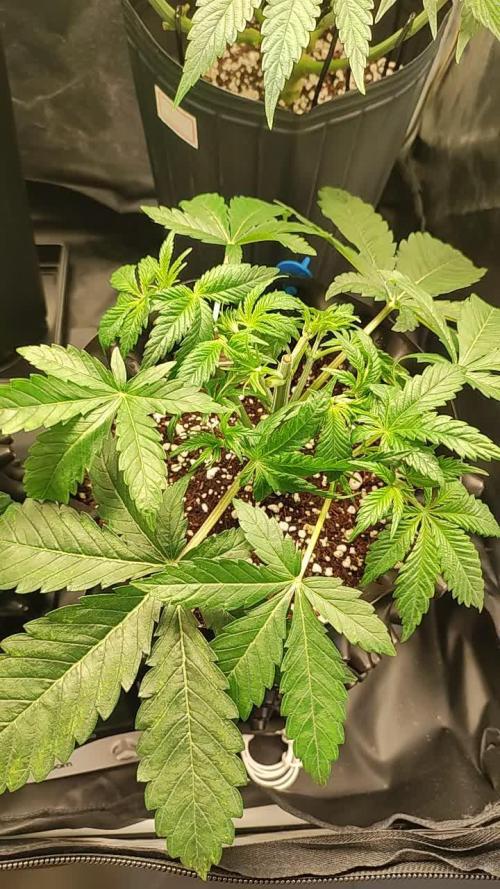
Week 5: Transplant Time & Root Power!
Oh man, this was one of those weeks! We transplanted all five phenos into bigger pots, and let me tell you, they’re thriving! (Check out the complete video episode for all the details 😉).
The girls are looking amazing, all pretty much the same size for now, so I don’t have any favorites yet—but let’s see what the future holds!
For photos, I used both my Nikon P900 and Sony A6000, with a bunch of lenses and filters to preserve the true colors—these LEDs are powerful!
Current Setup & Conditions
This week, they’re still chilling with their sisters in the big tent, but in about a week, they’ll be moving into the TrolMaster ecosystem for even better environmental control.
Watering: pH 6.06, EC 0.96
Temperature: A bit cold , but it is what it is. We’re facing some freezing outdoor temps (as shown last week in the frosty veggie garden pics!), yet these Runtz are holding strong like true champions. 💪❄️
Nutrition: Still on the Aptus Clean Program, with:
Regulator
System Clean
RO Water Conditioner
All-in-One Liquid
Root Development: The Real MVP!
Let’s go deep on roots! The mycorrhizae in the Pro-Mix soil has been working its magic, and I’m still boosting them further with a touch of Aptus Holland Mycor Mix. The root development on this transplant was insane—super white, healthy, and ready to explode with growth.
What Are Mycorrhizae?
The word “mycorrhiza” comes from Greek:
• Myco- meaning fungus
• Rhiza- meaning root
Mycorrhizae are a type of beneficial fungi that form a symbiotic (mutually beneficial) relationship with plant roots. These fungi extend far beyond the root zone, creating an underground network that helps plants absorb water, nutrients, and improve overall health.
This is not a single species but rather a whole category of fungi, mainly divided into:
1. Ectomycorrhizae – Live on the outside of plant roots, forming a sheath around them. Common in trees like pines and oaks.
2. Endomycorrhizae (Arbuscular Mycorrhizae, AMF) – The most beneficial for most crops and cannabis. These penetrate root cells, forming structures inside the roots that exchange nutrients.
Where Are Mycorrhizae Found in Nature?
Mycorrhizae naturally occur in forests, grasslands, and undisturbed soils worldwide. They play a crucial role in maintaining ecosystem balance by helping plants access nutrients from the soil.
In a natural environment, plants are constantly forming relationships with these fungi. However, in modern agriculture, excessive tilling, chemical fertilizers, and fungicides have reduced their populations, making supplementation necessary in many cases.
How Do Mycorrhizae Work?
Once mycorrhizae colonize a plant’s roots, they start forming an underground fungal network called the mycelium. This network extends the plant’s reach into the soil, acting as a second root system.
Benefits of Mycorrhizae:
✅ Enhanced Nutrient Uptake – Mycorrhizae help plants absorb phosphorus, nitrogen, and micronutrients that would otherwise be unavailable.
✅ Improved Water Absorption – The fungal network can reach deeper into the soil than roots alone, helping plants survive drought conditions.
✅ Stronger, Healthier Roots – They promote thicker, more robust root systems, reducing transplant shock.
✅ Better Soil Structure – They produce glomalin, a protein that improves soil aggregation and helps retain moisture.
✅ Natural Pest & Disease Resistance – Healthy plants with strong mycorrhizal relationships tend to be more resistant to soil-borne pathogens.
How Mycorrhizae Help in Cannabis & Gardening
In controlled growing environments, using mycorrhizae is a game-changer. Since cannabis relies heavily on phosphorus, the enhanced nutrient uptake provided by mycorrhizae is especially beneficial.
Best ways to apply mycorrhizae:
• At transplant – Dust roots with mycorrhizae powder or mix into soil.
• As a soil drench – Some liquid formulations allow fungi to colonize even after planting.
• Mix into your growing medium – Using pre-amended soil like Pro-Mix HP Mycorrhizae ensures roots have early access.
Pro Tip: Mycorrhizae need living roots to survive! Avoid using synthetic fungicides or excessive chemical fertilizers, as they can kill the fungi.
Think of mycorrhizae as a natural root booster. They’ve been around for hundreds of millions of years, helping plants thrive in all conditions. By using them in cultivation, you’re mimicking nature, ensuring your plants grow stronger, healthier, and more resilient.
When used correctly, mycorrhizae can increase yields, improve plant health, and reduce the need for synthetic inputs—making them a must-have for any serious grower!
Can’t wait to see how they’ll look in the next transplant!
I made a few changes to my improvised photo studio, including a pink background for now—because why not? Let’s keep things fun and full of color! 🌸📸
Massive gratitude to all our sponsors and of course, a special shoutout to Zamnesia, Plagron, and Grow Diaries for making this amazing cup happen. 🙌
And to the community—followers, supporters, lovers, haters—I love you all! ❤️ Let’s keep pushing forward, learning, and making this grow legendary!
Stay Tuned for More!
Next week, i may be moving them into bigger pots and getting them into their final environment. You won’t want to miss this next stage!
See you all next week—stay tuned, keep growing, good luck to all and let’s make history together! 🚀🌱
Genetics - Runtz https://www.zamnesia.com/6000-zamnesia-seeds-runtz-feminized.html
Nutrients - Plagron https://plagron.com/en/hobby
- Aptus Holland https://aptus-holland.com/
Controls - Trol MAster https://www.trolmaster.eu/
LED - https://www.futureofgrow.com/en
LED - https://www.thinkgrowled.com
Soil - https://www.promixgardening.com/en
Germination - Cannakan https://cannakan.com/?srsltid=AfmBOopXr-inLXajXu3QFgKXCXXos4F1oEvScjMKIB5MR5dk8-GJ-F49
DOGDOCTOR 15% off
Smoking Papers - https://ziggioriginal.com/
Terpene saver - https://grovebags.com/
As always thank you all for stopping by, for the love and for it all , this journey of mine wold just not be the same without you guys, the love and support is very much appreciloved and i fell honored with you all in my life
With true love comes happiness Always believe in your self and always do things expecting nothing and with an open heart , be a giver and the universe will give back to you in ways you could not even imagine so
As always, this is shared for educational purposes, aiming to spread understanding and appreciation for this plant. The journey with nature is one of discovery, creativity, and respect. Let’s celebrate it responsibly and continue to learn and grow together!
Growers Love To you All 💚
#EternityGrowCup #RuntzHunt #GrowersLove #CannabisCommunity #AptusHolland #ProMixSoil #TrolMaster #Zamnesia #Plagron #ZiggiPapers #Grovebags

Likes
26
Share
@pifflestikkz
Follow
Day 17
17/07/24 Wednesday
De-chlorinated tap water pH 6 with calmag 5ml -5L.
Very humid week, noticed a green turning colour on top of soils where the humidity has been far to high.
I have installed door netting and recently left open all day and night now so they can condition over night in colder temps.
All are doing well, one overdose slightly behind and looking ABIT swifted. But she'll come around 💪💚
Day 19
19/07/24 Friday
Lite Feed today, 250ml each pot small run off.
Seeing excellent start to these babies. Let's get it 👌💚
Day 21
21/07/24 Sunday
De-chlorinated tap water pH 6 with calmag 5ml to 5L.
Watering in 1L each day from now.
Updated video


Likes
125
Share
@SlowpokeFuegobud
Follow
🍊 🍋 🍮 🍭 🍊 🍋 🍮 🍭 🍊 🍋 🍮 🍭 🍊 🍋 🍮 🍭
Welcome to week 8, dear friends!! 😘
DAY 50
Watered with humics + bigfruits + vitalize + enzym+ and EPSOM 💧
DAY 52
Watered with 2ml A+B und 1ml C4 + 2ml PK + vitalize 💧
DAY 54
Watered with 2,5ml A+B und 1,5ml C4 + 2ml PK + vitalize 💧
DAY 56
Watered with BioEnhancer 💧
Thanks, everybody!! 💚 💚 💚 Grower love!!! 😘🙏 🌱
_________________________________________________________________________________
SETUP:
80x80x180 cm Zelsius
240W Full Spectrum LED IR UV dimmable
DW240H-A6-HS
Heatsink color red
LED Chips:
512pcs SAMSUNG LM301H + 24pcs Osram 660nm + 8pcs Osram IR 730nm + 8pcs UV 385nm
Color mix: 2700K + 4000K
2,8umol/J
Driver HLG-240H-C2100B
Coverage: veg 5x3ft / flower 4x2ft
Product size: 628x205x68mm
Green Buzz Nutrients
Shouts go out to my sponsors @GreenBuzzNutrients, thanks so much for your support! ❤️
If anyone would like to try their amazing organic products, use code GD42025 for generous 25% discount (for orders of minimum 75€) ✨
https://greenbuzznutrients.com/
Mills Nutrients
Biobizz Lightmix
custom exhaust fan 320/270cm³/h
Carbon Active Granulate 240cm³/h
tab water pH 8 - EC 0,25 with Calmag to 0,5
Advanced Hydroponics pH minus Grow + Bloom to pH 6.2
🍊 🍋 🍮 🍭 🍊 🍋 🍮 🍭 🍊 🍋 🍮 🍭 🍊 🍋 🍮 🍭

Likes
1
Share
@BruWeed
Follow
11/10 - comenzó su cuarta semana de floracion.
Su evolución fue muy notoria, de un dia para el otro se desarrolló mucho.
No tuve problemas en ninguna etapa, hasta el momento se encuentra perfecta.
Los cocos son muy resinosos y grandes.


Likes
7
Share

Likes
7
Share
@Naujas
Follow
wow, she's amazing:) with the conditions she has, this is a super result :) the weather is not spoiling us - every day, little sun - lots of clouds + almost half a balcony :D :D she has 3 more weeks - then I'll go on a long vacation :) everything didn't go as planned,:) I think she needs more time:) there will be a renewal until the finish :).
Likes
11
Share
@adam_pawloski87
Follow
This week has been great! Germination on all 4 Pre 98 Bubbas and 2 Dirty Blondes was a success!! We planted them in there pots an through out the week we gave em each a very light spray down of pure water phd at 6.5 and by Friday they all popped out the soil Let’s go!!!!! Next week we will start light feed on nutrients , so y’all keep them eyes peeled for next updates an I appreciate y’all for following my grow !!😶🌫️💨💨💨🙏🏻💚💯🤙🏻


Likes
16
Share
@TerpTurtle
Follow
-Starting to sugar up and pistil structures getting vigor pretty fast!
-Stretch was moderate, remained very active with the defoliation during
-Planning to harvest the Blackcherry Sherb clone & move in a Unicorn Poop x Purple Gelato freebie I got from NASC. Check out my Blackcherry Sherb diary for pics and videos of the pheno I found (:

Likes
11
Share
@Guaxi
Follow
My cats messed up with one of my Chocolopes when I turned my back for 1 second. I don't if its still on the vase. All the others seem to been going fine.

Likes
248
Share
@Ju_Bps
Follow
Hello my friends 👨🌾👩🌾,
The Banana Purple Punch 🍌🍌🍌💜💜💜🥊🥊🥊looking good, flip started🔥
This mid week the first pistils are poped.
I've continued to give 250ml each 2 day, since start week I give 500 ml/plants each 3 days.
And started fertilizer
I've given
200 ml water + rhizo
500 ml water + rhizo + canna tera
500 ml water + cannazym
PH@6
I've set up my new jewelry today 🔥🔥🔥🔥, this fc3000 look very nice.
Lamp @50% and 50 cm of the canope.
Next week, will be first blooming week 🌲🌲
See you next week and have a good week end my friends 🔥👨🌾👩🌾
Thank to Mars Hydro and @marshydrococo2 for sponsoring the FC3000 ❤️❤️, as well as @Fast_Buds for sponsoring the Seeds ❤️❤️
If you want a litle discount on your Mars Hydro order, add this coupon to your cart,
"Ju_Bps"
Thanks community for follow, likes, comments, always a pleasure 👩🌾👨🌾❤️🌲
Mars Hydro - FC3000
https://www.mars-hydro.com/fc-3000-samsung-lm301b-led-grow-light
42 Fast Buds - BANANA PURPLE PUNCH🍌🌲
https://2fast4buds.com/seeds/banana-purple-punch-auto
Likes
10
Share
@Bncgrower
Follow
One more week and this is the last one before switching to 12/12h, I decided to clean a few more sheets and I'm sure it will recover very quickly..
Happy growing! ✌️🌱🌿🍁
