
Likes
Comments
Share


@Bud_Bunny
Follow
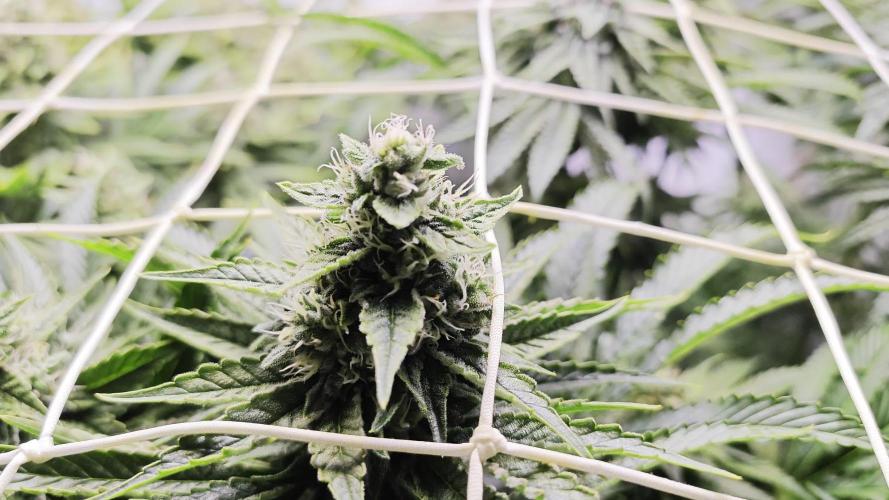
So we are coming into the final week(s). Super frosty. The fan leaves are dripping with tricholmes and so are the buds. Smells amazing like citrus.

Processing
Likes
11
Share


@Silverback_Guerilla
Follow
SUNDAY 5/5:
Rearranged the gardens..have 17 plants in the 4 x 5 now...yowsa!
MONDAY:
Plucked some dead leaves and did a trichrome check on couple of them...about 30% cloudy at most..
TUESDAY:
I observed some white spots(maybe powdery mildew) on a few leaves here and there throughout the garden, so I sprayed them today with Trifecta Crop Cure, a concoction of a bunch of natural plant oils. I already decreased the humidity in the room to 45% with my new 70L dehumidifier, so I think they'll be fine. I'll spray them again tomorrow and the next day, then I'll have to hope that did the trick, because they'll be entering the harvest window over the next few days.


Likes
2
Share


@LittleBigTrees
Follow
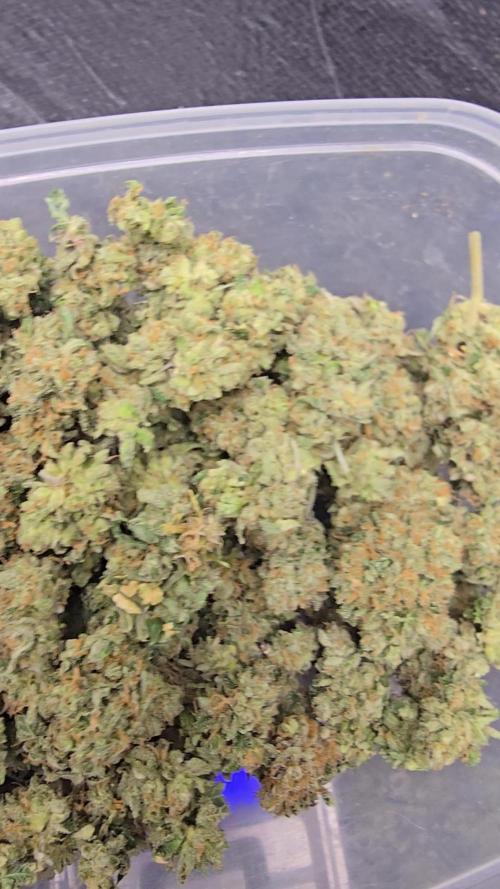
So they dried over 16 days, they came out nice and solid some airy but all covered in fruity smelling trichomes.
Very uplifting with a great fruity taste, nice day starter flower.
This is a one I'll grow again and have thoroughly enjoyed growing and vaping.


Likes
Comments
Share


@MCGA81
Follow
Habe wohl wieder uberdunngt.
Kleine Blüten sind abgefallen. Habe sie getrocknet und probiert...


Likes
151
Share


@PEAKYPLANTERS
Follow
I can not believe.😲
We have reached the end of another magnificent journey made together on this splendid platform which gives ease and opportunity to learn and perform in the best crops
I can already tell you that this baked tent is one of the best weeds I have ever grown so far!
But this can also be seen from the contents. Spectacular colors, solid gems....and resin in rivers
Stay updated for the white smoke 😋😎

Likes
20
Share


@RunWithIt
Follow
I mean, overall this was an extremely painless grow. The test of whether we should or shouldn't top autos is still TBD imo. Our topped candidate produced denser, frostier buds, but weighed slightly less, at 14 grams of bud total. And our lst plant produced 18 grams of bud, not as frosty, and almost as dense as our topped girl. I'll be topping autoflowers from here on out only under the circumstance I have 4+ to grow at the same time. Seems like it could be used to speed up the autoflower grow cycle if done properly, like with right. Since I'm doing a perpetual cycle, it's still a viable option for me in the long run. A few tips I have for anyone growing this strain in organics:
Start feeding bloom nutes a little bit prior to flower transition - this makes the transition more seemless. From weeks 1-3 flower, I slowly dropped the grow dosage until I cut off grow nutes week 3 flower.
Starting the flush around week 6 flower seemed to really bring out this plant's potential. But I think you could get away with starting the flush around week 5. I hope this helps anyone trying this strain out. It's a good one, I hope to see more journals of it, eventually.
Cheers everyone! Time for me to take a well-deserved puff. :) ☁️ 🌼
Likes
50
Share


@AsNoriu
Follow
Day 50 since seed touched soil. They overgrew everything !!! Bomb is heavily packed, top bleaching. I think i was late with top up, they developed fast and used a lot. I check run off for ppm, but thought 800 still ok, it was not. So big last top up !!!
ALL NUTRITIONS ARE GRAMS TO POT LITRES !!!! Neutralise is in real measurement only.
Great White - 3 g each pot
Biosys - 3g each pot
Charge - 30 g each pot
Life-Cycle - 60 g each pot
Bio-Blend - 100 g each pot
Watered straight after, 3.5 liters went in.
Some girls are almost brushing Mars Hydro TSL2000 and i see no issues if air is moved and temp with humidity allows it. Great light, plants grow very well, too well ;)))) will do new clearing after two waterings, want girls to eat first, make bigger roots, then i will resize again to concentrate more on tops.
MARS HYDRO TSL2000: 300W, Flower 2'x4', Veg 3'x5'
It's recommended for beginners.
Low-budget & high-efficiency.
Took down first time ever LST while still growing. Needed space of pot, for last top up and i think they will breath better without, branches are stiff, i would add silica to feed at such time, to stiff them, but i go with one line only, just full beans ;)))
Happy growing !!!

Processing
Likes
3
Share


@Andres
Follow
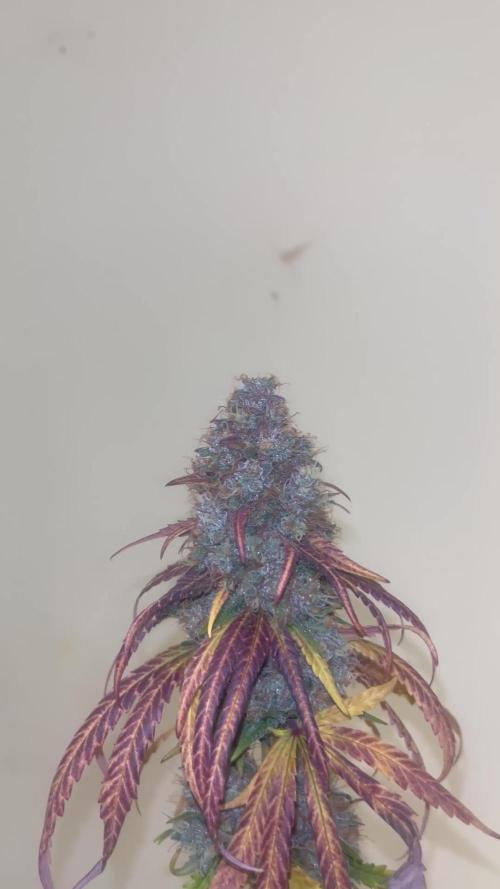
she is becoming purple.
the temperature low in my city .. it smells very good and strong... thanks ripper seed.......

Likes
7
Share


@DoctorP
Follow
Week 4 of veg (from clone) now looking well.
lights @ 100% brightness, always.
Likes
37
Share


@Aedaone
Follow
The temperatures, humidity, height, and watering volume(if measured) in grow conditions are all averaged for the week. The pH is soil pH. Any watering done by me is well water which is 7.6 pH and 50° F. Any listed nutrients are ml/gallon of soil spread evenly across the top of the soil.
Day 1 we had a high temperature of 84°F. We had intermittent storms and showers throughout the day that took care of the watering.
Day 2 we had a high temperature of 88°F. We had on and off rain and thunderstorms throughout the day. The rain took care of the watering. These are recovering well from the nuclear defoliation. They also responded well to treatment.
Day 3 we had a high temperature of 94°F with clear sunny skies. I watered about 5 gallons from the well. I treated these again with Growers Ally fungicide. The warmer nights, blazing sun, and this fungicide have really cleared up that powdery mildew. They've also decided to go all in on flowering.
Day 4 we had a high temperature of 94° with sunny skies. Heat index was over a hundred. It was super hot today. I watered twice about 8 gallons total. Everything looked good after treatment.
Day 5 we had a high temperature of 95 and partly cloudy skies. I watered twice about 4-5 gallons each time with well water.
Day 6 we had a high temperature of 91°F with partly cloudy skies. I watered twice today 4-5 gallons each pot, each time.
Day 7 we had a high temperature of 88°F with sunny skies. I watered 5-6 gallons each pot.
This week was a success. The powdery mildew issue has been cleared up. The Growers Ally fungicide worked great. These girls have rooted into the ground through the pots which is helping some of the 100+heat index days. It's hard to keep these pots moist in that kind of heat. Overall it was a great week.


Likes
4
Share


@Zoe_Spacecake
Follow
Enseño todo, la planta, sus bichos, oídio y un poco de botrytis. Hay bastante arañas pero prefiero esto que poner insecticida encima de los cogollos. También hay unas manchas de oídio encima de unas hojas pero nada encima de los cogollos. A pesar de todo esto después de la cosecha los cogollos tienen buena pinta.


Likes
5
Share

Likes
4
Share

@eldruida_lamota
Follow
Venga familia ya viene la cosecha de estas Runtz de MSNL, que ganas que tenía ya de darles tijera.
Para empezar es buena variedad un poco tardía de lo que dicen pero me encantó cultivarla , aún con la plaga de trips que sufrí las 2 últimas semanas aguantaron y sacaron unas flores alucinantes.
Las flores aparte se ven resinosa y tienen colores llamativos.
La planta pues si creció vigorosa, no es muy frondosa y es resistente.
Fue una genética con la que disfruté bastante y es bastante fácil de cultivar.
Agrobeta:
https://www.agrobeta.com/agrobetatiendaonline/36-abonos-canamo
Mars hydro:
Code discount: Eldruida
https://www.mars-hydro.com/
Hasta aquí es todo , espero que lo disfrutéis, buenos humos 💨


Likes
18
Share


@Grower_Of_Persia
Follow
week intel:
its time to harvest some of plants the ones that is mature enough. indica dominant plants will done first always so we should harvest them first
because my base nutrients and one of boosters was salt based, i'll do flushing this week to get some relieve to plants in the last days
stresses :
flushing
Drought stress via watering only one time with flushing this week
feeding:
day 1 : i flushed them with Advanced Nutrients Flawless finish and adjusted ph
day 3 : no more feeding from now on
day 5 : no more feeding from now on
guide of the week :
i harvest in 2 parts : first i harvest top of the branches and will let the lower buds to ripe another week then ill harvest the second wave.
indica dominant plants will get done 1 or 2 weeks sooner than sativa dominant plants that will often takes more than 8 weeks so be aware to harvest them sooner.
my dry and cure style is this:
3 days of hanging upside down to get water activity lower to around 0.6 in 50% humidity and 26 C temp (i know its a little high but we are in a hot summer right now and i cant get it lower even with air conditioner) and then after 3 days of drying i remove leaves and stalks, trim buds and move them to jar for the rest of their life :D . and in the first 4 days of curing i open the jar door and let hem get some fresh air in the jar for about 5 minutes and close the jar door again, after 4 days of curing like that buds are smokable but they will get better as they getting cured about 1 month.
im happy as hell with this harvest :D.

Likes
9
Share


@Flixus
Follow
Leider heute nicht so viel Zeit darum die kurz Fassung, nächsten Sonntag wird gelollipoppt, for Pflanzen sehen Mega aus und sind voll im Stretch. Ich bin super zufrieden und finde die Sorte echt Hammer, macht Spaß sie zu growen und ist sehr Anfängerfreundlich.


Likes
107
Share


@DogDoctorOfficial
Follow
Welcome back, my fellow green-thumbed enthusiasts, to another captivating chapter in the awe-inspiring journey of my magnificent Purple Lemonade FF! Today, we embark upon Week 9 from seed, which also marks the beginning of Week 2 in the enchanting realm of flower. Prepare yourselves for a tale of continued rapid growth, delightful flower development, and a harmony of environmental conditions that would make even the most discerning botanist proud.
Let me paint you a picture of our wondrous purple beauty as she continues to flourish. Oh, how she has grown since our last encounter! Her branches have become a mesmerizing tapestry of green, weaving together a spectacle of bud sites that dance under the gentle sway of the grow lights. We were wise to provide her with the second scrog layer, for now, she stands as a botanical titan, confidently supported and reaching for the heavens with undeniable determination.
In our last chapter, we dared to defoliate, revealing the hidden potential within our plant. Well, my dear companions, I'm pleased to report that our daring move paid off splendidly! The improved light penetration and enhanced air circulation have invigorated our Purple Lemonade FF like never before. Her leaves stretch out like sun-hungry fingers, eagerly soaking in every photon that the grow lights generously bestow upon her.
Now, let's talk VPD—Vapor Pressure Deficit—for those unfamiliar with the term. Picture this: our beloved plant has her very own atmospheric dance, a delicate balance between the humidity in the air and the temperature in her environment. Think of it as a dance floor—when the humidity and temperature are in perfect harmony, our plant is at her happiest, thriving and boogying in flower bliss. And guess what? Our VPD is a delightful 1.09 kPa, meaning the conditions in our grow space are ideal for our green diva to strut her stuff!
As our Purple Lemonade FF enters the second week of flower, her buds start to show off their flawless form. Each one is a tiny work of art, and together, they create a symphony of colors and aromas that tantalize the senses. The stage is set, and the audience eagerly anticipates the grand performance of flower, where the once-dormant calyxes now transform into beautiful blossoms, shimmering with trichomes and bursting with resinous delights.
Of course, let us not forget our unsung heroes—the nematodes, Spical Ulti Mite, and Swirskii. These valiant defenders continue their unseen battles, ensuring that potential pests remain at bay, and our precious Purple Lemonade FF can blossom without worry.
Fellow cultivators, I invite you to revel in the extraordinary growth and the magical transformation of our Purple Lemonade FF. As she enters the second week of flower, our anticipation grows alongside her buds. Together, we celebrate the power of defoliation, the wonders of VPD, and the sheer beauty of nature's grand design.
As always, I extend my heartfelt gratitude to each and every one of you for joining me on this enthralling journey. Your support means the world to me <3 <3 <3 Until next time, stay green and keep growing!
Genetics - Fast Buds Purple Lemonade FF
Ligth - Lumatek ZEUS 465 COMPACT PRO
Food - Aptus Holland
#aptus #aptusplanttech #aptusgang #aptusfamily #aptustrueplantscience #inbalancewithnature #trueplantscience #fastbuds #dogdoctorofficial #growerslove
With true love comes happiness <3 <3 <3 Always believe in your self and always do things expecting nothing and with an open heart , be a giver and the universe will give back to you in ways you could not even imagine so <3 <3 <3
All info and full product details can be find in can find @
https://2fast4buds.com/
https://aptus-holland.com/
https://autopot.co.uk/
https://lumatek-lighting.com/
<3 <3 <3 Growers love to you all <3 <3 <3
" Arising from a cross between purple and citrus Cali genetics, Purple Lemonade FF (Fastflowering) offers a complex high made up of perfectly balanced cerebral and body effects that are ideal for daytime use. Expect an extremely enjoyable high that boosts your mood while deeply relaxing your whole body and getting rid of muscle pain. This meticulous cross produces up to 550 g/m2 of some of the most beautiful purple buds, with pinkish and reddish hues that will catch everyone’s attention. The beautiful purple buds are ready for harvest in 7-8 weeks and come hand-in-hand with unbelievably sugary citrus terps that are just as refreshing as a cold lemonade on a hot Summer day. It’s the ideal variety for the sweet-tooth stoner seeking strains that deliver both in quality and quantity of resin.
Bud Description
Purple Lemonade FF grows chunky, spade-shaped buds that boast a whole range of pinkish-purple hues with rich, dark orange pistils shooting out of every direction. This variety stands out for the, oftentimes, lilac trichomes that give them a gorgeous pink tint and make for outstanding purple concentrates. The buds give off a delicious tart lemon aroma that reveals a sweeter, more fruity scent as you break the buds open. Definitely a must for flavor chasers and those looking for pungent terpene profiles. Smoke Reports
Purple Lemonade FF offers an effect that’s just as unique as the flavor. Expect a potent uplifting high that gives you that energy boost you need to get things done while 100% happy and stress-free. The effect gradually transforms into a wave that works its way along the limbs and through the muscles, deeply relaxing your body and putting you in the right mindset to go through a busy day with a huge smile on your face. This is an excellent all-day smoke as it not only increases energy but can also help combat chronic pain, migraine and stress. Plant Appearance
This feminized photoperiod variety develops a thick and strong structure, growing a medium-sized main cola with multiple shorter side branches, typical of hybrid strains. Purple Lemonade FF develops fairly short internodal spacing with gorgeous purple buds growing stacked on top of each other, making it the perfect choice for growers of all levels looking to get lots and lots of top-shelf purple weed, as this variety can produce up to 550 g/m2 in a 7-8 week flower cycle.
Grow Tips
This is a super fast feminized photoperiod version that takes approximately 7-8 weeks to flower with a 5-week vegetation cycle,, this means you can have faster harvests by shortening the veg cycle or have a longer veg cycle for bigger yields. Purple Lemonade FF (Fastflowering) makes for a great candidate for growers of all levels as it’s a vigorous strain that will thrive with basic maintenance both indoors and outdoors. This is a resin powerhouse so make sure to have your trim bin close by as all the resinous sugar leaves will make for the most mouth-watering hash and extracts. Flavor
Expect a long-lasting citrus zest that taste just like it smells. Purple Lemonade FF reeks of a delicious blend of sweet fruits and tart citrus that’ll make your mouth water. On the inhale, expect sour flavors that taste just like lemon candy with hints of orange and a really subtle earthy background. And on the exhale, the citrus flavors open up, giving place to a more sugary berry fruitiness that leaves your whole mouth tasting like an extremely sweet weed-infused lemonade.