
Likes
Comments
Share


@growops123
Follow
Transplanted em outside in the ground week 6 they got swamped on week 7 and got severely over watered week 8 I put em in new 45 gallon fabric pots and buried them a bit deeper to help root development they look better today then they do in the video....I'm a newb so knew nothing about ph and the 45 gallon pots have a ph of 8 very alkaline so there now not absorbing nutrient....bought ph down and going to start adding it to water and nutes apparently rain water has a low ph and it's raining again all week....hopefully it helps until I'm able to give them ph down....should be hard for them to get over watered in 45 gal pots...looking like a failed harvest

Likes
24
Share


@Frank_cultiva
Follow
Mismos riegos que la semana anterior de acuerdo a la tabla de advanced nutrients.
Las 4 nenas que están en floración(maceteros de 11lt) beben mucha agua, 8lt cada dos días y reciben un riego a la semana con nutrientes, el resto de riegos sólo con agua.
Mientras que las otras 2 que siguen en vegetación (maceteros de 30lt) están bebiendo 9lt cada tres días, también con sólo un riego con nutrientes por semana.
Saludos! Muy buenos humos a toda la gente que le da vida y vibra positiva a este mundo 💚🍀🤓

Likes
26
Share


@Rock_n_Roll_Randy
Follow
DID SOME MAJOR DEFOLIATION SO THE LIGHT CAN PENETRATE THE BOTTOM BRANCHES. ITS REALLY STARTING TO SHOW WITH HOW MUCH BRANCHES HAVE SHOT OUT.
FINALLY STARTING THE PHOTOPERIODS AND I HOPE MY TIMING IS GOOD FOR CHOPPING THE AUTOFLOWERS..........SEEDS PUT INTO THE SOIL ON JUNE 22ND.
RUNNING OUT OF ROOM IN THE 8X8 TENT SO I PUT ALL THE PHOTOPERIODS IN THE 5X5 WITH A TSW2000. SOME FAN LEAVES ARE BIGGER THAN MY HAND NOW.
SORRY TO EVERYONE WHO TRIES TALKING TO ME....I STILL CANT TALK TO ANYONE BECAUSE I TRIED CHANGING MY EMAIL ON HERE AND IT MESSED EVERYTHING UP. I CANT LIKE ANYTHING OR COMMENT ON ANYTHING. THE WORST IS I CANT JOIN CONTESTS
STRIVE NUTRIENTS IS THE BEST IVE EVER USED. A MUST TRY AND I BUY IT MYSELF. GOT A SAMPLE LAST YEAR AND ITS SO GOOD I BOUGHT MORE. ITS A 2 PART POWDER NUTRIENT THAT DISSOLVES IN MINUTES AND YOU MIX THE SAME STRENGTH OF THE 2 PART NUTRIENTS FROM WEEK 2 UNTIL THEY ARE FINISHED (BESIDES THE FLUSH), NO MORE BULLSHIT OF SWITCHING TO BLOOM FERTILIZER. THATS MY FAVORITE THING BESIDES THE RESULTS.
CHECK EM OUT AND BELIEVE EVERYTHING YOU READ BECAUSE ITS NO BULLSHIT, AWESOME FRIENDLY AND HONEST PEOPLE
Processing
Likes
10
Share


@Barcelona_Farmers710
Follow
Bueno entramos en semana 3 de flora... pasaremos usar pl booster y esperemos poder pasar led antes que acabe esté cultivo. El calor lo hace insoportable para las plantas están bastante resentidas a ver que tal sale! Salut y força al canut farmers!🔥

Likes
9
Share


@Cultivate
Follow
Week 3 of flower stinking dank!😂
Some heavy heavy defoliation slight lollipoping to increase that light power hoping for just nice bud development but we will see!
Thanks guys!


Likes
1
Share


@A-C-H
Follow
.Es läuft alles gut, abgesehen von einem kleinen Anzeichen von Stress, aber na ja, es ist ja auch sehr heiß.


Likes
40
Share


@MadeInGermany
Follow
Info:
Unfortunately, I had to find out that my account is used for fake pages in social media.
I am only active here on growdiaries.
I am not on facebook instagram twitter etc All accounts except this one are fake.
Flowering day 15
since the time
change to 12/12 h.
Hi everyone 😀.
This week there was a lot of stretch. The flowers begin to form and stretch the whole plant 👍.
I actually wanted to remove the bottom shoots last week, but I won't do that until the next week.
The tent was cleaned and all containers filled.
Have fun and stay healthy 🙏🏻
You can buy this Strain at :
https://sweetseeds.es/de/cream-caramel/
Type:
Cream Caramel
☝️🏼
Genetics:
Blue Black
x
Maple Leaf Indica
x
White Rhino
👍
Vega lamp:
2 x Todogrow Led
Quantum Board 100 W
💡
Bloom Lamp :
2 x Todogrow Led
Cxb 3590 COB 3500 K 205W
💡💡☝️🏼
Soil :
Bio Bizz Coco
☝️🏼
Fertilizer:
Green House Powder Feeding
☝️🏼🌱
Water:
Osmosis water mixed with normal water (24 hours stale that the chlorine evaporates) to 0.2 EC. Add Cal / Mag to 0.4 Ec Ph with Organic Ph - to 5.8 .


Likes
Comments
Share


Likes
13
Share


@GrowGuy97
Follow
Going great so far except the 2 Gorilla Zkittles are still a little far behind but they are starting to bounce back!
Day 18 everything finally transplanted in 5 gallon pots except the hulk berry is in the 3 gallon, hopefully the 1 small gorilla zkittles hits a growth spurt soon🤞🏼


Likes
13
Share


@DonKrika
Follow
Temperatures were quite high this week, 29-30 with the lights on, 27-28 with lights off. Humidity was ok, around 50-55%. Otherwise, everything is going smoothly.
DAY 133 -Molasses
PH - 5.85
PPM-723
Solution Temp - 23.4
Watering Volume - 4.1L
DAY 136 - Nutes
PH - 5.81
PPM- 2410
Solution Temp - 20
Watering Volume - 4L
Likes
6
Share


@eldruida_lamota
Follow
Vamos familia cosecha de Original de GrowBarato.
La verdad que el secado muy bien 7 días en Malla y a los botes, 40% humedad y 24 grados es la temperatura ambiental que han tenido en el secado.
Por lo demás de miedo os la recomiendo.
Gracias Agrobeta y Mars hydro , sin ellos este proyecto no sería igual 🙏.
Agrobeta:
https://www.agrobeta.com/agrobetatiendaonline/36-abonos-canamo
Mars hydro:
Code discount: EL420
https://www.mars-hydro.com/
Buenos humos.

Likes
4
Share

@Smev1337
Follow
hey all! these 2 ladys are giving really good power off 💪everything is going good and nothing is going bad so far hehe just the plant is developing so big buds that she is starting to tip over so i need to stabilize her before she goes all bendy downwards lmao 😂 happy growing all 😎💚✌️

Likes
40
Share


@Teamdirtbag2
Follow
Yeah I let her go a little long... I didn't defoliate... and she is tight and furry... my fault.. lost the cola and 4 nice buds.. but she is nice besides that.. my fuck up.. I knew in the back of my mind... this was going to happen.. I'm still happy with it.. and I'm ok with how my laziness caused this... I should have defoliated her.... I still got some serious nice buds that smell great... and I took her as far as she would go for me... but.. I got clones... flowering now.. so I might want to defoliate them... hahahahahaha it might help... 🤗

Likes
12
Share


@GREENPHOENIX6262
Follow
*Early Flower 09/10*
(2) Fastbuds - Mimosa Cake Auto
Aggressive LST was applied for even light coverage.
Smaller-Lagging budsites and bigger fan leaves under net have been removed.
Slight increase in nutrient feeds, thus far 0 signals of deficiencies.
*Mid week update - 09/13*
Both plants have grown approximately 6 inches in height
Early flowering continuing to progress accordingly
Half a gallon increase in water feed (Nutes included)
*End of week recap 09/16*
Mimosa Cake (Auto) - Both in week flowering accordingly
Small increase on nute feeds - Moderate increase in filtered plain water feed (1.5 gallons )
*SEE END OF WEEK RECAP VIDEO*


Likes
4
Share


@Bear_Grows_Green
Follow
01/29 day 23 start of week 4 and things are popping!! Haven't fed at all this week should tomorrow .
01/30 bed for 7 gallons water 3.5 gallons feed full bloom recipe
02/02 bed got 7 gallons 3.5 with rootwise products and wdg3000 and sprinkled some BB on bed.


Likes
5
Share


@Mr_nugs_lover_David
Follow
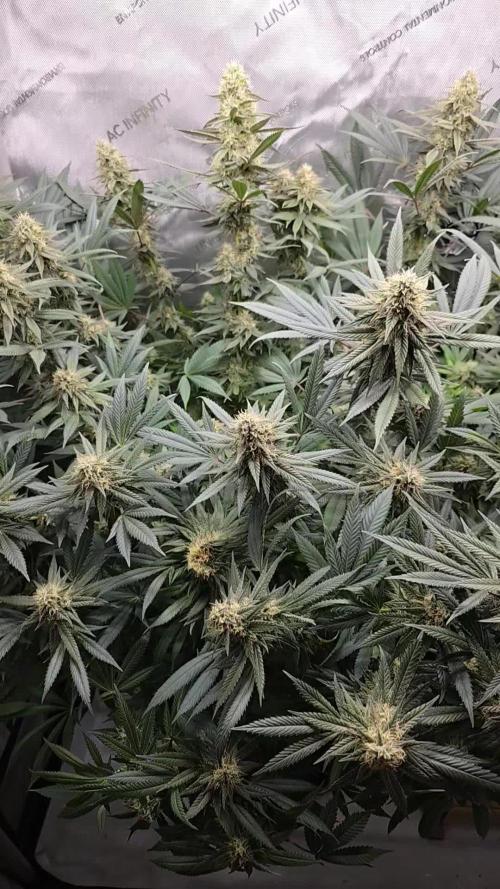
Very terpy smell, strong and very citric like a pure lemon, very lemony smell basically, nothing crazy but it's very nice, she's producing a lot of resin, you can see she's a good autoflower, not the bets I've grown but it's nice to have something to Harvey's fast. 100% organic grown