
Likes
Comments
Share


@Santica_Garden
Follow
Sorry for the lack of updates guys but we all can agree that the Veg stage is the boring part 😅 But the ladies are doing & looking great, I am going to be flipping them to flower tonight. 👍🏾


Likes
14
Share


@TheBudWhisperer
Follow
Week 5 of flower and stretch has been excessive in these F1 testers. Buds have been slow to develop and supercroppibg of 3 tops was necessary to maintain canopy consistency. The hollow stems are a good sign of things to come but I will say I was hoping for much better bud development. Perhaps unrealistic with this sativa dominant cross but still. I guess as long as the buds are fire, we’re prepared to deal with less overall yield.
The system continues to perform admirably. It’s one major drawback is having to recirculate through an additional drainage pump. The cheap bilge pump we wired into the tray failed and flooded out a portion of the basement - my fault really as I knew the pump was crap and should’ve changed it earlier. Still can’t get past how much more simplistic a gravity dependent system is but despite that - I have no complaints about this equipment and it will get regular use regardless of any future set up changes. Alls good in da hood y’all👌🤟
Strain details
She’s a mix of a particularly strong Northern Lights, crossed with a Spicy Bitch sativa hybrid. The hope is that we’ll be able to combine the overtly narcotic effects in the NL and mellow it out somewhat with the quality daytime sativa effects found in the SB.
Both strains feature numerous grower qualities. Both parents possessed vigour and resiliency, the SB particularly colourful in late flower. These beans were the product of a shotgun breeding run that presented an unexpected opportunity so there’s quite a bit of testing that should flow from the various F1’s we’ve produced.
Likes
50
Share


@Fibro_Witch
Follow
13 hours and 33 minutes of daylight when I took these photos and this video on August 27th. I've been slacking this month on uploading, having to play catch-up with this just like everything else in my life.
I'm so glad it's going to be September in a couple days. The weather is cooling off thankfully🙏
So, I cover most of the situation in the video, but basically GG (Good Girl) is looking great and her flowers are coming along nicely, whereas PC (Problem Child) is still continuing to be a Problem. Child.
First of all, PC is a much heavier feeder than GG. I have to give her almost 2x as much food as I give the other plants for her to have the same color. And since I've been running around all August and haven't had much time to tend to my beauties, I haven't been feeding as much as I could have. The other photoperiods are fine, They're still getting nutes from the soil and hopefully the mycelium from the substrate blocks have moved into the root system and are acting like good roommates and doing their part to support the soil foodweb. But this isn't enough for PC. Her flower development is definitely behind and her color is a brighter green than the other plants.
Hopefully I'll have time this month to just put the groceries to her and encourage those flowers to bloom because now I'm worried about the frost that will start coming in early October. Frost and ripe trichomes don't mix very well.
My apologies for repeating myself in the video😬
Likes
12
Share


@DutchRookie87
Follow
First week for the sticky beast and purple queen i had the runtz seeds a week earlier and i did not Wanted to wait i want these bitches to come out and soon 😂


Likes
6
Share

@ThatsmyGrow
Follow
Die Gorilla cookies auto hat sich auch wieder von ihrer besten Seite gezeigt. Nach 6 wochen blüte solche wunderschöne buds zu entwickeln ist einfach ein Traum.
Ich kann jedem nur fastbuds empfehlen.
Egal ob outdoor oder indoor.


Likes
88
Share


@PEAKYPLANTERS
Follow
Hi everyone ... Fellas Farmers.
El Patron is a really expansive plant ...
Wow really big, guys
The central doll almost filled all the empty spaces that are in the room ....
I hope I have no difficulty since I don't use a "scrog" technical because I always carry out manual irrigation and I don't like the idea of staying the water in the presses!


Likes
Comments
Share


@MOTB666
Follow
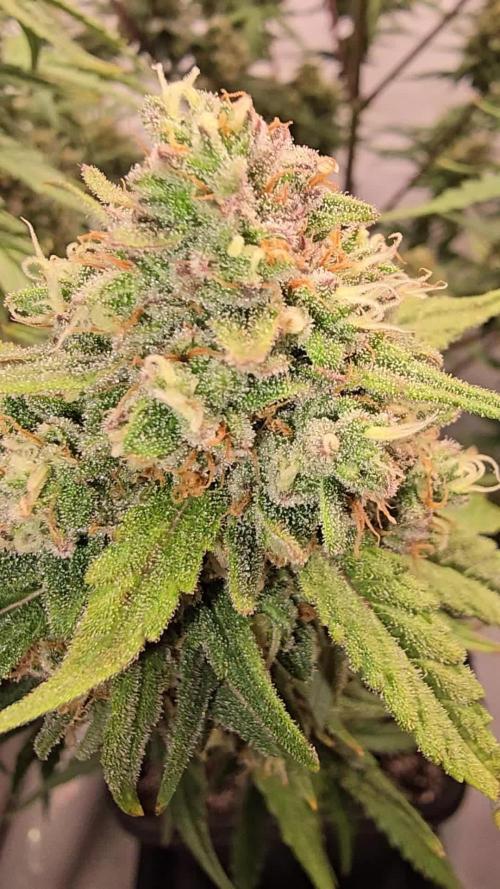
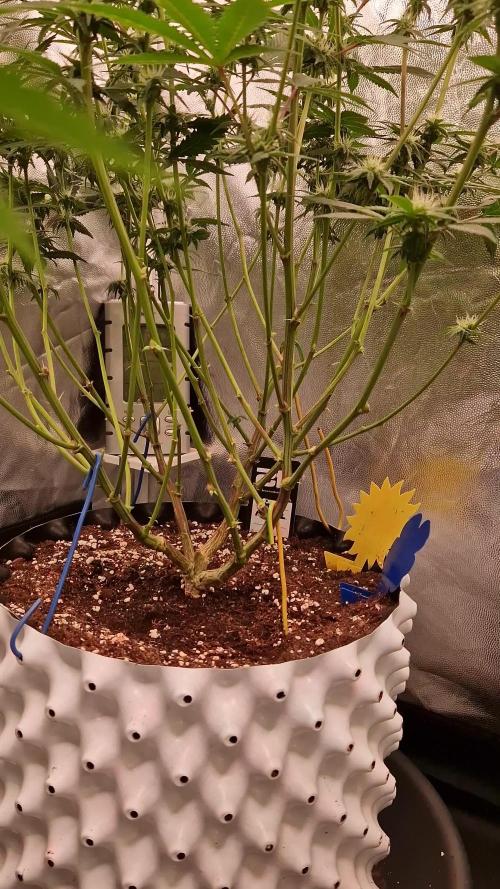
did some well needed defoliation looking a lot better. Buds are starting to get thick and heavy and covered in trichome. First bit of hairs are starting to turn orange.

Likes
17
Share

@TrickzGrowz
Follow
Sehr unterschiedliche Höhen in den Trieben. Da bin ich nicht so ganz zufrieden mit. Ich hoffe das Scrognetz gleicht das ganze noch ein wenig aus.
Likes
92
Share


@DogDoctorOfficial
Follow
🌸 Week 3 Flower – Growing Strong, Tall, and Vibrant! 🌱
Hey Grow Fam! It’s already Week 3 in flower, and I’m thrilled to bring you this update because these plants are doing phenomenally well! Some are stretching up so tall that I might have to get creative in the coming weeks! Fruit production is well underway, and it’s absolutely amazing to watch the canopy fill out as these girls reach their potential.
Aptus Holland Pack Unboxing & New Additions
This week kicked off with a big arrival: the Aptus Holland nutrient pack! 🙌 I couldn’t wait to share the unboxing with you all; there’s a video up where I go through all the goodies, so check it out if you haven’t yet! Between the photos and videos, you’ll be able to see just how well these nutrients are already feeding these green beauties. Having a blast sharing more content lately—I’m in the zone with editing and creating, so get ready for even more shares!
🌡️ Environmental Control and Fine-Tuning the Reservoir pH
Temps this week have been holding around 27.2°C with RH at 65.2% and CO2 at 800 ppm, creating a VPD of 1.26 for ideal flower development. The lighting intensity is at 833 PPFD, and the solution in the reservoir is fine-tuned to a pH of 6.22, EC of 475, with a temp of 21.8°C.
Let’s talk pH in the reservoir: it’s a dynamic process, and I’m constantly adjusting it to keep everything at the right level. The pH tends to rise throughout the week, and each day, I work it back down, fine-tuning it to keep those plants happy and balanced. Managing pH is truly a hands-on job, and it’s worth every moment. I love staying on top of it for optimal nutrient uptake—it’s all about consistent effort and keeping that perfect range dialed in.
Leaf Maintenance & Selective Defoliation
These leaves are HUGE and gorgeous, creating a lush canopy that’s nearly too perfect! I’ve been taking a few leaves here and there, focusing on leaves that may be blocking light from reaching lower parts of the plant. Selective defoliation at this stage is key because it opens up airflow and allows light to penetrate deep, boosting energy distribution across the whole plant.
Big, healthy leaves mean we’re getting excellent photosynthesis, but a gentle, strategic defoliation can guide that energy toward those developing buds. Leaf removal is all about balance, giving the plant space to breathe and thrive while still maximizing growth in flower!
🌐 TrolMaster + App – Real-Time Precision
Huge shoutout to the TrolMaster system and the app—keeping everything in sync and at peak performance is honestly effortless with this ecosystem. The app provides a full overview of each environmental parameter, allowing me to make real-time adjustments as needed and track trends over time. The precision here is unbeatable, giving me complete control over temps, humidity, CO2, and VPD, ensuring my girls are in a controlled paradise 24/7.
What I love most is how the app records everything automatically, so I always know exactly where things stand without having to keep separate records. If you haven’t tried TrolMaster yet, it’s a total game-changer for any grow setup!
💥 Shoutouts & Gratitude
Massive shoutout to TrolMaster and Aptus Holland for powering this grow with tech and nutrition that’s second to none. And, of course, gratitude to Pro-Mix for the superb growing medium and to the seed banks behind the genetics. We’re running strong thanks to each of you.
And to the whole community—thank you, everyone, from new friends to seasoned followers, lovers to haters. Your energy, whatever form it comes in, is all part of this journey, and I’m so grateful for it all. Special shoutout this week to my brother Daggadna—head over to IG and give him a follow! And if you’re loving the journey, remember to like, comment, and subscribe—it really helps the channel grow and reach others who may also dig this content!
Discount Codes so you can save big on your next check out 💚💚💚
Kannabia - DOGDOCTOR 30% off
SeedsmanSeeds - DOGDOCTOR 10% off
CannaKan- DOGDOCTOR 15% off
terpyz.eu - DOCTOR 15% off
The Neutralizer - PORKIT5-DOG 15% off
As always thank you all for stopping by, for the love and for it all , this journey of mine wold just not be the same without you guys, the love and support is very much appreciated and i fell honored and so joyful with you all in my life 🙏
With true love comes happiness 💚🙏 Always believe in your self and always do things expecting nothing and with an open heart , be a giver and the universe will give back to you in ways you could not even imagine so 💚
Friendly reminder all you see here is pure research and for educational purposes only
Growers Love to you all 💚💚💚


Likes
17
Share


@Ashbash
Follow
Zkittlez is growing very nicely think its about to start flowering. Lemon AK is slower but still looking nice considering its about 10 days older. Topped the zkittles and its responding well, got 2 tops where there was only 1. Tied it down as vertical space is very limited for me. Can't get too tall.
Likes
48
Share


@Troy_McClure
Follow
SUMMARY:
- overall everything went smooth but I overcompensated the LED height, I started too high (lack of extension cords), then I dropped them too low, ultimately burning the second set of "starter" leaves (after the cotyledon set). I didn't get the humidifier and climate to synergize in the way I liked either, but it went well overall.
nov. 11
12:00 - third seed has still not been able to germinate, resorting to emergency soak in glass of bottled flat water
15:00 - seed taken out of glass back in damp paper towel
nov.12
23:00 - put humidifier inside tent set to 95% but rH never got to 60% according to AC infinity's humidistat in between both smart pots at soil level
- lowered lights from 30inch to floor to 20inch to floor
- soil is 3.5" from floor
- seedling canopy is 1.5" tall
nov. 13
- 15:00 Grow tent climate stabilizing with the humidifier helping keep the rH between 50-60%, which is about 10% higher than before.
- note: humidifier is set to max 95% rH on its setting, claims the rH is high around 80% but the AC humidistat right at the canopy claims it is closer to 50%.
- Keeping the AC Infinity CLOUDLINE T6 controller set on 24/7 only on setting 2
- note: must be careful with the S6 active intake, as the ducting can drastically drop the cfm coming in, resulting in a rapidly increasing negative pressure which if left uncheck could force the tent to cave severely. It was very important to watch immediately when changing the inline fans speeds, and the ducting positioning to ensure a stable and safe pressure exists.
- Temperature stable around 78F during 18H of LED light
- soil is slowly drying up, its still significantly heavier than the empty pot, not quite moist so will have to see about watering, still trying to get those roots to work for it and avoid overwatering.
- Turned on 6" mini fans to get the lanky stalks to dance a bit and strengthen, fans are about 2 feet away at 45 angle set on "normal" power
nov. 14
19:00 - humidifier is able to get the tent to a low rH of around 60%+
nov. 15
14:00 - one hour after turning on lights without humidifier on and the rH drops from 53% (as it levels out to when lights are off for 8H) down to 40%.
Nov. 16
17:00 - seedlings looking a little sad and in need of some water
- the younger seedling’s leaves are starting to twist a little bit (like a propeller), this could potentially be from the mini fans moving them around.
- gave both plants 3x waterings of 50ml each, over the course of 5 mins. Watered until run-off, soil was extremely light and dry as to encourage greater root growth. Water was measured at 6.92 and the run-off is measured at 7.21 for the younger smaller seedling but 8.14 for the larger older.
Nov. 17
14:00 - seedlings had to sit in the room just under normal room lights as grow tent was set into final position and hooked up to the new ventilation going out of the house.
- some potential concerns with the air exchange “leaking” cold air back into the tent
- the concern is that the grow room sits around 70-74 during the warmest possible times
- whereas, during the coldest possible times it is possible for the grow room to drop to 63, which is the lowest temp just outside of the danger zone
-
- 22:00 right now the fan settings are synchronized on 4 and humidifier set to 80%
- it appears as if this setting will hold the rH around 60-70% and the temperature around 70-74F
- grow room temp: 74
- humidifier: rH 78%
- set to 80%
- Older seedling getting some discoloured around the tips and a little bit of a brown tip
- likely lowered LED too long, but they were out of the grow tent a few hours , so not worried at all and expect full recovery in 48 hours
- Lights now 27 inch from the floor / 23 from canopy
Specifications:😎👇
Seeds:
- 2x White Widow feminized seeds from Crop King Seed
Tent:
- 4x4x6 Mammoth Grow tent
LED:
- 2x Spider Farmer SF1000 LED (default 100 watt draw for seedling but will be bumped up to 125 Watt for flowering if not sooner)
Pots:
- 2x 0.5 L starter pots
- 2x 5 gal smart pots after transplant
Soil:
- Pro-mix containing mycorrhizae and perlite, used for starter pots and mixed at roughly 1:3 ratio with Ocean Forest
- Fox Farm Ocean Forest soil, used in the 5 gallon pots and mixed with roughly 3:1 ratio with pro-mix
- note: pro mix was mixed thoroughly with ocean forest in the 5 gal pot, then pro-mix was used on the top layer, in and around where the transplant will be to help the early veg stage avoid getting too "hot" via nutrients.
Nutrients:
- Fox Farm Big Bloom
- Fox Farm Big Grow
- Fox Farm Tiger Bloom
Inline Fans:
- AC Infinity CLOUDLINE T6 6" (exhaust)
- AC infinity CLOUDLINE S6 6" (active intake)
- AC infinity 6" ducting
Oscillating fans:
- 2x Wind Devil 6" fans
Carbon Filter:
- 2x iPower Carbon Filter on both inline fans
- note: carbon filter on intake fan as basement had mold issues in furnace room far removed but same floor, some mold issue in other room, cat litter in basement, thus, avoiding all risks and sleeping sound at night :) all mold was killed, scrubbed, cleaned, sprayed, painted, and sprayed again before setting up.
Humidifier:
- TaoTronics Cool Mist Humidifier
Timers:
- 2x Kuman 15A/1800W 24-Hour Digital Timer

Likes
35
Share


@Rap_a_cap
Follow
Hey Growmies, some of you had asked to me if I prepare concentrates.......Yes I do!
I don't like modern rosin extraction but instead very rarely I like to smoke some oil.
The following is the recipe of cannabis oil made by ancient Mustapha's process.
It needs:
pharmaceutical grade ethyl alcohol (96.5% by vol.) or 95% for liquors
Weed
A jar with rounded bottom
A lot of time
This oil is 5 months aged, from 20 grams of weed I've obtained 3.5 grams of product.
Trim previously dried weed (20 grams) and put into a 500 ml jar. Cover with 200 ml of alcohol and leave it partially covered with cap. Let alcohol to evaporate on itself and shake the mixture 2 times a day. The most of the solution will evaporate within 10-15 days. When the solution is evaporated by 2/3 it needs to be filtered between 90 and 120 microns. Now is the time to finish and decarboxylate the solution by heating the jar by bain-marie until the green cream sticks to glass. The jar needs to be refrigerated before you remove the cream with a spatula to transfer it into a smaller jar. Store it in a dark place and open twice in a week for few seconds.
You'll obtain a petroleum green/dark amber cream (the green tone will turn into dark brown by time). If the job is well done the surface will crystallize and will shine like a mirror.
This cream is insanely sticky.
Smoke one drop a time. The collapse is around the corner.
Tips:
Best results, in terms of flavour/aroma, with single strain
Let alcohol to evaporate very slowly, take away some macerated weed (after at least 48 hours infusion) and add new weed/hash pieces little by little. Act as if it were a piggy bank.
The final product is a very strong shit, really narcotic.


Processing
Likes
4
Share


@Ogbangbang2981
Follow
My beautiful C4 Auto from fastbuds, I decided to place her outside for her life and not to impress, should of just done both as indoor plants. The hash elements mutated her and continue to mutate. But overall she is budding pinkish purple colors throughout. Still hitting up with fem spray because I wouldn't be able to place an order with Fastbuds again so I try my best to keep this strain from them as my primary strain and get new strains from it .. Thanks Fastbuds.....