Likes
Comments
Share


@Bwright_315
Follow
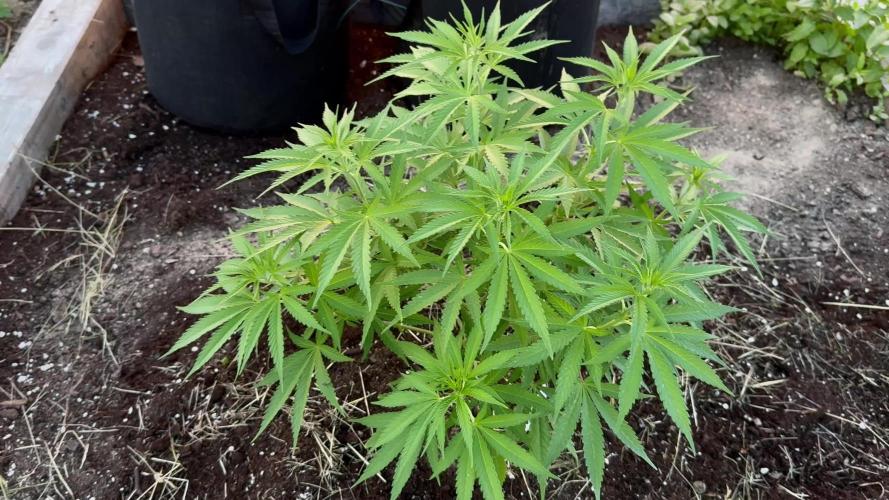
One of my plant I decided to grow out door I decided to transplant in to bigger pot. Yes I know I need to put more soil in it

Likes
12
Share


Likes
Comments
Share


@SurfingIguana
Follow
My first grow 'attempt'.
I am growing in an insulated shipping container. Using two Fluence SpydrX LED 660W lights. Not currently supplementing Co2. Feeding by hand for now but I will set up an automated dripper. Drain to waste. Growing in Pro-Mix HP w/ Mycorrhizae which contains (65%-75%) Peat-Moss, Perlite, Mycorrhizae, pH adjusters, and a wetting agent.
All 5 seeds sprouted!!
3 Peat Pellet, 2 Paper Towel
Light intensity set to lowest setting. (8%)
Feeding every couple days with 160ppm, 6.0 pH.
Overall, pretty good week.
Lights on! Using 18/6 light schedule.
The peat pellets were placed into peat pots and under a dome.
The lights should have been turned on a lot sooner, the seedlings stretched quite tall. Lesson learned there.
They continued to grow quite tall. One fell over, it was replanted slightly deeper to support it. Fingers crossed it survives.
Light intensity set to lowest setting (8%).
A lot to learn.

Likes
14
Share


@RealPuffDaddy
Follow
She was a breeze. Put up with early drainage issues and over feeding during veg. Responded well to all the training and snipping bouncing back each time. And gorgeous flowers during late bloom that smelled like hard candy. Full disclosure I goofed the bloom pretty bad. Late in bloom I put a new bulb in only to find out I never took the MH out from veg. Had a couple of strokes plus in colorblind so judge me lightly. Anywhos aside from me screwing the yield down to 42g with that mistake it was a kick ass experience. Definitely will grow Red Dragon again very soon.

Likes
6
Share

@Snugens
Follow
This week fall has entered the scene and the girls are nearing the end of their time in the sun.
Front right: Og Kush auto - week 7 she’s got some burnt tips but the terps are the absolute loudest. Straight up reminds me of back in the day when you’d get that rare dankness that only rolled around every blue moon. Started pre flush this week with 10 ml per gal winter frost, 5 ml per gal ruby, and 5 ml per gal of the carb from new millennium.
Front left: Pineapple Og auto - week 8 she’s is stacking those golf ball nugs and is a beauty queen. The terps I’m getting are like gym socks and dog shit with some gas. Super stoked to try it out. Not available on Humboldt site so I’m pretty sure it’s a trial pack? Either way glad they sent them to me. Started pre flush this week with 10 ml per gal winter frost, 5 ml per gal ruby, and 5 ml per gal of the carb from new millennium.
Back left: Dream Queen auto - week 6 she’s still has a few weeks to go before I start doing any pre flush. She’s out going the tent but I’m not complaining. The terps are a little lighter and still developing. I can’t really seem to trim it enough. It’s like every time I look at her I have to take off another fan leave.
Humboldt tri gro is going really well and man I’m super stoked. Just a few weeks left till they go in the diy “canna troll” I rigged up.
Big spliffs and mad rips grow brows 🤘✌️🌲🔥💨

Likes
8
Share


@Wackytabacky_420
Follow
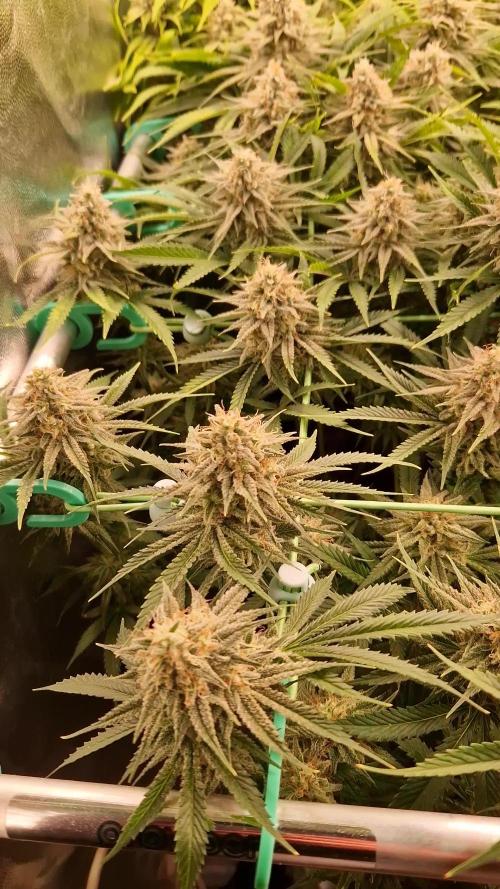
🚨 Durbin Thai/Cinderella 99 week 12 update 🚨
🚨 week 12 of veg!! 88 days old!! 🚨
So this is a clone I received on Jan 31st. She has been transplanted from a solo cup 2 a 5 gal pot. She had 2 be topped in her second week of rooting do 2 the top frying from to much light in young clone stage. Since the topping this lady has come 2 life!! She has been defoliated 4 times! Most recent defoliation 3/24! She spent her first month feeding just off nutrients in fox farm soil. On 3/2/22 I gave her her first Gaia Green trio feeding!! She has exploded with growth since!! She was defoliated on 3/27 again. She was given her second feeding of @gaiagreenorganics on 4/02. This lady was defoliated on 4/10 and 4/19. This is what she looks like today!! 1 week till light flip!! My wife finished the Alice pot this week and she is now in Wackyland!!
💡 Grow Sponsor💡
@marshydroled__amazon
@marsnier
#marshydro
#TSW2000
Marshydro equipment--
Marshydro- 4x4 grow tent
Marshydro- Tsw2000
Marshydro- 6" inline exhaust fan with digital temp and humidity sensor
Marshydro- 6" carbon filter
Marshydro- 6" Black duct line
Other companies in this grow-
@foxfarmsoilandfertilizer - 100% ffof
@gaiagreenorganics
@inkbirdofficial - WiFi temp control
@madmanplant- 6" Tent shelves
Thanks 4 checking out my grow!! Till next week!!! Best of luck and Happy growing!!!
Likes
32
Share


@BigBadLion
Follow
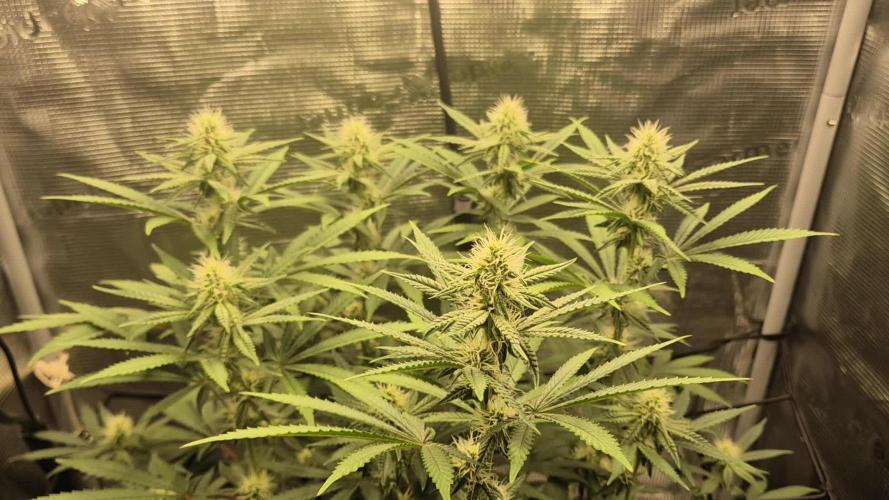
Hey everyone! Week 7 is here (2nd of flower) and here's what happened this week! 😃
- Both of my girls look very different from each other. Many things could've lead to this!
- The one that's on the "front" is developing faster, her leaves are darker in color and they look long and thinner (more Sativa in her DNA?).
Besides that? Not so much besides this was a very, veeeery hot week compared to previous ones and that one of my girl is no longer showing Magnesium deficiency, which is amazing!
I'm really impressed how things are going so next week I'll start adding some extra PK and see how things develop. I want some biiiiig buds! 😍
Anyway, that's all for now.
See you all next week and enjoy the photos and videos!

Likes
Comments
Share


Likes
7
Share


@Mr_nugs_lover_David
Follow
These 3 Gelato auto are part of a 30 plant SOG project, in this diary we will only focus on this fantastic strain as you can see, this is Gelato auto by fast buds grown with nothing but FLO (living soil blend) mixed up with the soil and water 💦, let's see what type of flavors we are going to find! Stay tuned for this one! 👨🌾❤️💚
Likes
12
Share


@Mikefromjax
Follow
It’s been one hell of ride but I enjoyed every minute these are your babies and there like real kids I only let them listen to slow jams lol 😂

Likes
300
Share


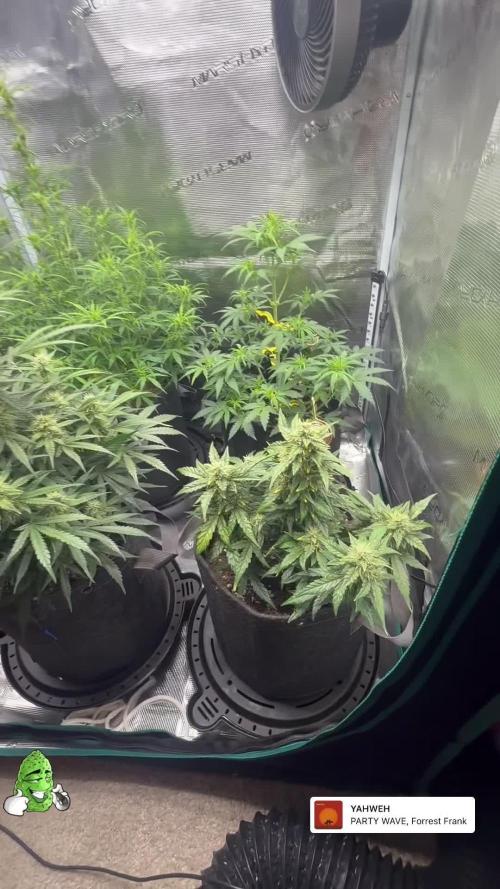
@Ju_Bps
Follow
Hello growmies 👩🌾👨🌾🌲🌲,
👋 End is arrived, let's go for harvest 💜✂️✂️🏁
💧 No Water
💡Mars Hydro - FC 3000
50% 26 cm
Mars Hydro Fan kit
Setting 9
Have a good week and see you next week for the harvest ✂️👋
Thanks community for follow, likes, comments, always a pleasure 👩🌾👨🌾❤️🌲
Mars Hydro - Smart FC3000 300W Samsung LM301B LED Grow Light💡💡
https://www.mars-hydro.com/fc-3000-samsung-lm301b-led-grow-light
Mars Hydro - 6 Inch Inline Fan And Carbon Filter Combo With Thermostat Controller 💨💨
https://www.mars-hydro.com/6-inch-inline-duct-fan-and-carbon-filter-combo-with-thermostat-controller
Fast Buds - Tropicana Cookies FF🌲🌲
https://2fast4buds.com/us/seeds/tropicana-cookies-fast-flowering
Likes
64
Share


@Cheeba_Inu
Follow
Overall, I am extremely happy with the genetics of the Auto Euforia and the general success of the grow. I always like to reflect on mistakes I have made, so let me lay them out here:
I overlit the plant during veg, contributing to it's bushy nature. It grew well but this would be a waste of electricity if I was growing more commercially.
During the last week of flower, my region of Ontario was hit with tons of rain and humidity. I took some steps to increase circulation of dehumidified air, but lowering 95rh to 65-70rh is still insufficient and I lost some control of the environment. The awful result was the start of mold in some select areas, particularly in the fattest buds and where leaves were cut away and petioles remained. This issue is not due to Dutch Passions great genetics, and is entirely due to a combination of an unseasonable environment and my own overconfidence.
This mold was never clearly apparent on the outside of the buds, but I found it will trichomes scouting under magnification. This forced me to speed up the harvest and drying process. It also means that I have had to carefully grade the buds into those safe for smoking and vaping, those mold free but needing a second examination (will be rosin pressed), and those close enough to spots of mold to be only for for edibles. Any moldy bud was of course cut away and will be disposed of.
Nevertheless, I have many ounces of fantastic buds, and will be making some nice pressed rosin based 510 cartridges. I will edit the harvest post with more information after the cure, and showing the various processing I will be doing.
Happy growing! 🌱

Likes
14
Share


@Growhome_90
Follow
Woche 1:
2024-07-18: Die Samen habe ich zum Keimen in feuchte Wattepads gelegt und anschließend in einem Zipperbeutel deponiert. Anschließend gab es Dunkelheit für die Samen bei ca 28 Grad.
Zwei Tage später waren sie bereit um umgesetzt zu werden.
2024-07-20
Heute ging es daran die gekeimten Samen umzusetzen. Ich nutze dafür ein Minigewächshaus und Anzuchtsubstrat.
Anschließend befeuchtete ich alles und das Minigewächshaus kam in die Growbox. (18/6 Licht bei 200-300 ppfd )
2024-07-23
Durch einen Spontantrip welcher morgen startet, habe ich die die kleinen Heute schon in ihr endgültiges Zuhause versetzt.
Zusätzlich habe ich ein Bewässerungssystem installiert und den Luftbefeuchter angeschmissen.
Da es sich um ein kleines Experiment handelt habe ich Drei verschiedene Topfarten benutzt.
1. Cannpot - ein Topfsystem mit manuellem Bewässerungssystem ab der 2. Wachstumswoche.
2. Airpot - 9l
3. Stofftopf - 9l
Ich möchte die Vor- und Nachteile der verschiedenen Topfarten für mich entdecken.


Likes
38
Share


@Green_Mountains
Follow
Another good week! I fed them once on Monday. A final shot to boost them for finishing up. I am pretty certain they will finish within 2 weeks.I also watered them on Thursday and today (Sunday).
I defoliated both plants earlier this week as well. For one, I needed to open the canopy up to help keep the humidity down but, there were a lot of leaves yellowing and turning brown. I was not feeding them correctly... in the sense that I wasn't watering enough in between feeds. There were excess nutrients built up in the soil and I believe that led to the nutrient burn. Also, this was my first and only feed without the Grow Big due to flushing for week 9. I followed the Fox Farm feed schedule... but, I think I needed to understand my plants better!
I also believe I stunted these girls! One is about 24" tall and the other is 21" tall. Both on the very low end of the growth chart.
Overall, I am very happy!! So much to experience and learn in such a short window of time! I've thoroughly enjoyed this grow!
I look forward to the harvest and experiencing all that is to come!
One last thing... Anyone use GrowBuddy and any word on what is going on with the current download? I've followed the drama around taking so long and all that (the new hardware soon to be for sale for 2.0)... but, the website now says the software is available for free and working on Macs and Windows.... So, I downloaded it last night and I cannot activate an account. Everything has a greyed over kind of look... So, I assume they took some part of their servers offline... Anyone know if this is accurate and has anyone else activated a new account recently? Thanks for any insight!!
Peace!
Likes
45
Share


@masterofsmeagol
Follow
8/27 I think I mightve been overwatering. It's so hard to tell when the conditions change week to week. That's Maine for ya. Bags were still heavy and plants were soaked. I tried to shake the more advanced flowering plants without sending water everywhere. That's how septoria spreads. The event horizon I treated with plant doctor looks the best it ever has. It's tile for another application on the toasted toffy. I'm seeing a few spots again. I didn't have time to take pictures or do a video. This video is from last night. I'll treat that toasted toffy again today and I'll record it here. After I see it working u may treat the others. I see some residue of k bicarb but it has pretty much eradicated the pm. I know it will always be there but these treatments seem to be working. I'll be adding beastie bloom to my line up soon. EVERYDAY I go over the buds are bigger more compact and dense. Event horizon, toasted toffy and the red runtz (I think) in the 50 are flowering to beat hell! The get bigger everytime I see them. I can smell them as soon as I round the corner. This is going to be a good year. These strainsxare high in thc. Maybe I gave up some mold resistance and a harder to grow strain but if I can make it to the end it will be fire.
WENT BACK OVER AROUND 5. OBVIOUSLY IN THIS SCORCHING 80°+ day the seedling in the 10 was dry as a popcorn fart. Some other plants seemed dry when I stuck my arm down the bag but I could feel some moisture when I pushed my finger through the medium. They WILL need water but I'm not giving it to them tonight. Took a shit ton if pictures and a video this morning. I'll uploadcthat shit tomorrow. I'm trying to do a couple right now. Anyway I continued to defoliate what needs it. Flowers are swelling. I GAVE THE TOASTED TOFFY ITS 2ND TREATING OF PLANT DOCTOR. I USED A QTR GALLON OF A 4 TSP PER GALLON MIXTURE. I MADE SURE TO GET AS MUCH OF THE FOLIAGE AS POSSIBLE AND THEN I USED THE RESTCON THE MEDIUM. I SHOULDVE PROBABLY WATERED THAT ONE BUT ITS GOING TO RAIN TONIGHT. AT LEAST I HOPE IT IS. Looks like some of the pics are uploading! Yay! The plants looked the best I've ever seen them tonight so I held off watering. My wife is I'll and may need to go to the hospital. So instead of watering prematurely I can monitor the situation and make a decision in the morning. I made enough phed water for my father to go around and water everything. He is aware of the situation. Hopfully that will not be necessary. However, I don't want to over water and I feel like they didn't want it. Just going with my intuition. It's done me pretty good so far.
8/28 Luckily no hospital. It's sprinkling out. Plants are covered in water so we got SOME rain. It says we will get 0.00 but that can't be right. I watered the 10 yesterday and everything else this morning with a gallon each except the middle gmo in the 30 which got 1.5 gallons. Did not water the one in the 50 gal pot. It looks a little overwatered. Also looks like it has a slight calcium/magnesium deficiency. I'll up the calmag and i'll make sure when I do water I'll water thoroughly. Like usual toasted toffy is looking better after the treatment. The all star has been the k bicarb. I haven't seen shit for pm. Just a little residue from the k-bicarb. Took a video and some pictures. This is the fun time. I like watching the buds develop. Some of these plants were monster cropped so they are STACKED. I'll keep what I do updated.
8/29 Made an awesome video today bit it won't upload. Probably because its a little over 2 minutes. I'll do another one if it won't upload. Nope it won't even attempt to upload it now. Oh well. They flowers just looked so pretty this morning. I noticed some WPM on the event horizon in the middle. I noticed SOME on the bottom and interior of the GMO that I had already identified. I'll do another k-bicarb treatment and see how that goes. Plant Doctor seems to he doing a pretty good job on the septoria on toastedctoffy and my favorite event horizon. That plantvis THICK. it's going to be stacked and have some huge colas. I need to LST it and suppirt those giant colas and separate them a bit more. There is never any shortage of work to be done I can tell you that. I have defoliation to do on the sherb pie and the middle event horizon. It seems like crisis after crisis. Bu my plants are STRONG.
8/30 It was in the 40s at 6am. Shook off the plants. Bags are still heavy. I see some septoria climbing a bottom branch of the toasted toffy. It's foggy as hell out. Can't see a foot in front of me. Saw a LITTLE PM on the gmo I've been treating. It's just time to apply the ki bicarb. Plant Doctor is working wonders on even horizon in the back. I see some pm on the one in the middle. I think I'll treat that with plant doctor as well. I'm not sure. I messed up the video. I've got work to do. I'm waiting until I water and I'll feed again. I'm going to add beastie bloom to the lineup this time I think. Only one plant seems like it m9ght be too early for it. We'll see. I need to look back. I'll document what I do. Video won't upload. I'll try later but it's sideways
WENT OVER AROUND 3PM AND EVERYTHING LOOKED FABULOUS. WELL....THE PLANT I DIDNT WATERCLAST TIME IN THE 50 WAS DROOPING SO I GAVE IT A GALLON AND A HALF. THE TEN WAS LIGHT SO I GAVE IT A GALLON. IT WASNT DROOPY BUT ITS A HUGE PLANT IN A 10GAL AND USES A LOT OF WATER. I WAS PLANNING TO GO CHECK THEM TONIGHT AND SEE IF THEY NEEDED WATER BUT EVERYTHING IS PRAYING TO THE SUN! I DONT WANT TO OVERWATER AND I BELIEVE THESE WOULD BE BEST SUITED TO BE WATERED IN TGE MORNING. ILL FEED THIS TIME AS WELL. IM CONSIDERING ANOTHER APP OF K BICARB. TOOK A FEW PICTURES AND VIDEOS BUT ILL NEED TO UPLOAD
8/31 FED AND WATERED EVERYTHING. TOASTED TOFFY DIDNT GET FED DUE TO SEPTORIA AND THE 10 ISNT FAR ENOUGH ALONG.. THE 50 WAS WATERED YESTERDAY BUT GOT THE FEED WITH A LITTLE MORE WATER THIS MORNING. I ADDED ABOUT 1/16 TSP BEASTUE BLOOM TO THE REGULAR LINEUP TO SEE HOW IT GOES. MY BUDDY TOLD ME LOTS OF PEOPLE HAVING PROBLEMS WITH PM. I WENT BACK OVER TO DEFOLIATE AND LOOK FOR PM AND I FOUND IT. ON THE GMO INTETIOR AND SOME BOTTOM BRANCHES. I DEFOLIATED WHAT WAS BAD AND THEN I SPRAYED 3 GMO'S, EVENT HORIZON IN THE MIDDLE AND SHERB PIE WITH K-BICARB. HOPFULLY THAT WILL KEEP THINGS OUT OF CONTROL. I WILL BE WATCHING AND KEEPING UP WITH FUNGACIDES. IF I FIND ONE NOT WORKING ILL SWITCH IT UP. I HAVE A FEW OPTIONS. BUDS ARE EXPLODING IN GROWTH! WINDY OUT. I SAW A SECONDARY BRANCH LIMP AND MY GEART SUNK. I LOOKED DOWN THOUGH AND SAW THAT IT JUST WAS BLOWN HATD AGAINST THE TOMATO CAGE AND SNAPPED. I REMOVED IT WITB A SIGH OF RELIEF. MY BUDDY SAYS THE SEPTORIA DOESNT LOOK TO BAD AND ITS PRETTY FAR IN FLOWER SO HE THINKS ILL BE ALRIGHT. NEVER GROWING CLONES AGAIN. ILL STICK TO SEEDS AND STEAINS MADE FOR MAINES
9/1 Forgot to write an entry. IT RAINED FOR A BIT BUT TURNED TO BRIGHT 80'S
9/2 WATERED EVERYTHING. I THINK ITS TIME FOR ANOTHER TREATMENT OF PLANT DOCTOR TODAY. The septoria is getting a little worse. The buds are swelling everyday though. I think this plant only has a month left. I just need to outrun it. So far so good. I think my watering habits are better now. It's different depending on weather. Potassium bicarb has been wonderful treating the pm on that gmo. I treated the middle event horizon with it as well. It seems to work awesome. I'm losing tons of leaves. I hope that's normal senescence. I think it is seeing as how I see SOME foliage in the woods. Its matching other diaries. The plant must shed some leaves to make these flowers that seem to double in size every time I see them! Trying to upload a couple videos but they are long so we'll see what happens.
WENT BACK OVER AT NIGHT ANDCAPPLIED A LITTLE BIT OF K BICARB AND DEFOLIATED WHAT I SAW ON THAT GMO. IVE BEEN DEFOLIATING WHAT SEEMS LIKE A LOT BUT BUDS ARE SWELLING AND ITS CONGRUENT WITH THE MAJORITY OF MY DIARIES. I WISH I HAD PERFECT CONDITIONS BUT I DONT. I TREATED THE EVENTHORIZON WITH PLANT DOCTOR AGAIN. I USED APPROX A QTR GALLON OF 2 TSP/GALLON AND TRIED TO AVOID BUDS WHILE STILL GETTING THE LEAVES. I KINDA USED THE REST AS A SQUALCH SINCE I HAD WATERED THIS MORNING. THE WIND WAS STRONG. I ADDED A GARDEN STAKE AND ROPE SUPPORT TO THE TOASTED TOFFY AND ATTACHED IT RIGHT TO THE FRAME OF THE CAGE. LOOKS GOOD FOR NOW. ILL KEEP THINGS UPDATED.

Likes
29
Share


@nonick123
Follow
Día 48 (10/06) Riego con 1 Litro H2O + Regulator 0,15 ml/l + CaMg-Boost 0,25 ml/I +TopBooster 0,2 ml/l - pH 6.2
Día 49 (11/06) Riego con 1 Litro H2O + Regulator 0,15 ml/l + P-Boost 0,5 ml/l + K-Boost 0,5 ml/l + CaMg-Boost 0,5 ml/I +TopBooster 0,2 ml/l - pH 6.2
LCCA tiene unos colores espectaculares con tonos morados 😍
Subo el CalMag a 0,5 ml/L porque BPPA no se recupera, y el resto muestran inicio de deficiencia
Día 50 (12/06) Está lloviendo mucho por aquí. Menos mal que tengo el techo de policarbonato en mi invernadero casero. Hoy no necesitan riego
Día 51 (13/06) Riego con 1 Litro H2O + Regulator 0,15 ml/l + K-Boost 0,5 ml/l + CaMg-Boost 0,5 ml/I + TopBooster 0,2 ml/l - pH 6.2
Día 52 (14/06) Riego con 1 Litro H2O + Regulator 0,15 ml/l + CaMg-Boost 0,5 ml/I + TopBooster 0,2 ml/l - pH 6.2
Tiene un aspecto espectacular, con su cogollo central muy muy gordo y con unos reflejos morados preciosos
Me parece increible que esta planta pueda ser capaz de acabar en las 8 semanas (menos de 60 días). Voy a empezar a mirar sus tricomas con el microscopio
Día 53 (15/06) Riego con 1 Litro H2O + Regulator 0,15 ml/l + K-Boost 0,5 ml/l + CaMg-Boost 0,5 ml/I + TopBooster 0,2 ml/l - pH 6.2
En el microscopio se ven las antocianinas subiendo por los tricomas 😍
Día 54 (16/06) Riego con Té de Floración - 750 ml / planta
💦Nutrients by Aptus Holland - www.aptus-holland.com
🌱Substrate PRO-MIX HP BACILLUS + MYCORRHIZAE - www.pthorticulture.com/en/products/pro-mix-hp-biostimulant-plus-mycorrhizae


Likes
25
Share

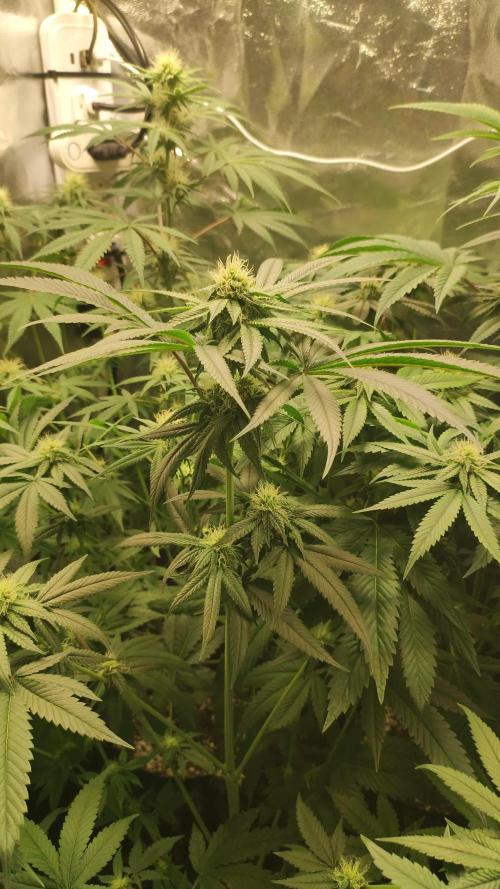
@TrickzGrowz
Follow
Ich bin jetzt schon verliebt in die Terpene der 7th Wave! Ich kann es kaum abwarten. Die Buds sind steinhart und schwellen immer dicker an!