
Likes
Comments
Share


@Dutchhobby
Follow
The lst one is making denser and bigger buds .u can see she wants to make me happy..the other one smells very citrus..like it..green one smells bit like original jack her.dont expect high hield.but the people from growers choice say on website that they only produce 30 gr...looking forward to smoke it do

Likes
55
Share


@pifflestikkz
Follow
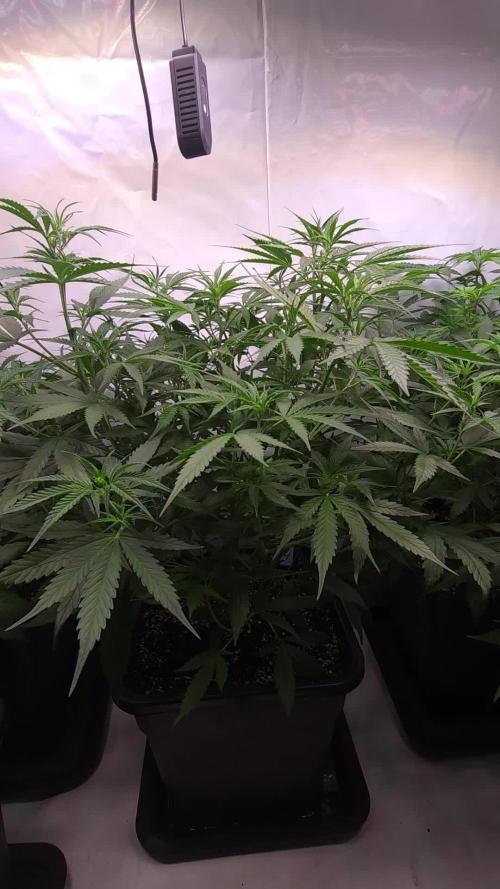
Day 85
26/07/24 Friday
Big feed today full 5L a little run offusimg de-chlorinated water pH 6.
So we are through her first transition week.
Starting to see sex pistils forming at end of last week.
Picture and video update ✌️💚
Day 88
29/07/24 Monday
Just de-chlorinated tap water pH 6 today, full 5L with just under a 1L run off.
Day 89
30/07/24 Tuesday
De-chlorinated tap water pH 6 today but I'm adding in Plagron Power Buds AND Plagron PK13-14 only 5ml each to 5ml water.
It says to use on every irrigation from early flower so here we go. If I start getting burns I'll cut out a few advanced nutrients extras and go again from there.
She is just ridiculous, robust, never stresses, healthy and just wants to throw arms out everywhere 🤣💚
Day 91
01/08/24 Thursday
End of week
Using de-chlorinated tap water pH 6 only this time.


Likes
35
Share


@farahweed
Follow
I flushed the pots once this week.
And use once with enhancer and a very small dose of shrot flowering fertilizer.
And I tried very hard to lower the humidity and make the daytime temperature not more than 25 degrees
💐🛸👽💥1


Likes
121
Share


@Tropicannibis_Todd
Follow
💩Holy Crap Growmies We Are Back💩
Code Name FBT2307
Well growmies we are at 70 days in and everything is going much better , she's bounced back pretty good👍 really good actually 👌
👉 Shes getting frosty now , and i hope she fills out 👌if she does gonna have some buds on a stick 💪
Lights being readjusted and chart updated .........👈 Even with early major issues due to the soil/medium she's come a long way 👈
👉I used NutriNPK for nutrients for my grows and welcome anyone to give them a try .👈
👉 www.nutrinpk.com 👈
NutriNPK Cal MAG 14-0-14
NutriNPK Grow 28-14-14
NutriNPK Bloom 8-20-30
NutriNPK Bloom Booster 0-52-34
I GOT MULTIPLE DIARIES ON THE GO 😱 please check them out 😎
👉THANKS FOR TAKING THE TIME TO GO OVER MY DIARIES 👈
Likes
8
Share


@Smokecheefacheefa
Follow
I'm so late 😩 life been taking over tho. So weather played a huge factor here. Weird storm happened shut power off for a couple days and got the temperature super low in my grow closet. So the deficiencies came in with the vengeance! Didnt notice it right away so I just continued watering at 6.5ph then thats when I started to notice the leaves on the lemo pie curling up. But I thought it was just the light so I moved it from right under it but it just got worse. I procrastinated longer confused on what it was going to do.🤦♂️🏿 didn't look good So I made a seabird guano,worm casting,alpha meal tea, breed it for 48hrs and used it about 5days ago. If somebody! anybody! Could let me know if ots a wrap for her or she might be ok? I would really appreciate it.


Likes
38
Share


@BlackHatGenetics
Follow
A lb from 2 plants in 69 days from sprout. You literally CANNOT beat that. Not to mention the 9g of kief I got just from my trim box. This stuff smokes like a dream, burns slow and tastes pine on the inhale, citrus/lemon on the exhale. Mephisto you guys prove time and time again why you are the elite.


Likes
6
Share


@Barcelona_Farmers710
Follow
Aquí empezó los problemas por el regulador...no podíamos bajar la potencia de 320w y los pelos se quemaron un poco, apesar de todo los colores empezaron a florecer! Buenos humos compañeros 🍁

Likes
62
Share


@OwlGang_Uk
Follow
Week 7 - Oh Mehn There’s So Much To Say About These Girls, I’ll Start With The Purple Power, It Is Ready To Be Harvest Anyday Now But I’m Looking To Push It To Week 8, It Has A Strong Aroma Of Sweet Berries. The Stardawg And Girls Scout Cookies (3gal) Are Putting On Some Dense Nuggets I Like How They’re All Looking Identical That’s A Good Sign. The Stardawg Has A Lemon But Earthy Scent And The 3gal Girls Scout Cookies Smells Like A Citrus Lemon With A Hint Of Pine, The Buds Are So Hard And Sticky Mehn I Cant’t Wait To Taste These Girls. The Other Don’t Have A Scent And The Gorilla Glue Having Start To Flower Yet Probably Gonna Steal The Show In The End! And I Would Like For MSNL To Acknowledge I Grew There Auto Lemon OG Up To A 100cm
Be Sure To Like My Grow Diary.
Height Chart:
Girls Scout Cookies: 30 1/2 (3gal)
Purple Power: 29 1/2 inches
Stardawg: 34 1/2
Girls Scout Cookies: 37 1/4 inches
Gorilla Glue: 24 inches
Lemon OG: 39 1/4 Inches


Likes
78
Share


@ClubRiot
Follow
Week 7 ,
pH Perfect Connoisseur Bloom Part A ( 1 ml/L )
pH Perfect Connoisseur Bloom Part B ( 1 ml/L )
CarboLoad Liquid ( 2 ml/L )
Sensi Cal-Mag Xtra ( 2 ml/L )
Sensizym ( 2 ml/L )
Bio-Heaven ( 2 ml/L )
Big Bud ( 2 ml/L)
Nirvana (2 ml/L)
Likes
5
Share


@pzwags420
Follow
I installed a PH controller but it didn't work right and only the ph up peristaltic pump is working. I will use this over my vacation as my PH drifts down naturally so this should work until i get a replacement. I watered in my gsc and other seedlings until runoff with 850 ppm heavy in nitrogen to green them up as the organic top dressing is taking too long.will see how they respond.on week 4 day 4 They are responding well to nitrogen Gsc is taking off!!!will continue nitrogen until end of this week as needed.


Likes
24
Share


@TerpTurtle
Follow
Week 1 flower
-1 pheno has been bushier and shoots more branches than the other
-cleanup/deleaf for light penetration and lower canopy suckers
-Spinning the plants every few days during Veg/stretch
-smells like tropical wine & sportswear when the lights go out lol

Likes
12
Share

@ThatsmyGrow
Follow
🌸 Week 5 – Gorilla Cookies Auto Pheno Hunt
Another week is done and the differences between the phenos are becoming more obvious with every update 👀🔥
Now that flowering is progressing, each phenotype is starting to show its own character much more clearly. Even though all plants are running under the same conditions, their reactions are very different.
📈 Current observations:
Some phenos are handling irrigation and feeding extremely well and continue pushing strong growth
Others are showing a bit more sensitivity and reacting differently to the same watering routine
Leaf size differences are becoming huge now — some phenos are producing massive fan leaves while others stay much more compact
Plant structure and overall vigor continue to separate more week by week
At this point, 4 out of the 6 phenos are currently looking like strong candidates and fall into what I’d personally consider the “good” category so far 👀
🍃 Maintenance & feeding:
I’m still managing the canopy and keeping an eye on how each plant develops through early flower. Small adjustments and observation are becoming more important now as every pheno responds differently.
📊 Current environment:
Temperature stable around 26°C
Relative humidity staying between 63–65%
VPD maintained around 1.3 kPa
Light intensity unchanged from previous adjustments
Now I’m especially excited to see how the buds start forming over the next weeks, because that will probably decide which phenos really stand out in the end 🔥🌸
The structure is there — now let’s see who delivers when it matters.
💬 Which pheno do you think will end up producing the best flowers?
Likes
3
Share


@MotherNaturesSon
Follow
hardy sativa, good taste profile with notes of peach and pink starburst, good yield, does in fact finish fast. likes training and grows robustly, yielding large buds that are quite dense given this strain’s sativa predominance. overdried a bit this time around, by overcorrecting for the summer humidity.


Likes
10
Share


@BOMbolenath
Follow
Flowers still growing, i will let one more week or so before harvest.
Giving water only.
Flowers are very dense like rocks.
Smell is amazing, like fresh sweet fruity gas :)

Likes
22
Share


Processing
Likes
13
Share


@Alpaca
Follow
Hoping they finish their flower stretch this week, snoopy and hazel are pretty tall already and my tent won't support much higher. Branches are getting tougher to lst as they grow. Other than that, looking great.
My goal for this grow is 150 grams, so on average about 38 per plant. As long as I hit 100 grams I'll be happy though
(Day 39) glad I did more lst because Snoopy and Hazel are growing 5cm a day. Thea (bottom left) has stayed pretty small compared to her sisters, as a result she has only been able to claim a small corner in the tent, she's furthest in flower regardless though.
(Day 41) starting to look like Hazel might actually become the biggest plant, her stem is way thicker than any of the others. She's also the least far in flower and working on her sidebranching

Likes
18
Share


@auto_floo
Follow
Lots of nice buds sticky and smelly :) ,412g of wet weight with stalks ,very nice outcome for first grow ,as a newbie I think I grew a nice plant with awesome buds ,looking forward when ready and cured .thanks for likes guys . Grow Diaries TOP 👍🏼 So happy guys ,thanks to you all for likes .
Likes
7
Share


@SzkolaZiola
Follow
One month of flowering is behind us. Another one to go - or so 😎
They are doing mighty fine 💪
Bueautiful overall, tightly stacked colas, healthy leaves 🍃
Most of canopy tops get 1000-1100 PPFD - corners get around 600-ish 🌞
I take a leaf here and there when I see it creating moisture spots or shadowing bud sites too much. Bottom half got lollipopped 🍭
See you in a week 👊