


Likes
7
Share

@HighHolidays
Follow
We’ve reached the final week before harvest. Most of the plants are already ready for root flushing or do it. I’ll do it in batches since humidity levels are a bit tricky. I flush the roots with plain water first and then add several liters with Final Flush to see if it leaves any effect on the flavor. I’m still applying a preventive fungicide foliarly. They’ve developed some great main buds, and I’m really looking forward to trying them.

Likes
11
Share


@CanarianGrow92
Follow
Week 2 for our banana purple punch from the fastbuds family
All looks good and the buds are forming real quick, we continue for now with master root and master bloom, next week we start to add some more addictives
Some plants had a little to much nutrients but we corrected the dosis and continue with a little less bloom nutrients! For the rest all good!!

Likes
21
Share


@JeyGanesha
Follow
Eccoci entrati nella 3°settimana di fioritura.queste papaia cookie mi stanno sorprendendo.belle e sicuramente buone.hanno una struttura ben forte. Stanno iniziando pure a profumare in modo spettacolare.buona buona davvero..
Quando sarà pronta vi dirò anche com'è a livello di gusto e effetto stupefacente 😂🤣😂🤣
Likes
3
Share


@Ninjabuds
Follow
It’s day 27 from seed for all the plants in the photo sea of green. Let’s call it the battle of the strains summer 2025. All of the plants are starting to have visible differences. I’m already starting to tell witch plants are more sensitive than others.


Likes
9
Share


@AustinRon
Follow
20 Weeks Total
12 Flower Weeks
Harvest
HARVEST - 12 Weeks, 4 Days - 2022-11-21T20:00:00-0600
Today (chop) is the 14th day since moving to 18/6. The Foxtailing of the top flowers indicates 1) light stress, 2) Reveg . . .?
Even with 18/6 and TWO full weeks beyond week 10, I’d have waited another 7-10 days to ripen the Trichomes to my liking (>1/3 w/ vanishing abscission). As is - I know we’ve more mass - they’re both trichome laden - the smoke test will tell.
Phenos
#7 “Broader Leaved” demonstrated moderate inter-nodal spacing, stacking buds put to the terminal flower(s). Flowers started as tiny ‘sunbursts’ of pistols in the common form for broad leaved plants in general. She branched significantly more than I expected - the buds along each mainline cola are on a small stem that’s 1/2” - 3” long, with a 1.5” to 2” bud attached. The buds spiral up the cola, starting (with varying internal spaces)
Ambassador Cartwright
Ambassador Cartwright by IRIE Genetics
Transition to Flower
Afterglow X Arise
(Clementine X Arise) X Arise -> Afterglow BX1?
((Tangie X Lemon Skunk) X Arise) X Arise
______________________________________
Start of Week: Saturday 19 November
AC3Q
120:F:13:1
to Friday
25 November
AC3Q
126:F:13:7
Summary:
Plant HeightBeginningOfWeek: [ 33, in]
Plant HeightEndOfWeek: [ 33 in]
Temp: 74.8
RH: 70.7
VPD: 0.88 kPa # need to get into the 0.9 -> 1.1 Early Flower
LightSchedule: 18/6
amt: [ 1750, ml] #
period: [ 9, hrs]
frequency: [2, day]
times: { first: 2100, second: 0300 } # Auto Only!!! Otherwise 1.3 @ 2100
Environment:
EC Targets: #
rel.
|
abs (rel + source)
ECripen:
[ 0.3, 0.6]
[ 0.6, 0.9]
ECflush:
[ 0.0, 0.2]
Fertigation Daily:
- Times; {2100h, 0600h}
- {pid: 4, amt: 1250 ml, ec: 0.6, pHRange: [ 5.5, 6.5], times: [2030h, 0500h]}
- {pid: 7, amt: 1250 ml, ec: 0.6, pHRange: [ 5.5, 6.5], times: [2030h, 0500h]}
Fertigation: #
Mammoth-P: [ 1.5, ml]
BioAgFullPower: [ 10, ml]
(The Rooted Leaf) Resin Bloom [ 3, ml]; # Potassium & Plant Extracts
_____
Saturday 19 November 2022
AC3Q 120:F:13:1
- [x] AM - EC 0.6
- [x] PM - EC 0.6, 1000 ml (local: sun am)
Sunday 20 November 2022
AC3Q 121:F:13:2
- [ ] PM - EC 0.6
- [x] AM - EC 0.6
Monday 21 November 2022
AC3Q 122:F:13:3 | HARVEST CHOP 87 Flower Days
Tuesday 22 November 2022
AC3Q 123:F:13:4
88 Days in Flower
Wednesday 23 November 2022
AC3Q 124:F:13:5
Thursday 24 November 2022 - Happy Thanksgiving!!!
AC3Q 125:F:13:6
Friday 25 November 2022
AC3Q 126:F:13:7


Likes
5
Share


@Sativa763
Follow
Day 49 after switch.
very nice i would say :)
everything is getting bigger and frosty.
no complains so far.
last week watering with PK 5-8, then just water until she´s finished.
Likes
31
Share


@BudXs
Follow
This week i kept doing what i do. Also i germed some mothers for the big show


Likes
6
Share

@DivineBuds420
Follow
Both RS11 plants are growing steadily and looking healthy. In contrast to the Pink Gelato, her leaves are noticeably thinner, showing a different growth characteristic.
During the week, they’ll likely be transplanted into a slightly bigger pot and will get their full BioTabs treatment – nutrients, beneficial microorganisms, the whole organic setup. I’m excited to see her thrive.
I’ll be away on vacation for a few weeks after this update, so some diary entries may appear a little later. My cousin will be looking after the plants and watering them, and he’ll also take a few photos to keep track of their progress. Everything should continue smoothly while I’m away.
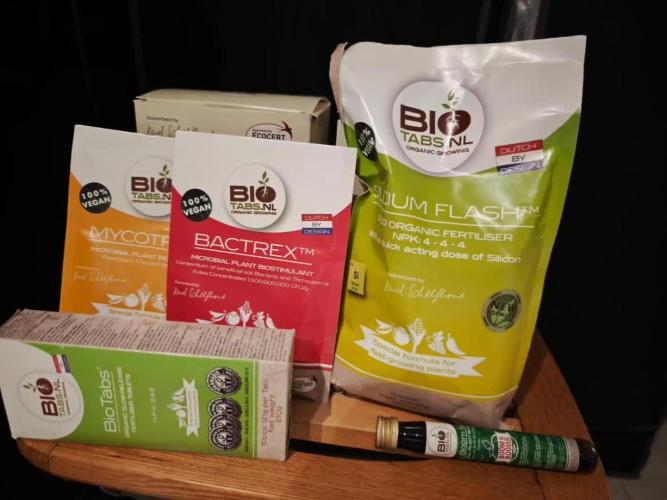
Both plants were successfully transplanted into 3.5 liter pots and received the full BioTabs treatment, including microorganisms and nutrients.
The substrate is based on reused and reconditioned soil with roughly 50% perlite mixed in. The base soil is BioBizz Light Mix.
Since watering is done exclusively with osmosis water, about 7 g of dolomite lime per liter of soil was added to provide proper calcium and magnesium buffering.
This run marks the first time following the BioTabs “just add water” strategy.
The substrate was prepared accordingly and amended with Startrex and Silicium Flash.
Before placing the plants into their new pots, Mycotrex was sprinkled directly into the planting hole and one BioTab was added to each pot.
After transplanting, the leaves were lightly sprayed with Boom Boom Spray.
The substrate was then watered with osmosis water mixed with Bactrex.
Everything went smoothly and the plants handled the transplant very well.
From here on, it’s all about letting the biology do the work.

Likes
24
Share


@Samsemilla
Follow
Soweit so gut.
Die Blüte neigt sich langsam aber sicher dem Ende bzw geht in die letzte Phase, ein paar Wochen brauchen die Ladies aber noch.
Hinten rechts scheint von Anfang an schneller und dementsprechend auch eventuell eher fertig zu sein, mal schauen wie sich das entwickelt.
Die Ladies werden etwas "rostig" aber ich denke das ist in dem Stadium kein Problem bzw einfach der Zahn der Zeit, der an ihnen nagt.
Der Geruch wird stärker und die Spannung steigt 🙏🏻💚

Likes
5
Share


@Msweedster
Follow
This past week I was out of town. However, I set up an auto watering system for two girls and one lived off the auto pot.
Seedling 1 - Largest in clear container
Seedling 2 - Autopot
Seedling 3 - The “Late Arriver”
I monitored the process and tent while away and was not let down. Came home to the nutrients finally being delivered, so the girls received fresh water with a first dose of “minerals and food.”
I’m just stoked they survived in my absence!

Likes
92
Share


@DeepWaterGrower
Follow
🗓️ WEEK 8 / DAY 50-56
⚡ Light: 55 cm / 150 watt;
⌛ Schedule: 18/6;
🌡️ 24.5° C - 65% RH average;
📑 PH 6 - EC 1.5;
🌱 She's very fine, has a beautiful green color and drinks about 1 LT/day!
⚙️ Fan, extractor and pump ON 24/0. No humidifier.
Likes
34
Share


@Hexus
Follow
Day 22 - She's doing okay! Had a minor PH issue the other day due to a cheap meter, which has been replaced. Her bottom first fan leaves are a tiny bit brown as a result. Her roots are clean and nice looking, thanks to the Hydroguard. She seems to be doing all around very well. Definitely have to check and adjust PH daily to keep her under control, however.
Day 26 - So I moved her to a new, non-visible home. Not because of any failure of the visible setup, but because at one gallon, it was just plain too small. She was going through water so quickly that I was having to redo her whole tank every two days. Was becoming too much maintenance. If I can put together a three gallon clear setup I will move her over to it. That is the plan at least. If not, she'll be a bucket girl. She's doing well and thriving, so everything is cool on that front.
Likes
3
Share

@420DeepGrow
Follow
📆 Semana 7
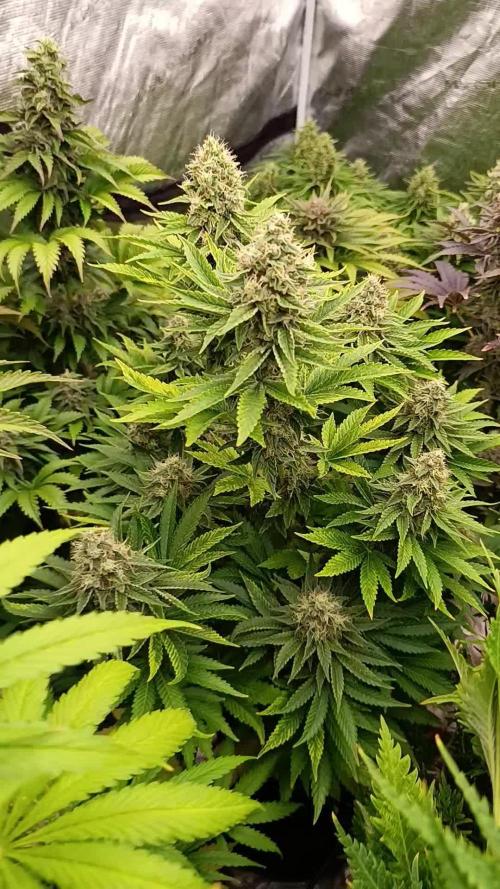
La Monster Maker entra en su tramo final de floración mostrando todo su esplendor. Los cogollos se han compactado y endurecido, repletos de tricomas que dan un brillo casi plateado bajo la luz. Los pistilos comienzan a oscurecer ligeramente, señal de maduración, mientras el aroma se vuelve más denso y penetrante, llenando el ambiente con notas dulces, especiadas y un fondo terroso inconfundible.
El riego se ajusta con precisión para evitar exceso de humedad, manteniendo la planta firme y saludable. Cada día revela una evolución visible, dejando claro que está en su mejor momento antes del gran cierre.
🔥 Fase crítica de maduración: la potencia, el aroma y la resina se afinan al máximo.
¡Seguimos creciendo fuerte 💪!

Likes
3
Share


@123Grow
Follow
This is for the RQS autumn cup.
I also use SST’s: Corn and Lentils
LABS ( lactic acid bacteria serum)
Looks like I have 137 days to harvest these 4. So that means 2 full months of veg and 65 day of flower.
Happy growing to everyone
Likes
26
Share

@420DeepGrow
Follow
Gracias al equipo de FastBuds y XpertNutrients sin ellos esto no sería posible.
💐🍁 Gorilla Punch (Auto):
Niveles fulminantes de THC. Testado en laboratorio con un 25,695 % en cannabinoides.
Perfil rico en terpenos. Los complejos y sabrosos terpenos de esta variedad son codiciados tanto por los extractores como por los fabricantes de hachís.
Rendimientos impresionantes. Los cultivadores pueden esperar hasta 550 g/m² de flores deliciosas y aromáticas, rebosantes de THC y otros jugosos cannabinoides.
Prueba de excelencia. Dos premios al primer puesto en menos de dos años dejan claro que esta cepa es una auténtica campeona.
🌻🚀 Consigue aqui tus semillas:
https://2fast4buds.com/es/seeds/gorilla-punch-auto
⛽ XpertNutrients: es una empresa especializada en la producción y comercialización de fertilizantes líquidos 🍶y sustratos🐛, que garantizan los mejores resultados y cosechas de la más alta calidad. A través de una cuidadosa selección de materias primas y un proceso de producción avanzado, sus productos son sinónimo de resultados confiables.
🛒 Consigue aqui tus fertilizantes:
https://xpertnutrients.com/es/sobre-nosotros/#:~:text=Xpert%20Nutrients%20es%20una%20empresa,de%20la%20m%C3%A1s%20alta%20calidad.
📆 Semana 7:
Por fin se ha acabado este temporal maldito y se pu ahora espero que crezca algo mas y se hagan unos buenos cogollos resinosos.
Todo va bien hasta ahora 😊
Likes
33
Share


@Ksouth1
Follow
Last week went well. She has grown tremendously in the last two weeks. Most growth has taken place in the last week. Over a foot of stretch. Because she was growing so much faster than the other autos, I put her in her own spot with her own Mars Hydro ts600 so I can adjust the light height just for her. I'm hoping she starts stacking on some bud. It seems like she isn't going to be a purple pheno, but oh well. As long as she turns out decent. She responded well to topping, lst and supercropping. She also seems to like the organic diet. I will update as she progresses. Until next time happy growing to everyone!
4/30- She is still stretching some but not as much. Starting to add bud mass. The bud is starting to get a purple coloration to it like I had hoped. Next time she will be grown with a soil mix that has 35% coco coir in no less than a 5 gallon aerated fabric pot to maximize the potential. I am also going to make sure she has the best lighting from the start. Because she wasn't as close as she should have been at first, that is why I think she is as lengthy. Just going to get a feel for her and improve for the next grow of this strain. Will update as she progresses.