


Likes
121
Share


@NuggetPawn
Follow
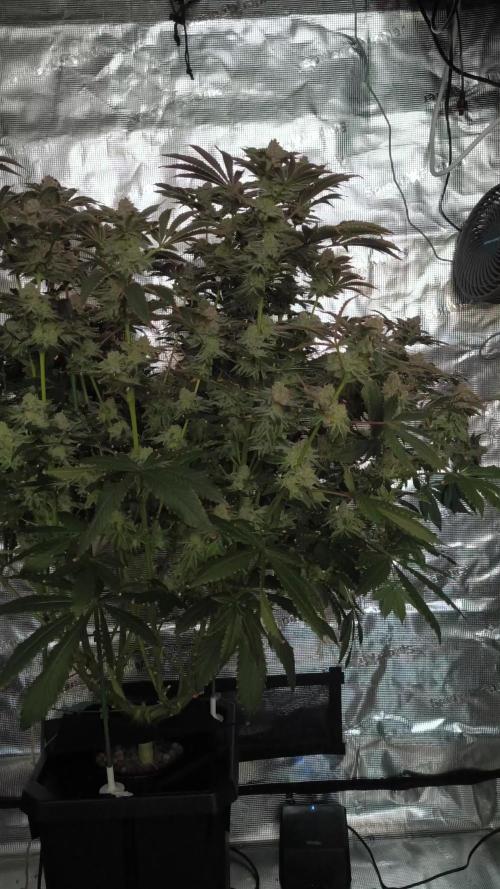
They still seem to be growing, although going in the room twice a day, it is difficult to notice unless I look closely or compare photos with previous weeks.
Going to cut off a couple small pieces of calyx's shortly and will post a couple pictures from my scope. Speaking of those, they're starting to give me some nice colours, slight purples, neon greens and yellows, the photos don't really do them justice under the warm lighting but I will try and take a couple pics in some white light when I chop her down in a couple weeks time.
It is also quite difficult to illustrate the size of some of these colas, the one near the back on the right, is about 19 inches long, and about 4 inches wide. Looks like 2 ounces of bud hanging on her and I have had to lasso some string around it and a couple other colas as they were falling down.
Bringing EC slowly down to around 1.2 - I think I will cut nutrient strength down to about 0.8 EC in a few days time to try and hurry her along a bit.
I will only be flushing for 3 days at the end of this grow, they will also be in the dark for 2 days at the end with low temps (mid teens in ºC) to preserve terpenes, oils and other cannabinoids.
Thanks for stopping by!

Likes
30
Share


@Sticky_fingaz
Follow
BIG BIG apologies to Heather from fast buds & to Growdiaries & anyone who follows.
The past few months have been a massive struggle, not just with temperatures & growing weed but on a personal level.
My wife has been very poorly & with covid and everything going on, it's put a massive strain on us all!!
I've tries to maintain an active presence on Instagram but that's about all I've physically had time for.
I've put this update together today, so far into the grow now it almost seems pointless.
I lost my original Mimosa due to high temps & high RH. Moving into the attic at that time of year was a mistake. It has cost me a small fortune to keep things alive. I've had to purchase an air con unit, more fans & just more of everything to be honest.
My purple punch is almost ready to harvest, any time within the next couple of days, followed shortly by Bruce Banner & Kosher cake.
I wont be winning any awards for this Diary & I feel bad as I was supposed to be show casing what 420 Fast buds has to offer & I've failed...miserably.
I hope you can make sense of all the pictures I've included....just a mass photo frenzy over the past few weeks.
Thanks to everyone & all your comments.
Wishing you all the best.
One Love ❤️

Likes
120
Share


@TheBudWhisperer
Follow
Week 22 of our painful result on the mothers. Reveg. Is full on and the plants are all trying desperately to figure out how to flower again. A couple days ago I was resolved to the fact that this cycle of mothers was not going to be anywhere near our acceptable standards for a high quality bud harvest. We lamented and cried a little…. Then we got ridiculously high to numb the pain…. And then I had a brilliant thought! The whole purpose has been to pollinate clones this whole time. Now that our stable of clones are well into rooting and reveg. We can simply use the mothers for breeding instead and salvage a harvest of high quality buds with the clones! It’s not an ideal situation and will result in less smokable buds but that said (and as per the outdoor photos), quantity won’t be a problem this year as usual😉. I figure a week or two to see what happens with em and we’ll commence the sperm spray😎.
We’ve also taken some additional steps and commenced with impregnating the Spliff strawberry on a couple of select branches. This plant is proving a beauty as expected - even despite a little fasciation she’s a monster🤩🤩.
Method
- we placed some pollen into a brown paper bag (both some SOG in one and some 707 in another.
- we marked 2 branches with zip ties to keep track of which pollen is where.
- we wrapped the branches in each bag and twisty tied it closed to the stem base for about 12 hours.
- after remove the bags and to prevent further pollination on the rest of the plant we sprayed down the pollinated branches and then the entire plant with a light mist of water.
When ur outdoors this isn’t perfect science and there will be some additional seed that pops out elsewhere. Regardless, it’s a guarantee the 707 is viable but I’m none too sure about the Skywalker stuff. It may have been subjected to moisture while in storage and could be inert at this point. No telln for a few weeks🤞.
The dutchy system, despite significant time to set up has been better than expected - all the plants are happy, added a Skywalker clone to the mix for flowering as well. They seem to be taking to the Druid nutes just fine. Great system and she’s pretty much on cruise control right now👌.
All told - the pollen chuck is not yet a complete failure. We’re definitely gonna have some cross beans - they only question that remains is how many different strains. Thanks again for hanging with the longest grow ever👍👊.
Background/Repetitive Nonsense
These plants will be the two mothers this growing season that will be utilized for stage 2 of the pollen chucking project. We’ll be taking clones and stressing the genetics for some fem. pollen using colloidal silver.
Instead of trying to reinvent the wheel with landrace genetics, we’re effectively skipping initial hybrid crossing and stabilization, going straight to the polyhybrid mix. I call it the shotgun approach to selective, unvetted and amateur breeding on a micro scale😉.
These 2 parent strains will form the basis for 8-10 different F1 polyhybrid combinations and a further S1 back cross of each of the mothers. Not only should we be able to preserve the genetics for both mothers in feminized form but we’ll also be running an entire family of new hybrids after seeding out clones from each on the initial lineup of this summers photoperiods.
Method is pretty simple here; once we’ve got our pollen off the two mothers we’ll be clipp’n clones on 4 select strains that have proven results from various respected breeders. We’ll be using those for pollination purposes in what is expected to be a 10 plant recirculating Dutch bucket hydro system.
***Update***
The feminization process didn’t take at all with the strawberry or the Skywalker so it’ll be reg. Seed crosses with only Skywalker and some other 707 Headband that we have in the vault.
*********
Strain details:
Parent strains for self pollination
- Skywalker Kush by Reserva Privada
Classic kush effects and earthy aroma. The strong kush element of this cultivar will compliment any cross.
- Spliffs Strawberry by Spliff Seeds
Incredible mix of flavourful terpenes and hard hitting high THC. She’s got some Herer as well as some Diesel in ‘er so an obvious choice for any cross as well.
***UPDATE***
The strawberry had to come out of this breeding run to wait for a better mother that hasn’t been attacked by aphids. It’s been a tough battle this season and we’ve had to make a couple of heartbreaking sacrifices already.
Parent Strains for cross pollination
***UPDATE***
We added another 2 strains to the mix just in case we need to spot swap for some more variety.
- Ghost Train by AMS Seeds
A cross of Alien OG x Ghost Train Haze. Never tried the strain but I’ve heard only good things. This one might be worth mixing with the Strawberry so we’ll see how it goes.
***UPDATE***
Sadly - the ghost train turned out to be an auto so cloning her out as part of the breeding project is a no-go. Really disappointed about this but at least we still have a ready backup strain on the lost coast og to take her place.
- Boogie Nights by AMS Seeds
A cross of Kalijah, aka afghani/skunk/diesel/blue heaven X Juanita, aka NYC Diesel/Reina Madre). No idea here so naturally I’m interested😉.
**************
- Lost Coast OG by Emerald Triangle
Pakistani Kush x Lemon Thai x Chemdawg #4. Essentially a classic, west coast combo of landrace kush genetics that Cali is famous for, mixed with hard hitting Chemdawg #4.
***UPDATE***
The Lost Coast is a winner of a plant. Still outdoors and in veg. Looks like it’s recovered from the aphid attack. Might consider trying to take another cut of this and just rooting it in a pot for pollination. At this point, what the hell and if we could salvage anything it would be a positive.
*****
- Spliffs Blueberry by Spliff Seeds
(Chocolate Thai x Afghani #1 x Highland Oaxaca) x Northern Lighhts Special. Only 1 bean of this left and the whole purpose is to blend the best of Spliffs Berry strains as a tribute. Awesome breeder and they’ve been very kind to us over the years.
- Northern Light by Royal Queen Seeds
NL means nuff said. A combo of 11 unknown strains believed to originate from the west coast of North America. This cultivar is a great take on these classic genetics and a perfect compliment to just about any cross. A biased fave of ours.👍
- White Widow by Seedsman
Brazilian Sativa x South Indian Indica. This classic strain has been unluckily elusive for us the last couple years. We know the quality of seedsmans version of this cultivar having grown it in the past. Sadly, a very strong performer that never made it to harvest due to an uncontrollable aphid infestation.
And we’re only at step 1.... still gonna need an assist with pheno hunting all of the crosses so if anyone’s interested in running the testers (when we finally get to that point) just let me know👍😎.
Gonna be a Dope ass summer project and can’t wait to see it in full swing🤟. Thanks for stopp’n in y’all👊


Processing
Likes
41
Share


@KilgoreTrout
Follow
Doing great. Getting excited.
2-3 until harvest. Maybe 4, you just never know
Based on tricombs I'd say at least 3
Likes
12
Share


@Papabro2k
Follow
Quick update added my pets for the comp Started with some bloom this week topped her too happy days growing fast
Likes
17
Share


@CanadianFillmore
Follow
Week 7 begins for Mandarin dreams and Divine storm. These ladies are looking happy and healthy, bulking up, putting on weight and glistening with frost.
This grow and grow light is sponsored by Mars-Hydro, thank you Kaoritracy for hooking me up with the TSW2000.
Thanks for stopping by growfessors, tune in next week for another episode of growfessor theatre! 👽🌳💚


Likes
20
Share


@DeepRootsGrowTrees
Follow
KRITIC AUTO by KANNABIA
Week #9
Week #6 Flower
No issues this week she's doing 👍 she's really focusing her energy into her buds as the have stared becoming dense they look amazing and smell great!! Stay Growing!!!
Kannabia.com KRITIC AUTO

Likes
8
Share


@Dapper_Buds
Follow
This week the GMO cookies started to bounce back fast an hard from the leaf strip. At the start of the week all 3 girls got 1tsp of grow an bloom from roots organic dry amendments along with a feed of elemental at every watering at 1/4tsp per gallon of RO water. Add half 1/4tsp of dynomyco to the water also for some of that extra root support. Other then that slight adjustment on the tie downs an just letting the one on the right side just do her thing. Thanks for viewing an happy growing mates!

Likes
6
Share


@Ryno1990
Follow
Going threw week 4 of flower this Purple Lemonade is really starting to fill out an is starting to get her purple color comming in she's deff been doing awesome with these cronk nutrients am this fold 6 led from medic grow
Likes
27
Share


@GrowInger420
Follow
This week is start of 4th flower week. The plants look good but i need buy some yellow cards. Buds become bigger and start to smell more intense. The lemon haze surprised me, because i germinated her 15 dsys after them other 2 and shes the biggest of them all. Hope, everything will be fine. ✌️
In the middle of the week i took the net away because it seems they stretched finally and they have a good shape now.


Likes
13
Share


@GrowerGaz
Follow
As usual plain sailing the autopots are such a bonus when it's 28c indoors. This week they have had pH water and Iguana juice Bio. Also they have had two times KNF foliar feed.


Likes
23
Share


@Wazowskid
Follow
Some leafs are turning yellow which is a signal that the root flushing has worked. I've tried to see the trycomes with s magnifying glass but I don't see any turning ambar yet, the opposite with the pistils, most of them are already brown. At this point I don't know if I should harvest now or wait one more week.
Likes
147
Share


@JamMAKEcan
Follow
So much in the garden .. Not enough sun for quality cannabis but great for veggies..they dont do too good in direct sun so there im good 😁🏆
Likes
147
Share

@JamMAKEcan
Follow
It's been cloudy for days but no rain right go figure ..have to try and keep those 2 cannabis off grid.. Experiment keep moving it for sun.. Then neighbor informer lol.. Im playing spy behind enemy lines ( right next door )..lol lol. Dam snitch..why other people has to watch other people is my guess


Likes
14
Share


@Tried_and_Tested
Follow
This was a brilliant week for plant growth, with some side branches over doubling their height. I added the ScrOG net at the beginning of the week and began some more intensive training.
The LST only plants I pretty much just continued to bend. The topped & LST'd plants I removed some of the lower bud sites that were not getting any light. I also removed a few awkward fan leaves that could not be tucked away. The addition of the net has helped with this though, as keeping the canopy even is much easier with the support it gives.
I also decided not to try any further cuts on the (half) mainlined auto's. My reasoning is that they have developed strong, independent colas already, so cutting for more would not see much gain. The plants had also begun to flower on the night I went to perform the second cut, and my growing experience tells me not to mess with flowering plants too much so here we are.
I gave the plants one regular watering of 10L pH'd water, and a 20L nutrient mix using the ratios stated above. All volumes were split equally between the plants.
The scrawny looking blue critical has perked up a heck of a lot, so the weakest looking plant is the LST only on GSC. ZThe strongest plants by far are the ones that have been topped and LST'd, closely followed by the mainlined ones. LST only is definitely great, but it is clearly lagging behind the other two techniques.

Processing
Likes
18
Share


@GrowingisFunkO
Follow
Week 14 - 06/14 - 06/20
Light - 400 W HPS & 265 W LED
Temperature - 76 +/-3
Humidity - 40 +/-5
D43 Flower - Watered the ladies, they are swelling up nicely. While I am happy to stare at these beauties daily, this is definitely the boring part of growing, not much to report besides beautiful bud growth. They have also started to produce a strong scent, to the point where I will smell the entire house up if the garage door is open. Loving the way this grow is turning out.
D46 Flower - Water with nutrients and added some blackstrap molasses to the mix. I took a risk today and tested out some late flower defoliation, I took the large fan leaves off two of the clones and front Hulkberry and Royal Gorilla Scrog. I want to see the difference in growth with late flower defoliation.
D47 Flower - Moved the LED light a little further away, I had noticed some light burn on one of the clones. Decided to build a drying box since I am pretty sure I will have to harvest these strains separately. Added some pics, its a quick build out of some stuff I had laying around the house. Only had to buy a $10 filter that I could cut up and $20 silica gel packs. I am running the exhaust air from the tent into the dry box that will filter through the $10 charcoal filter I cut up and doubled up on the filtration. I'm going to add refreshable silica gel packs in the box to help fight humidity. Hopefully, it works.
Likes
19
Share

@Nedizzle
Follow
Day 56. This grow is in the last round and will most likely finish on day 63.
Jealousy is pretty cooked, however i finally figured out why the ph dropped so hard. The roots were matted. I poked oxygenchannels with a clean spoon and it helped immediately to actually raise the Ph, however it was already flowerday 52 and it seems, that i can only take this knowledge with me into the next grow.
She drinks very little and when she does not drink more, i will harvest her tomorrow at day 58.
Lemon Cherry Gelato still going hard and i will change the recipe to p/k booster and calcium only at 1.0 EC.
Few days later, i will maybe try Flawless Finish from AN.
This is almost it and tbh, Jealousy was a tough experience, since it growing for like four months, but i'm excited for the next run and i think will dial in very good. Its the first run in DWC with the combination of new nutrients.
In my next run, i will grow Hindu Kush and the new release of Thin Mint Frosting from Barney's Farm.

Likes
1
Share


@NorthStarCannabis
Follow
She was not getting enough light outside. Given proper light and Sensi-Grow nutrients, she's growing like crazy!! Soon it will be time to start LST.
Likes
16
Share


@DreamIT
Follow
-Sponsored by:
💫PARADISE SEEDS💫-💡VIPARSPECTRA💡-💐GREEN BUZZ LIQUIDS💐-🛠️WEDRYER🛠️
🏁18/6 hello growerz, with today I start the resumption of diaries on GD. I have 13 new genetics in germination and as many diaries. I start by putting the seeds in water for 24 hours, after a day I will put the two seeds in two different jiffies, one with humic acid from greenhouseseeds and the other with just plain water. Get comfortable and follow the updates 😉👋🦄
19/6 The seeds were divided and placed in two different jiffies, one with humic acid and one with water only.
21/6 after another 24 hours in the dark the jiffies were moved under the lamp. let's start the dances!
23/6 The seed in the humic acid jiffy has already sprouted and the cotyledons have opened. look forward to updates on the brother in the water only
24/6 we await the release of the seed in jiffy
25/6 still nothing for the second seed .-. I'm starting to worry
30/6 the second seed is officially dead, I caught a glimpse of it in the jiffy and by pressing it lightly it exploded. I will always wear a new one from paradise seeds, stay tuned
__________________________________________
Personal advertising (contains affiliate links)
__________________________________________
🦄 winners and holders of the most prestigious awards, since 1994 they offer genetics of the highest quality! Anonymous shipping!
✅https: //bit.ly/Paradiseseeds_
__________________________________________
Did you know that Green Buzz Liquids fertilizers are 100% vegan? A complete line of products ready to give the best to each of your plants! Visit the site and see my journals to see how they work 🦄
🤯 And with the code "dreami t" you will immediately receive a 15% discount on your purchases
✅https: //bit.ly/GreenBuzzLiquidsPro
__________________________________________
👀 Are you looking for a good lamp to start with? 👀
🌞Viparspectra has something more than the others, take a look at their site.
⏩ Use "GDVIP" for an extra discount or "DREMIT3" for an extra 5 %% discount
👀 Search for it on Amazon
✅Amazon USA: https://amzn.to/30xSTVq
✅Amazon Canada: https://amzn.to/38udUVe
✅Viparspectra UE: bit.ly/ViparspectraUE
✅Viparspectra USA: bit.ly/ViparspectraUS
______________________________________________
🌈 Tired of blowing on your weed hoping it dries quickly? Check out the Wedryer website! You will find a well-made accessory that will help your weed dry in just 8-10 days without the annoying risk of finding mold or other annoyances! (no affiliate links)
✅https: //bit.ly/Wedryer_
______________________________________________
📷🥇Follow the best photos on Instagram 🥇📷
https://www.instagram.com/dreamit420/
Backup
https://www.instagram.com/dreamit4200/
🔻🔻Leave a comment with your opinion if you pass by here🔻🔻
🤟🦄💚 Thank you and good growth 💚🦄🤟
