
Likes
Comments
Share


@xHide_BG
Follow
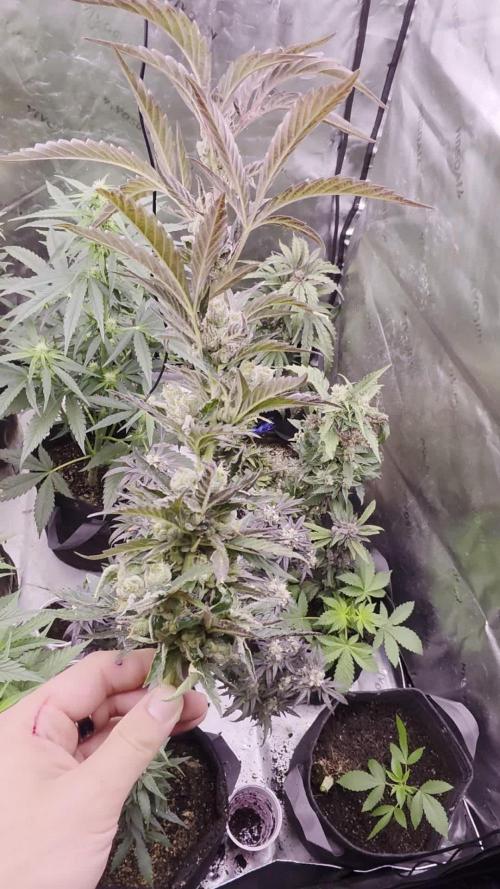
Good Strain ..
it's not the best of all.
but the experience is worth it.
😀I think it's a great plant to test
xxxxxxxxxxxxxxxxxxxxxxxxxxxxxxxxxxxxxxxxxxxxxxxxxxxxxx
xxxxxxxxxxxxxxxxxxxxxxxxxxxxxxxxxxxxxxxxxxxxxxxxxxxx
xxxxxxxxxxxxxxxxxxxxxxxxxxxxxxxxxxxxxxxxxxxxx
xxxxxxxxxxxxxxxxxxxxxxxxxxxxxxxxxxxxxx
xxxxxxxxxxxxxxxxxxxxxxxxxxxxxxx
xxxxxxxxxxxxxxxxxxxxxxxxxx
xxxxxxxxxxxxxxx
xxxxxx
x
it's not the best of all.
but the experience is worth it.


Likes
5
Share


@MyWeedSteps
Follow
Money maker strain was very satisfying. High THC. Made and smoked with love in 2017.

Processing
Likes
15
Share


@Excalibur
Follow
05 October 2018
New Tent
New pump , hose and airstones.
06/10/2018
Re-arranged shed.
07 October 2018
Finished the Shed
08 October 2018
New propagation kit
13 October 2018
Day 1
Seeds added to root riot.
15 October 2018 -
Day 3
Nothing
18 October 2018 -
Day 6
Some Lid Fitting and DIY
19 October 2018 -
Day 7
We have a sprouting seed!!!!


Likes
49
Share


@DogDoctorOfficial
Follow
🌿 Mentha de Croco – Harvest Report | Week 19 from Seed (End of Week 8 Flower) 🌿
By Terpyz Mutant Genetics
And just like that, we close this incredible chapter in our mutant journey. 💚
After 19 weeks from seed, including a long, loving veg phase and a wild 8 weeks of flower, our girls have reached the final moment: Harvest.
Each one was chopped with gratitude and admiration, then gently hung to dry, where they will now rest for about two weeks under carefully controlled conditions:
🌡️ 18–20°C
💧 60% RH
…A slow, respectful cure to allow all those unique expressions to settle and shine.
These plants were peculiar from the start, true mutants, each with her own story, her own twist of leaf, her own rhythm. What they lacked in size or symmetry, they made up for with character, energy, and intense presence.
Let’s talk terps:
The dominant aroma is deeply chemical, like nail polish, with a gas note that grabs the senses. It’s bold, loud, unapologetically strange, and that’s what makes it so special. This isn’t your everyday garden — this is an experience.
No two flowers are alike. The phenotypes are as if sculpted by nature’s abstract brush, perfect in their imperfection, from the shape of the colas to the twist of every leaf.
📸 We’ve shared photos of their final moment standing — each one captured in her full glory before the shears came in. May they live on through memory, resin, and smoke.
⸻
Dry & Cure Notes:
They’re hanging now in a dark, clean space, and we’ll aim to maintain the 60/60 rule (60% RH / 18–20°C) for the next 10–14 days before trimming and jarring for cure.
Expectations are high. We’re hoping for smooth smoke, complex flavors, and some deep mutant magic in the effects.
⸻
🌱 Shout-outs to the dream team:
@terpyz_mutant_genetics – creators of this beautiful madness
💧 @aptus_holland – for the cleanest mineral recipe in the game
💡 @futureofgrow – lighting the path forward
📊 @trolmaster.agro – keeping every condition dialed in
💚 And always, the Grow Diaries community – friends, followers, lurkers, lovers & haters alike. You’re part of this journey.
📲 Follow us on IG & YouTube for more madness, inspiration, and behind-the-scenes freak shows.
⸻
This isn’t just a harvest… it’s a celebration of weirdness, patience, and beauty.
Until the next round — thank you for growing with us.
Growers love. Always
DD 💚
Genetics - Mentha De Croco
Nutrition - @aptusholland
https://aptus-holland.com/
Led Power @ F.O.G. Future Of Grow
https://www.thefuturofgrow.com/en/online-store/BLACK-SERIES-600-p489093171
Controls @ TrolMaster
https://www.trolmaster.eu/tent-x
Let’s see what next week brings! 🚀
As always thank you all for stopping by, for the love and for it all , this journey of mine wold just not be the same without you guys, the love and support is very much appreciloved and i fell honored with you all in my life
With true love comes happiness Always believe in your self and always do things expecting nothing and with an open heart , be a giver and the universe will give back to you in ways you could not even imagine so
As always, this is shared for educational purposes, aiming to spread understanding and appreciation for this plant. The journey with nature is one of discovery, creativity, and respect. Let’s celebrate it responsibly and continue to learn and grow together!
Growers Love To you All 💚

Likes
37
Share


@RFarm21
Follow
Boas growmies! Penso que a royal gorilla #1 quando completar 10 semanas posso começar o flush.
10/08/2021 - O gráfico representa a nutrição misturada em 2,5L de água da Royal Gorilla 1. EC = 1,32; pH 6,2
;10/08/2021 - Alimentaçao das Royal Cheeses (4L): CE = 1,34mS; pH 6,2
-BioGrow - 7ml; BioBloom - 5,5ml; TopMax - 5ml; BioHeaven - 6,5ml; Activera - 6,5ml; Calmag - 1,5 ml
Alimentação Royal Gorilla2 (2L): CE = 0,67mS; pH 6,4
- BioGrow - 0,5ml; BioBloom - 3,5ml; TopMax - 12ml; BioHeaven - 1,5ml; Activera - 3ml; Calmag - 1ml;
Reduzi o nitrogenio (biogrow e bioheaven) porque as folhas parecem muito verde-escuro.
---------------------------------------------------------------------------------------------------------------------
13/08 - Alimentaçao da Royal Gorilla #1(2,5L): CE = 1,37mS; pH 6,1
-BioGrow - 3,5ml; BioBloom - 5ml; TopMax - 3ml; BioHeaven - 6ml; Activera - 5,5ml; Calmag - 1 ml;
13/08 - Alimentaçao das Royal Cheeses (4L): CE = 1,33mS; pH 6,3
-BioGrow - 8ml; BioBloom - 7ml; TopMax - 5ml; BioHeaven - 8,5ml; Activera - 9ml; Calmag - 2 ml;
Alimentação Royal Gorilla2 (2L): CE = 0,70mS; pH 6,1
- BioGrow - 0,5ml; BioBloom - 4ml; TopMax - 2ml; BioHeaven - 5ml; Activera - 4,5ml; Calmag - 1,5ml;

Likes
15
Share

@GERGrowDesigns
Follow
Welcome to Flower Week 6 of Kannabia Clementine Slush BioBoost Edition
Need a Fail-Safe Germination and Express Flowering?Kannabia Makes It Easy with BioBoost, Sproutly and Its Fast Genetics . More informations to find at The Kannabia Blog on GrowDiaries.
Check out Kannabia Seeds with my link [https://www.kannabia.com/de?ref=61966] and grab the germination device or the strains I used . Trust me – it’s worth it for sure !
Get another 20% Discount at all products using the code [GGD] at the checkout
For this Project , I’ve chosen the Feminized Photo Strain Clementine Slush BioBoost :
Here’s what I’m working with:
• 🌱 Tent: 225x150x150
• 🧑🌾 Breeder Company: Kannabia Seeds
• 💧 Humidity Range: 45
• ⏳ Flowering Time: 65 Days
• Strain Info: 21%THC
• 🌡️ Temperature: 26
• 🍵 Pot Size: 20
• Nutrient Brand: Hy-Pro
• ⚡ Lights : 600W x 2
A huge thank you to Kannabia Seeds for allowing me to try my Best with this amazing collection from Photo Strains they managed to Sponsore . Big thanks for supporting the grower community worldwide! Your genetics and passion speak for themselves!
Let’s grow together – and don’t forget to stop by again to see the latest updates!
Happy growing!
Stay lifted and stay curious!
Peace & Buds!
Likes
38
Share


@Green_Mountains
Follow
Another good week! I fed them once on Monday. A final shot to boost them for finishing up. I am pretty certain they will finish within 2 weeks.I also watered them on Thursday and today (Sunday).
I defoliated both plants earlier this week as well. For one, I needed to open the canopy up to help keep the humidity down but, there were a lot of leaves yellowing and turning brown. I was not feeding them correctly... in the sense that I wasn't watering enough in between feeds. There were excess nutrients built up in the soil and I believe that led to the nutrient burn. Also, this was my first and only feed without the Grow Big due to flushing for week 9. I followed the Fox Farm feed schedule... but, I think I needed to understand my plants better!
I also believe I stunted these girls! One is about 24" tall and the other is 21" tall. Both on the very low end of the growth chart.
Overall, I am very happy!! So much to experience and learn in such a short window of time! I've thoroughly enjoyed this grow!
I look forward to the harvest and experiencing all that is to come!
One last thing... Anyone use GrowBuddy and any word on what is going on with the current download? I've followed the drama around taking so long and all that (the new hardware soon to be for sale for 2.0)... but, the website now says the software is available for free and working on Macs and Windows.... So, I downloaded it last night and I cannot activate an account. Everything has a greyed over kind of look... So, I assume they took some part of their servers offline... Anyone know if this is accurate and has anyone else activated a new account recently? Thanks for any insight!!
Peace!
Likes
10
Share


@Colectivegrow
Follow
Día 15 de vegetación de Tropicanna Poison XL (Día 20 desde germinación)
El crecimiento de nuestra Tropicanna Poison XL sigue con un buen ritmo. Aparecieron algunos pulgones, pero los eliminamos con Bio Pets, un pesticida orgánico nacional (Chile). También agregamos micorizas, calmag, bio grow de BAC y Nirvana de Advanced Nutrients.
Actualizacion día 21 de VEGETA (Día 27 desde la germinación)
El FENO 2 se a espigado considerablemente, se pone una base para que este mas cerca de la luz led
Al parecer el FENO 3 es el mas estable de los 3 especimenes.

Likes
137
Share


@MrJones
Follow
mrjones - Slurricane #7 S1
🌱Slurricane #7 S1
@inhousegenetics_official
👨🌾🏽GD Grower: MrJones
🔹🔹🔹🔹🔹🔹GOALS🔹🔹🔹🔹🔹🔹
🌞Environment - 75/80℉ and 60% Humidity Good Old Mother Nature
💧 Feeding - The Green Sunshine Company - Earth Dust All-Natural Plant Nutrients
⚗️Soil - 35% ProMix MP / 25% Ocean Forest / 20% Tupur Royal Gold / 10% lobster Compost / 10% Additional Perlite
🍃Training / So this girl was 60 Inches and spread her out under a 5x5 Trellis
🕷️ IPM - Will be using Green Cleaner" 1 OZ per Gallon, and CannControl from Mammoth alternating between product each month
🔹🔹🔹🔹🔹🔹🔹🔹🔹🔹🔹🔹🔹🔹🔹
📜 Rambling - Week 17 / This lady was already 60 inches tall, built a 5x5 Trellis, and spread her out, with the whole summer to go she is going to Beast Mode On Me! Going to be top dressing with the Green Sunshine Company - Earth Dust All-Natural Plant Nutrients, Two-part Dry Amendment, Base, and Bloom, will be making compost teas each week, see recipes below, will be doing a vegetarian focus tea, and a flowering focused tea.
🔹🔹🔹🔹🔹🔹🔹🔹🔹🔹🔹🔹🔹🔹🔹
▶️ Sunday - 05.30.21 / We have been having a small amount of rain, so this outside run has been self-sufficient.
▶️ Monday - 05.31.21 / We have been having a small amount of rain, so this outside run has been self-sufficient. We do have some warmer weather on the horizon! The great news was able to move the CLONE of this plant outside today, the Mother and Her Clone are Doing Great!
▶️ Tuesday - 06.01.21 / Outside grows are starting out sort of easy, soil is nice and moist.
▶️ Wednesday - 06.02.21/ The big girl is really starting to fill the SCOG and stretch up to the second SCROG
▶️ Thursday - 06.03.21 / The outside plants are doing very well, cooler weather with rain again today.
▶️ Friday - 06.04.21 / Warmer day today and it got into the mid 80's they are loving the sunshine!
▶️ Saturday - 06.05.21 / With the week coming to an end, I can be happier with the way the Earthdust is performing so far only a small amount of water, and rain, and the outside Slurricanes are rocking it, the clone has grown at least 6 inches.
🔹🔹🔹🔹🔹🔹🔹🔹🔹🔹🔹🔹🔹🔹🔹
Earth Dust - DESCRIPTION
🔹Earth Dust is our all-natural plant nutrient designed for indoor and outdoor flowering plant growers. You can grow easily by “just adding water” to your soil for the entire growth cycle. It creates a “living soil” so your plants thrive from seedling all the way through flower and harvest. Earth Dust represents an organic dry amendment method of gardening, it’s made of a natural powder of ingredients.
🔹Because you only need to water your soil with Earth Dust, you can concentrate on caring for your plants and getting a healthy crop “on autopilot”. Now you can grow without spending hours of your life mixing chemical nutrients, and you can do it naturally. What’s more, is you will enjoy the cleanest, most aromatic, and flavorful harvest you’ve ever experienced when a plant grows in a rich, organic web of living soil.
Product Highlights
🔹All-Natural Ingredients – Mostly plant-based – Safe around children and pets.
🔹Packaged in kraft paper bags that are recyclable and compostable.
🔹Easy to Use – Just mix the powder into the soil 3 separate times – then water only.
🔹Packed full of rich microbe food & contains billions of beneficial fungi and bacteria! Creates a resilient, living soil that defends against pests and diseases.
🔹Rich in trace minerals and nutrients for full plant expression. Sourced from rock dust, sea-farmed kelp, and land-grown crops.
🔹Soil Conditioners help balance pH and make nutrients more available in the soil. Achieved with ingredients like bat guano, worm castings, limestone, molasses, and humic acid.
🔹The correct balance of N-P-K nutrients for each stage of growth:
🔹Earth Dust Base (3-1-2) contains key nutrients for sustained vegetative growth. High nitrogen (N), Low Phosphorous (P), and Medium Potassium (K).
🔹Earth Dust Boost (2-3-6) contains accelerated-release nutrients for powerful flowering growth. Low nitrogen (N), Medium Phosphorous (P), and High
Potassium (K).
🔹Re-use soil harvest after harvest by simply adding more Earth Dust Base to begin again. Create your own living soil that gets better every time it’s used.
🔹Go organic, save time, and get predictable, healthy harvests.
🔹🔹🔹🔹🔹🔹🔹🔹🔹🔹🔹🔹🔹🔹🔹
Compost Tea for Vegetative Stage
Water 4 Gallons
3 Cups Composr (Your Favorite Worm)
4 TBL Molasses
4 TBL Seaweed Extract
4 TBL Fish Fertilizer
Use air Stone o the tea for 24/3 hours 70/75F, use at full strength for establishing plants and a half strength for younger plants
Likes
4
Share


@PotusArg
Follow
Week 3: The plants have adapted very well to the new pots and didn’t show any signs of stunted growth. I decided to do some main-lining so they grow evenly and maintain their height. I won’t lie, I was a bit nervous, but everything seems to be going smoothly. I’ve also added a new oscillating fan to improve air circulation.
Semana 3: Las plantas se adaptaron muy bien a las nuevas macetas y no mostraron signos de estancamiento en el crecimiento. Decidí hacerles main-lining para que crezcan de forma pareja y mantengan su altura. No voy a mentir, estaba nervioso, pero parece que todo va viento en popa. He incorporado un nuevo ventilador oscilante para mejorar la circulación del aire.


Likes
47
Share

@Salokin
Follow
GMO × Triangle Mints BX – Week 18 Veg | Transition on the Horizon
145cm now and she’s been given more room to breathe — moved to a more open spot with full sky exposure, and it shows. The upper internodes have started stretching out noticeably, which at this time of year with daylight slowly declining from the solstice peak is likely the first signal that transition is not far off. No pistils visible yet but the structure is beginning to shift.
Did another defoliation pass to keep airflow through the canopy and gave the main stems some support with wire ties — at this size and with what’s coming in flower, a bit of structural insurance makes sense.
Day temps 28°C, nights 18°C. Watering holding at 25L per feed, EC at 1.2 mS/cm, pH 6.2. Nutrients: CANNA Aqua Vega 3ml/l, CalMag Agent 1.1ml/l, Aptus Regulator 0.1ml/l.
The forecast this week brings some rain — around 15mm with the heaviest hitting Tuesday morning, temperatures reaching up to 27°C by Thursday. Winds light throughout. After the heat of recent weeks, a bit of rain is welcome.
Updates every Sunday. Stay tuned. 🌿
Likes
23
Share


@SkunkyDog420
Follow
Hallo zusammen 🤙.
Sie wächst sehr schön und macht keine Probleme.
Rabattcode für den BIOTABS-Webshop https://biotabs.nl/en/shop/ GDBT420, damit erhalten Sie 15 Prozent

Likes
24
Share


@FrostyCloudzz
Follow
Woche 5 hat gestartet und ihn geht es prächtig sie verändern sich täglich, eine zeigt Mängel auf aber nur minimal.
bin gespannt noch circa zwei Wochen Wachstum dann in die Blüte.
Die Girls wurden langsam LTS gebunden und topping wurde gemacht bei jeder
Purple Punche wurde durch random seid ersetzt sieht bis jetzt gut aus

Likes
59
Share


@Bakeryguy420
Follow
Rolling through week 4 of flowering for the first rhino Ryder and white Russian things are starting to look good !
Rhino Ryder 2 coming to and end of week 2 of flowering not to far behind the other two glad all plants are pulling through strong !! Same ratio with nutrients temps between 72 and 77 and humidty between 30 to 50%
Smell is pretty strong would say 6.5 outta ten !
Water every 3 days 2 gals a week pretty much using Poland spring natural water for now.
Check out the rest on my Instagram bakeryguy420 doing my first give away for seeds and glass spoon
Some updates photos towards the end of the week and some videos!!

Likes
3
Share


@Krautis_IndoorFarm
Follow
🍂 Der Herbst ist im Zelt angekommen 🍂
In den letzten 10 Tagen hat sich in meinem Auto-Zelt nochmal richtig viel getan.
Heute gab’s das letzte klare Wasser, und am Donnerstag wird entschieden, ob sie fällt oder noch ein paar Tage bekommt. 🌿
Man sieht’s deutlich der Herbst ist angekommen, die Farben sprechen für sich 🍁
Ein Traum geht langsam zu Ende… und öffnet die Tür für das nächste Projekt 🚀
🌸 Sorten:
• Auto Orange Amnesia XL
• Blue Dream Auto
• Auto Amnesia 47 XL
• Red Velvet Auto
🌱 Samen: @ganjafarmer.seed


Likes
6
Share


@vilby_micro_grower
Follow
a girl seem to like advanced nutrients ph perfect fertilisers. I'm glad I have those bottles 😊
Day 8. Advanced nutrients.
Day 10. Advanced nutrients.
Day 11. olant is 21,5cm high and got over 57000lux. 😎
Day 13. Time-lapse
Likes
5
Share


@BenChasinBigBudz
Follow
Initiated flower with a 48 hour period of darkness on the 35th day from seed.
#SFgrow
