The Grow Awards 2026 🏆 


Likes
Comments
Share
@greymane
Follow
These two girls are starting nicely.
Still nursing the third pot.. I’ll update on it later as well.
** Update **
The third girl popped on 9/8. She’s looking healthy as well


Processing
Likes
8
Share
@eldruida_lamota
Follow
Bueno pues lo dicho familia, es una cepa dulzona y acaramelada, con un porcentaje medio de 16% thc , me parece bastante potente está indica en verdad es un cebollazo épico, si te pasas sentirás hormigueo en las extremidades asegurado.
Sencillisima de cultivar, muy rápida de verdad tamaño entre 45/60cms no es muy grande pero las flores son muy compactas.
Espero que os guste este último trabajo, os dejo muchas fotos y algunos vídeos finales , un saludo y buenos humos.

Processing
Likes
5
Share
@Pureleelove
Follow
Another week and a half later I believe. The tentacles have started to take more of the baby nuggetito form. Slowly you can see the flowers starting to make little bud-nuggets.
Same 12/12 lights, 3 day water cycle, LST, and removing any extremely small looking buds on the lowest nodes branches. The fan leaf stems have gone a little purple in colour, and the trichomes are starting to show up (Wazzzaaaaa). I presume the purple because of the drop in general temperature because of winter.

Likes
98
Share
@DogDoctorOfficial
Follow
I love growing its a big passion of mine , and the fact that GD exists makes everything so much better, one can interact with others and enjoy and learn from each others. Thank you all growers love and keep them green <3 <3 <3


Likes
58
Share
@2x2growing
Follow
Harvested my third grow and second strain from Canuk seeds. Both plants from them have been absolute bangers! I highly recommend growing their seeds.
I ended up with 176.2 g about 6.2 oz of trimmed and dried bud with one plant. It wasn’t as high as the last plant but mainly because I didn’t let her get as big and I pruned up all of the 8 branches she had but we still got kinda close🙂
Overall, I’m very happy with this run. I learned a ton once again and I love every bit of growing these beautiful plants!
Definitely gonna enjoying smoking this one👌🤠🤘🥁

Likes
29
Share
@BioGrowKing
Follow
Die Woche ist sehr gut verlaufen ich dachte eigentlich sie stirbt aber sie hat sich sehr gut erholt nach dem ich die Nematoden hinzugefügt habe man kann es gut erkennen da wo ich getoppt hab kommen und zwei weitere Köpfe und die neuen Blätter die wachsen sind wieder schön grün und saftig
Sie ist nun auch in der zweiten Blüte Woche beziehungsweise der elfte Tag dann schauen wir mal wie es weitergeht.

Processing
Likes
16
Share
@Gerto
Follow
Was a bit dissaointed, turned out my PH pen was faulty..... Made errors. Nearly lost crops. Got a new PH pen and EC pen. Back on track.
Excited about my greenhouse starting September. My second grow room, and the seedling stations. 👌👌


Likes
21
Share
@TheStrainAlchemist
Follow
To me the ladies always look so small but they grow at an impressive pace.
I’m in love with those nutrients, is my first full organic grow and Guanokalong is impressive, I never seen a similar root development, I transplant the plant from a 0,5L pot to a 1,5l and in 3 day I moved them again to the final 20L Plastic pot because already clogged.
Enjoy fellow growers , I wish abundant harvest ☮️♥️

Likes
8
Share
@ZombieKushAddicted
Follow
FC-E 4800 lamp ,
to view this lamp or any other marshydro product go to: https://instagram.com/marshydro_aliexpress?igshid=YmMyMTA2M2Y=


Likes
34
Share
@PEAKYPLANTERS
Follow
Hello everyone, my friends! this week we will do more with the rinsing of the roots, waiting for these magical nuggets to swell even more 😉🍭
Likes
7
Share
@TST1313
Follow
Veräuft sehr gut, aber mein Problem ist,das ich nicht genau weiß ,welche Blätter besser noch weg können,und welche Sie benötigt.Bei meinen letzten Grows habe ich zuviel abgeschnitten,und die Pflanzen haben es mir nicht gedankt.Jemand einen Tip.Habe dutzende Tutorials geschaut,aber es ist trotzdem schwer.
P.S so ein Stretch gibt es gar nicht ca 60cm in 3 Wochen gewachsen,glaubt mir Keiner!!!
Habe jetzt ca 30% Blätter abgeschnitten, es werden noch etliche folgen.Am WE wird sie nochmal richtig entlaubt,will sie nicht so stressen!!

Likes
13
Share
@SgtDoofy
Follow
Mar 14
Looking good. Fed 3/4 gallon of RAW GROW 6 days ago. Seems to have taken it well. Getting close to needing another drink.


Likes
1
Share
@Bingbings_garden
Follow
Hello growers,
-April 22-
MK2 has already starting to show vertical growth which is very surprising. She was given some left over alfalfa tea (0.1L) and has getting sprayed with water every 2-3 days.
MK1 was moved over to her new home which is 3 gallon pot. (Ran out of 1 gals). She is a lot slower but roots did start to show around April 18th. She has a cup over her to help keep her RH up. She also has a little yellowing of the leaves but very minimal.
-April 25-
MK2 got some serious growth going so decided to start LST. She did have some red stem issues so nothing major.
MK1 still coming a long at her own pace.
I'll also add some update pics of the mothers as they go through flower. Not every week as this diary is for the clones.

Processing
Likes
6
Share
@Jack_Greenstalk
Follow
3 Plants. 3 citrusy phenos!
#1 : First to sprout rapid rooter. TASTE: Pure Lemon front end into hashy cakey afghani. refer to this as the "lemon hashcake" phenom very dense, beautiful nug structure. Yielded 24.5 dry grams of primo smoke. Uplifting more cerebral sativa high with some punch in body as well. happy stress reliever for sure! has some "gassy" or fuel notes to it but very subtle
#2 Tangerine pheno: I orginally thought sour 76 was sour diesel x 76 Afghan til i read hso marks post on uk420 forums saying its cali sour d x 76 afghan. cali sour d is cali orange x sour d x mexican sativa. and it shows in this pheno which smell and taste pretty similar to tangie my friend grows which is cali orange x skunk 1 (mexican sativa x Colombian sativa x afghan indica) pretty similar genetics roots! Smell: Sweet tangerine 🍊
Taste: Just like tangerines 🍊
Medical Effects: Hybrid feeling effects felt both in body and mind. Stimulating mentally, relaxing in the body. Mild pain relief generally with amazing relief improving feeling in joints (reduced swelling or irritation in otherwise aching areas, loosened tension at joints)
Notes: After breaking up or grinding the sweet tangerine open jar/bud smells turns more sour tangerine with very subtle gas aroma. This one is scary strong! I am an all day regular smoker of the most potent buds I can find, and I never make it thru 1 bowl of this without long breaks after each hit. Starts off strong and creeps to EXTREME psychoactivity. Not for the faint of heart this one might not be best for "new smokers" 😎🔥🔥🔥 yielded 26.1 grams if id have taken clones this woulda been the keeper of the batch, but I got more to check out in future run :) and I got a cloner and veg chamber to start keepin the keepers now I know i like the strain!
#3 Lime Fuel pheno: Smell: Lime🍈 and gas ⛽
Taste: lime
Medical Effects: Cerebral uplift. Creeper. thought it was weakest on initial smoke but 10 minutes in it end up being strongest high of all 3. super wicked sativa, buzzy uplifting all similar to Cinderella 99 or strong jack herers this has almost a "scary high" first few times but once you get used to it or microdose, it is a super fun creative medicine. Helps my arthritis pains and gives me the clean up the house kind of high
Notes: Foxtailed, lowest yield of 3 sour 76's likely because its place directly under the light (perhaps didnt like too intense direct light) but is the most potent of the 3 as well. yielded 22.5 grams of dry
Likes
14
Share
@Patillac31
Follow
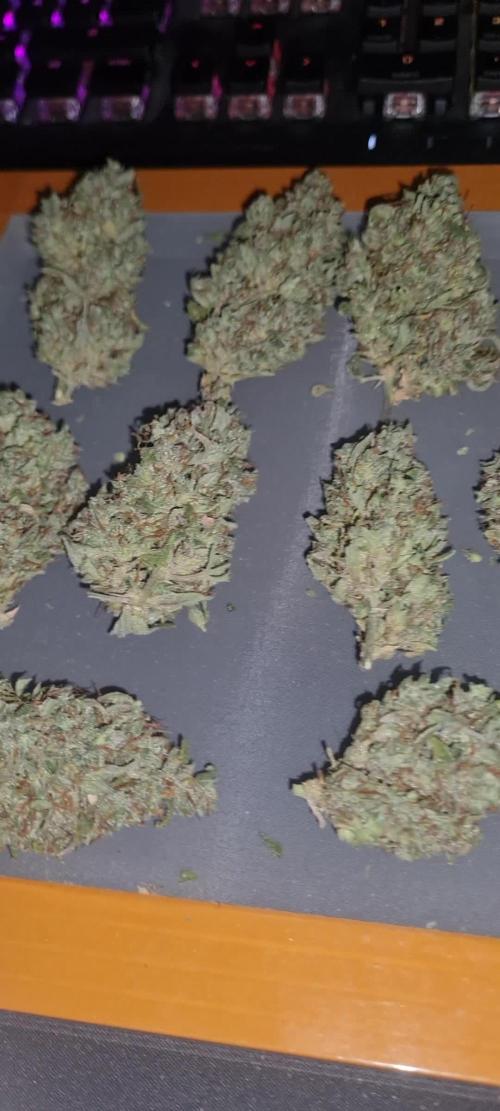
Start of week 8 (day 50). Started the week off with a little recharge&water. I had to rig up some branch supports to compensate for compounding nugs. I'm pretty sure a pack of papers is a standard measurement? I've been struggling to get out of bed from knee pain (awaiting my 3rd surgery). And really not sleeping at all. Hopefully this lady will ripen early and give me some relief. Happy Gardening any suggestions or comments are appreciated 👴🏼🔥🖖✌️🙏🌱
¤ End of week 8 and the garden is smelling great. I'm scheduled for knee surgery next Tuesday and will be down for an unseen amount of time. Happy Gardening
