The Grow Awards 2026 🏆 


Likes
8
Share
@biggerbud420
Follow
i feed a 50/50 mix of fox farm happy frog all purpose and fruit and flower 1 tbs per gallon of media
watered a half gallon

Likes
16
Share
@CookiesAndCake
Follow
Week 15
Day 99 (20/11/2020):
Unfortunately did not have time today to take pictures or check them because have been quite busy.
Day 100 (21/11/2020):
Woow day 100 today, which seems a bit crazy but I think the girls just need another month and they will be ready for harvest. It has been a great grow so far and although 100 days seems like a lot, the girls have definitely come really far. DSD is definitely one of the slower girls and her buds are not as big as the other girls, but maybe that will pay off by being the most hard-hitting.
Day 101 (22/11/2020)💧:
Measured the pH of the girl today before watering and it was at 5.75 which means it needs to be increased slightly. I wonder why it keeps dropping because apparently the BioBizz soil is supposed to maintain the pH pretty well but I guess she is quite big and must be taking in more nutrients. I also decided to stop giving her CalMag since she has not been showing the deficiency on the leaves for a week or two now. So I watered with the usual 1.5ml of BioGrow, 4.5ml of BioBloom, 1.5ml of TopMax. And on top of that I gave 0.75ml of pH+ to increase the pH by 0.5 points. The buds are not fattening up as much as I thought they would but the trichomes are definitely getting more and more dense on the flower which is a great sign.
Day 102 (23/11/2020):
DSD has definitely been the most resistant to stress/nutrients/watering problems. She always looks happy and except for the calcium deficiency at the end of veg, she has definitely been the strongest girl of the 4 in the tent. So happy with how she has been growing, definitely reflects the indica that she is
Day 103 (24/11/2020):
Not that many updates today, just doing as amazing as always.
Day 104 (25/11/2020)💧:
Today I watered the girl with 1.5ml of BioGrow, 4.5ml of BioBloom, and 1.5 of Topmax. She is looking really healthy and beautiful as always
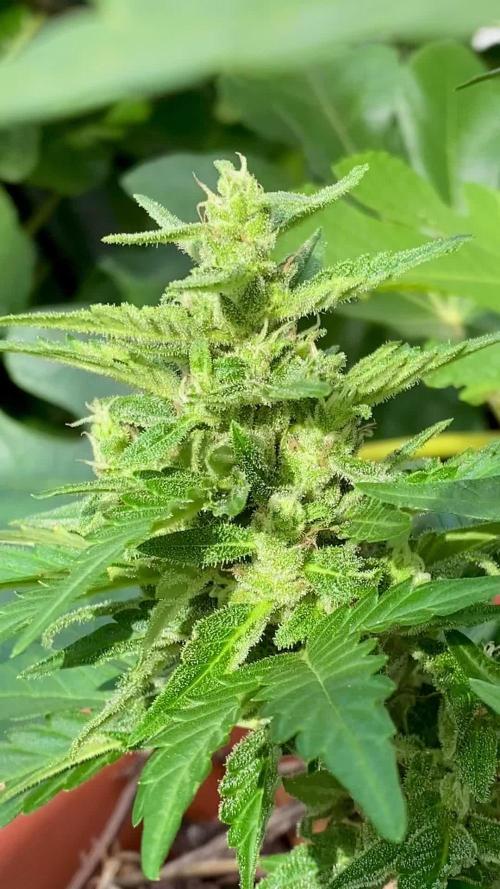
Day 105 (26/11/2020):
Managed to take some lovely pictures and a video of a close up of those beautiful snowy trichomes. This girl will definitely be a hard hitter – all the trichomes are so densely packed. Amazing progress from last week and the flowers are definitely fattening up.

Likes
19
Share
@Skinnytalls420
Follow
Day 38- 18/01/22 and we are now in flowering everything is looking good I’m still cutting down the plants from my last grow Afghan kush and once I’m done with that I’ll be moving everything that isn’t chemdawg into the HPS tent!!! Day 41-21/01/22 there’s only fastbuds chemdawg in this tent now I managed to free up some more space in hps tent!!!
Likes
12
Share
@FlavoursUk
Follow
The grow was one of the best I've done, the strain itself is awesome, taste, smell and effect are all 11/10. If theres one strain I would grow again it would be this, if you haven't tried it.. it's a must grow. A hidden GEM for sure. Do not miss out!

Likes
14
Share
@Teak76
Follow
Bis auf das Problem das es in unserer Region Arsch Kalt ist und ich im Grow Temperatur Probleme habe läuft es gut. Die Ladys haben eine gesunde Farbe und sie sind in der Vorblüte. Leider musste ich eine Gorilla Glue entsorgen, die andere Erholt sich gerade. Bin mal gespannt was aus ihr wird.
Da ich noch sehr Unerfahren bin und ich bei meinen ersten Grow durch ein Zwitter alles zerstört habe bin ich mir nicht sicher ob auch jetzt einer dabei ist. Habe ein Bild hochgeladen. Vielleicht kann mir ja jemand sagen ob ich mir Sorgen machen muss.
Bis jetzt läuft es Überraschend gut. Beobachte Die Lady weiter und hoffe das es kein Zwitter ist. Glaube aber nicht. Den anderen Damen geht es super.


Likes
3
Share
@TheBuckeyeGrower
Follow
Light feed day 8. Day 12 I'm happy with the growth so far, I'm feeding maybe half a liter every couple days. Dumped a liter of water in the saucer to bottom water. Day 14, split a gallon of feed between the 3. Very happy at the end of week 2
Likes
17
Share
@jamjam887766
Follow
I cut down plant #2 last week, dried the bud and put it in jars for curing. Plant #1 still has a ways to go. It's starting to smell better (before there wasn't much of a smell), I haven't spotted any amber trichomes and the pistils are still mostly white and stretching. I'm only feeding it plain, tap water and will see what happens. I'll keep you posted!
Likes
8
Share
@Orgaponics
Follow
Now super steady! I need to add way less water than last year (over half a liter a day then), because the eweather is just so cloudy. Just 20°C, max during the day, rarely above and not for long... But it doesn't prevent them to grow fast!
Lazarus is a baby that I had put in the filter tank in spring. He spent the autumn and winter in the living room with his bros after I found eggs by september. I thought they had disappeared but there he is! Or maybe it's a joke from a friend...


Likes
65
Share
@Mrs_Larimar
Follow
May, 8th
Plant is still stretching, And Building some woonderful Flowers too
A lot of WWork and Energy for the Plant
I feed her in every Watering because shee is geting alittle Pale/ limy
And I added some Calmag too, to help with Photosynthesis
because she has still a big need In Nitrogen , added some flowering Nutrients, too

Likes
2
Share
@Bear_Grows_Green
Follow
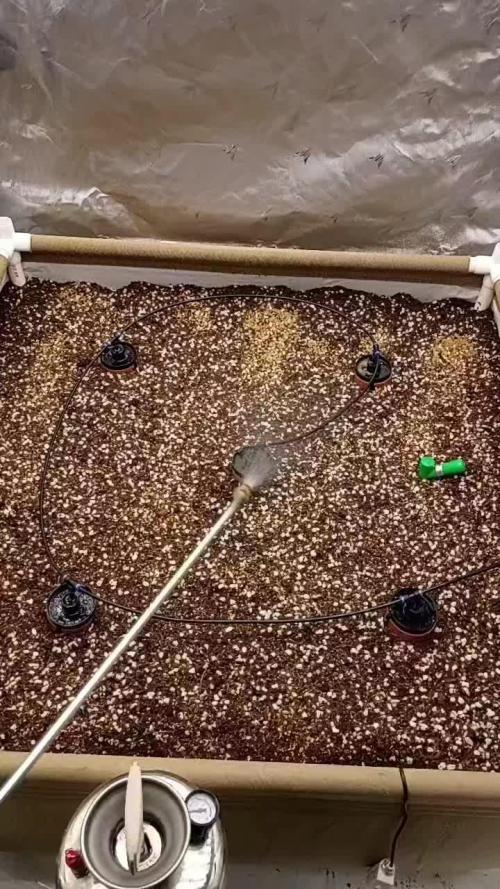
Got the seeds straight from Johny at Huckleberry Hill Farms. Super excited!!.
Popped and planted on 11/15/2025 in domes under 200ppfd tent being held at 0.7 vpd.
11/17 all 10 sprouted and look healthy. Got bed filled today planted cover crop inoculated with goodies and got thirsty earth system installed
Likes
2
Share
@CannaIGrow
Follow
Plant seems to be growing well, she’s has some nice fans. I’ll be transplanting some time next week. Topped her this week too.


Likes
15
Share
@902EastCoast
Follow
This week went great. The ladies are still looking happy and healthy. Bud sites everywhere. One plant is monster cropped and looks insane. As far as I can tell they are done stretching out now. Took off some leaves covering bud sites and some of the bottom limbs not getting much light. Happy Growing y’all 🔥💨💚✌️🏼


Likes
2
Share
@Madman2020
Follow
Oct 5-11 Vegetative steering?
Aiming for:
leaf Temp -80f
CO2 -1250ppm
VPD +1.04
(65%/75F)
Vegetative Steering 6P1/ 2P2/1P3
Each P1 water event is 15 minutes apart. Seems to far apart. I think i Need More water events, with less time in between events in order to get a strong veg signal?
Watering for 2min(110)ml
May need 3min waterings(currently not getting runoff)
I have to hand water every two days.
Day 11 flo
18.5inches tall
12inches from light(moved to 16)
1300ppm
Day 18
Defol
Sprout chickpea(2days)
Soaked 1cup for 4 hours then rinsed. Completely covered then Soaked overnight.
Rinsed then poured water out and layed jar on the side for one day.
Blended with water(aloe vera and coconut)
Day 19&20 foilarspray
Alfalfa/Chickpea SST with Kelp,aloe,coconut,silicate,microbes brewed for 1.5 days
Day 21
Fed the Tea blend
Leaf temp 80
65kluxx
Co2 100
Plants look like they responded well to the foilar. The flowers at this stage are my best performance yet .crop steering may be working?


Likes
14
Share
@DTHEREID
Follow
Gonna start flushing next watering and get my fade going, can tell she’s been missing nitrogen for a while as she’s already yellowing in spots.
She’s looking pretty good.
Likes
2
Share
@MatthewVC
Follow
Update; February 14th, 2023.
From the moment I flipped to flower, they’ve been exploding with growth! They are super healthy! They grow back and fill in so fast after defoliating, no matter how heavy I go.
I’ve added the supplemental lighting (Viparspectra 600) this week to really get the most I can. Figuring out a way to mount it higher.


Likes
13
Share
@Comfrey
Follow
Es gibt nicht viel zu berichten. Ich habe sie einmal gegossen und ein Blatt abgezwickt.
Der Duft im Garten ist sehr angenehm. Sie hat einen betörenden Duft, der im Gesamtbouquet der Gartenkräuter deutlich hervorsticht, sich aber so einfügt, dass es nicht auffällt. Ich liebe den Duft.

Likes
11
Share
@Kmikaz420
Follow
Plante exceptionnelle !! Elle m'a donner 210g dry cured et l herbe est juste magnifique niveau goût comme effet !! Et en plus de tous sa en seulement 12 semaine .merci mr fast bud^^ et c est une plante qui pousse sans difficulté faudra juste faire en sorte d avoir du cal mag et une bonne dose de nutriments^^
Likes
18
Share
@Dunk_Junk
Follow
Nice flowering growth this week!
She is very bushy!!
Hopefully she makes plenty of nice buds!
Likes
17
Share
@Wizard555
Follow
As the third week draws to a close, our plant continues to thrive, thanks to the nurturing care and high-quality nutrients provided by Xpert Nutrients. Embracing the art of Low Stress Training (LST), our girl has responded with enthusiasm, showcasing new growth and vibrant green foliage. With each passing day, she flourishes under the nourishment of Xpert Nutrients' Master Root and Master Grow series. Their Master Root, at 2ml per liter, and Master Grow A and B, each at 1ml per liter, have become essential components of our feeding regimen. With a balanced pH of 6.2 and a TDS of 250, our plant receives precisely what it needs to thrive. We extend our heartfelt gratitude to Xpert Nutrients for their exceptional products, which play a pivotal role in the success of our grow journey.
