
Likes
Comments
Share


@6ix6ix6ix
Follow
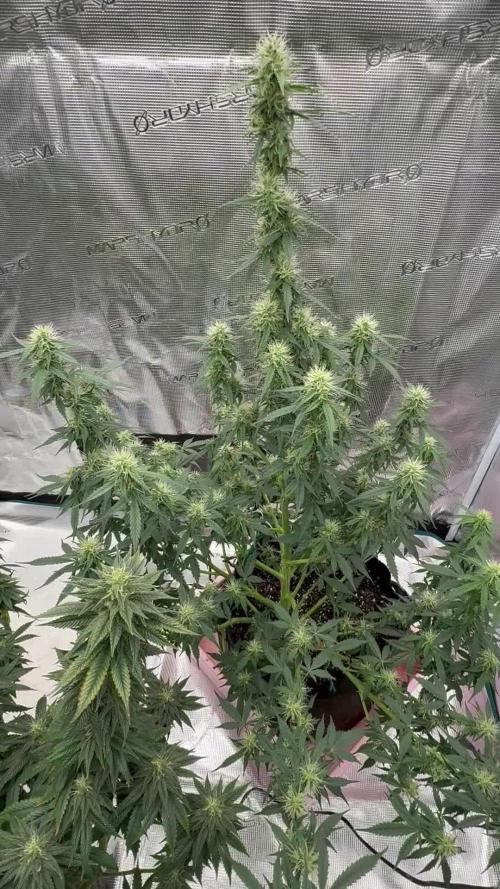
Halo shalom buenas dias!
All week been strugling witg the nitrogen overload that my soil in giving my poor plants. Tried washing out, but no significant results.
However, adding PK (half of the recommended dose) gives really positive results, i see the buds develop more, however the leaves are also there.
I’m really confused by the way the three plants are completely different on rip ess stage, bud formation and growth overall. They get absolutely same treatment and sit in the same tent.
My feeling is that i have around a week with 2/3 plants and around two weeks with the “flagship”
Today is 56 days since germination.
Any suggestions how to dry plants during an active grow? Will the light somehow interfere?

Likes
2
Share

@NAG420
Follow
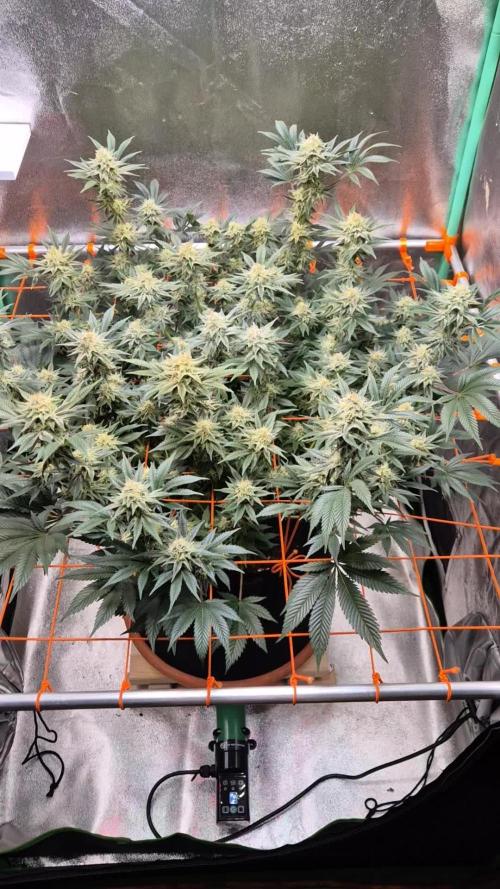
This week I did a lot of work on opening all possible areas of the bud sites. I picked up the rubber bud tie downs and went to work and did some defoliation on her lash removing only bud sites that are being covered. The temps been holding strong live in a cold climate very tuff before keeping warm at night. Day time temp has been 73-78F humidity at day 43-55% VPN 1.64kpa.
Likes
5
Share


@TherealNICOGREEN
Follow
Er blevet plantet over i 17 liter potter i stedet en 12 liters! Hun er allerede begyndt at vise tegn på rigtig gå i blomst 🌸. Det er først gang jeg prøver pulver gødning OG JEG ER SÅ POSITIV OVERBEVIST OM DET ER DET JEG VIM FORSÆTTE FREM AF ( undtagen det der ikke fåes i pulver ( endnu) 😇glæd jer til flere dagbøger og nye spændende planter og NYE SKUNK STRAINS OG NY GØDNING ÆGTE GRO JORD MED TILHØRENDE PULVER GØDNING! Det bliver fantastisk spændende😇🤩🤩🤩🧐🤩🤩😜😝😎🤪😇💚🖤💛💚🖤💛💚

Likes
7
Share


@Ice_R
Follow
This week battling a bit with the wind in the growtent (you can see in the video i included), had few leaves with windburn but now all are looking fine. Continued LST to create an even canopy. Also think i should have removed the duct tape i used to repair the broken stem should have been removed earlier (it was on there for 10 days) as i saw afterwards (see in the pictures of broken stem repair) that the area of the stem where the duct tape was stayed fairly thin.


Likes
33
Share


@The_Moz4rt
Follow
The plant kept stretching during this week. I'm a little bit worried as I don't see the flowers touching each other to form nice colas, but she's healthy so I can't complain, it's my first grow after all. Just hoping in fatter buds and not many popcorns.
She's drinking a lot of water in these days and the EC was higher when checking it before the daily refill. Don't know why she's eating less, but I lowered it to 1.6 again. I give her what she wants.
Keeping an eye on her development and trying to figure out when to add the P-K booster.
No particular problems this week, everything is going ok.
I gave her another (hopefully not too heavy) defoliation at day 59 so i guess I'm not going to touch her again till harvest.


Likes
7
Share


@Big_Dennis_Budz
Follow
Decided to switch the cmh for a 400w Hps , the budd sites on the cookies are everywhere been pulling here about a good bit , the purple just showing signs of pre flower to
Likes
23
Share


@DedicatedJOKER
Follow
So got my SOG up, the right side was topped and the left side was fim'd on one side. Preparing for flower in a few days.

Likes
11
Share


@RFarm21
Follow
Week 9 november - 15 november
11 november - i did a little defoliation on the first 2 Nodes in branches.
I also gave the first bloom nutrients because in the next week it will be flowering and it looks like it was asking for more phosphorus
14 november - One more soft session of defoliation/lollipoping
Led power: 240W (80%)
Likes
6
Share


@rvabudman
Follow
Graduated, and am off from work for a few weeks, so went overboard on photos. Plant is doing well, leaves are starting to turn yellow (strain trait).
Can't wait for the harvest and being able legally gift my xmas ornaments to my cousins during our "cousins walk" at our family xmas party.

Likes
19
Share


@HisHope
Follow
4/30 Week 2
Some discoloration, moved light up.
Most likely be ready to transplant in a couple of days, color good
Slowly increasing nuets Leave them here a while.
5/1 Pic
5/3 TRANSPLANT DAY!
Time to move her, her roots are three inches beyond the garden bag and her veg growth has kicked in.
Roots are very white, very strong and very long.
Transplanted into 5 gallons of prepared/buffered/triple washed coco and 40% perlite.
Pot soaked well with goodies to get things going quickly, she has some catching up to do 😏
5/4
Pics
She is thriving! 😎
5/5 Pics
Almost doubling in mass every day
5/6
Pics
Added Silicon and increased Grow nuets slightly
She has tripled in size this week color is good and stems are strong.


Likes
6
Share

@ThatsmyGrow
Follow
Die Gorilla cookies auto hat sich auch wieder von ihrer besten Seite gezeigt. Nach 6 wochen blüte solche wunderschöne buds zu entwickeln ist einfach ein Traum.
Ich kann jedem nur fastbuds empfehlen.
Egal ob outdoor oder indoor.
Likes
16
Share


@eldruida_lamota
Follow
Que pasa familia, de vuelta otra vez, os traigo unos esquejes de le Xupet negre y Haribo de Rkiem seeds , que han sido donados por un colega, me e llevado 8.
Necesitaron 7 días para el enraizado y las condiciones fueron 80% de humedad y 24 grados, una vez enraizados se pasaron a tierra en unos vasos y me los traje a casa.
cuando llegaron a casa ese mismo día , trasplante a macetas de 7 Litros con tierra de Plagron , Royal mix .
Utilizaré la gama básica de Advanced Nutrients para cultivar estos ejemplares, de momento solo les aplique una dosis mínima para que se vayan acostumbrando, también practiqué varias podas apicales para dejarlos a la misma altura.

Likes
48
Share

@Growingdaddyo
Follow
7. Blütewoche beginnt. Die buds bekommen langsam Struktur und mehr und mehr Farbe. Bin sehr gespannt aufs Finale. Es duftet schon richtig nice!

Likes
22
Share


@Spliffi
Follow
Week 11👍🤙👍🌱
I can see the end. This Contest have been a eye opener!!
Jon Dabs
Check them out here:
https://jondabs.com
@jondabs Instagram
The Sponsors
Check them out here:
Dutch Passion
https://dutch-passion.com/en/
Hydroponic.co.za
https://hydroponic.co.za/hydroponic/harvesting-and-growing-accessories/
Bud Juice
https://www.gohydro.co.za
The Best Grow
https://thebestgrow.co.za
Dynomyco
https://www.dynomyco.com
Nuclear Roots
https://www.nuclearroots.co.za
Photronic
https://shop.photronic.net
Special Thanks to Hydroponic.co.za. I buy all my products from them. Best service.
Daily updates coming...
Likes
21
Share


@ArucambaAutoflowers297
Follow
This was my first coco coir grow. Also the first grow i did not neglect in anyway. This grow was a handfull but dedicating time to your garden pays off!! I got 1371 grams of 3 autoflowers
Zkittlez: 324
FBT29: 495
Forgotten Cookies: 552
Under 500 watts thats 2.74 grams per watt!


Likes
87
Share


@ThrashedTV_BakedByGlaze
Follow
Week 1 - 01/01 to 01/08 2021
HUGE THANKS TO @MARSHYDROLED and @VIPARSPECTRALED!
New surge protectors/heavy duty timers/the good cords.
The Red Poison by @Sweet_Seeds is right on track with the Dark Devil and Purple Lemonade from my other diaries. The LSD is a little behind but the genetics seems to keep it small if you get the wrong pheno. Will give it a week or so for it to really settle in with a root base before cleaning out my 5gal RootPouch pots from the last grow and getting them transferred into their final homes.
I have all my seedlings under the P1500 from Vipar as my veg light for the first few weeks to a month. It's SO nice to not have a blurple anymore, the light is way better in my room and on the eyes. The new diodes had every single seedling grow more in 6 hours than it did in the first 7 days under the blurp LED. The Red Poison perked right up and threw another set of leaves in the first 6 hours under the new light just like the Dark Devil and Purple Lemonade.
I noticed a bit of spotting on the Dark Devil in my other diary so I added some Hydrogen Peroxide to the spray bottle and it cleared up. All four have been getting constant spritzing from the spray bottle to keep humidity up.
Excited to see how big i can get the autos under the new lights, will switch over from the Vipar to the Mars by end of week 2/mid week 3 once I transfer them and give them a day or so settle in.
Thanks for stopping in! Throw down a like and/or follow so i can return the favour 🙌
--
Check out my Diary of the Year 2020 entry 🙏
https://growdiaries.com/diaries/54258-fastbuds-original-auto-sour-diesel-grow-journal-by-glazedgrow
IG: @GlazedGrow
CannaBuzz: @GlazedGrow

Likes
169
Share


@Hattiwatti
Follow
Hola 🐴
Week went fast and nice. All girls have now roots in water and spare is catching.
Purple nutz is biggest.
Green has most roots.
Edge is growing little weird but lets see.
Spare is spurting.
DLI around 25.
Green and Purple Nutz in timelapse for couple days.
With High Hopes 🍀
Likes
29
Share


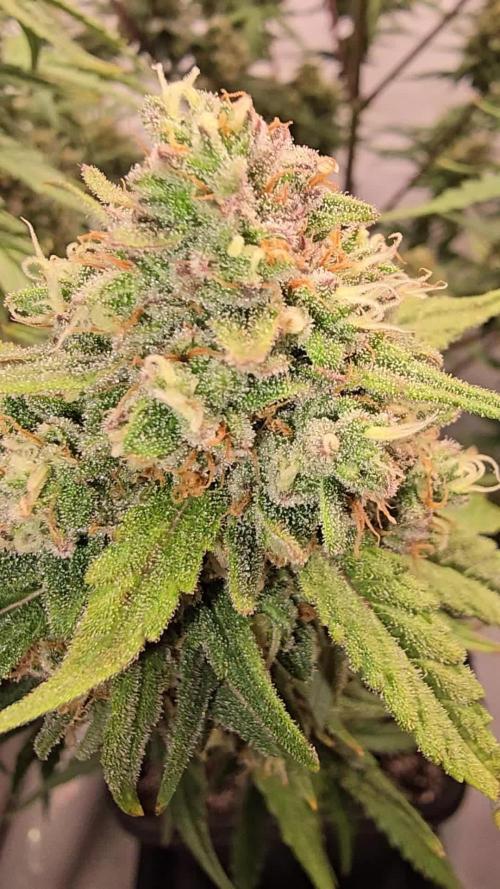
@Cheeba_Inu
Follow
The buds are still bulking a little more as of day 64. The trichomes are pretty milky/frosty so the harvest is getting close, but I am not going to rush it if the plant is healthy and the buds are not suffering. My best estimate right now would be between day 68 and 78 for harvest.
Day 67: areas of amber colored trichomes are appearing on the calyxes, under 10 percent of total. this is what I have been watching for to indicate harvest time so I will be giving water from here out and begin cutting down the plant in a few days.
Thanks for reading!
