
Likes
Comments
Share


@420DeepGrow
Follow
Esta nena se esta comportando muy bien, esta semana solo aplico algun aditivo para la mejora del suelo.
📅Dia 14: Riego:
EC 530 PH 6.5
Escurrido: EC 1790 PH 6.74
📅 Dia 15: Pulverizo Agua EC 250 PH 6.5
📅 Dia 16: Pulverizo Agua EC 250 PH 6.5
📅Dia 17: pulverizo agua Ec 250 Ph 6.5
📅Dia 18: pulverizo agua Ec 250 Ph 6.5
📅Dia 19: pulverizo agua Ec 250 Ph 6.5
📅 Dia 20: Descanso
Al estar el sustrato alto de nutrientes, solo aplico aditivos una vez por semana y espero a que el agua de escurrimiento llegue a las 700 - 800 ppm.


Likes
18
Share


@Spliffing_Around
Follow
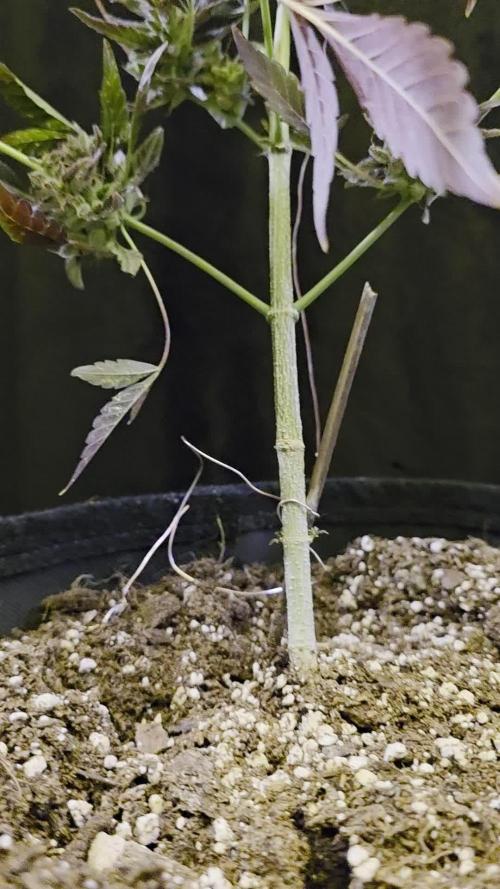
Temp is low cuz near this tent there is a dry tent. Will flip them soon no matter the size diff. Will train them before as well.

Likes
7
Share


@GrowmieDeLaStreet
Follow
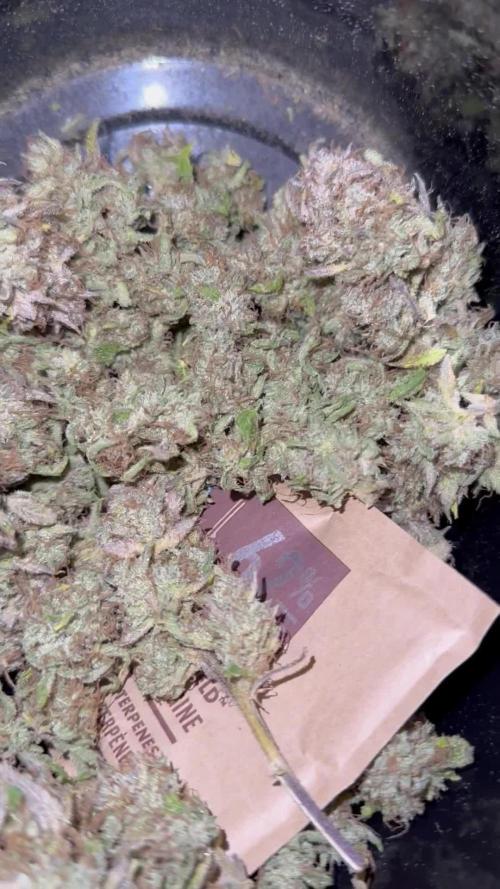
First off, that mf holds it's name very well. The smell on that strain is phenomenal. Much of fruity citrus and earthy notes and that's without the curing.
I smoked a bit to get a taste. Smoke and taste quite harsh but that should go away with the curing.
I harvested 634g wet, including a lot of stems, and ended up with 121g dried. they lost 80% of their mass and I might have over-dried them since I expected to get more tbh. However that's more than enough to get me through next harvest.
The 3 plants turned out to be pretty different phenotype. All over pretty great but one could have used denser buds. They don't have the same maturity which means I got buds for all occasions.
Kept the trimmings in the freezer for an hour and also harvested 0.67g of kief with a 220 micron bag. A lot of impurities but that was to be expected.
I don't think the calcium problem has had a significant impact.
Overall very happy with the product and the experience.

Likes
40
Share


@Ukfarmer420
Follow
Hi guys,
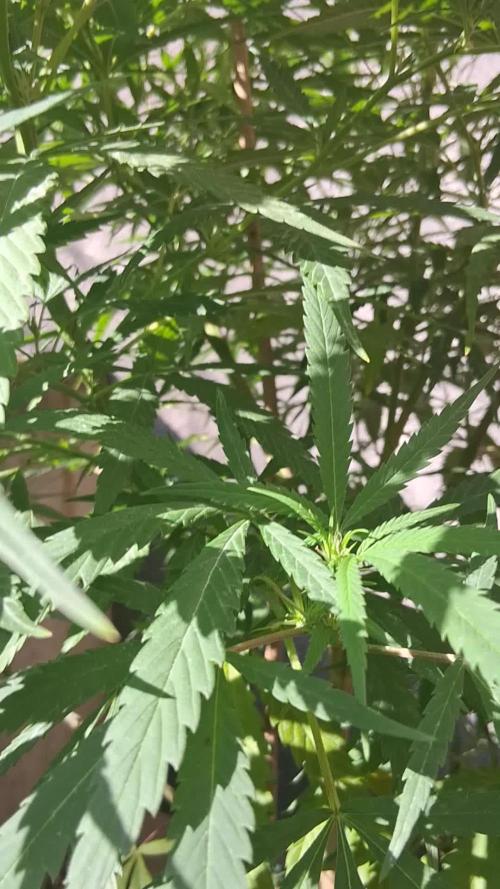
So this week im expecting rapid growth on all the plants, my plant still has orange spots i call it plant aids 🤣. There on 18/6 light cycle. I will be doing some lst on them to try and fill my grow space out abit.
I been soaking them and turning lights down for 2 hours then turning light back up for a few hours then soaking again so on so on. My misses plant is doing better than mine thats for sure tho.
Happy growing canna family 💚🍁


Likes
17
Share

@420DeepGrow
Follow
Gracias al equipo de Seedsman Marshydro XpertNutrients y Trolmaster sin ellos esto no sería posible.
💐🍁 Tangerine Snow F1 Fast:
Esta gran cepa es un cruce de cuatro vías 75% sativa de (Boost x Tangelo) con (Lavender x Power Plant). Este híbrido Fast F1 proviene de la genética Cali y cuenta con excelentes terpenos cítricos, alta producción de resina para extractos, altos niveles de THC, muy buenos rendimientos y excelente resistencia al moho. Tangerine Snow F1 Fast se puede cultivar tanto en interior como en exterior. Los tiempos de floración en interiores son de entre 8 y 10 semanas, mientras que el tiempo de cosecha en las latitudes del norte es en septiembre, mientras que en el hemisferio sur los productores cosecharán durante marzo. Las regiones climáticas recomendadas son cálidas, secas, húmedas y cálidas. Se trata de plantas altas, semiramificadas, que superan los 200cm y que presentan un alto vigor con muy buena uniformidad. Al igual que muchas otras variedades con fuerte dominancia sativa, Tangerine Snow F1 Fast ofrece una excelente resistencia al moho, así como a las plagas y enfermedades de las plantas. La combinación de terpenos cítricos y mucha resina la convierten en una cepa de muy buen extracto, cuyo método de "lavado" produce muy buenos rendimientos de hachís. El perfil de terpenos cítricos recuerda a las mandarinas y mandarinas y también tiene notas dulces. La producción de THC ha sido verificada en laboratorio en un fuerte 24%, mientras que el CBD es bajo. El efecto es edificante y energizante, perfecto para usar durante el día y las primeras horas de la noche.
🌻🚀 Consigue aqui tus semillas:
💡TS-3000 + TS-1000: se usaran dos de las lámparas de la serie TS de Marshydro, para cubrir todas las necesidades de las plantas durante el ciclo de cultivo, uso las dos lámparas en floracion para llegar a toda la carpa de 1.50 x 1.50 x 1.80.
https://marshydro.eu/products/mars-hydro-ts-3000-led-grow-light/
🏠 : Marshydro 1.50 x 1.50 x 1.80, carpa 100% estanca con ventanas laterales para llegar a todos los lugares durante el grow
https://marshydro.eu/products/diy-150x150x200cm-grow-tent-kit
🌬️💨 Marshydro 6inch + filtro carbon para evitar olores indeseables.
https://marshydro.eu/products/ifresh-smart-6inch-filter-kits/
💻 Trolmaster Tent-X TCS-1 como controlador de luz, optimiza tu cultivo con la última tecnología del mercado, desde donde puedes controlar todos los parametros.
https://www.trolmaster.com/Products/Details/TCS-1
🍣🍦🌴 Xpert Nutrients es una empresa especializada en la producción y comercialización de fertilizantes líquidos y tierras, que garantizan excelentes cosechas y un crecimiento activo para sus plantas durante todas las fases de cultivo.
Consigue aqui tus Nutrientes:
https://xpertnutrients.com/es/shop/
📆 Semana 4:
Continuamos la etapa de vegetación, ella se desarrolla muy bien 😎, comienza el buen tiempo, temperaturas agradables para todos.
Esta semana se aplica una solución de trichodermas para una mejor adaptación aunque realmente va genial.
Se mantiene 1/3 de nutrientes Master Root y Master Grow
Likes
3
Share

@pifflestikkz
Follow
Day 137
12/12 Friday
Finally harvest day!!
Not a bounty to brag about, but we know i messed up in veg with these autos so it was a ' ride it out '
Trial.
I managed to get 38g of potent looking buds. I will update after hang dry and dry trim. Then cure. 💚
Likes
1
Share

Processing
Likes
6
Share


@Thckaos
Follow
03-08-20 No se cambia la solución con nutrientes aún. Empezamos la tercera semana y aún tenemos solución con 1.89 ms y un PH 5 que corregimos a 5.8.
04-08-20 se rectifica el PH de 4.5 a 5.5. Se calibra la sonda de ph.
La conductividad es de 1.95 ms. Cuando suba de 2.1 ms cambiaré la solución.
Se baja la luz a 70 cm
05-08-20 el PH vuelve a bajar a 4.8 y la conductividad llega a 2.1 ms. Se procede hacer un lavado de raíces bajando la conductividad a 0.2 ms PH 6.5 y una nueva solución con nutrientes que pondré en los datos principales.

Likes
21
Share

@BlaKX
Follow
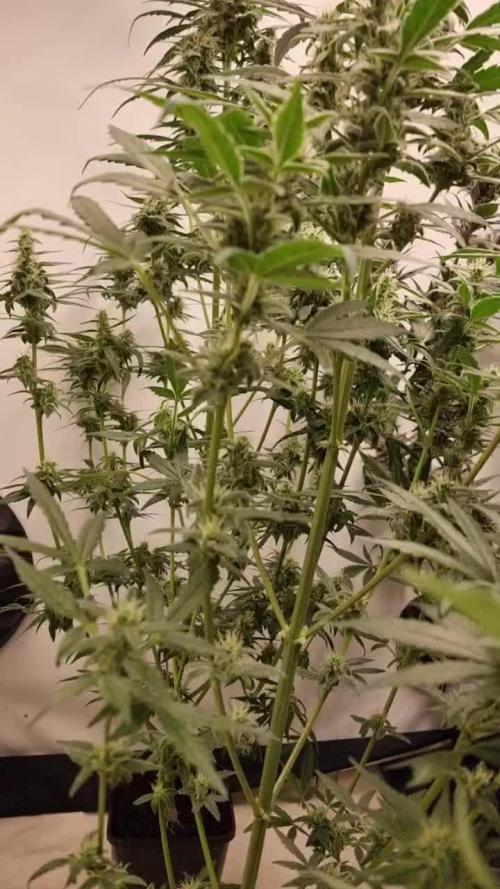
SIE BLÜHT Liebe Growmies!
Seit 1 Woche ist sie definitiv in der Blüte 💚💚💚
Habe mich aufgrund der Umstellung auf organischen Dünger und der Guano von Compo ist so gut wie aufgebraucht.
Deswegen werde ich BioCanna Vega und Flores benutzen weshalb ich diese Woche noch mit Vega düngen und ab nächster Woche auf Flores. Bin gespannt wie der dünger performed für outdoor erscheint mir das einfach praktischer und bin gespannt ob man noch besseren Geschmack erreicht damit.
Wenn Sie noch 7 Wochen Blüte vorzubereiten sich hat ist sie Ende September fertig was optimal wäre!
Mit 2,5cm Stamm durchmesser geht schon was💜🤜🏻🤛🏻💚

Likes
37
Share


@yan420
Follow
FERMAKOR BARREL MIX – BASE IN USE
(Testing on the Fantasy Feast girl we pulled out of another diary
https://growdiaries.com/diaries/274722-grow-journal-by-yan402 )
(FERMAKOR BASE SYSTEM KOH VERSION diary
https://growdiaries.com/diaries/278391-grow-journal-by-yan402)
(Urea & Micros on the way — first week running without them)
🍶💧🍶💧🍶💧🍶💧🍶
💧 30 L Barrel – Current Working Mix
🍶💧🍶💧🍶💧🍶💧🍶
Step 1 – Calcium Nitrate (Part A)
7 L warm water (~35–40 °C) → added 45 g Calcinit, stirred until fully clear.
That’s the calcium + nitrogen backbone for the feed.
Step 2 – FERMAKOR PK Base (Part B)
15 L water in the main barrel → added 30 ml FERMAKOR PK Concentrate, mixed well.
This forms the main P + K part of the formula.
Step 3 – Combine Solutions
Slowly poured the Calcinit mix into the barrel while stirring — no reaction, still crystal clear.
That confirms the mix is stable and precipitation-free.
🌿 Step 4 – FPJ / FFJ Batch
Added 30 ml homemade FPJ (fish + veg batch) ≈ 1 ml/L.
Color shifted to a light-amber tone — looks alive and active.
🍋 Step 5 – Citric Acid Balance
Added 1 tsp citric acid after everything was blended to fine-tune pH and help chelate micros later on.
📦 Step 6 – Top Up & Check
Filled to the 30 L mark with plain water → pH tested with drops, showing yellow-green — roughly 5.8 – 6.0 range.
Nice clean look, stable smell, no residue.
💧 Current Base Ingredients (Active Mix)
Warm Water ≈ 22 L total
Calcinit 45 g → N + Ca foundation
FERMAKOR PK Base 30 ml → P + K support
Citric Acid 1 tsp → Chelation + pH balance
FPJ / Fish Emulsion 30 ml → Organic enzyme booster
Result: clean amber mix, mild and balanced.
I’ll let this version run for a week before adding anything.
👀👀👀👀👀👀
Observations and changes
👀👀👀👀👀👀
27.10.25 VW27 noticed some min burnt tips so I decreased Calcium Nitrate 45 to → 40g, decided to add two more elements micros and Epsom salts just to make sure they got everything, Fetrilon Combi 1 (Micros): 0.5 g, Epsom salts: 8 g
28.10.25 VW27 she seems devoid of any deficiencies, seems ready for the flip to 12/12
02.11.25 VW27 girl is looking good so I decided to stop making daily videos and do a standard once a week update.
09.11.25 aVW28 7 days since flip,stretch in full swing, first pistils showing, leaf color deep and healthy. Slight tip burn early week → gone after pH stabilized.
Feed stayed clear, no residue, roots clean and sweet-smelling, did what I hope is a last cleanup and pruning🎥
10.11.25 VW29 added Phosphoric acid pH down to the schedule for flowering stage.
14.11.25 FW1 FERMAKOR PK Micros 40 → 50 ml
🌱💦🌱💦🌱💦🌱💦🌱💦🌱
🌿Day to day tasks & actions 🌿
🌱💦🌱💦🌱💦🌱💦🌱💦🌱
16.11.25 VW29 – no feed no water
17.11.25 FW1 – Fed 3l of #1 → 1l runoff
18.11.25 FW1 – Fed 3l of #1 → 1l runoff
19.11.25 FW1 – Fed 3l of #1 → 1l runoff
20.11.25 FW1 – Fed 3l of #1 → 1l runoff
21.11.25 FW1 – Fed 3l of #1 → 1l runoff
22.11.25 FW1 – Fed 3l of #1 → 1l runoff
23.11.25 FW1 – Fed 3l of #1 → 1l runoff
🍶💧🍶💧🍶💧🍶💧🍶
💧 Nutrients in 30 L #1 Veg — FERMAKOR
🍶💧🍶💧🍶💧🍶💧🍶
💧 Calcium Nitrate (Calcinit / Nitcal):
45 g → 40 g → 35 g
= 1.33 g/L → 207 ppm N + 253 ppm Ca
= 1.17 g/L → 183 ppm N + 224 ppm Ca (current)
💧 PK Concentrate (FERMAKOR Base):
30 ml → 40 ml → 50 ml
= 1.00 → 1.33 → 1.66 ml/L
→ balanced 1:1 P:K + light micros (from extract)
💧 Home-made FFJ/FPJ (Fish + Veg):
30 ml
= 1.00 ml/L
Epsom Salt (MgSO₄·7H₂O):
8 g
= 0.27 g/L → 26 ppm Mg + 35 ppm S
💧 Fetrilon Combi 1 (Micros):
0.5 g
= 0.017 g/L
→ Fe 0.7 ppm • Mn 0.7 ppm • Zn 0.3 ppm • Cu 0.3 ppm • B 0.1 ppm • Mo 0.02 ppm
Phosphoric Acid (pH down) + Citric Acid (chelation):
→ First set pH with phosphoric acid
→ Add a little citric only if extra chelation is needed
💧 Target pH: 5.8 – 6.0 (drop test yellow-green)
📦 TOTAL Inputs:
60 ml → 70 ml → 80 ml / 48.5 g per 30 L
= 2.00 → 2.33 → 2.66 ml/L + 1.62 g/L (current)
YouTube Link: https://youtube.com/-m8h?si=A7x4Zlr2kj-_ga31
Likes
47
Share


Likes
16
Share


@UnkleSkunk
Follow
il tutto prosegue per il meglio ho tagliato qualche rametto basso e un po' di foglie...
continuo con la sistemazione regolare dei tiranti..
ora sta iniziando a far vedere il sesso vediamo come si comportera'...

Likes
114
Share


@Natrona
Follow
This week has been rainy so the outside girls only got watered and fed once. With all the rain we've had, all the girls grew a bit. I top dressed all girls with Bloomin Soil from Elm Dirt. Lemon Cake is now 48 inches and stacking nicely. Happy girl means happy mom.


Likes
5
Share

@LittleBigTrees
Follow
All three plants are happy and showing a nice layer of trichomes. Still in 2litre pots.

Likes
8
Share


@mikearon
Follow
May 31st - Day 104 : I had to take two babies out because of the lack of space in the tent. Didn’t realize they would grow that much.. So I planted them outside and will let them do their thing as I didn’t have the heart to kill them. But besides that, thriving.
