
Likes
Comments
Share


@HmGrwnFlowers
Follow
Girlscout Cookies x UK Cheese by HomegrownCannabis Co.
Produced lots of chunky flowers. Nice calming smoke. Would definitely grow it again.

Likes
5
Share


@Sur_cannabico
Follow
7semanas desde la apertura de cotiledones, vamos super. El spectrumboard de heavengrowligths y abono orgánico de wonderlandAgronutrients.
Que mejor combinación 🔥

Likes
31
Share


@TheStrainAlchemist
Follow
This is my first induced flowering growth.
I always grow weed outdoors with big satisfaction on yield and nature contact, But I have to say that training plants is real fun and I can’t wait to see the buds first appear and then fatten up.
On day 5 of flowering she started to appear a little stressed, I think is a little overfeeding because her leaves are a little burned on the tip and a little underwater too but this morning end of day 6 appear to be recovering has the timelapse show on the end.
Happy growing to you all brothers and sisters ☮️☮️☮️✌️🏼
Likes
16
Share


@LivingOrganics
Follow
Week 14, Flower
(Day 57 12/12)
Riding straight into week 8 now so this is when I expect her to put most of her weight on which is hard to believe considering colars are already falling over.
Still filling the res up and just letting her do her thing. Smells are incredible! She is definitely going 10weeks minimum not a orange trichome in site and fresh flowers popping up.
No more signs of bananas and she is happy I put her into slightly more dark and raised the lights a little as well. Now it's just ride it out for the next couple weeks.

Likes
7
Share


@Sdubb78
Follow
Extremely satisfied, yes!! Ive daydreamed about this for 25 + years, germinated hundreds of seeds over the years for fun- but never had the equipment to keep it going Im sooo excited! Seems to be going well so far..
Likes
8
Share


@JamaweedOPO
Follow
Harvested on day 88. The plant had a really strong smell, and I ran into some issues during drying because the temperature dropped, and humidity went up a lot. It dried over 16 days, turned out nice and dense, and kept its sweet, citrusy aroma.

Likes
8
Share


@jaydee702
Follow
Bubba cheesecake Grow is going well in the tiny pot ..She is doing alot Better than i expected in such a small pot the roots are maxed out in ther e and starting to push the first spam container up and away from the reivor container the tapoot is still bigger than my finger .She has an estimated three weeks to go till Harvest. th buds are starting to get stickyand smell fruity so far


Likes
11
Share


@TheBulldozerSicily
Follow
Lunedi 5/12/2022
8 lt demineralizzata 800ml rubinetto ec 335
Aggiungiamo 18 ml APT 9 ml enzimi ¾ cucchiaino silicate 8 g megabud
ottendo Ec 1760 Ph 6.3
Mercoledi 7/12/2022
8 lt demineralizzata 800ml rubinetto ec 325
Aggiungiamo 18 ml APT 9 ml enzimi ¾ cucchiaino silicate 8 g megabud
ottendo Ec 1833 Ph 6.3
Giovedi 8/12/2022
8 lt demineralizzata 800ml rubinetto ec 298
Aggiungiamo 18 ml APT 9 ml enzimi ¾ cucchiaino silicate 8 g megabud
ottendo Ec 1873 Ph 6.3
Sabato 10/12/2022
8 lt demineralizzata 800ml rubinetto ec 301
Aggiungiamo 18 ml APT 9 ml enzimi ¾ cucchiaino silicate 8 g megabud
ottendo Ec 1867 Ph 6.3
Domenica 11/12/2022
8 lt demineralizzata 800ml rubinetto ec 337
Aggiungiamo 18 ml APT 9 ml enzimi ¾ cucchiaino silicate 8 g megabud 4 ml calmagpro
ottendo Ec 2093 Ph 6.2
Likes
28
Share


Likes
50
Share


@CapitanKush
Follow
been a slow week i think. had a problem with my power going out for 8-9 hours sunday (rcd tripped)
before i opened the tent to 98% rh and water covering the leaves but turned all my fans up and it dried quick so all is good now
UPDATE: done some defoliation to get more light through, lets see how that goes

Likes
4
Share


@Autower
Follow
End of week 10 and coming on well now smells starting to get strong now on these especially the papaya cookies she’s frosting well and the branches are starting to bend so will need to hold them up soon gorilla cookies #2 had some problems but hopefully will recover nicely onto next week and happy growing peace
Likes
27
Share


Likes
2
Share


@smokeycropping
Follow
- LAS PLANTAS SIGUEN CON EL MISMO PLAN NUTRICIONAL
- NO SE VEN CARENCIAS NI EXCESOS
- el hps de 600 MANTIENE MI AMBIENTE SIN MAYORES INCONVENIENTES
-NO SE VEN PLAGAS NI MAYORES PROBLEMAS

Likes
28
Share


@Willy_Balls
Follow
Today is the 1st day of 2nd week of flowering. I've put the net on them on 20.01. Started the autopots on 18th. They are well rooted. The aptus startbooster is really potent, roots are poking out of the medium with beautiful micro hair. Never had it before. The stems are crazy thick, also I think thanks to regulator.
On 22.01 Ive started the air pump supplying airdomes.
I have the lowest EC ever on aptus. Right now around 1.0. But still get a tiny little bit of tip burn one a few plants. Let's see how it goes.

Likes
1
Share


@Weedwithwes
Follow
Starting to fade early haven’t feed anything but water and mostly let the drippers do the work on this run

Likes
4
Share


@Gram_Solo
Follow
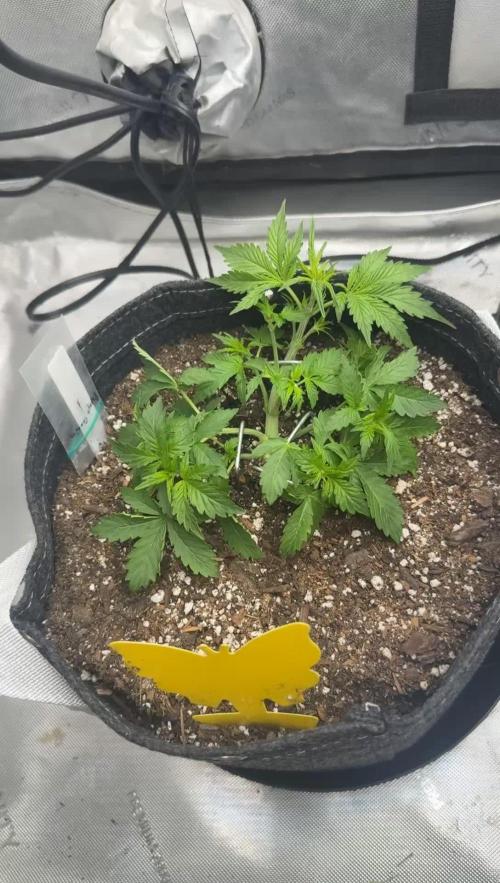
These 2 are shooting up fast man! Literally not had to do anything to them after the main lining was complete the shape has remained and its solid lol may need to get a tomato ring to support or some yoyo strings to hold up once flowered.
Applied some cal mag and micro, grow to this feed to try and improve leaf colour.
Need to lower nitrogen now so hope it works.
Likes
9
Share


@mheat
Follow
I smell her over my LSD25...Not a citrus aroma. Can not really pinpoint what it smells like. But smells like weed. She is filling in...hope she gets to swelling.
Likes
Comments
Share

@Stacy_smokez
Follow
No training on this plant just seeing what’s going to happen so far so good it’s very bushy I may defoliate in the future we just have to see and the damaged leaves recovered
Likes
1
Share

@StillBlazin
Follow
Flower day 22 now, I planted the cuts 48 days ago I’m very happy with it. Defoliation on day 20 was very tough the strain has many small leafs took me and my girlfriend 4hours😤😅

Likes
24
Share


@BillMonroe
Follow
The beautiful plant brings a smile to my face
I built up the nutrients to 1250 ppm ... (including 200 ppm tap water).
The plant is living under a CMH lamp now. Let's see how "XXL" it will get
