The Grow Awards 2026 🏆 


Likes
Comments
Share
@Gumbassman
Follow
Well….. that lst thing scares the shit out of me… I just touched CK yesterday but as soon as I did she dropped to the soil…. So in the end two of my girls got some stability from my…. Stunt.

Likes
13
Share
@einamio
Follow
Day 36 I guess I can call it bloom. Nice strong pistils shooting all over. She is the tallest so far making me raise my lights a little more.
Day 38 Now Californian Snow is the tallest :) Ztrawberry stopped at a perfect height, it looks like she's gonna develop into a beautiful lady. Fat white pistils all over 😻
Day 39 Happy girl got 2500ml cm bg bb bh 6.3ph ~1EC She is perfect, symmetrical, stopped stretching at about 50cm, flowers are mostly leveled, branches are strong, leaves point up unless I water. I think she's also turning purple. Beaut 😻
Day 42 I think I saw some burnt tips but she still looks super happy and healthy. The most vigorous plant I've had.

Likes
6
Share
@Ninjabuds
Follow
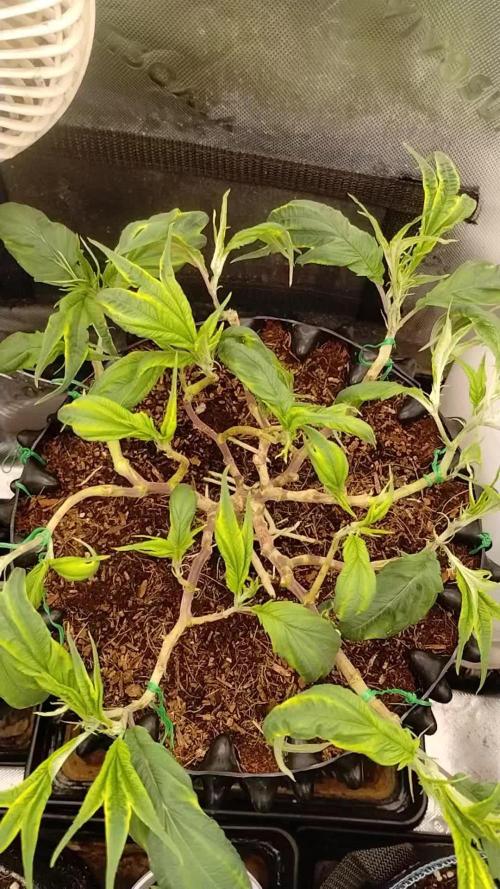
This Permanent Marker is a smaller plant, only about 4 inches tall. But what it lacks in size, it makes up for in those super distinct wide leaves that make it a standout. While it's a steady grower, it does have a big appetite, always seeming to need more nutrients.
The other Permanent Marker plant is also around 4 inches, but it's growing much faster than the other one. Its super skinny, pointy leaves are what really make it stand out from the rest. At 1st I thought this plant was going to be a dud but is starting to out pace the other plant.
Happy late turkey day grow diaries world!!!! It's now day 24 from seed for all the seedlings I have going. The past few days the plants have really started to take off. There roots have really started to dig in. Every other water I am still giving 2ml per gal of fox farm grow big. I keep having to tell myself not to add any more nutes other than that. I don't want to fry my plants but I also want they to start jumping. I'm quite excited for the coming week, I think the next 7 days or so is when the plant really starts to transform and look more like a pot plant than just some random little green thing.
A few days ago I decided to move the plants from under my 55w cheep amazon light to under my spider farmer 100w newer version light with the good leds in it. The plants will hopefully be ready to up pot them here soon and get them in the large tent.
Sometimes when growing multiple different strains it can be really hard to balance giving to much or to little light. You don't want the faster growing plants to get to stretched out waiting on the slower plants to catch up
I spend Thanksgiving day morning transplanting the plants into 2gal pots. I am useing spme promix potting soil it's my 1st time tring this soil. It is actually doing really well the roots were all white and nice looking. I think next time I'm going to add some worm casting, kelp, granular mycos, and a little bit extra perlite. I just didn't have the money with christmas coming to splurge for all the extra stuff. I got rid of 2 plants 1 of the bubble og and 1 skunk apple runtz. There is only room for 10 pots in the 2x4 tent. I will peob only bring 8 of them to flower, always good to have back ups. Yesterday I also stuck the plants back under the 500w medicgrow mini sun 2 in my 2x4 tent. They did great under it the 2nd half the day I was happy they didn't get stressed. I had put them under that light a little early about 10 days ago or so. I am expecting in a week these plants will ge going crazy with growth


Likes
91
Share
@DogDoctorOfficial
Follow
These one was a big messy jorney, everything happened from almost kinling them, to almost no space for them to grow, LED broken middle flower and still perform like the queen champion she is!!!
I am felling her mature over cycles , i am thinking of her like a wine vine that gets better over time , these one in my humble opinion its a must in everyones garden <3 <3 <3
Wen harvesting these one i felt the need to break it all apart to prevent bud raw or anything we do not want on our medicine, i like to hang them all and let them dry but in these case there was no chance i was taking that big of a risk with these big fruits all over the place, what a blessed run, my rack is completely full, there was no more space , i mean no more space at all hahah amazing , thank you thank you thank you <3 <3 <3
As always thank you guys for your love , your time, your support and it all, i fell blessed and i am truly thankful <3 <3 <3
All info and full product details can be find in can find @
https://www.zamnesia.com
https://aptus-holland.com
#aptus #aptusplanttech #aptusgang #aptusfamily #aptustrueplantscience #inbalancewithnature #trueplantscience #zamnesiaseeds #growerslove
With true love comes happiness <3 <3
Always believe in your self and always do things expecting nothing and with an open heart , be a giver and the universe will give back to you in ways you could not even imagine so <3 <3 <3
More info and updates @
https://growdiaries.com/grower/dogdoctor
https://instagram.com/dogdoctorofficial
https://youtube.com/channel/UCR7ta4DKLFMg2xxTMr2cpIg
<3 <3 <3 Growers love to you all <3 <3 <3

Likes
29
Share
@BusyBeeFarmer
Follow
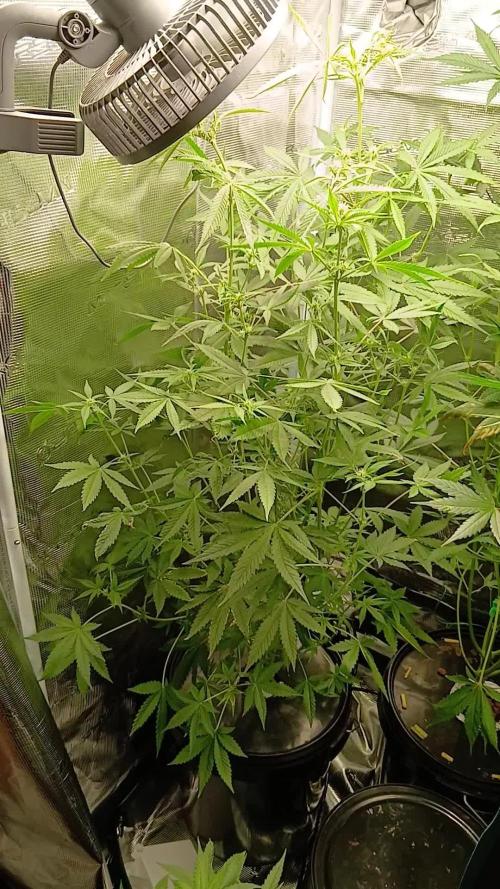
Week 7: Preparing for Flowering
At the beginning of the week, we installed the net, marking the final stretch before flipping to flower. The plant is growing beautifully, and I’m genuinely impressed by its vitality. All the training seems to have had no negative impact—she’s handling everything like a champ! 💪🌿
By the end of the week, it’s finally time to switch to flower—wish me luck! 🍀
Challenges this week:
Temperature: ~26°C
Humidity: ~35%
VPD: A whopping 2.4!
Not exactly ideal, but thanks to the large fabric pot, she had enough water to keep going strong while I was on vacation. 🌱💦
We’re still seeing light-colored tips, and she’s putting on a final growth spurt before I flip the switch! 🌸🚀
Likes
8
Share
@Skinnytalls420
Follow
Very happy with the outcome just as good as the first time I grown this strain!!!!
Likes
18
Share
@Wahalan
Follow
Valeurs sûre la gorilla blue
Couper a Flo +68
Je repasserai après séchage et curing


Likes
3
Share
@Trinidad
Follow
15.07.25. Day 55
She stretched so much she passed the light and one of her buds grow into the light and got burn.
Likes
10
Share
@Bncgrower
Follow
Defoliation done on the last day of the week, everything's fine so far. The flowers have already started to give off a wonderful scent, everything is going as expected. Looking forward to the next few weeks... ✌️


Likes
28
Share
@MrGrowthSpurt
Follow
This strain was easy to grow, she started flowering on the 5th week and reached maturity on the 13th week (8th week of flowering). I had 2 of these plants growing at the same time. White LSD#2 took on a reddish/burgundy tone which made it look completely different from#1 All in all it was really a easy grow.

Processing
Likes
10
Share
@yaron
Follow
Most of the day the ladies are under a roof due to rain.
Maybe tomorrow a bit of sunshine but the weekend doesnt look good.
Like i said another rainy Day,hang in there ladies!
Likes
7
Share
@MADMANk
Follow
Big defoliation, the amount of nodes that sprout on this genetic is craZY, i dig it! Just quite a bit of maintenance!
Taken 2 clones - these clones will be grown out, one crossed with a FastBuds - Gorilla Cookies AUTO for a "fast" cross!!!
The other, might be selfed or if i find a male of value, crossed with BBQ C GPP or Ethiopian landrace for a new "F1"!

Likes
29
Share
@Kagesan
Follow
***English version***
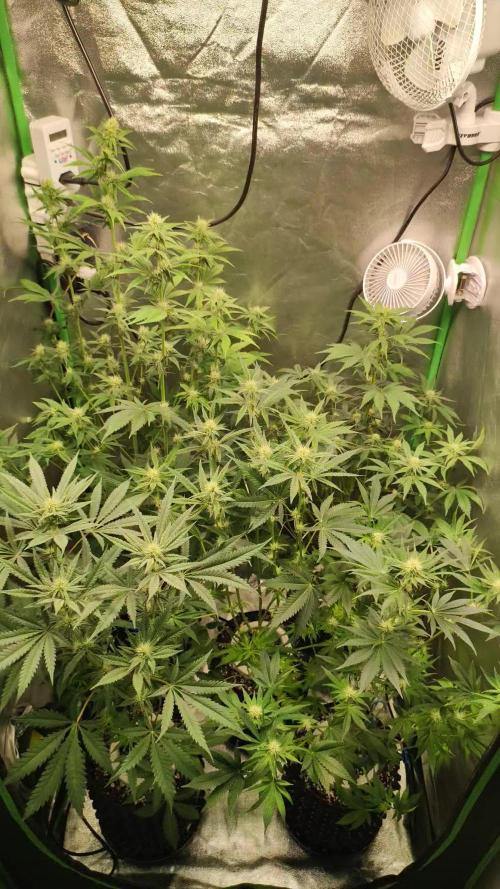
Welcome to Week 4 of Flowering! 🥦🥦🥦🥦
Hey everyone! The fourth week of flowering has begun, and it looks like the stretch phase already wrapped up last week.
There hasn’t been much vertical growth—Runtz A now stands at 48 cm, while Runtz B has reached 59 cm.
Today, I didn’t do a full defoliation but simply removed a few larger, obstructive fan leaves.
The buds are visibly increasing in size, and Runtz B is leading the way with impressive speed. She seems to be about three days ahead in development compared to Runtz A.
One of this week’s highlights is the incredibly intense aroma filling the entire tent.
The sweet notes remind me of a mix of ripe tropical fruits and berries—absolutely irresistible!
Although the two plants have some visual differences, I’m now convinced they share the same phenotype.
Everything is going according to plan, and I’m excited to see how the buds continue to develop in the coming weeks.
Until the next update—happy growing! 🌱
***Deutsche Version***
Willkommen zur vierten Woche der Blüte🥦🥦🥦🥦
Hallo zusammen! Die vierte Blütewoche hat begonnen, und es scheint, als wäre der Stretch bereits letzte Woche abgeschlossen gewesen.
Viel Höhenwachstum gab es jedenfalls nicht mehr: Runtz A misst nun 48 cm und Runtz B 59 cm.
Heute habe ich keine vollständige Entlaubung durchgeführt, sondern lediglich einige größere, störende Blätter entfernt.
Die Buds nehmen nun sichtbar an Größe zu, und besonders Runtz B legt ein beeindruckendes Tempo vor. Sie scheint in ihrer Entwicklung etwa drei Tage weiter zu sein als Runtz A.
Ein weiteres Highlight dieser Woche ist der unglaublich intensive Duft, der das gesamte Zelt erfüllt.
Die süßlichen Noten erinnern an eine Mischung aus reifem tropischen Obst und Beeren, einfach unwiderstehlich!
Obwohl sich beide Pflanzen äußerlich unterscheiden, bin ich mittlerweile überzeugt, dass sie denselben Phänotyp besitzen.
Alles in allem läuft alles nach Plan, und ich bin gespannt, wie sich die Blüten in den kommenden Wochen weiterentwickeln.
Bis zum nächsten Update – happy growing! 🌱
Likes
2
Share
@CK-OrgGrow
Follow
Blüte Woche 8
Die Pflanzen entwickeln sich mega In dieser Woche habe ich denn EC wieder von 3,0 auf 2,5 heruntergesetzt.
Bei der Pflanze hinten Rechts gibt es keine weiteren Verschlechterungen oder Verbesserungen zu erkennen, aber sie entwickelt sich auch weiter, nur langsamer und anders :-).
Trichome (THC) entwickelt sich sehr heftig.

Likes
20
Share
@gottagrowsometime
Follow
Welcome to my LSD-25 Auto, sponsored by Fastbuds, & Spider-Farmer + Mars-Hydro with new sponsored nutrients from Expert Nutrients. For now she's been given fish force by plagron and no nutes. As I'm waiting for Xpert Nutrients. I did add some small worm castings to add something to the soil.
So, she's a lil slower out the gate but, I'm sure the wait to be started properly on Xpert Nutrients and not jumping from one to another will be more benifical for her in the long run. I see no need to add any core NPK nutrients yet. Although it will need a boost sooner rather than to late and be left with a runt. Or I'll scrap her and start again with Xpert Nutrients as I've no more plagron grow left just enough for the v2 bigger Fastbud Autos you see to her left. Let's hope that won't be the case as I've only 1 LSD seed left. As I broke the 1st ones stem. So I waited 2 weeks. And got this going with Purple Haze Auto. This will be 1 of 15 autos this round and 17 fems. 32 my biggest crop to date. All ran from a 1m2 and a 70cm2 veg tent with the help of my dark room I use to swap my fems out as I can't fit all in at the same time + with autos. My FC3000 and Spider-Farmer SF1000 have handled everything thus far. My SE5000 will make an her entrance this wk as 4 of my 5 fems will have left pre flower and will need better light coverage if I'm to get a solid ppfd coverage my 300watf won't do it
Thanks to my sponsors and to all who stop by. I'll be adding the rest of this week and then more pics as she comes into her own with the new nutrients.


Processing
Likes
17
Share
@MissSolasolita
Follow
End of week 3 flower
LST totally failed
She looks healthy and strong

Likes
3
Share
@dwotTV
Follow
8/23 - End of Week 3. Going to start some top feeding at like half strength for the Fox Farm Soil schedule in next few days. Drinking well and consistently from the self-watering bases. Bugs seem to be under control but will probably add some bits to the bases to make sure the gnats don't resurface. Stalk is strong and looking good and a good amount of new growth after taking some fan leaves off yesterday to "top". CO2 levels looking a little better, opened another vent in the tent.
8/22 - Adjusted light down to 80% after getting a lux meter and checking the intensity. Soil PH is slighly acidic at 6.1. Got some phUp and phDown but haven't adjusted yet. Trimmed top 4 fan leaves to stall out the top stalk and open up the bottom branches a bit. Added a mushroom exhale bag to increase co2 levels, were sitting around 500 ppm before I added.
8/21 - Still drying out the self-watering base a bit, will add water today. Sides of fabric pot still a bit wet to the touch but I think that's just the active wicking going on. Thought the initial canoe'ing leaves were from overwatering when overfilling the self-watering base but now I think it has more to do w/ some shock from the thrips and 24 hour light, or perhaps a bit of sunburn from being sprayed w/ the neem oil / bug killer.
8/16 - Had to fight off some thrips and still dialing in the tent conditions. Might be a little overwatered currently.