


Processing
Likes
35
Share


Processing
Likes
176
Share


@Teamdirtbag2
Follow
Yeah somthing is going on. Candida and Nightingale are not happy with there newts. Well if it continues I will flush them. Orinoco is doing great.

Likes
16
Share


@HegauHillsFarmers_M11
Follow
Die Pflanze wurde Mitte letzter Woche an Tag 66 geerntet. Getrocknet wurden die Blüten 6 Tage lang bei einer Luftfeuchtigkeit von 53% bevor sie nun ins Glas kommen.
Getrimmt wurde die Pflanze trocken.


Likes
21
Share


@DreamIT
Follow
-Sponsored by:
AMSTERDAM MARIJUANA SEEDS-💡VIPARSPECTRA💡-💐GREEN BUZZ LIQUIDS💐-🛠️WEDRYER🛠️
🏁18/6 hello growerz, with today I start the resumption of diaries on GD. I have 13 new genetics in germination and as many diaries. I start by putting the seeds in water for 24 hours, after a day I will put the two seeds in two different jiffies, one with humic acid from greenhouseseeds and the other with just plain water. Get comfortable and follow the updates 😉👋🦄
19/6 The seeds were divided and placed in two different jiffies, one with humic acid and one with water only.
21/6 after another 24 hours in the dark the jiffies were moved under the lamp. let's start the dances!
23/6 the seed in the jiffy with only water is sounted earlier and waits to sprinkle, the brother in the humic acid makes me wait longer
24/6 the seed with humic acid is not preparing to rise, but we are confident
25/6 still no second seed, I start to worry :(
30/6 now I begin to lose hope for the unborn even if I hold on and wait 24 hours before looking for the seed in the jiffy. instead I present a new personal logo, created by a friend who I cannot name for obvious reasons
__________________________________________
Personal advertising (contains affiliate links)
__________________________________________
🦄 Professional site, exceptional genetics for over 25 years and a new and very nice mascot!
✅https: //bit.ly/Amsterdammarijuanaseeds
__________________________________________
Did you know that Green Buzz Liquids fertilizers are 100% vegan? A complete line of products ready to give the best to each of your plants! Visit the site and see my journals to see how they work 🦄
🤯 And with the code "dreami t" you will immediately receive a 15% discount on your purchases
✅https: //bit.ly/GreenBuzzLiquidsPro
__________________________________________
👀 Are you looking for a good lamp to start with? 👀
🌞Viparspectra has something more than the others, take a look at their site.
⏩ Use "GDVIP" for an extra discount or "DREAMIT3" for an extra 5 %% discount
👀 Search for it on Amazon
✅Amazon USA: https://amzn.to/30xSTVq
✅Amazon Canada: https://amzn.to/38udUVe
✅Viparspectra UE: bit.ly/ViparspectraUE
✅Viparspectra USA: bit.ly/ViparspectraUS
______________________________________________
🌈 Tired of blowing on your weed hoping it dries quickly? Check out the Wedryer website! You will find a well-made accessory that will help your weed dry in just 8-10 days without the annoying risk of finding mold or other annoyances! (no affiliate links)
✅https: //bit.ly/Wedryer_
______________________________________________
📷🥇Follow the best photos on Instagram 🥇📷
https://www.instagram.com/dreamit420/
Backup
https://www.instagram.com/dreamit4200/
🔻🔻Leave a comment with your opinion if you pass by here🔻🔻
🤟🦄💚 Thank you and good growth 💚🦄🤟

Likes
53
Share

@Growbody
Follow
Hallo und herzlich willkommen zu meinem Schlußbericht Outdoor 2025 mit den Sorten Power Flower Feminized, Royal Medic Feminized und Special Kush #1 Feminized, alle 3 von Royal Queen Seeds. Es ist das erste Mal, das ich Töpfe für den Outdoor grow verwendete, bisher waren alle Gorilla grows und direkt in die Erde gepflanzt.
Die URL der Power Flower Feminized: https://www.royalqueenseeds.de/feminisierte-hanfsamen/120-power-flower.html
Die Planung für den Grow war, die Samen in easyplug Anzuchtwürfeln keimen zu lassen und danach in 0,6L und 2,2L Plastiktöpfen, dann letztlich in die neuen komplett doppellagigen ROOTIES 15 Liter Wide Version Stofftöpfe umzutopfen. Sobald die Witterung es zuläßt, sollten die Pflanzen an die frische Luft.
Tag 249: Die Schlußernte der Power Flower feminized von Royal Queen Seeds steht an. Für die 103 Gramm Nass getrimmter Blüten hab ich von ~17:00 Uhr bis weit nach Mitternacht geschnibbelt. Die Buds haben eine schöne lila Farbe. Mit der ersten Ernte vom 12.10. macht das zusammen 360 Gramm Nass getrimmte Blüten. Die Blüten liegen zum trocknen in den DryFerm Bags im Keller bis sich das Gewicht an 3 aufeinanderfolgenden Tagen nicht mehr verändert. Dann ist die Restfeuchte bei ca. 60%. Das ist die schonendste Trocknung die ich kenne, kaum Geruch im Keller aber die volle Ladung Terpene, wenn man die Tüten öffnet. Absolut zu empfehlen.
Tag 251: Hab euch noch den Trocknungsplan fotografiert und meine DIY Pollenmaschine. Das Ergebnis der Siebung zeig ich euch, wenn's soweit ist. Auf dem Trocknungsplan kann man sehen, dass die Special Kush #1 fem. (SK#1 1) am Sonntag noch 125 Gramm auf die Waage brauchte und heute, 3 Tage später nur noch 74 Gramm. Alleine in dieser Tüte sind in der kurzen Zeit 51 Gramm Wasser verdunstet.
Tag 252: Die Blätter der Power Flower feminized sind fertig durchgesiebt, das Glässchen ist fast voll. Diese Art der Blattverwertung gefällt mir besser als Cannabutter zu kochen. Minimaler Energieeinsatz, keine Action. Jetzt schau ich Mal, wie ich den Pollen gebacken bekomme.
Wenn's dir gefallen hat, schau wieder vorbei ✌️😎

Likes
9
Share


@bigolebuds
Follow
Week 8 Day 1: how did we get here?! Northern Lights is looking beautiful (the only plant in a 5 gal pot outside). No major issues. Kids were fed liquid nutrients for the second time 9/8, and will be recieving them once a week moving forward (hopefully every other watering). Gotta find a way to make watering a smoother process tho, might invest in a home RO filter 😂 Big dreams being discussed, this could be the start of the only cultivation, breeding, and distribution center that has a primary focus on re-entry and subsequent business development.. That’s how you do socially responsible business and policy.
You heard me?


Likes
48
Share


@Focus420
Follow
Dobrý den a áhoj vítejte v poslednim týdnu kvetení 🤟🌱
Poslušně hlásím proplachuji 4 den 🤗
7 dní schází k dokončení procesu🌱🤠
Květiny vypadají skvěle.👊😉 na první sklizeň teda. AŤ PŘÍŠTĚ VYPADAJÍ LÍP!!!!!!!!!
podle mikroscopu cca 15 - 20 procent jantar trichom☺️
106 den - po proplachu zdá se být vysoká vlhkost 😂 cca 40%
- přidán odvlhčovač👍po 2 hodinách 30%,
107.den 🌱 proplach ph 6.3 ec 0,42👏
108.den kontrola trichomu, průměrně kolem 40 % jantar 😉
mohl jsem o týden víc podávat živiny..
109.den nic nedělám jen se dívám✌️
110.den poslední 3 dny nechám vyschnout vodu a sekera🤫
111. Den video , kontrola trichomu 60% ,zítra sekera🌶️🌶️
112.den sklizeň proběhla dobře ☺️ ted 10 - 14 dní sušení a jedem bomby ,
Barneys farm těším se 🤗🤗🤗
jsem připraven na vaše kmeny !!!🥇


Likes
18
Share

@all_about_420
Follow
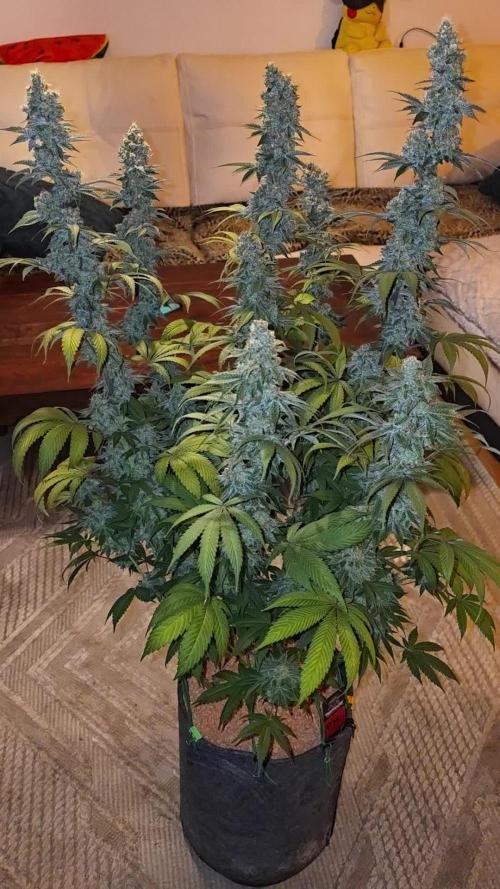
Der Tag der Ernte ist endlich gekommen und das Ergebnis ist schlichtweg beeindruckend. Die Permanent Marker präsentiert sich als wahre „Frost-Queen“ mit massiven, harzüberzogenen Colas, die eine außergewöhnliche Dichte und Qualität aufweisen. Nach dem konsequenten Lollipopping und der gezielten Nährstoffführung hat die Pflanze ihre gesamte Energie in die Ausbildung dieser erstklassigen Blütenstände investiert. Die Genetik von Traphouse Genetics hat hier auf ganzer Linie überzeugt und liefert zum Abschluss ein visuell sowie aromatisch überragendes Resultat. Ein perfekter Abschluss für diesen Run, bevor es nun in die Trocknungsphase geht.
Parallel zu diesem Erfolg reift bereits eine zweite Permanent Marker heran, die statt mit BioBizz mit Advanced Nutrients versorgt wird. Ich bin extrem gespannt, wie sich das Endresultat und die Terpenausprägung im direkten Vergleich der beiden Düngersysteme unterscheiden werden.
Likes
134
Share


@DogDoctorOfficial
Follow
One more week and this Girl is just fantastic, i can already see the great genetics on her, and let me tel you, despise the fact that her next door got infected wit freaking thrips and on this side so far i have seen none , that also means she is stronger than the rest on that field, and that she is healthy and it all, non so ever i ordered a bunch of beneficial bugs and some nematodes and i will apply a IPM ( integrated pest management ) just in case, as soon as the mail arrive and i apply them i will take pictures and explain the all process and why is so important to do it , the pros and what may or may not happens wen not applied and growing in organics.
Any way she is doing great, she still growing and stretching if you guys prefer the term, and her inter node is just perfect, this one will produce great fruits i can already see them in my mind , lets keep giving her love and see how she keep reacting to it.
For this week no changes on her food recipe but if she keeps at this pass i will start adding extra K , but for now i believe she still doesn't need that extra K boost, i want her to finish completely her grown and after i will start working on her fruits <3 <3 <3
As always thank you all for stoping by, for your time, your love and for it all, i am truly blessed with you all.
All info and full product details can be find in can find @
https://dutch-passion.com/
https://aptus-holland.com/
#aptus #aptusplanttech #aptusgang #aptusfamily #aptustrueplantscience #inbalancewithnature #trueplantscience #dutchpassion #dogdoctorofficial #growerslove
With true love comes happiness , Always believe in your self and always do things expecting
nothing and with an open heart , be a giver and the universe will give back to you in ways you could not even imagine so
More info and full updates @
https://growdiaries.com/grower/dogdoctor
Growers love to you all
P.S. reminder no emogies other way the text just puff and its gone lol 😆💚
Likes
2
Share


@Kloud9gardenz
Follow
Have been flushing and temperature training for the past 2+ weeks and she's a very deep purple all around with nice hints of grapes. The trichomes the last i check were starting to get milky as this strain only goes 50 day and today is day 55, this plant won't make it past the wknd
Likes
31
Share


@BigBadLion
Follow
Hey guys! Another update! 💪
I bought a Cal-Max from Grotek 👌 From the photos I shared it seems Matcha and Pistachio are suffering from some Magnesium deficiency (I hope that's the issue 😰) and this should help with the issue. I foliar spayed both of my babies and then I added the recommended dosage to all the waterings I made during the week. Gladly the first changes were clear after 48 hours of spraying them and I'll probably see the rest of the changes next week (or the week after) 😱
Besides that Matcha is still super small compared to Pistachio and I wonder what might be the issue. Maybe I'm watering her a bit too much or the heat is too high and it's not letting her take the proper nutrients? Maybe her roots are still small (for some reason I think this might be the main issue) or the damage she suffered from the lack of magnesium was way too severe and can't be fixed? No idea but she seems to be recovering so I'll let her continue that way for a bit more (and let her grow some more roots) before switching into flower. Oh! And I switched places between her and Pistachio, in case the lights were a bit too strong for my baby!
As for Pistachio, she's growing strong so I suspect she'll be a huge plant during the stretch phase 😃(you can only dream). She's also showing some chlorosis but absolutely nothing compared to Matcha.
I also defoliated both of my plants, they were getting bushy and I want all the "new" colas to receive as much light as poooooosible!
Anyway, that's all for now. I hope you'll all enjoy the photos and video!
See you all in the next update! 👍


Processing
Likes
13
Share


@mr_smooke
Follow
we pass 6 weeks of flowers. buds are getting fulled and the smell is so so beautiful. Here on pics is day 31 of flowering. On feeding menu is again Iguana Juice Bloom, I spend all Mother earth. it is awesome nutrients. will buy it again.
Likes
12
Share


@Hazeberg
Follow
Day 92 Pink Cookies 102 cm: Nothing to do today.
Day 93 Pink Cookies 102 cm: Nothing to do today.
Day 94 Pink Cookies 102 cm: Nothing to do today.
Day 95 Pink Cookies 102 cm: Nothing to do today and we are getting closer to harvest.
Day 96 Pink Cookies 102 cm: I turn off the AutoPot System and the lights. She will be harvested soon. See the pics of the trichomes from mid to top buds.
Day 97 Pink Cookies 102 cm: Lights are out and we are close to harvest time.
--------------------------------------------------------------
🙏 Thanks for visiting and follow for daily updates 🌱
Likes
11
Share


@TheMadHasher
Follow
Whats up everybody cheers to another week of growth for everyone!
This week the ladies buds started showing signs of progress. You can see them produce more and more resin every day thanks to the cold weather its really easy to keep a pretty dry environment. Can’t wait to do my final defo next week! Until then stay green!


Likes
8
Share


@GreenWalker
Follow
This week i change light to 12/12. one runtz start flower so i change nutrient to core + bloom + flower fuel + Terpinator + calmag but the rest still core + calmag + grow + bloom and also add some cleanse. ppm for flower is 1000-1200 they look grow nicely i also get new seed from Ethos(4punchline RBX + 4End game R2 + 4Cresendo + 3 lemon skunk) in another room. I'm not sure doing a diary or not. if anyone want to see Ethos seeds with athena line let me know.

Likes
14
Share


@GERGrowDesigns
Follow
Dear Growers ,
Welcome to Week 6 or Flower week 3 // Day 42-49 from Blimburn Plushberry Auto.
Incase of Moving to a New Home . I Decided to skip 3-4 Weeks from every Diarie of the 12x12 Automatic Project . Everything should be Normal in the next Weeks .
Whether you're a beginner or an expert, you are warmly invited to join, ask questions, and share your own experiences along the way!
Project Setup & Conditions:
• Brand/Manufacturer: Blimburn Seeds
• Tent: 222cmx150cmx150cm
• Light: 2x 720 Watt Full Spectrum
• Humidity: 50%
• Soil: Narcos Organix Mix
• Nutrients: Narcos Products
• pH Value: 6
Get Your Epic Blimburn Seeds Genetics or Explore the whole seeds/headshop or Merchandise from This Amazing Breeder.
Just Take a look with some time in your pockets with this Link [https://blimburnseeds.com/?blb=dstp8dm]
Get another 10% Discount using the code [DSTP8DM] at the checkout.
If you want Germinitation results like mine , check out Kannabia Seeds with my link [https://www.kannabia.com/de?ref=61966] and grab the germination device or the strains I used . Trust me – it’s worth it for sure !
Get another 20% Discount at all products using the code [GGD] at the Checkout .
Stay curious and keep up Growing —we look forward to welcoming you back for the next chapter soon!
