Likes
Comments
Share


Likes
102
Share


@Roberts
Follow
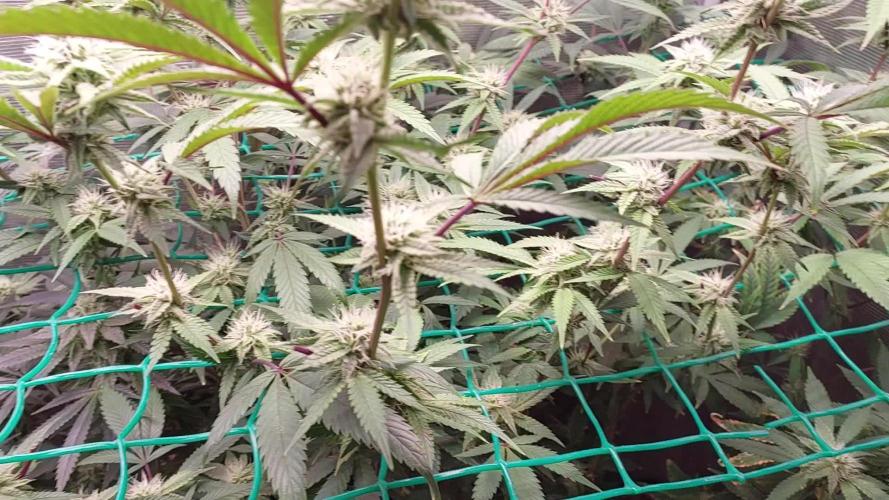
Ztrawberriez auto is growing great. She is starting to stack and has been very hungry. She has a great layer of frost started. Everything is looking really good at the moment. Thank you Fast Buds. 🤜🏻🤛🏻🌱🌱🌱
Thank you grow diaries community for the 👇likes👇, follows, comments, and subscriptions on my YouTube channel👇. ❄️🌱🍻
Happy Growing 🌱🌱🌱
https://youtube.com/channel/UCAhN7yRzWLpcaRHhMIQ7X4g
If anyone needs to purchase fastbuds here is a link for my affiliate program
https://myfastbuds.com/?a_aid=60910eaff2419

Likes
3
Share


Likes
3
Share


@UnkleSkunk
Follow
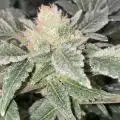
we are almost at the end ..
the colors change, the shortcomings are felt but the peaks are of very considerable size
the trichomes are all milky, expect a little amber
I had to further modify the vase due to the very small size .... it always fell

Likes
7
Share


@Mokorelsare1
Follow
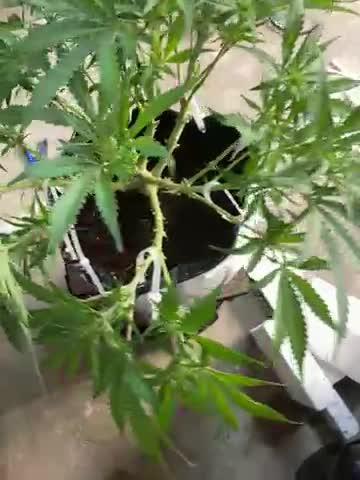
Hello let's call this first week of flower, she started to smell a little bit, also startet stretching, very strong plant!
Have some Phosphorus deficiency (curled discolored leaves, yellow leaf tips) so i'm feeding half dose of Big Buds from Advanced Nutrients (NPK 0,1,3), let's see how she reacts.
Day 30 TRYING TO FIX PROBLEMS BEFORE IT'S TOO LATE:
Magnesium deficiency - yellowing between leaf veins.
Phosphorus deficiency - curled leaves, yellow leave tips( nutrient deficiency overall) slow growth.
Calcium deficiency - small rusted dots on the middle aged leaves.
Ph was kinda high 7.1
Fix the problem:
I've added 1.5ml/l Calmag
0.1.3 NPK 1ml/l Big buds which will give plant its nuteients.
And water PH 5.5 to lower overall soil PH.
I think she will bounce back in a few days!
Day 34 and we are back on the track! She's been recovering and stretching very well, soil PH is 6.6 for now
Day 35 end of frist week of flower, 10cm stretch in 7 days.
Likes
33
Share


@MrStryker
Follow
All plants are finished and drying harvest pictures and weights next Sunday !!!! Happy Growing


Likes
3
Share


Likes
Comments
Share


@eldruida_lamota
Follow
Vamos familia, actualizamos la segunda semana de floración de esta Amaretto Tarmac de Seedstockers.
Empezamos abonando ya con varios productos de la gama Agrobeta para la floración.
Temperatura y humedad dentro de los rangos correctos, 12 horas luz, 12 oscuridad.
Una lástima que de todas solo aguanto una, y en concreto tiene un color espectacular aún así seguiremos con el diario hasta el final.
Agrobeta:
https://www.agrobeta.com/agrobetatiendaonline/36-abonos-canamo
Hasta aquí todo, Buenos humos 💨💨💨


Likes
4
Share


@TheGreenGroomer
Follow
The plant was harvested on day 67 of flower and is now hanging up to dry. I've got the drying environment set at around 58-60% humidity with a temperature range of 15-19°C. Hoping for a nice slow dry to preserve those terps! 👃💨 Will update once it's ready for the next step. Stay tuned! 🚀
Likes
6
Share


@Elguacho420
Follow
Buenas a tod@s... Décima semana de floración de estás tropicanna poison, décima y última semana, ya pueden despedirse, la semana q viene ya entran a poda, está semana un buen lavado de raíces un poco de defoliación y listo, la planta tiene cogollos compactos y pesados, buen aroma, bastante recina... A mí me gustan, aún q no tengan buen aspecto, no juzguemos las apariencias 😉 tiene muy buena pinta, contento con el resultado pero a seguir mejorando... Buenos humos para tod@s 💨💨💨😎⚕️
🇦🇷🤝🏻🇪🇦
Likes
13
Share


@FlavoursUk
Follow
So, things are going great. The RO water change left me with a nice sterile clean res. The plants are loving the lighter feeding and it shows.
The trolmaster has my light schedule dialled in with the sunrise and sunset setting
Make sure you follow my YouTube and Instagram accounts linked on my profile page.

Likes
15
Share


@38PLAN
Follow
Stiamo ancora raccogliendo,ancora nessuna pianta é morta,sto rimuovendo piano piano le cime più mature,così facendo evitiamo le cime popcorn e diamo il tempo alla pianta di riempire anche le cime inferiori,per adesso levando quella fumata e venduta siamo all'incirca sui 780g,però aspettiamo anche il nuovo stendino,alla fine del raccolto dovremmo arrivare a quasi 2 Kili con 7 piante e 6 vasi,con una media di 333g a pianta,ho pubblicato tutto quello che potevo,ogni procedimento,spero vi piaccia e mi seguiate
Likes
73
Share

@Roberts
Follow
Deep Forest Auto is still trucking along. She is still bulking and the ph has bee. Stable all week. She should be on her way to finish soon. Thank you again Doctor's Choice, Medic Grow, and Gen1:11. 🤜🏻🤛🏻🌱❄️

Likes
27
Share


@w33dhawk
Follow
Moin moin an alle, immer noch nicht viel los gibt immer noch nur Wasser (ohne Ph Regelung) Pflanzen sehen ganz gut aus finde ich.
Anfang der Woche hab ich gleich mal das netzt drauf geschmissen und über die Woche angefangen ein zu weben dabei ist mir am 14.02 leider einer der spitzen der Seiten äste abgerissen naja halb so wild wächst ja weiter..... Hab mich am 14.02 auch dazu entschieden ein wenig zu entblättern unterm netzt für etwas mehr Licht habe allen 4 Ladys exakt 6 Fächer Blätter entfernt also insgesamt sind 24 Blätter raus geflogen aus dem Zelt (ich Weiss, ich muss nicht mit zählen) habe die größten Blätter mal fotografiert und auch mit hoch geladen aus Langeweile. Hoffe euch geht es allen gut bis nächste Woche........ Cu ihr growmies

Likes
12
Share


@Siriuz
Follow
Starting week 9
She is huge that's why we added extra LST to her big main stem so she could have support and hopefully gets more yield!
Day 57
She is doing very good
Full of trichomes
Cant wait to taste it
Day 58
Going hard on nutes
1900ppm
Then lots of light
Soon I'll be showing you pics of progress
Also she's 65cm or more since she's bended
Day 59
She's even better
No nutrient burnt
Everything is Good;
Continues to grow 20/4 schedule
Day 60 Hope you like the video
Day 61.62.63.
Sorry didn't have the time to take pics or bids but overall she's good
Defoliate a lil bit here and there yellow leaves and she's got more Buds around and finally fattening up
I will show you next week
Rh 60/70%
Was rainy outside for couple days
Temp hot 28/30 night and day was 32
Thank God we've got AC....
Likes
24
Share


@Finniegrow
Follow
NOTES:
Keeping pH at 5,8-5,9 through the entire Vegetation-phase. EC is now around 1,2 and i'm increasing it if needed. I'll be checking the levels regularly from this week since all of the hydroponic systems are now running. I'm going to add some ice cubes in to the nutrient tanks to cool nutrient solution a bit always when I remember to, even though temperatures haven't been an issue so far. Can't do any harm so why not I quess. I'm also adding a CO2-bag in to the tent above the plants.
Also I'll begin training my plants this week by topping them.
Day 22 (8.11.)
Lights are set to 70%, water pumps are now on for 24/7 (EBB's drain water is on lowest setting possible to avoid drowning the roots) and pH is 5,8-5,9 / EC 1,2-1,3 on every hydroponic system.
I topped all of my plants and cut off all of the lowest leafs with single tips and some of the small nodes starting from them.
Day 23 (9.11.)
pH-level keeps on raising so I'm gonna be measuring it pretty often. I'm correcting it by adding some pH- while filling up the nutrient tanks with small amounts of fresh nutrient solution at a time. Everything's going well and I can't wait to flower these!
Day 24 (10.11.)
Lights are now set to 80% power at 70-75cm height from the tops. I cut off the rest of the lowest nodes which I had left to some of the plants while topping them. I don't think they would get enough light when they are bigger.
Day 25 (11.11.)
Removed the lowest (three-pointed) leafs of each plant.
Day 26 (12.11.)
I moved the Led's a bit higher (now at ~90cm above plants) and set them up to full power. Plants are now around 11-14cm height and growing like crazy!
Day 27 (13.11.)
The growing has exploded and these plants are getting bigger and bigger. I'm going to defoliate them lightly and remove the lowest nodes so the plants have around 6 nodes each going forward, hopefully I'll get an even canopy.
Day 28 (14.11.)
I changed new nutrient solution in to the EBB-flood system which has the Ayahuasca's on it. I'm keeping the EC at around 1,3-1,4 and pH at 5,8-5,9 on every system. Also added small amount of Cal-Mag in to both NFTs.