
Likes
Comments
Share


@AustinRon
Follow
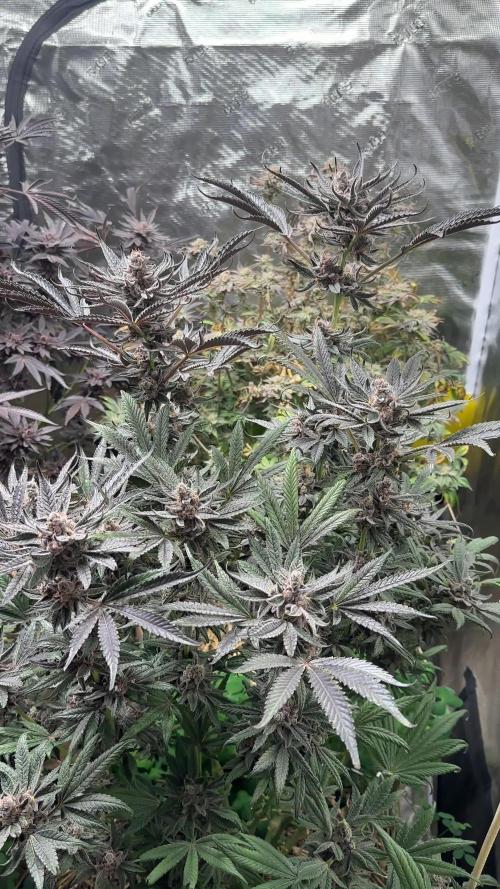
Week 9 - Flower 5
Sangria - by Twenty20 Mendocino
4Q 2022
Flower Week 5: Wednesday 01 March - Tuesday 07 March 2023
Start of Week: [ 2022-03-01, SA20 64:F:9:1]
End of Week:
[ 2023-03-07, SA20 70:F:9:7]
HeightWeekStart: [ 14, in]
HeightWeekEnd: [14, in]
Start Date: 28.12.2022 # Seeds Wet
Harvest Window: 17 - 27 March 2023, 79 - 89 Days
EnvironmentGermination
- LightDistance: [ 14.5, in]
- LightStrength: [911, 505, µmol/m2/s]
- Temp: [ 79, 85, °F]
- RH: [ 73, pct]
- HumidifierTrigger: [ 69, %]
Fertigation
(BioAg, Mammoth-P)
__________________________
Wednesday 01 March 2023
SA20 64:F:9:1
- BluMat dumped, Temperature lowered (Chilled Water), humidity stabilized. Showing water stress, expect to fade by tonight.
Thursday 02 March 2023
SA20 65:F:9:2
Friday 03 March 2023
SA30 66:F:9:3
- USB Fans Failing - either the connectors (Hate USB-B!) - rotating replacements. Need a long term solution.
Saturday 04 March 2023
SA20 67:F:9:4
- LightIntensity: [ 898, 549, µmol/m2/s]
- Replaced fan - charging two others. Minor defoliation to remove fans blocking mains.
- Pot still has MAJOR HEFT


Sunday 05 March 2023
SA20 68:F:9:5
- [ ] Refill Reservoir: [1.5, gal]
- [ ] Mammoth-P: [ 9, drops]
- [ ] Ful-Power: [ 30, ml]
- [ ] SLF-100: [7 .5, ml]
Monday 06 March 2023
SA20 69:F:9:6
- Still struggling w/ Fans
- Temp Reached 85 °F - Raised Fan to 4 (from 2)
- Set BluMat 1/2 pt back - Petiole droop. Let’s see if cooler better . . .
Tuesday 07 March 2023
SA20 70:F:9:7
- BluMats Dumped Overnight (1.5 Gal)
- Removed some fans blocking airflow
- No Humidifier Runoff
- Reduced Light to Reduce MAX TEMP
- LightStrengthPeakMin: [ 1031, 534, µmol/m2/s]
_____________________

Next week (Nominal Flower 10)
Wednesday 22 March 2023
SA20 71:F:10:1

Likes
7
Share


@BushDoctor740
Follow
Strawberry 🥧 I feel like her milky trichomes were starting to turn a little amber on some of the more mature buds so I chopped her down.Indica dominant strain so I wanted to let her go as long as possible.Smells great I’ll update a smoke report after she dries and cures.I think I’m going to use the majority of this one for some Rick Simpson oil and see how she turns out :)

Likes
36
Share


@TaterheadJohnson
Follow
7/7: Transplanted plant to final pot! Roots showed out of tray. Accidentally pulled a root off during transplant 😢.
After transplant I top feed/watered medium with a half gallon of treated water. I mixed 2ml of Rapid Start in 1 gallon water hub. Poured half in half gallon jug then poured half gallon over medium. Added 2 gallons of water into reservoir (1st white line) to promote root growth to bottom and to begin capillary reaction.
7/8: Bumped light intensity dimmer to 30%.
7/9: Left for Vacation.... Praying for my baby!🙏🏿 Going to be gone for 4 days. 😅
***** For this Grow******
“Day Air Temperature” will be the max temp of tent for the week.
“Substrate Temperature” will be the average temp of tent for the week.
“Night Air Temperature” will be the lowest temp of the tent for the week.
Likes
41
Share


@MadeInGermany
Follow
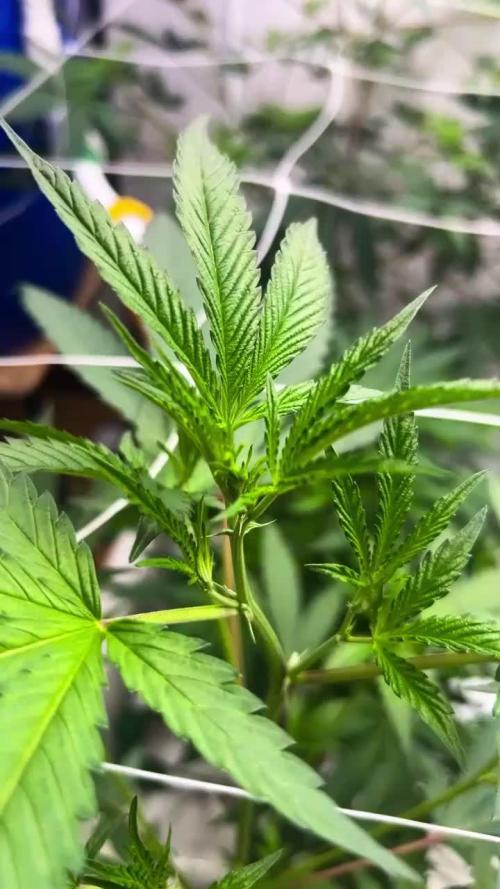
Hey guys :-) .
Today the plant was sprayed again with neem oil.
There weren't any more trips to be seen after the second application, but to be on the safe side, you did it again today get a cure.
That's why the beautiful dark shimmer on the leaves :-).
She has developed very well this week.
I will give you 7-10 days before I switch to flowering.
This week it was poured 3 times with 1 l each (nutrients see table above)
Otherwise everything was cleaned and, as always, everything was checked.
Have fun with the update and stay healthy 🙏🏻
👇🏼👇🏼👇🏼👇🏼👇🏼👇🏼👇🏼👇🏼👇🏼👇🏼👇🏼👇🏼
You can buy this Nutrients at :
https://greenbuzzliquids.com/en/shop/
With the discount code: Made_in_Germany you get a discount of 15% on all products from an order value of 100 euros.
👇🏼👇🏼👇🏼👇🏼👇🏼👇🏼👇🏼👇🏼👇🏼👇🏼👇🏼👇🏼
You can buy this strain at :
https://www.exoticseed.eu/
Water 💧 💧💧
Osmosis water mixed with normal water (24 hours stale that the chlorine evaporates) to 0.2 EC. Add Cal / Mag to 0.4 Ec Ph with Organic Ph - to 5.8 - 6.4
MadeInGermany

Likes
6
Share


@HAN_GROWER17
Follow
Esta semana a estado marcada por un excelente desarrollo, ya esta culminando el desarrollo de los capullos para dar inicio al proceso de engorde de las flores.

Likes
2
Share


@Traver
Follow
Removed ScrOg, I’m too ocd and damaged two colas. Two weeks was enough to space. Wish I put it on two weeks earlier. Currently removing flarf sites.
Likes
17
Share


@Fat_Olsh_Farms
Follow
Day 30. Continuing general Hydroponics maxigro every other watering. Half the recommended dose, til 15% runoff.
Likes
13
Share


@JohnnyBlaz3
Follow
for all of these strains I am putting the dry weight. this strain was in 3rd place in the tent this harvest and overall this plant was one of the stronger ones. She suffered the most from the ph mishap earlier on in the grow


Likes
6
Share

@Growverse420
Follow
These Chicken n Wafflez, Jelly Donutz, and Vanilla Frosting are in the final few weeks now, I'm thinking... I have absolutely loved this grow. Five of the phenos are pretty big and gorgeous. Three of the plants lagged a bit, either genetics, or my guess is I could have dialed their Blumats in better. I fear they may have been underwatered a tad, but they should still make good smoke! Also, my 4/20 gift to myself was purchasing the VCure from Vivosun. It's supposed to ship in May (I'm hoping early May!), if so it may make it here just in time for the dry/cure… Happy Growing!


Likes
34
Share


@Southwest_budders21
Follow
Day 49 Flip day! Just flipped them to 12/12 took loads of leaves off. Let's see if I've guessed the sex right then 😏 I think I've got 3 fems but people still tell me I want know until I've flipped 🤷♂️🏼
Update: Day 50 and day 1 of flower looking very happy will give a nice feed when soil dries out. Lights are now maxed out and on Day 51, day 2 of flower I'm sure all 3 are definitely fems will keep eye on them next few days 👀
Update again: Day 53, Day 4 of flower and they looking beautiful 😍
Likes
29
Share


@nonick123
Follow
Día 27 (20/05) Riego con 250 ml de Té de Compost
Auto Northern Dragon Fuel está creciendo exponencialmente!
Día 28 (21/05) Vuelven a tener sed! Las riego con 250 ml sólo H20 pH 6.2
Auto Northern Dragon Fuel se ha recuperado muy bien de la deficiencia de Mg
Día 29 (22/05) Riego con 750 ml H2O+ Regulator 0,15 ml/l + CaMg-Boost 0,25 ml/l + Startbooster 0,25 ml/l + TopBooster 0,2 ml/l- pH 6.2
Día 30 (23/05) Lemon Cherry Cookies Auto está sedienta de nuevo!
500 ml de sólo H2O con el pH 6.3
Día 31 (24/05) Lemon Cherry Cookies Auto está sedienta de nuevo!
Riego con 750 ml H2O + Regulator 0,15 ml/l + TopBooster 0,2 ml/l- pH 6.2
Día 32 (25/05) Las plantas no paran de crecer! 😍
Día 33 (26/05) Riego con 750 ml H2O + Regulator 0,15 ml/l + CaMg-Boost 0,25 ml/l + TopBooster 0,2 ml/l- pH 6.2
Lemon Cherry Cookies Auto tiene un olor increíble 😍😍😍
💦Nutrients by Aptus Holland - www.aptus-holland.com
🌱Substrate PRO-MIX HP BACILLUS + MYCORRHIZAE - www.pthorticulture.com/en/products/pro-mix-hp-biostimulant-plus-mycorrhizae
Likes
23
Share


@Fatnastyz
Follow
9-18
Day 14
Well, she is growin very well. I haven't burnt her yet! 😱😂. She is bigger every time I look.
1500ml ph 6.0 with yucca. Turned a fan on a bit, shes taking it well.
Little extra on pictures. 😂
9-21
Day 17
Watered 2k ml recharge ph 6.2
Adjusted lst and removed bottom nodes.
One of the 2nd nodes got injured in battle, I had to remove her too.
She grows!
9-23
Adjusted lst slightly and watered with yucca.
Enjoy!

Likes
2
Share


@SouthernOnions
Follow
These pics were taken on day of chop 1/8/24. Didn't get any pics of them hanging, will get pics of the trimming process in about a week when she's done drying. I typically dry for around 8-10days with 14 being ultimate goal but I'm fine with 10. Will update in a week or so with the smoke report and final conclusion!


Likes
21
Share


@Mr_Motalovah
Follow
Hello growers and tokers! 👋 👩🌾 🧑🌾.🔥💨
There has been a couple changes this week!!
First there was a big defoliation done, I cleaned the bottom of the plant.
All the growth that wouldn't amount to anything because the light doesn't penetrate that low.
Also took off the biggest fan leaves to give more light penetration.
Then finally switched to 12/12..
Just 36 hours after the defoliation she looked fuller than before.
Leaves pointing up and out. By how she's doing I'm sure she'll stretch a good bit these next few weeks.
Great reaction to the defoliation.
I'm still watering every other day, After the defoliation I watered with only Enzymes 2ml/L to clean the roots a bit then started with the nutrientes again.
I dropped the amount of grow nutrients from 3ml/L to 1ml/L and started adding bloom nutrientes 2ml/L for now.
I'll slowly be upping the bloom nutrientes and after week 2 I'll no longer add grow nutrients.
That's it for this week. Stay tuned to see how she flowers.
Stay safe!

Likes
4
Share


@Drtomb
Follow
I provided the girls another drink of bloom ferts... Looks like they need another week of growth to fatten and finish. This strain looks to be closer to a 70 day finisher. Will be switching back to pure h2o for the final week.

Likes
Comments
Share

@SolitudeCorners
Follow
📓 Cultivation Diary: The 12/12 Flip & Transition Week
📅 June 5, 2026 (Veg Day 17)
Irrigation/Reservoir: Prepared a full 100L reservoir refresh.
Nutrients: Kept the feeding aggressive with a double dose of vegetative nutrition (x2 Nutrient formula) to ensure the root zones and plant tissues are fully stocked with elements before the transition.
Canopy Observation:the canopy is thick, uniform, and fully occupying the table space. The trellis net is officially filled out, and the lower branches are strong and rigid.
📅 June 6, 2026 (Day 1 of Flower / Bloom Week 1)
The Flip: Officially switched the timers to a 12/12 photoperiod (Lights ON at 6:00 PM / Lights OFF at 6:00 AM).
Schedule: First irrigation shot triggers exactly 1 hour after lights on (7:00 PM), followed by a shot every 1.5 hours.
Volume: Configured the drip stakes to run for 1 minute per shot, delivering 5 shots total per day. This provides roughly 450ml per plant per day, creating excellent target dry-backs overnight to force vigorous root searching.
📅 June 11, 2026 (Day 6 of Flower / Bloom Week 1)
Irrigation/Reservoir: Bumped reservoir capacity up to 110–120L to keep up with increased transpiration as the plants begin their post-flip stretch.
Nutrient Recipe (TargetingpH 6.0 EC 2.5
Water: 110–120L
Athena Cleanse: 120ml
Silica: 220ml (Essential for stem strength during the stretch)
CalMag: 10ml
Athena Bloom: 600ml (Adjusting base to target 1.2–1.3 EC from Bloom component)
Athena Core: 400ml
Irrigation Adjustments: Increased the shot duration slightly to 1 minute and 15 seconds to match the accelerating growth pace.
The early flowering stretch has officially begun. The tops are noticeably pushing past the trellis net layers, and the node spacing remains tight and stacked. Leaf color is an excellent dark green with healthy, bright yellow-green shoots driving upward at the growth tips. No signs of stress or stalling from the schedule shift.
Likes
57
Share


@BigDaddyK
Follow
Ok, lets think about this logically - why are the leaves turning brown? it looks like a Calcium/Phosphorus issue, A LOT OF PEOPLE HAVE THIS ,
is it a deficiency??? Unlikely in Hydro as the solution is more effective as there are no contaminants, so this leads me to believe its a lockout, what can cause this ? 2 things = A) Too Much Nutrient Potassium or B) ph is too low - SO to rectify this, i have added more water to the reservoir and raised the ph to 6.3
As i am using more water in the reservoir its entirely possible that when the water goes down,even though the EC stays the same the proportional concentrations of each nutrient can change - for example EC pen says 2.0 when i first fill with 20 litres, the plant drinks 4 litres of water and consumes lots of bloom A+B so when i put my pen in two days later the 16 litres of solution still reads 2.0 but there is a higher proportion of PK.
Of course it could always be option C) these plants eat phosphorus for breakfast and need more ..😜
I have checked roots they all ok
Wednesday- changed solution , made it slightly weaker EC 1.7 ph 6.2-3
Thursday I had a little chat on Instagram with mammoth , i think they might need less than usual
Saturday - noticed some yellowing on the little plant , it’s a confusing as th3 other plants are all using the same nutrients and they are loving life , it might be the buckets , I am much preferring the size of the 35 litre ones , and the root structure is perfect , because the 45 litre boxes are more rectangular than square the roots are sort of sideways .
Still waiting for some purple on the tall one 🤔
ITS VERY IMPORTANT IN DWC - Do not automatically think you need to add nutrients , in DWC it’s so much more efficient that less is more , 99% of the time it’s overdone it , normally the tips go brown first , but it’s some circumstance s The concentration can increase without you knowing , FIRST change solution with a little bit less , I usually go to 1.6-1.7 EC TOTAL and 6.3 ph that is a universal solution that provides enough without overdoing it .
Updated DAILY