
Likes
Comments
Share


@MrOgchemist
Follow
Quick kush is called quick for a reason 👌, nice big indica leaves starting to grow and stretch pretty fast, i had to re pot one of the girls so one of them might look a bit sad but she will get better (its the salts)
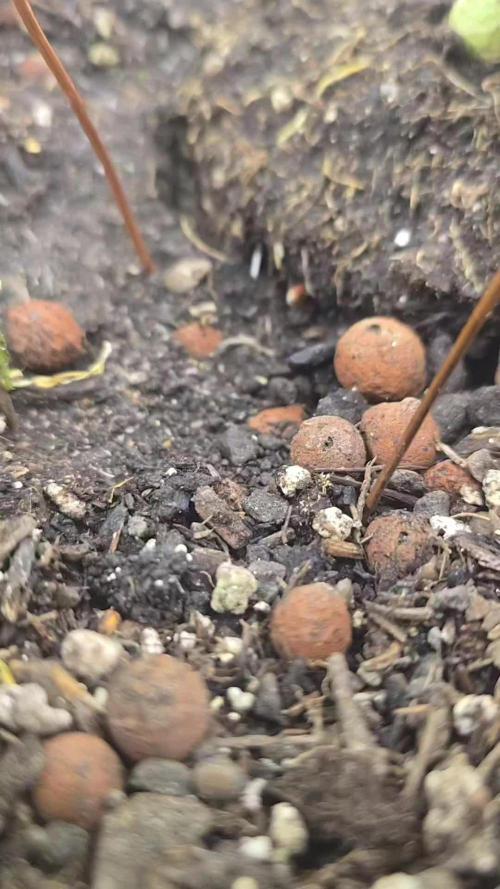
Flushing and Buffering-
I am personally using Canna Coco Coir,mix with one brick of plagron coco coir(had one left).
1. Why you Should buffer your Coco. Lets get to reading! (Its Worth it for those that dont know about it)
There are cation exchange sites in coco that will interfere with nutrition until they are buffered. The cation exchange sites in coco naturally come loaded with sodium (Na) and potassium (K) cations. However, the Na and the K are only weakly held to the exchange sites. In the presence of calcium (Ca) or magnesium (Mg), the sites will release their Na or K cations and lock onto the Ca or Mg. These processes are known as “cation exchanges”.
Buffering coco is accomplished by soaking it in Ca and Mg. This allows the cation exchanges to take place prior to adding plants. Simply soak your coco in a solution of Cal/Mag water and the exchange sites will release their K and Na cations and lock onto the Ca and Mg. When the cation exchange sites bond with Ca and Mg rather than Na and K, it is “buffered”. The bonds that hold the Ca and Mg to the sites are very strong and cation exchange will largely stop. This means that all of the nutrients that you add to the water will be available to the plant at the ratios that you provide them.
2. Alot of growers Grow in Unbuffered coco coir and its a big mistake guys, I myself was a "victim"😬of unbuffered coco and it does cause alot of problems... now i am going to try and fix them!
-----GROWING IN UNBUFFERED COCO---
Many growers are unaware of the need to buffer the coco and they try to grow plants in unbuffered coco. In unbuffered coco, the cation exchange sites will strip the nutrient solution of the Ca and Mg and replace those cations with Na and K. This creates a sub-optimal Nutrient Element Ratio (NER) and renders Ca and Mg unavailable to the plant.
Failing to buffer the coco is why so many growers suffer calcium deficiencies in coco grows. Manufacturers of prepared coco products try to exploit these problems and convince growers that only their proprietary products are suitable for growing. However, it is actually very simple to properly buffer your coco yourself. This tutorial walks you through the process and provides all the information you need to turn even the cheapest brick of dehydrated coco into a superior growing medium.
I hope i Helped out someone who didnt know about this link on how to Buffer your Coco Coir is Here https://www.youtube.com/watch?v=OQi8AMMIyyA&t=18s
14/02/2019- I Decided tp raise up the amout of nutes and im giving them 1,5 ml per L so 15 ml's for 10 L / 2 Gallons of water

Likes
11
Share


@Heregrowsnothing
Follow
Popped them straight into rockwool, 9 days later they all emerged just adding a few drops of water every couple of days


Likes
Comments
Share


@Jbcultivates
Follow
First week back with my plants and they’re wayyy bigger than I thought they’d get! Decided to do a big defoliation since it’s about the 3-4 week in flower. And they’re getting stanky


Processing
Likes
3
Share


@Dico29
Follow
98 days in of the autoflower, pistils look crazy but calyxes are still beginning to form, I’m young and still trying to learn the best techniques of anyone would want to send me a link to their grows I’m open to all

Likes
12
Share


@CampaCavallo
Follow
2ª Settimana di Fioritura 💐:
La bella e vigorosa Critical Lemon⚡🍋, Continua nella sua crescita e mette in mostra tutti i suoi nuovi fiori!😍
Sotto il vigile controllo di TENT-X 🤖, la piccola sta dando il suo massimo nel vaso da 6,5 litri...... Abbiamo settato anche alba e tramonto con una durata di 10 minuti (figata) ☺️👏🏻👍🏻


Likes
17
Share


@Budophile
Follow
Day 32 of flowering (12/12 to be precise): Halfway is getting close and they're starting to frost/smell quite a bit. Not much swelling on the buds although some of the pistils are already changing colour so I hope they will start fattening up real soon or I won't get any beautiful colas. Absolutely no yellowing on the oldest fan leaves so cutting down Bio-Grow once again. Will feed it for about 2 more waterings and then I'm definitely going to drop it out. Found a nanner on one of the top budsites of the bigger GSC but nothing too alarming. Think I'll have enough footage by the end of the week to compose a little timelapse what has been cooking so far.
Day 35 of flowering: Last supper of Bio-Grow for the girls. No deficiencies showing and RH/temps are staying just perfect. The other GSC has two nanners pushing out of the top colas and the other Gelato#45 seems to be starting to foxtail and making a cluster of nanners on top of the tallest colas (might be just light bleached and suffering leaves but doesn't look good..) If they turn out to be bunch of penises without balls I might have to "tip" her a bit from the top since the lower nodes look just fine. Wouldn't be surprised if it's just from way too intense light since I didn't find it necessary to raise the lamps at the start of the week cause all of them seemed to be enjoying the abundant light and I was already maxing out the hangers. Did a little tweaking and raised the lamps a good 15cm and now they're around 35-40cm from the tallest tops. We'll see how it goes..


Likes
14
Share


@BB_UK
Follow
Ever since I turned to mars hydro I have double sometimes nearly quadrupled my yields I first had with eBay lights (meh) I have never looked back since and gained so much respect from the community and the breeders too! And to hold the sponsors I do shows me that I am doing something right and I show appreciation to all who support! And that’s why I take a different effort to be fair and document you all! Even though I’m aware your businesses I just can’t be bias when it comes to the greatest I think you all are! Thank you for choosing me! (No I’m not the only one) just showing the love back as best as I can! 💚💚💚💚💚 thank you

Likes
16
Share


@MendocinoGreeno
Follow
Hi to all friends of the green leaf,
So, the move to the big tent went well, you can see the strawberries like the space, they started to expand immediately. Today I gave them one last "big" training, they are all starting to bloom nicely.
Oh, and lest I forget, for the first time I'm experimenting with adding CO2, I used the normal fermentation process, using yeast, sugar and water. I mixed it all up in a bottle, made a hole in the cap for the tubing, and placed the end of the tubing in a circulation fan.
So, have a nice time and keep it growing !
Peace✌️

Likes
12
Share


@Rob96
Follow
Pleased with this plant overall although it has grown much higher than the others it has still been manageable and this last couple of weeks has really really started to fill these long stems nicely. Has a really strong nice smell so all seems to be going well and looking forward to see how much fatter it fills out these last couple of week, will be flushing from next week getting ready for the cut, can’t wait till all done and get to enjoy all these buds

Likes
6
Share


@lOlympusl
Follow
I added a second light yesterday. I’m not sure if it’s overkill and if it’ll work well with the other one. They are both VIVOSUN 300w LEDs, the one I already had has a veg and bloom switch, but the new one doesn’t. But hey it was cheap on Black Friday for $63. But having the new one in there quickly increased the heat in there from 75 to 85. I’m waiting for an oscillating fan to throw in there also which will help. Any advice on the light situation? More light spectrum the better?
Update: did my first LsT on all three girls on 12/1. Within 3 hours all the leaves were facing the lights again I was impressed


Likes
1
Share

@Dendegrow
Follow
🍬 Sweet Mandarine Skittles (Sweet Seeds) – Week 7 | Flowering Day 1 🌸
Here we go! 🚀 Yesterday I flipped her to bloom, so today is officially Day 1 of flowering. She’s growing in Sonnenerde (yes, real “sun soil” 🌞🌱) and has already stretched like crazy. Honestly, she smells phenomenal – a strong sweet citrus candy vibe in the air 🍊🍬.
I’m a bit worried she might turn into a giant later on, but that’s part of the fun 😅. I didn’t catch the moment right after transplanting to see how she reacted, but hey – it’s all part of the experiment. Luckily I’ve got a few more seeds of her in the stash, so we’ll see what this one can teach me 🌿.
Stick around, follow along, and let’s see how big this Sweet Mandarine Skittles rainbow will shine 🌈🔥.
---
🍬 Sweet Mandarine Skittles (Sweet Seeds) – Woche 7 | Blütetag 1 🌸
Jetzt geht’s los! 🚀 Gestern habe ich auf Blüte umgestellt, also ist heute offiziell Tag 1 der Blüte. Sie wächst in Sonnenerde 🌞🌱 und hat sich vorher schon ordentlich gestretched. Der Duft ist jetzt schon phänomenal – süß, fruchtig, richtig nach Citrus-Bonbons 🍊🍬.
Ein bisschen Sorge hab ich schon, dass sie nachher ein richtiger Riese wird 😅. Leider hab ich den Moment nach dem Umtopfen nicht getappt, um zu sehen, wie sie reagiert hat – aber egal, ist ja ein Experiment. Zum Glück habe ich noch ein paar Samen auf Lager, also mal sehen, was dabei rauskommt 🌿.
Bleibt dran und vergesst nicht zu folgen – das hier könnte ein richtig süßer Ananas-Rainbow werden 🌈🔥.

Likes
6
Share


@Alienrdwc1
Follow
Not happy with amount of roots..so dropped b52 for 3 days and upped dosage of voodoo juice. Running ro water 780liter system. 3L A &B ec at 1.6 trying to push them this week..


Likes
13
Share


@GrowGuy97
Follow
Day 36 - This beautiful lady is starting to show some purple, she does seem to have a bit of nutrient & or light burn been trying to figure out but overall she is doing great! Thanks for following & happy growing friends!✌️🏼🌱
Likes
44
Share


@Chedderbob112
Follow
Waiting on a full plant hang dry so will wait at least two weeks maybe three hope ma vegging station holds up n can dae tge damage the now as av said guys this is definitely not the perfect set up am not on good terms with land lord so basically squatting here lol and growing and a got caught with one in this house the land lord doesn’t even know lol 😂

