
Likes
Comments
Share


@cr0baron
Follow
Sorry I was away for a bit. Spilt a pint of beer and then a pint of water on my laptop and had to get it repaired. Lost everything on my SSD so tryna build back.
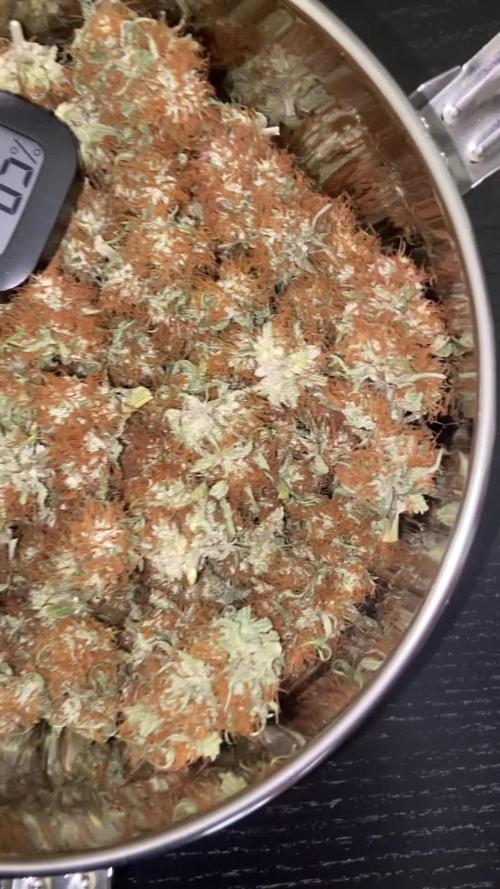
We're now in the penultimate week, i'm using Dragon Force from Shogun for a final boost before I flush next week.
I have added a dehumidifier into the mix. Had some issues initially with the reservoir filling up to quick and emptying it being a pain so I attached the pipe to drain water back into the oxypot. Unfortunately I connected it badly and it leaked into the tent creating a spicy situation. I managed to mop up the water and reconnect it so it now drains correctly into the oxypot. It seems to be working. I had it set to 50% these last few days and it reduced the RH from 70% to 51%. I've now set it to 40% to try and boost that last minute resin production.
Got 4 clip on fans and the airflow relatively high to keep the air as fresh and dry as possible. Had some rot on the last crop, determined to not let that happen this time.
I removed the second OHS plant because it was stunted and the 2nd Morpheus plant was so large she could use the space and has done nicely. The morpheus 2 is dominating the space but has absolute monster colas so I forgive her.
There's this mutant bud pictured. Wasn;t sure what was going on so after doing some research it seems it's either polyploidism or fasciation. I'm not exactly sure how to tell the difference but it looks cool as hell and I've excited to harvest, trim and smoke that badboi.


Likes
128
Share

@ElNass
Follow
🌱 Harvest & Cure Begins
Harvest is complete, and today marks the beginning of the curing process.
This run taught me a lot about Fruity Durban. From the very beginning, it showed exceptional vigor and recovered incredibly well from topping and training. Its strong sativa-like growth and rapid flowering make it a very interesting cultivar.
Looking back, I think I initially evaluated this cultivar from the perspective of a home grower running a single large Living Soil plant. After discussing it with Simon, I realized that Fruity Durban’s greatest strengths probably lie elsewhere. Its speed, vigor and growth habit make it particularly well suited for commercial SOG cultivation, where fast turnover and plant uniformity are major advantages. Seen from that perspective, I understand much better why this cultivar deserves its place in the Serious Seeds catalogue.
The drying phase has now been completed, and the flowers have entered curing.
My first impressions are already very promising:
🌸 Pink pepper
🍊 Fresh citrus
🌿 Herbal notes reminiscent of sage
The effect is already clear, uplifting and energizing, making it a great daytime smoke.
I’m very curious to see how the aroma and flavor will evolve over the coming weeks, as curing often reveals the true character of a cultivar.
A huge thank you to Serious Seeds for giving me the opportunity to test and document this variety from seed to cure. 💚

Likes
7
Share


@OwlGang_Uk
Follow
Week 9 - Week 9 And Plants Are Looking Fine - Plants are healthy and they have a very nice structure of branches. Looking forward to seeing the bud development.

Likes
15
Share


@38PLAN
Follow
La fine del viaggio.siamo in Italia,e in Italia la cannabis é illegale.nel mio quartiere c'é stato un blitz violento che ha portato via tante persone,ho deciso di tagliare perché la situazione polizia qui si é fatta pesante,sono salvo ma non ho più tempo per continuare,avrei voluto farvi vedere di più,portare le piante al massimo,ma questo é stato il loro tempo,non diffidate mai delle autofiorenti buone,se fatte bene possono competere con le loro sorelle femminizzate.Sono veloci rapide e potenti,tutto ciò che serve a chi non ha tempo e spazio,come dimostrato se fatte con conoscenza possono portare risultati esorbitanti,é stato il più bel raccolto della mia vita.il costo totale del raccolto é stato all incirca 1600€ fra terra bolletta e fertilizzanti,il valore della materia prima prodotta si aggira intorno ai 10000-15000€
Likes
2
Share


@LittleBigTrees
Follow
I cut feeding towards the end of week 8 , the plants could have easily gone for another week but at this point the tops were loosing all colour so I decided to harvest at the end of week 8.
The trichomes were cloudy and clear with a few Amber.

Likes
1
Share


@Hustle786
Follow
Lemon is growing
Doing well can see some big nugs
Hopefully let’s see what Barney farm seed like

Likes
19
Share


@TylerBud
Follow
Welcome to the Jungle 😁😎
Girls are enormous , i literally lollipopped them 😅 , later in the flowering i will also make a great defoil of the tops to prevent very serious mold that already attacked my autos ,

Likes
48
Share


@DreamIT
Follow
💐🌟HESI contest🌟💐
💮 8.2
💮 9.2 ...
💮 10.2...
💮 11.2...
💮 12.2...
💮 13.2 all right for now, yeah
💮 14.2 Happy Valentine's Day
____________________________________________________________________________________
❕❗❕ Do you already know HESI products?
Take a look at the details You will be fully satisfied 😉
👀 https://www.hesi.nl/en/products
📜 A look at the details of what I'm growing 📜
🍓🍌🍇Strawberry Banana Grape by Seedsman🍇🍌🍓
⚧ Gender
▪️ Feminised
➰ Genes
mS
🎄 Genetics
▪️ Strawberry x Grape x Banana OG
🚜Harvest
▪️ 400 - 500 g / m²
🌷Flowering
▪️ 60 - 65 days
✨THC
▪️ 15.0-20.0%
✅CBD
▪️ 1.0%
🏡Room Type
▪️ Indoor
🌄Room Type
▪️ Outdoor
🕋Room Type
▪️ N/D
🎂Release Year
▪️ 2019
__________________________________________________________________________
📷🥇 Follow the best photos on instagram 🥇📷
https://www.instagram.com/dreamit420/
🔻🔻Leave a comment with your opinions if you pass by here🔻🔻
🤟🤗💚Thanks and Enjoy growth 💚🤗🤟
Likes
8
Share


@Ninjabuds
Follow
Code ; NINJABUDS for a discount on ELUFAH lights
The spectrum from ELUFAH is really making the plants grow really well
My papa Payton I have growing under the ELUFAH uap-1500 along with the ELUFAH Saturn ring under canopy light. I recently put the plant back in a 2x2 I did have 2 plants but the other plant needed up being male. No need for the larger tent still.
Likes
6
Share


@Reidy_B
Follow
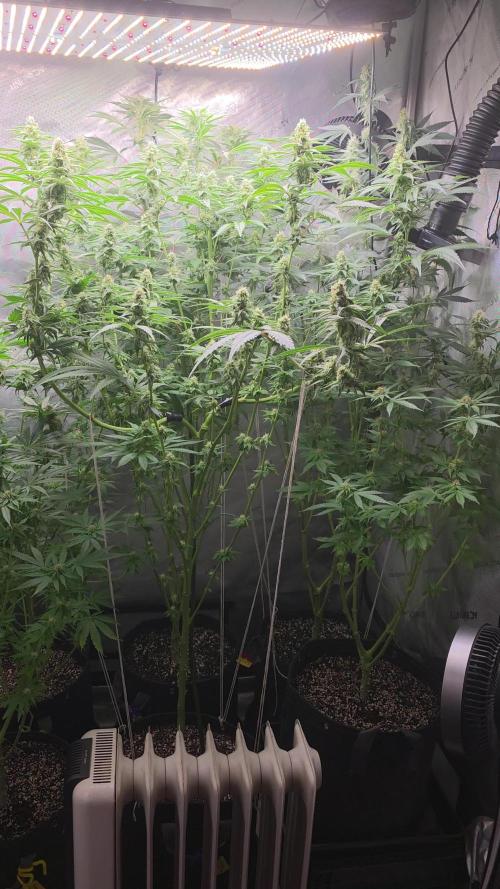
Moving right along! Got a second tent for smaller plants. So I can start the flowering cycle with the gorillas. Looking forward to see what happens in the coming months! 😃💚

Processing
Likes
6
Share


@Mr_nugs_lover_David
Follow
She's responding super good to lst method she looks absolutely gorgeous I would have loved to be able to grow her since march however It was not posible but I keep this wonderful indica in my list. This wonderful pheno of Alien gorilla has started flower the 3rd of August.

Likes
Comments
Share

@DogDoctorOfficial
Follow
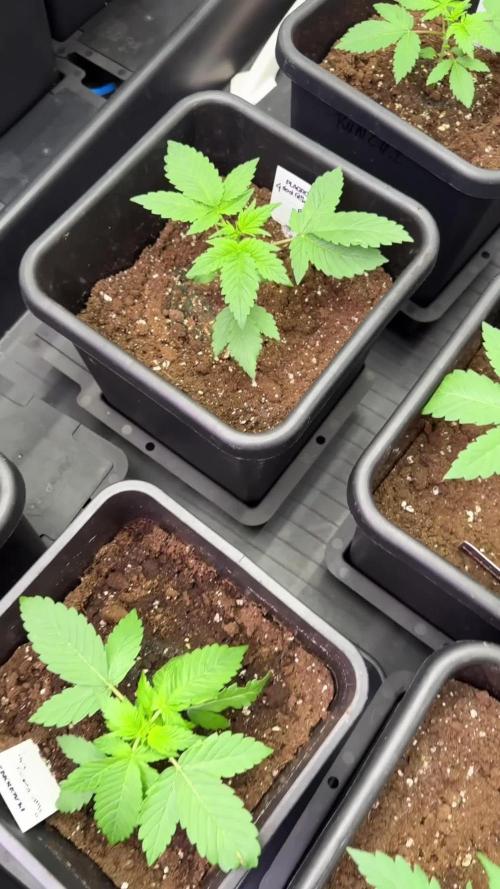
Cash Express – Pheno B | Week 3
Small Sister, Big Potential
Welcome back to another week of the 8×8 Adventure, where every phenotype earns its own place in the spotlight. While sister plants may share the same parents, they rarely tell exactly the same story—and that is one of the most fascinating parts of growing from seed.
This week brings us to Cash Express Pheno B, the quieter sister of the pair.
At first glance she may appear slightly behind Pheno A in overall size and development, but spending a little time with the photographs reveals something far more interesting.
This is not a weak plant.
This is a plant writing her own chapter.
⸻
Week 3 Environment
🌡️ Temperature: 27.4°C
💧 Relative Humidity: 55%
💡 PPFD: ~700 µmol/m²/s
🌱 Medium: Plagron Lightmix
? Growing Method: 12/12 From Seed
💦 Water Consumption: ~0.9–1.2L per day
Feeding Schedule
Days 18
* EC 1.0
* pH 5.99–6.0
* Approximately 1L
Days 21
* EC 1.3
* pH 6.0
* Approximately 1.2L
The environmental conditions remained stable throughout the week, allowing differences between phenotypes to become increasingly visible.
⸻
Cash Express Pheno B
If Pheno A represents symmetry and textbook structure, Pheno B represents individuality.
She is slightly smaller.
A little less aggressive.
A little less imposing.
But she possesses something equally valuable.
Character.
Looking at the canopy from above, the first thing that stands out is how compact and tidy she remains. While her sister is charging forward with obvious vigor, Pheno B appears to be investing more energy into establishing structure before accelerating upward.
The leaves are healthy and evenly colored.
The stems remain strong.
The new growth is vibrant and active.
Most importantly, the plant shows no signs of struggling despite her slightly slower pace.
In fact, many experienced growers learn over time that the fastest seedling is not always the plant that finishes strongest.
Some phenotypes sprint.
Others build momentum.
Right now, Pheno B feels very much like the second type.
⸻
A Different Growth Rhythm
One of the most interesting aspects of growing multiple phenotypes side by side is seeing how differently plants can respond under identical conditions.
Same tent.
Same nutrients.
Same environment.
Same light.
Yet each plant interprets those conditions through its own genetic lens.
Cash Express Pheno B seems to prefer a more measured approach.
The internodes remain relatively compact.
The branching is beginning to establish itself.
The center of the plant is becoming increasingly busy with fresh growth.
And while she may not command attention immediately through sheer size, she rewards closer observation.
There is a quiet confidence developing here.
A feeling that she is preparing rather than rushing.
⸻
Healthy Signs Everywhere
Several positive observations stand out this week:
* Excellent leaf color throughout the canopy
* Strong, healthy petiole development
* Compact structure
* Good node formation
* Active new growth
* Positive response to increased feeding and PPFD
The fresh growth emerging from the center is particularly encouraging.
Those younger leaves display the lighter green color typical of rapidly expanding tissue, showing that the plant is actively building new biomass and continuing to adapt to the increased light levels.
Nothing about this plant suggests limitation.
Only a slightly different timetable.
⸻
The Beauty of Phenotype Variation
One of the goals of documenting every phenotype separately is to capture these subtle differences.
If both sisters looked identical, there would be little to learn.
Instead, we get to observe how two related plants express themselves in unique ways.
Pheno A currently impresses through vigor and structure.
Pheno B impresses through balance and composure.
Both approaches are valid.
Both are beautiful.
And both deserve their own spotlight.
Sometimes the plant that receives less attention early on becomes the one that surprises everyone later.
I’ve seen that story play out many times before.
Perhaps Pheno B has a surprise waiting for us too.
⸻
Looking Ahead
Over the coming week I will be watching closely for:
* Increased branch development
* Changes in growth rate under the higher PPFD
* Early flowering indicators from the 12/12 schedule
* Structural differences compared to Pheno A
* Signs of unique phenotype expression
At this stage she remains healthy, happy, and steadily progressing.
And honestly, that’s exactly what I want to see.
No drama.
No problems.
Just growth.
⸻
Thank You
A huge thank you to everyone following along with this project.
Thank you to the GrowDiaries community for creating a place where growers from around the world can learn from one another.
Thank you to Plagron for supporting this cultivation journey.
Thank you to Zamnesia for the genetics and the opportunity to document these cultivars from seed to harvest.
And thank you to every grower who takes the time to stop by, leave a comment, share advice, or simply enjoy the journey.
Every plant has a story.
Some tell it loudly.
Others tell it quietly.
This week, Cash Express Pheno B reminds us that quiet stories are often worth listening to.
🌱💚
Growers Love and see you next week, little lady. Keep growing your way.
Likes
6
Share


@BudeCo
Follow
Everything is ok
Growing faster than i wish.
I should defoliation again and put some clips tomorrow.
Need some topping after almost a week.
Its health and fine.


Likes
81
Share


@MOSS_FIGURE
Follow
On week 3....I noticed that the 3rd week the soil dries out quickly, so this week controls water the plants only 2 times with nutrients but add water
volume increase to 1.5 L. , Switch the light to 18hours per day.
{Activities)
(Day 15) First day I don't water the plants.
(Day 16) And second day I still don't water the plants because the soil is wet.
(Day 17) Today use the nutrients, There're (Cal-mag 0.5ml. , Fish-mix 2ml. , Bio-heaven and Acti-vera each 3ml. per 2L. water. I think should add more fan for my grow tent so today I'm buying new one.
(Day 18) Mixed Fish-Mix & Acti-Vera each 1ml./L. for foliar fertilizers
(Day 19) Today switch the light to 75% and Lamp To Plant Distance 24-26inches .
(Day 20) The soil has dries up.
Use a Root-juice 4ml/2L. 🚿
(Day 21) The last day...
(Hope you like and enjoy my diary)
Thank you so much for checking out my grows. Feel free to leave a comment, push the like or give the follow.

Likes
24
Share


@JONNY_APPLE_WEEDS
Follow
More to come!... don't even ask how I keep this tent in the 70s in the garage when it is already getting to 96 degrees outside..... short answer... "oh, this works, well it did work, maybe if I do this, that seems to help, well shit, that didn't work, uh oh, its getting hot, I got it!... and done. - temps start to climb into the 90s - " oh shit, oh shit!, Its not working anymore, I guess 90 degrees inside the tent is better than being in the 100s.... think, think, think, 😲 I got it!... annnd done👌! Its working. The temp at the time of writing this is... 73 degrees (last night it is was in the upper 80s lower 90s).
So yeah, my wife is upset at the time I've been spending on it..... if only she would have let me do this inside the house like I wanted to. Meh, whatareya gonna do? 😕
There is something living in my attic... I hear it now.😒....
Likes
12
Share


@Bhodidharma
Follow
She is starting to chunk up now. I'm doing the same fertilizer routine as last week.
Likes
21
Share


@BB_UK
Follow
Brand new amnesia punch Zamnesia and ripper seeds collaboration have made a never to forget strain! There was only 500 so I got me one and germinated a seed to add to my photo tent so I could be one of the first to test and try it!
Started in a glass of water for 48hrs then onto paper towel for 24hrs then potted! I am running them in 12L of soil, I have also put Co2 bags into the tent too


Likes
70
Share


@Kid_Colombia
Follow
Finally back to the garden after 4 weeks away.
They were really in need of love by the time I got back to take care of the garden.
BIG NEWS! Now running a California Lightworks Solarxtreme 500 as my main light.
Will add a second SX500 light into the room once I start flower.
Hit the LST on the again and just making sure they are getting fed and lots of love.
Will have to push back my starting flower by another few weeks. See how the recover


Likes
56
Share

@Natrona
Follow
Strawberry Trop Cherry - STRNG Seeds
W12F3 1/25-31
TPS1 14ml/g
Silica Gold 3ml/g
1/27 73 6.5 ph & 935ppm
1/27 66.3F, 6.6 ph & 1014 ppm
To balance out the feed solution, I blend some of one bucket into the other and then back to the first bucket. I do this a couple of times to even out the PPM and temperature.
Strawberry Cadillac #1 51” #2 52” each drinks 1.5 gal
Strawberry Trop Cherry #1 37” #2 57” #2 drinks 1.5 gal #1 only 1 gal
Straw-Lectric Lemonade #1 40” #2 50” both drink 1 gal.
Other than bud development, they should not stretch any more.
STC#2 is taller than the light, so I have her pushed to the back.
1/29 I did the final defoliation on all strawberry gals. video
1/30 TPS1 14ml/g
Silica Gold 3ml/g
65.6f 6.3 ph & 1110 ppm
66.3f, 6.3 ph & 1120 ppm These are after blending the buckets.
Important dates
11/9 Germination
11/25 Transplant to 1.5 gal,
12/1 Topped, Pinned and removed 2 large center leaves
12/5 Repositioned pins and removed lowest fan leaves
12/16 Topped 4 tops on each plant except Cadillac1 (first topping) and put manuka honey on the cut.
12/24 Transplant to 5 gal
12/27 Defoliate all
12/28 Flip to 12/12
1/05 Supercrop Cadillac #1 at the joint where I topped her.
1/11 !st flower week defoliation and lollipop for all the Strawberry collection.
1/16 More super cropping of Cadillac1 and 1st time Trop Cherry2.
1/29 I did the final defoliation on all strawberry gals.
Stay green, growers love 💚🌿
💫Natrona💫

