
Likes
Comments
Share


@eLeMeNt3de
Follow
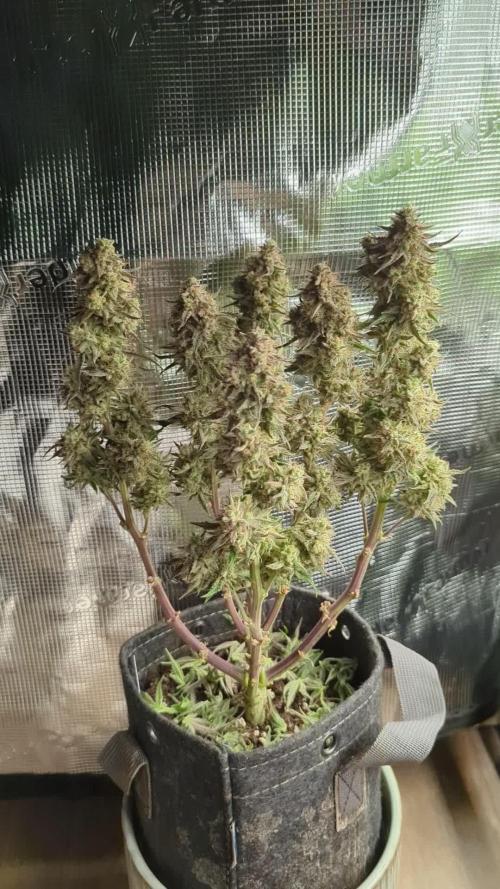
First time growing Blueberry Auto, found it to fast growing with little margin for error.

Likes
24
Share


@Dingle
Follow
All the plants seem to be developing well going into the later stage of flower.
Some signs of possible deficiencies and nutrient burn on a few leafs but not too many.
The smell again is increasing more and more to a sweet one.
More defoliation and the use of sticks for more coverage.
Light still set at 90%
✌️☘️🌱

Likes
18
Share


@eLBowAutoGrows
Follow
Day 50. Still a lot larger than I anticipated. But the good news is she still fits in the 3x3 and is showing signs of slowing down the stretch. Iv heard people burning up their plants using canna PH13/14. So I’m going to mess around with a couple dosages and see how she handles it.
So far this method has done almost exactly what I wanted. Stayed about a foot shorter with a much more even canopy. In about 10 days she will be getting another heavy defoliation.
Update day 54. Heavy defoliation under way to expose bud sites. In about 6 days I’m going for mt first schwazzing. Should be a good time
Update: As week 8 comes to an end I and very happy with the progress. I’ve bumped the ec up to 2.8. Will continue on that for a little bit longer. Day 60 about I will do my first “schwazzing” pretty excited about that.

Likes
6
Share

@PapaTerps
Follow
AlienZ Automatic - Greenhouse Seed Co.
Day 95
🚿 She was watered with 3L of just plain RO tap water, pH'd to 6.3, twice this week and has been left to dry back for the last five days 👍🏻
✂️ To prepare her for harvest, she had the majority of her fan leaves and larger sugar leaves removed at the start of the week, this also allowed for more light to reach areas of the bud that had been shaded. For harvest, I performed a wet trim, to ensure she had as little foliage as possible on her, removing as many leaves and stems from her as possible, to prevent any moisture buildup during her dry 🙏🏻
🌸 Her bud is fully mature now, most of her pistils have turned amber with just new growth exhibiting white pistils. All of her trichomes have either turned milky or amber, with about 15% being amber 👌🏻. Her smell has also changed a bit and is now heavy on the citrus/grapefruit with undertones of floral/earthiness - very pleasant 🌸
♈ She will now be dried in a dark cool room (at ~20 degrees celsius with ~60% humidity) for about 8 days before she is move into glass jar for her cure, which will last for at least a month before she is used 🤞🏻

Likes
Comments
Share

@SmokingTiki
Follow
Once again, the sun was there and Thelma and Louise develop nicely 😎 They kept stretching especially Thelma which is now way taller than Louise.
Heights :
Thelma : 67cm
Louise : 37cm

Likes
1
Share


@carlitospiratahaze
Follow
Aquí estamos con la purple punch!!!
11/4/26
La pequeña como es normal entra en floración debido al cambio de un interior a 18/6 a las 13 horas que tiene ahora diurnas,la dejaremos afrontar la floración y luego sufrirá una transición a vegetación nuevamente..
Seguiremos observando los cambios en la pequeña

Likes
170
Share


@SlowpokeFuegobud
Follow
🍪 😍🍪 😍🍪 😍🍪 😍🍪 😍🍪 😍
Welcome to week 11, dear growmies!! 😘
I'm leaving for 5 days and figured out a watering system. I need to actually water them for 1 or 2 days from remoteness.. :thinking:
DAY 72
Watered with 4ml bloom + 2ml pk + 4ml growzyme, humics, bigfruits + 2ml calmag + epsom 💧
DAY 73
test bottles for my vacation💧they are plugged into the soil with ceramic cones
Thanks for showing up and supporting me and the girls, bless you, growmies!! 😘
Shouts go out to my sponsors @GreenBuzzNutrients, thanks so much for your support!! 💚 💚 💚
If anyone would like to try their amazing organic products, you can find a generous discount code of 25% in my weekly comments! 😜 🙏
If you want a recommendation which product to get first.. BIGFRUITS!! 😍 I love the tasty terps with this one!!
https://greenbuzznutrients.com/
Thanks also of course @Anesia_Seeds, for the beautiful genetics!! 💜 💜 💜
________________________________________________________
Strain Information:
Foster
Foster is a balanced hybrid with a slight sativa dominance and it’s the result of crossing a particularly THC-rich Emperor Cookies Dough with our highly potent Sleepy Joe. The combination of these two exceptionally strong parents has resulted in a premium strain that delivers a fine balanced aroma and an insane high.
Foster’s high is deceptively slow at first and creeps up, but after a few minutes her outsized potency unfolds with dizzying energy and euphoria. The mind is suddenly full of motivation and a feeling of lightness spreads. At the same time, the body is flooded with tingling, warm effects and greatly relaxed. The strain clears your mind for new ideas and concepts, lets you dream and makes you feel really happy. Due to her high potency and measured THC levels of up to 35%, she will delight and challenge those with a high tolerance with ease, while certainly beaming away novices for several hours. Because of this, she is not recommended for beginners and you should not underestimate this fragrant beauty.
Growing Foster
Foster is a resilient and vigorous strain that produces excellent results indoors, outdoors and in the greenhouse. She tips the scales in yields of up to 550g/m² or 1000g per plant, grows quickly and forms many strong side branches with large heavy buds. Towards the end of the flowering period, the buds are covered in a thick layer of glistening resin and emit an intense sweet, fresh and floral scent.
She is perfect for growing in a SCROG or SOG and has a very favorable calyx-to-leaf ratio, making manicuring easy. Her terpene profile is complex, offering an aroma and flavor reminiscent of coffee, caramel, freshly baked cookies, and vanilla. It’s a seductive treat that shouldn’t fool you with her mind-blowing potency. She is among the strongest strains on the market and has enough THC to blow your head off.
Therapeutic effects
Due to its complex terpene and cannabinoid profile, it has a similar wide range of uses in the therapeutic field as in the recreational field. It helps to reduce stress, has a mood-enhancing effect and is extremely helpful for pain and inflammation.
https://anesiaseeds.com/product/foster/
________________________________________________________________________________
SETUP:
80x80x180 cm Zelsius
240W Full Spectrum LED IR UV dimmable
DW240H-A6-HS
Heatsink color red
LED Chips:
512pcs SAMSUNG LM301H + 24pcs Osram 660nm + 8pcs Osram IR 730nm + 8pcs UV 385nm
Color mix: 2700K + 4000K
2,8umol/J
Driver HLG-240H-C2100B
Coverage: veg 5x3ft / flower 4x2ft
Product size: 628x205x68mm
Green Buzz Nutrients
Shouts go out to my sponsors @GreenBuzzNutrients, thanks so much for your support! 💚 💚 💚
If anyone would like to try their amazing organic products, use code GD42025 for generous 25% discount (for orders of minimum 75€) ✨
https://greenbuzznutrients.com/
Biobizz Lightmix
custom exhaust fan 320/270cm³/h
Carbon Active Granulate 240cm³/h
tab water pH 8 - EC 0,25 with Calmag to 0,5
Advanced Hydroponics pH minus Grow + Bloom to pH 6.2
🍪 😍🍪 😍🍪 😍🍪 😍🍪 😍🍪 😍

Likes
79
Share


@Salokin
Follow
Hello Growmies,
As we wrap up the seventh week of our Epic Buzz cultivation, our tent is bustling with life, with each plant showcasing the fruits of our labor. The training techniques, including defoliation, lollipopping, and scrogging, have been executed to near perfection, allowing our plants to transition into the flowering phase with robust vigor. Epic Buzz #1 and #2, in particular, are the epitome of horticultural excellence, with their sturdy stems and lush foliage setting the standard in our green haven.
This week marked a pivotal shift in our lighting strategy, as we nudged the PPFD values from a modest 250-350 up to an assertive 450-500. This increase is designed to optimize the light intensity during this critical phase of growth, catering to the heightened demands of our flowering beauties.
Our nutrient regime has been meticulously fine-tuned to accommodate the changing needs of our Epic Buzz varieties. The switch from Alga Grow to Alga Bloom signifies our plants' transition from vegetative growth to flowering, ensuring they receive the ideal nutrient profile for bud development. This, paired with our steadfast mix of Sugar Royal, Power Roots, and Orca, is dispensed religiously every four days to maintain optimal health and vitality.
The controlled conditions within the Tent-X continue to be monitored with precision, keeping the VPD levels within a desirable range, despite occasional deviations due to manual fan adjustments. However, the imminent arrival of the Prima Klima EC fan is set to revolutionize our environmental control, promising seamless day-to-night transitions and a well-deserved retirement for the Mars Hydro fan.
I humbly seek the collective expertise of this community for guidance on integrating a 5-phased PWM motor with the TrolMaster controller. Your shared experiences and advice are invaluable as we strive for continuous improvement in our growing endeavors.
As we look ahead, the promise of what's to come with our Epic Buzz trio fills us with anticipation. Their impressive canopies and formidable structures are not just a testament to their genetic potential but a reflection of our dedication and the collective wisdom of this remarkable community.
Stay lifted, and may your gardens always grow bountifully,
Salokin
Likes
24
Share


@Newbiegrower420
Follow
Day one of week five! 19th September!
Small amount of defoliation today as some leaves had been laying on the soil and were turning yellow. Other than that the girls look good I think. A little more LST but think Ive got a good even spread so far.. 🤞🏼
Nutes gone in today Biobizz: Grow/Bloom/TopMax all at 1ml per litre..
Day 3 of week 5! Update 21st September:
Nutes gone in again today BioBizz Grow/bloom/Top Max all at 1ml per litre...
Starting to see signs of filtered water deficiencies so CalMag going in on next feed @ 1ml/l. Wasn’t sure if my water filter was much cop but looks like it’s better than I thought. Wish I’d gone with my gut and started the CalMag earlier! Other than that I’m giving them a couple more weeks of veg and then we’re going to flower 🌷 all being well 🤞🏼❤️
Day 4 UPDATE: 22nd Sept.
More LST to keep things all the same height and encourage more new growth sites..
Day 5 UPDATE - 23rd Sept:
Last lot of Nutes for the week - BioBizz Grow/Bloom/Top Max @ 1ml/l and now that CalMag has gone in @ 1ml/l I’m hoping to not see anymore brown spots on my leaves 🤞🏼🍁
Happy growing everyone!! 🍃 🍁

Likes
31
Share


@Reaper
Follow
picture: start of week 8, preflowers show up
video: end of week 8, flowers start to bloom


Likes
15
Share


@Green_claws
Follow
Yes gromies
I gave her canna boost for the first time today
I'm giving around 600ml de-chlorinated water every 2 days, il aways feed every 2 days spreading all different nutrients between them, get a nice balance, watering just enough so the coco goes dry after 2nd day well on top atleast anyway.
Giving silica on its own once a week 0.5ml to 600ml water ph'd to 6.
Removed a few lower leaves and pegged back 2 branches to make room for the many colas now coming threw nicely.
Not sure how this grow is going! it feels slow upto now but she's well into flower now and the stretch is real...
Added midweek..
I could feel her asking for phosphorus and potassium so gave her a little tickle of PK13/14 (0.5 To 500ml ph'd to 6). 1 feed.
Going vertical and filling budding sites nicely.
😛.
Raised the light for more vertical growth before she puts some weight on. 😉.
Thanks for taking your time out to view my diary.
Peace and love 💚
Likes
5
Share


@dreads
Follow
Defoliation day about 50% of the leaves ladies looking great not much to do really
Likes
12
Share

@Melacola
Follow
Bien et bonnes graines 12 zaines de graines fractal et blak opium euphorias 60graines enfin heureuxde la participation au concours divine seed mercis a tout ces acteurs de la culture tous confondut petit et grand merci a growdiaries


Likes
9
Share


@Chubbs
Follow
Week 5 on these amazing girls. They're full into the flower stage and the smells are starting to come through super strong. I've switched over to bloom nutes and they seemed to never skip a beat. All in all excited to see what the coming weeks have in store.
Happy Growing.
Likes
57
Share


@LockDownGrow
Follow
Ok so the taste test is :
I like this over the girl scout cookies and the BlackBerry for daytime ,
It's a very nice euphoric head high that turns you into a creative genius , you feel like you could do anything you put your mind too, the buzz sticks around for a while too ,
It's really nice indeed , and a few months cure and she will smell fantastic ,
Likes
24
Share


@Grey_Wolf
Follow
Eva Seeds
High Level 14 weeks of vegetation completed 20th Jan 2020
This Diary feels like it's been going forever 😄 and Ive still got about 10-12 weeks still ahead of me 😶 Not to worry tho I've been busy tying up the branches on the big plant
as they are getting bigger everyday. I'm going to need to start training the branches closest the far end of the greenhouse to start growing horizontally otherwise they'll be pressing against the ceiling of the plastic greenhouse which isn't good for the buds or Discretion. I have to get most of the training done before I head off for a fortnites break.
I have a close friend who will be watering them all for me but that is all they'll be doing so all training and preparations must be done prior to me leaving.
Cheers for stopping by I'll be back next week.

Likes
15
Share


@Kitties_and_Colas
Follow
6th week of flower, I just started increasing N because their color was starting to fade a little sooner than I'd like for a 10-11week strain..

Processing
Likes
6
Share


@Mr_nugs_lover_David
Follow
She's developing ver slowly I don't know why could be happening this,Never have those problems with any plant so let's hope she develops well and without problems.

Likes
125
Share

@SlowpokeFuegobud
Follow
🍊 🍋 🍮 🍭 🍊 🍋 🍮 🍭 🍊 🍋 🍮 🍭 🍊 🍋 🍮 🍭
Welcome to week 10, dear friends!! 😘
DAY 64
Watered with 2ml A+B + 2,5ml PK 💧
DAY 66
Watered with 1ml A+B+PK 💧
DAY 68
Watered with Clean Fruits 💧
No nutes from now on! 💀
Thanks, everybody!! 💚 💚 💚 Grower love!!! 😘🙏 🌱
_________________________________________________________________________________
SETUP:
80x80x180 cm Zelsius
240W Full Spectrum LED IR UV dimmable
DW240H-A6-HS
Heatsink color red
LED Chips:
512pcs SAMSUNG LM301H + 24pcs Osram 660nm + 8pcs Osram IR 730nm + 8pcs UV 385nm
Color mix: 2700K + 4000K
2,8umol/J
Driver HLG-240H-C2100B
Coverage: veg 5x3ft / flower 4x2ft
Product size: 628x205x68mm
Green Buzz Nutrients
Shouts go out to my sponsors @GreenBuzzNutrients, thanks so much for your support! ❤️
If anyone would like to try their amazing organic products, use code GD42025 for generous 25% discount (for orders of minimum 75€) ✨
https://greenbuzznutrients.com/
Mills Nutrients
Biobizz Lightmix
custom exhaust fan 320/270cm³/h
Carbon Active Granulate 240cm³/h
tab water pH 8 - EC 0,25 with Calmag to 0,5
Advanced Hydroponics pH minus Grow + Bloom to pH 6.2
🍊 🍋 🍮 🍭 🍊 🍋 🍮 🍭 🍊 🍋 🍮 🍭 🍊 🍋 🍮 🍭
