


Likes
18
Share

@GREENPHOENIX6262
Follow
05/10 - (M) - Mom will be cut down today after 48hrs in the pot with lights out - Drying will be as close to 60-60 as possible.
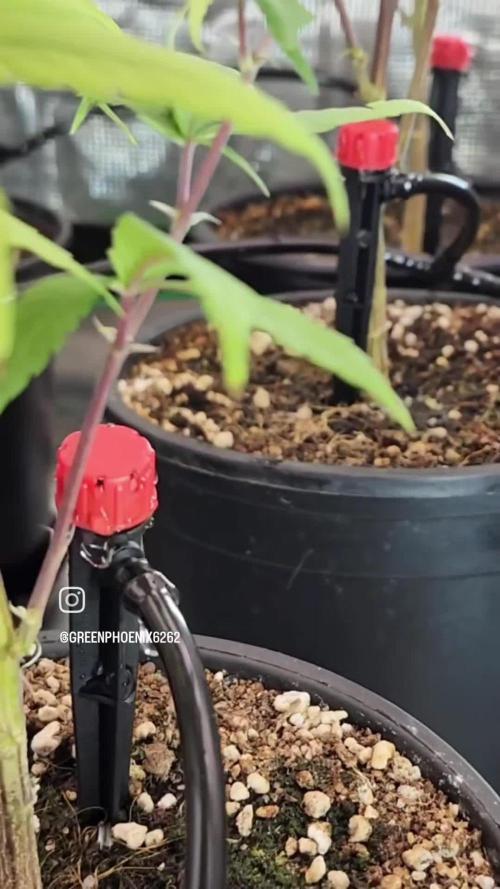
05/10 - (C) - All the ladies are out of pre-flower and and are growing accordingly - The @VIVOSUN drip system is working wonders in helping keep a steady and effective feeding regiment. A new C02 bag will be added this week - PPM/PH are at optimal ranges - The smell is coming in as well, Citrus, Lavender notes are apparent.

Likes
27
Share


@adam_pawloski87
Follow
Over all was an amazing grow, super sticky dense nugs with smell of berries, highly recommended for everyone!!

Likes
1
Share

@Krautis_IndoorFarm
Follow
Am 5.3 habe ich sie das erste mal mit der STS Lösung eingesprüht. Blüte Tag 2 haben wir heute


Likes
13
Share


@frenchysmoker
Follow
It went pretty good this week (*I'm sorry because of ly work I could not take pictures this week so you have 2 videos*). I will not cut anymore branches before turn into flowering next week, normally it will be a 20 week grow from seed to budd I hope great results with this Cheese from Greenhouse Seeds Company :)

Likes
23
Share


@Ferenc
Follow
Day 80, 2nd of December 2020:
Tall and twisted look at the main stalk haha.... Nice plant clearly she wi be a green pheno the small bonsai version is purple :)
Not problem at all but i noticed something. She may be a bit hermie because the bracets are so strange. I am not sure yet may be the nature of the gentics. Anyways all good she is developing buds but slower than the other one
Lamp is now on 11 hours and off 13 hours. Every week 15 minutes was taken off and after 4 weeks here we go. Strated 12/12 and now 13/11 wanted try to imitate the nature as the light days are getting shorter.
Fertilization has changed no more epsom salt from this week and I will stop giving nitrogen as well from next week.
Let's see what happnes next Hehe :)


Likes
11
Share


@Krissci
Follow
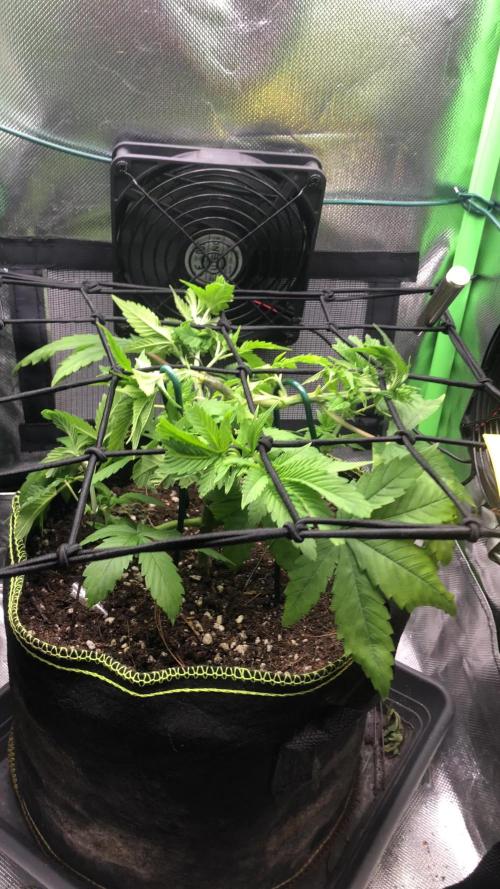
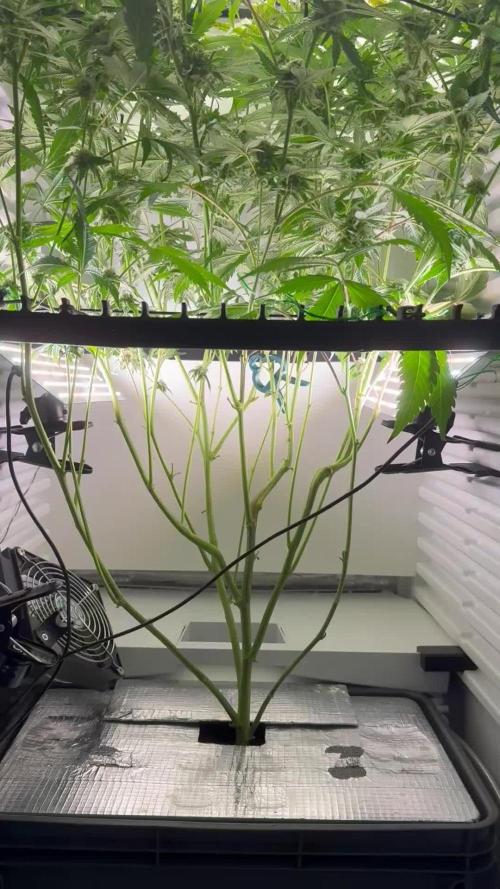
Day 2 - LST and topping/mainlining where possible before flowering
Both plants have broad leaves blocking light to the canopy

Likes
26
Share


@BudBoutique
Follow
! this is my current status, gonna upload my last veg weeks within the next week - got a bit busy around Spannabis - thank you for your understanding! 💚
Welcome to Bud Boutique Grow Diary - really appreciate all your love and support :)
Dont forget to check out my other current grows!
🗓️ This Week:
after 48 hours of complete darkness (important for seedlings to make sure all plants switch into flower same time), I finally switched my lights to the 12/12 schedule and sent my ladies into the flower.
- This one Phenos super strong
- more than healthy and going well
- Day 3: Foliar spray with APTUS Regulator and APTUS Nutrispray to give them extra micronutrients and give them a little shell for protection.
! always use APTUS Regulator first and mix well with your water before adding any other nutrients for Feeding or Foliar!
Thank you for still staying with me 💚
___________________________________________
--- 🌱 Strain (Sponsor) ---
🏷️ Blue Cinderella 99 FF by MSNL
https://www.marijuana-seeds.nl/blue-cinderella-99-fast-flowering
--- 🥗 Nutrients and Feeding (sponsored by APTUS: APTUS Ambassador) ---
🍸 APTUS: full nutrient schedule extreme
-- Regulator, N-Boost, P-Boost, CaMg-Boost, K-Boost, Allin1 Liquid, Startbooster, Topbooster, Enzym+ every feeding
-- Fulvic-Blast, NutriSpray as Foliar each once a week
🔗 https://aptus-holland.com/
--- ♻️ Grow Control (Sponsor) ---
TROLMASTER: TENT-X + LM14 Light Adapter to dim/sunrise/sunset lights + Temp & rH Sensor all remote on App
🔗 https://www.trolmaster.eu/
--- 🏭 Grow Setup ---
💡LUMATEK Zeus Pro 600
* 🏠🌿 Indoor: Homebox 120x120x200cm (4x4)
* 📐🌀 PrimaKlima exhausting Fan 1180m3/h (running on 60-80%)
* 🌀 Can Light Filter 800m3/h & 1x Fanbox 1x Dyson fan for Air circulation
🔗 https://lumatek-lighting.com/zeus-600w-pro-29/
🔗 https://primaklima.com/de/shop/ventilatoren-de/ec-ventilatoren/pk160ec-tc/
🔗 https://canfilters.com/products/filters/
All Likes and comments are highly appreciated!!!
👨🌾 don't forget to check out my Instagram for daily educational content: budboutiquee
- Bud Boutique


Likes
21
Share


@OGTrauma
Follow
Ok Niggas this can be the first month of the plants since germination - and the start of the fourth vegging week, plants overall growth is savage, even for the plants that still presents Ca Mg carencies , as they tend to have a pale green colour compared to their siblings. The lack of green makes that one plant highlight a purple hue prominent on the leaves & stem, it can be confused with cold through . But i'm discarding that reason as .cl winter is finishing and temperatures are above 0°c.
Did a Barrier spray on the mix, just with CaMg on soil to attend the previous urge, as this substrate is very light, yet i can still fuck it up and misdiagnose a nutrient block if i go too heavy. Plus that i found a munched leaf and that barrier has a moderate nutrient amount besides try to half the pest advances.
I want to finish this week to count 30 officially days and probably do a topping cut , and try to get on the level of the net on day 45 / finishing on 6 week in order to fill the space, as if this strain is stable it stretch and node space should be on the short side, but nod that some og kush relatives can be stretchy because there'sslight sativas phenotypes as well.
Finishing this text wall homies, as plants has the same age, i can notice that this substrate is fast to colonize as the one that stay on 'pot on pot' are way smaller that the ones that are on its final containers.
I will consider lollypop too, as i want to try to check before signals that vertical growth light reinforcement with the fan shaped bulbs is viable on all growty , as if i saw that they underdevelop just on veg stage should be a big no & discard that stupid idea. But at the moment is going fine. Just having a nice cri to inspectionate the plants is a good advantage to be assimilated on frankenstein's indoor setup. 🦄
Big gas Leakz !!! & Big dick Energy!!!

Likes
14
Share


@CampaCavallo
Follow
6ª Settimana di Fioritura 💐💐💐💐💐💐
Amici della Cannabis 💚, guardate che belli che stanno diventando i fiori della RUNTZ 💓🗿💙!
Belle cime gonfie ed innevate😍🏔️
Un abbraccio a tutti 😘💪🏻💚
Likes
37
Share

@Ferenc
Follow
All good flowering nicely , I needed to remove a lot of fan leaves from the top of the Gelato Sorbet they were yellowish and some kind of deficiency is there.


Likes
12
Share


@Roberts
Follow
Ze Chem Bang has made it. It was a rough start, but she has pulled through. Everything is looking really good now. Thank you Medic Grow, and Terpyz mutant Genetics. 🤜🏻🤛🏻🌱🌱🌱
Thank you grow diaries community for the 👇likes👇, follows, comments, and subscriptions on my YouTube channel👇.
❄️🌱🍻 Happy Growing 🌱🌱🌱
https://youtube.com/channel/UCAhN7yRzWLpcaRHhMIQ7X4g.


Likes
1
Share

@blaze_fpv
Follow
start of week 7 flower | smell is insane | i just love this cut | very slight lightburn | i dropped the night temperatures to 20C | dropped overall temp to 25 | dropped 5% of light | gonna decrease day temperature in the coming days | one more week of hesi mineral line |

Likes
18
Share


@DogDoctorOfficial
Follow
Week 5 Report: White OG – Thriving After Topping! 🌟
Another week, another chapter in the White OG’s journey—and what a resilient beauty she’s turning out to be! Following last week’s topping, she’s bounced back like a champ, showing us just how strong she is. While the temperatures dipped a little this week, she’s staying steady and pushing through like a true survivor. 🌱✨
Growth Update: Recovery in Full Swing
After being topped at node 7 last week, she’s been focusing all her energy on lateral growth, with new shoots emerging beautifully. Her structure is looking strong and balanced, with all signs pointing to a bushier, more productive plant in the weeks ahead.
While the room’s been a little chilly, with temperatures around 18°C and RH at 60%, she’s adapting well. These slightly cooler conditions are giving her an opportunity to build resilience while still maintaining steady progress.
Nutrients: All-in-One Pellets Taking Charge
This week marks a small but important change in her feeding routine: I’ve paused the use of All-in-One Liquid, as the Aptus Holland All-in-One Pellets are now fully kicking in.
Why Stop the Liquid Feed?
The slow-release pellets are designed to provide consistent nutrition over time, reducing the need for additional liquid feeds. They’re packed with everything she needs to thrive during this vegetative stage. Of course, if I notice she’s asking for a little extra love, I’ll bring the liquid feed back into the rotation.
Room Conditions: Staying Steady
Even with a slight dip in temperature, the room remains an ideal environment for her vegetative stage:
• Temperature: Around 18°C—on the cooler side, but manageable.
• Humidity: A stable 60% RH keeps her comfortable and prevents unnecessary stress.
• Lighting: The Future of Grow (FOG) LED continues at 200 PPFD, delivering steady, compact growth with no signs of stretching or stress.
These conditions ensure she’s getting the balance she needs to continue recovering and thriving.
Looking Ahead: Strength and Structure
As we move into Week 6, I’ll be keeping a close eye on her continued recovery and lateral growth. Her bushy structure is already forming beautifully, and I’m excited to see how she uses her energy to fill out and prepare for future training and flowering stages.
Shoutouts and Gratitude 💚
A huge thank you to the incredible sponsors and tools that make this journey possible:
• Seedsman Seeds for the fantastic genetics—don’t forget to use the DOGDOCTOR 10% off discount code!
• Aptus Holland for their unparalleled nutrient solutions.
• Pro-Mix Soil for the perfect foundation with their HP Mycorrhizae + Bacillus blend.
• TrolMaster for keeping the environment perfectly dialed.
• Future of Grow LED for lighting the way.
• Cannakan, where it all began.
And, of course, to all the followers, supporters, lovers, and even the haters—you’re all part of this journey! A special shoutout to Grow Diaries for being the space where we connect, learn, and grow together. 🌱✨
Stay tuned for Week 6, where we’ll keep building on this amazing progress. As always, feel free to drop by my IG or YouTube (links in my profile) for more updates, tips, and behind-the-scenes moments. Let’s keep growing stronger, together. 🌟
Growers Love! 💚
DISCOUNT CODE - SeedsmanSeeds - DOGDOCTOR 10% off
As always thank you all for stopping by, for the love and for it all , this journey of mine wold just not be the same without you guys, the love and support is very much appreciated and i fell honored and so joyful with you all in my life 🙏
With true love comes happiness 💚🙏 Always believe in your self and always do things expecting nothing and with an open heart , be a giver and the universe will give back to you in ways you could not even imagine so 💚
Friendly reminder all you see here is pure research and for educational purposes only
💚Growers Love To you All and remember to keep that smile big and alive 💚

Likes
30
Share


@LeafTucker
Follow
Well, she is 70 days today. She has started to fade. Leaves are yellowing, and showing some red. She is still producing white pistols, and new flower growth daily. Her Trichromes are mostly cloudy with very little Amber on the flower. She has swollen a great deal through the week. I gently pulled her secondary branches away from the primaries to allow more light penetration. I check her maturity about every 60 hours. She was watered with pH'd water last week, and she is getting tap water this week. She should be completely flushed before harvest. Got my humidity packs, humidity sensors, jars, and drying closet ready. It just up to her now. Not so much impatient as I am excited for my first harvest. With her, and a Bubba Kush getting ready to finish together, I am so stoked. Will have a video uploaded later. Thanks for stopping by, much love, and happy farming.


