
Likes
Comments
Share


@LittleBigTrees
Follow
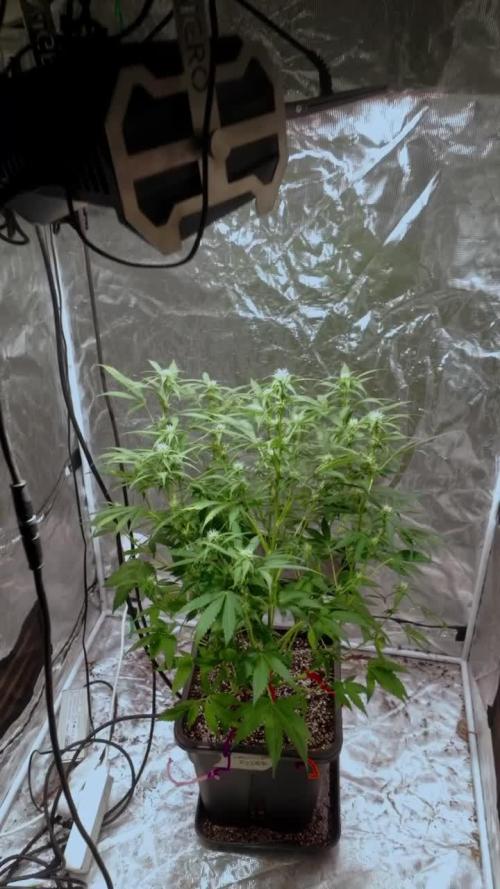
All stretching at different rates so the canopy is all over the place , blue og smells like kalimist!
All really hungry at the moment and feeding well


Likes
2
Share

@ReinDeer
Follow
I've been working on my tent previous week and updated what's essential in this phase of growth. I've set up a new carbon filter to prevent the smell to distract my kind neigbours and I've purchased a small fan. Both, are serving now well and adding more than needed fresh air to the plants. They're all producing small flowers and hopefully they'll form huge buds by the end of the harvest season.
I had small issues with the plant positioned just in front of the fan that is showing some wind burns on leafs but nothing major. I raised the fan and the problem is now gone.
Other than that I feel very confident that this run will be majestic 😀
Wish you all a nice week and see you around soon!
p.s.: Hope you love my new videos

Likes
140
Share


@MrJones
Follow
mrjones - Slurricane #7 S1
🌱Slurricane #7 S1
@inhousegenetics_official
👨🌾🏽GD Grower: MrJones
🔹🔹🔹🔹🔹🔹GOALS🔹🔹🔹🔹🔹🔹
🌞Environment - 75/80℉ and 55% Humidity
💧 Feeding - Advanced Nutrients Organic
⚗️Soil - 50% Ocean Forest / 20% Tupur Royal Gold / 10% Earth Worm castings / 10% lobster Compost / 10% Additional Perlite
🍃Training / HST, Will be topping, Cloning, and creating larger plants, and placing to flower under a trellis
🕷️ IPM - Will be using Green Cleaner" 1 OZ per Gallon, and CannControl from Mammoth alternating between products each month for Integrated Pest Management.
💡Using 480 Watts of LED Lights.
🔹🔹🔹🔹🔹🔹🔹🔹🔹🔹🔹🔹🔹🔹🔹
📜 Rambling - Week 21 / These girls have about another 1.5 weeks of flower time, will be tapering back the PPM on the feed this week and prepare the ladies for the flush, I really hate that term, but basically the last 2 weeks will be just PH H20, the buds are all pretty much Golf Ball Size, hard as rocks, heavy and smelling just amazing!, Going to have to try and tie up a few stems for support when lights on!
🔹🔹🔹🔹🔹🔹🔹🔹🔹🔹🔹🔹🔹🔹🔹
▶️ Sunday - 06.27.21 / Fed 1/2 gallon today, will start reducing the watering and just keeping the soil moist.
▶️ Monday - 06.28.21 / No watering today
▶️ Tuesday - 06.29.21 / No Watering today.
▶️ Wednesday - 06.30.21 / Fed 1/2 gallon today, will start reducing the watering and just keeping the soil moist. Saturday will start the flush for a few weeks.
▶️ Thursday - 07.01.21 / Only feeding H20
▶️ Friday - 07.02.21 / Only feeding H20
▶️ Saturday - 07.03.21 / Only feeding H20
🔹🔹🔹🔹🔹🔹🔹🔹🔹🔹🔹🔹🔹🔹🔹

Likes
7
Share


@MaxWax
Follow
The plants are all doing well, unfortunately they are developed differently, in the future I will make a report per plant
Likes
17
Share


@GERGrowDesigns
Follow
Welcome to Flower Week 5 of Kannabia Pink Gelato
I'm excited to share my grow journey with you from my
Kannabia Seeds Project . It's going to be an incredible ride, full of learning, growing, and connecting with fellow growers from all around the world!
Check out Kannabia Seeds with my link [https://www.kannabia.com/de?ref=61966] and grab the germination device or the strains I used . Trust me – it’s worth it for sure !
Get another 20% Discount at all products using the code [GGD] at the checkout.
For this Project , I’ve chosen the Feminized Photo Strain Pink Gelato:
Here’s what I’m working with:
• 🌱 Tent: 225x150x150
• 🧑🌾 Breeder Company: Kannabia Seeds
• 💧 Humidity Range: 45
• ⏳ Flowering Time: 56-63 Days
• Strain Info: 23%THC
• 🌡️ Temperature: 26
• 🍵 Pot Size: 20
• Nutrient Brand: Hy-Pro
• ⚡ Lights : 600W x 2
A huge thank you to Kannabia Seeds for allowing me to try my Best with this amazing collection from Photo Strains they managed to Sponsore . Big thanks for supporting the grower community worldwide! Your genetics and passion speak for themselves!
Let’s grow together – and don’t forget to stop by again to see the latest updates!
Happy growing!
Stay lifted and stay curious!
Peace & Buds!

Processing
Likes
45
Share


@LovelyT
Follow
Killer purp has a very skunky odor. This smell is growing stronger everyday. Ive been using terpinator and its really bringing out the aroma much more now. I also noticed some purple on the buds as well since last week. So far so good.👐

Likes
29
Share


@Hasard
Follow
Last week !!!!
Day 91 : 62 days of flowering & 29 days of vegetative
I will cut them down tomorrow.
Let's harvest !!

Likes
26
Share


@Jsammy09
Follow
This was a fairly smooth week. Right now there is not a whole lot to do. I mainly just try to ensure that my environment stays in check and kind of just sit back and watch the growth take place. I did have one pretty major issue this week with some of my equipment. I want to share incase anyone else comes across this issue, but if you are running AC infinity setup and using their humidifier, it could mess with your AC infinity controller. I woke up this week to find my temps were high and humidity was way down. I went to check what was going on and my conrtoller 69 was going crazy. I couldn't figure it out. I called and there is a known issue somehow when the humidifier is plugged in with other ports being used it may cause the other ports to not work. After a few hours of trying to get everything working, I finally got it resolved. I had to unplug humidifier, reset the controller to default, delete and redownload the app, and somehow everything started working again thankfully. I have my humidifier on a spare controller for the time being as I cant send for a replacement right now, but that seems to be working fine. Other than that though, everything is going great. Going to continue to monitor and keep an eye on things.
As always tips and recommendations always appreciated. You guys rock and I have learned a ton from everyone, so thanks!

Likes
7
Share


@StonedandSteady
Follow
Phenomenally Bright and Totally Tight under these Magnificent Grow Lights! I've been Flushing her out for the past 6 days with 2 gallons a day with some Cold Declorinated Tap Water and Applied the Ancient Art of Stem Splitting to help finish her with Extra Terpy Frosted Budz!
This Awesome and Outstanding #Opium is Growing the Distance and Got those Leaners Supported into her 13th W/Flower: No 13th Feed of #HumboldtCountysOwn this Week! I picked Up a pack of 32" bamboo skewers and staked her Up to help prevent her Bodacious Budz from breaking off! She's Packed, Stacked Up and Lights Upgraded!!! Cloned with my Steady's Saliva!!! We'll definitely Grow back to everything here soon! #Pre-Sexed 4/9/21 #Opium/#PabloEscobar *Fems* breed by Team #DivineSeeds #DivineSeedsSquad #DivineSeedsBreedingCompany I'm Very Excited and Extremely Gracious!!! These Cannabis plants are Camping out in the Closet for a week or so! Lol
My #PabloEscobar and #Opium *Fems* from #DivineSeeds Regs: SalamiLegF3's×2 and FireAlienRomulan look$ Outstandingly Awesome and Finished Up Phenomenally Fine into thier 9th week of Flower! Thanks Again for All the Love and Support my fellow Growmies and Growmets!!! These Magnificent and Magical Ladies were Growing in our 48×24×60 ViparSpectra Official Club 🌿 ®️ Grow Tent and under our #Osree QB1000w and #GrowStarQB1000w but Finished out in Flower under our #BloomPlus BP1500w! #TNBNaturals The Enhancer Co2 Despersal canister and ph'd them w/ Declorinated watering w/ TNB ph Up and Down! Totally Top Quality Topz all Around! Thanks Again #GallowGlas420 #HarleyGrower #thehumancannabiniod #AlienBloodGenetix #TNBNATURALS #www.as420.ca #divineseeds #divineseedssquad #divineseedsbreedingcompany #HumboldtCountysOwn #ThrivingDesign Family's and Teams!!! Your Genetics are Merry Magnificent, Mega Marvelous and Mighty Medical! Love um!!! I really Can't stress enough how Thankful and Grateful I am of All of you and what you've Shared with Us! Means the World!!! It's definitely a Pleasure being able to Grow with these Phenomenal Grow Lights! Please Enjoy! BudBrothers4-Life! Cheers Famz!!! Much Props and Much Topz!💯🔥#BloomPlus #GrowStar #Growatt #Osree #TNBNaturals #TNBTeam #HumboldtCountysOwn #GrowYourOwn #Bliss
Bloom Plus BP-4000
CA:https://www.amazon.ca/dp/B08DTDP5FF/ref=cm_sw_r_cp_awdb_imm_86Q7H2D5BGFYB9B6PR9K
US:https://www.amazon.com/dp/B08DTN3B84/ref=cm_sw_r_cp_awdb_imm_4B7XWCAS09M4V3W0AFJH
Bloom Plus BP-2500
CA:https://www.amazon.ca/dp/B08DTCYV9Y/ref=cm_sw_r_cp_awdb_imm_YDNA8G16PH3TB002VKGE
US:https://www.amazon.com/dp/B08DS53THM/ref=cm_sw_r_cp_awdb_imm_SX3AEDKRVAYQECF32BE4
Bloom Plus BP-1500
CA:https://www.amazon.ca/dp/B082XYLHRJ/ref=cm_sw_r_cp_awdb_imm_XEBFV7790EHT53B2J9B5
US:https://www.amazon.com/dp/B082XYLHRJ/ref=cm_sw_r_cp_awdb_imm_MB3PYZEVSQRZY096AB79
BloomPlus Instagram Link: https://instagram.com/bloom.plus?utm_medium=copy_link
Thanks Again Broski #SmokinPlantaz for Hosting your Bright and Tight Amazon Prime Day #BloomPlus-1500w Giveaway! I'm still Blinded by the Light!!! Lol (Song Pun) it's Ultimately Lit, Extremely Powerful and Brilliantly Bright! I also Love and Appreciate Everyone out here! Please! Go Over and Spread That Love to my Bro's YouTube Channel and Team #BloomPlus on their Instagram! I'll have thier Links posted ⬆️⬇️! BudBrothers4-L!!! Cheers Famz!!! Much Props and Much Pars!💯
SmokinPlantaz YouTube Channel Link: https://youtube.com/channel/UCDKJthWoS6-miAhq_lLb_-w
HumboldtCounty'sOwn:
Email: [email protected]
Phone: (707) 725-4119
Toll free: (866) 872-9434
Humboldt Bottling
Po Box 429 · Fortuna, CA 95540
HumboldtCounty'sOwn Website Link: https://humboldtcountysown.com/
HumboldtCounty'sOwn Instagram Link: https://instagram.com/humboldtcountysown?igshid=1qj809qkkwych
https://instagram.com/bloom.plus?utm_medium=copy_link
https://instagram.com/osree.light?igshid=1vrsbdyhzg2h8
https://instagram.com/growstarstore?igshid=2yjn0r00r6ru
https://instagram.com/divine.seeds?igshid=1r90iwe9xiwz8
https://instagram.com/thehumancannabinoid?igshid=17k159pumklkq
https://www.instagram.com/alienblood_genetix_official/
https://instagram.com/thrivingdesign?utm_medium=copy_link
https://instagram.com/as420.ca?igshid=1f116alw054wp
The Grow Bags: https://www.as420

Likes
26
Share


@MG2009
Follow
04/18/2021
Bluedreamatic is cruising along, and smelling good, a good berry smell. Spray with microbial tea to boost immune system
there is some PW showing up hope microbial tea has the bacteria/fungi to combat bad stuff
Also a soil drench of (MICROBIALSCIENCE)
Seed & Plant
organic starter

Likes
34
Share


@rhodes68
Follow
12/13 Week 17 and the end of the run for the Killer Clones their time as rulers of the Tent is over.
New Vid - See , because I like the damn song
These girls as something
All in flush just waiting on when I feel like taking 1 first then 2
12/16
Weather warming a bit so.... Harvest FF-10-1 tomorrow morning she has done about all one can expect
Harvest the other once that one is dry
12/17
Harvest day for FFT-10-1
12/18
Due to the weather, a warm up, going to harvest FFT-10-2 in the morning and get it dry before the cold moves back in to stay.
So this wonderful grow comes to and end with the sun.

Likes
4
Share


@IronGrower
Follow
Since my last grow i have a problem with powdery mildew... So on veg. i just spray Sulfur and worked fine... (the smell is terrible....)
now i am in flower and found the mildew again... i try a new mixture:
dry common horsetail
1 onion
1 garlic
cook that for around 1 hour.
Then i flux it 1:5 with water.
The smell is not so bad and just for 2 days. The leaf and flower not change color or smell.
Hopefully it works! i will spray that now every week.
Update:
Flower Day 20
I start with the Top dressing on all Plants. They start to frost.
The powdery mildew spreads :'( i dont know what else i can do?! i spray again!


Likes
2
Share


@bizar78
Follow
Crecimiento rápido, gran producción, increíble aroma.. Estoy contento con mi amnesia..

Likes
10
Share


@Naujas
Follow
This is my first grow with WeedSeedsExpress, I've only heard good reviews about them, so the first week seems to have gone well, I'll be using Biotabs fertilizer for this grow - for the first time :) so I prepared the soil according to the pre-specified norms on the Biotabs leaflet, according to it, the girl will now only receive water for 4 weeks :) Good luck to everyone.

Likes
13
Share


@HeavyHead
Follow
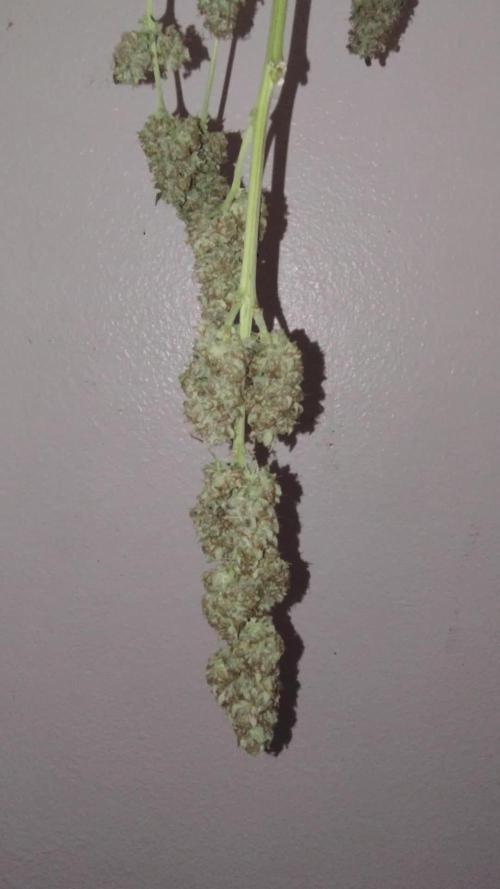
So this is a combination of weeks 11-12 as they all went into 48 hours of darkness and cut down on different days. My got cut down on different days. Will post dry harvest pics next ;p
Likes
82
Share


@UnorthadoxDude
Follow
Hello growmies!
Welcome to week seven of An Epsilon Adventure! Massive thanks to both Shogun and Royal Queen Seeds for sponsoring this grow!
I have just completed the final defoliation for the three least advanced (and largest) girls. I have also rearranged the tent again to try to maximize the space available and light usage.
I have not fertigated for 5 days after the last fertigation was a flush without coco base. I am struggling with humidity at the moment so I have been trying to let the plants go more dry than usual.
Daily Updates
###
Week 7 Day 2 02:30 7/8
Heavily defoliated plants 1, 5 & 6 and removed some of the lower branches. Rearranged tent then photographed & measured:
Plant 1 is now almost unbelievably 2nd tallest at "only" 141cm in height! Her stretch has just about ended.
Plant 2 has stopped stretching at 111cm and is 2nd most advanced into flower.
Plant 3 has stopped stretching at 95cm and is most advanced into flower.
Plant 4 has stopped stretching at 100cm and is 3rd most advanced into flower.
Plant 5 has gained 6cm this week and may add few more but she is pretty close to done stretching at 119cm.
Plant 6 has gained 22cm this week and isn't quite finished. She is now the tallest plant in the series at 142cm.
###
Week 7 Day 2 07:00 7/8
Fertigated 1.6l each
###
Week 7 Day 4 02:00 9/8
Fertigated 1.6l each reduced coco a/b to 2m/l each.
Spent a bit more time photographing and videoing to try and capture the changes and the developmental differences. These 140cm+ plants are going to STACK. I am bracing myself for a lot of trimming and a monster harvest. 🙏
The current order of maturity and likely order of harvest is 3 2 4 1 5 6. I think the first and last plants will be at least a week apart in harvest, perhaps 2 or 3.
###
Week 7 Day 6 23:00 11/8
Fertigated 1.6l each
The smell in the tent is there now, really not that strong but there are 6 plants motoring through flower here now so it's not insignificant either.
Plant 3 is absolutely stacking now, she's more or less run out of space around her cola and is now growing some foxtail like structures, exciting!
Plant 6 the least mature is 2-3 weeks behind plant 3, but her stretch has finally stopped at 144cm.
Took wide angle in tent photos today.
All of the girls are drinking a lot now, but especially plant 1 who is really thirsty.
---
Thanks for reading growmies! 👊
==========
Tent: 120cm x 120cm x 180cm
Light: 600w HID Elite Dual Spectrum HPS + Angel Wing Reflector
Air: 5" duct fan system with carbon filter ~300 m3/hour + RAM 9" floor fan + 4" intake fan
Pots: Air Pruner Fabric Pots 30l - UGro XL Coco + horticultural grade perlite (~20%)
Seeds supplied by Royal Queen Seeds https://www.royalqueenseeds.com
Nutrients supplied by Shogun Fertilisers https://www.shogunfertilisers.com/en
==========
Likes
3
Share


@StrontiumGrow420
Follow
This week it's all about the 8 White Widow clones, rooted well in shallow water bath with .5ml pH perfect Grow in the water.
Long roots sprouted through the rockwool and they didn't seem to be inhibited by the 50w led.
Now transplanted into their 1L pots with fresh soil substrate, no additives.
Transplanted 2 clones into rockwool now in 1 pot, see how they (Cerberus) develops.
Harvested the clone cuttings on 24/8/2020, took approx just over 2 weeks (17 days) to develop the long roots seen in the pics above.
Kept the water feed fresh every 3/4 days to prevent algae build up.
Switched to 12/12 11/9/2020
Unfortunately, I had to pull this grow, it was painful to ditch the plants as the grow was going well but i had to move house and couldn't take them with me.

Likes
14
Share

@JolliGrowz27
Follow
November 9 2025. DAY 63 OF FLOWER, 9 WEEKS
I harvested early this morning before the light turned on. Cut her down whole before the lights and the sun. Had everything ready, so I put up coffee and grow videos. I wet trimmed this time, because I will be busy in the following weeks. I want to get an even dry and start curing ASAP. I have the jars ready. Finger Hash was ridiculously sticky. Had to clean the trimmers in between. Took about an hour to trim. I have a damp towel in the outdoor closet with the hanging plant. Colder outside for a slower dry. Smoke report coming soon. I have 4 clones in flower going right now. 2 clones of Pheno 1 and 1 clone of both pheno 2 and 3. Pheno 3 and pheno 1 are both crossed. Pheno 3 is crossed with my Baby Yoda X Red Zkittlez. Pheno 1 is crossed with a Blue Dream male. I will run those babies at a later date.
Likes
2
Share


@bbs42
Follow
Day 23, been QCing the buds and lots defoliation the past 2 days. Getting caked in Trich and some nice bright orange hair poping out. Added trimmed buds to mulch layer. No fan leaves in mulch

Likes
162
Share


@nonick123
Follow
Bienvenidos al diario de GG4 Sherbet FF patrocinado por FastBuds
Muchas gracias a @Fast_Buds por enviarme estas semillas! Espero que tener una cosecha espectacular!
He elegido esta genética porque en los diarios y en su ficha técnica se habla de fuerte resistencia a las bajas temperaturas, y este es un parámetro que no voy a poder controlar
05/10: Se coloca un semilla en vaso con agua filtrada (TDS 50 PPMs) + 3 gotas de agua oxigenada (H2O2) y se coloca en un lugar oscuro a 25 ºC durante 24 horas
06/10: Se prepara un maceta de 400 ml con sustrato Light Mix + 15% Coco + 10% Perlita
Se humedece la maceta hasta escorrentía con agua filtrada (TDS: 50 PPMs)
Se hace un agujero de 1 cm de profundidad, se coloca la semilla al azar en el agujero, se tapa con un poco de sustrato y se humedece ligeramente con agua en spray
Se coloca la maceta en propagador con 4 luces LED, que arrojan 200 - 300 PPFD (no se encenderá el LED hasta que germine!)