


Likes
9
Share


@guitarrasrockeras
Follow
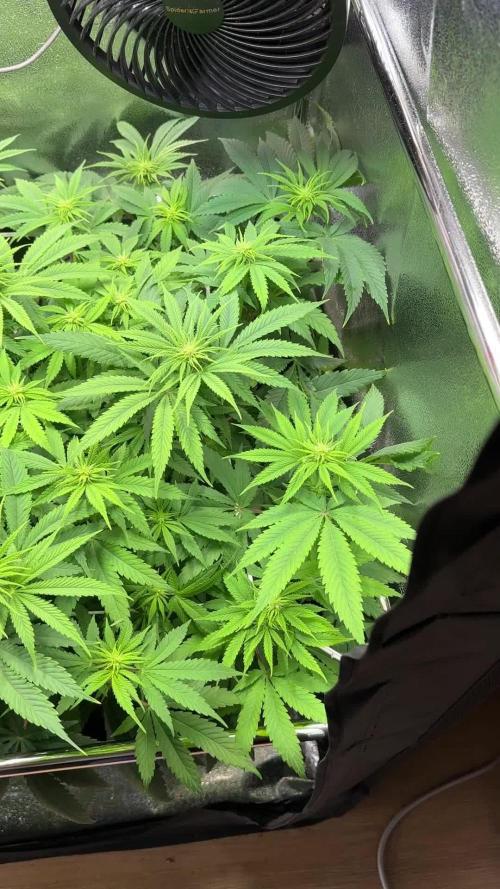
comenzamos la semana realizando varias tecnicas de cultivo tales como poda apical y defolicacion inferior hasta el quinto nodo mas o menos. seguimos a la espera de que sigan creciendo para ya pasar al metodo scrog.
Saludos


Likes
14
Share


@BB_UK
Follow
Love how beautifully she is growing! She’s 12 days in transition now so 2 days away from 2 weeks in bloom basically (since I switched to 12-12) so interested to see where her stretch will cease! She’s no longer on raises now and is now climbing above the girl that was already in bloom! (Iced grapefruit) and now stands an inch above her when I started I had the plants raised to match her height and now it will be visa versa! And so many flower sites too! Amazing progress! I’m also done with pulling her ties anymore now as she’s also wide enough and has bushed out! True beauty!

Likes
9
Share


@Cestlaweed
Follow
Satisfecho con los resultados y el control sobre la temperatura con nuestro Cooltube reduciendo eficientemente cerca de 5-6 grados al armario.
El itinerario para nuestro cultivo es mantener en las condiciones actuales a nuestras 5 bebes y durante la tercera semana germinar La sexta. Recordar que este diario está enfocado solo en 4 babys, macetas de 11Litros 3xGlueberry OG Auto de DutchPassion y 1xLSD-25 de FastBuds, muy buenas genéticas de muy buenos bancos que esperamos potenciar en cosecha con tecnicas de Bajo estrés incluyendo el mallado SCROG, y ya en etapa avanzada de crecimiento una tecnica de Alto estrés conocida como popping (poda de bajos) además de un casi completo programa de fertilización, contando con los nutrientes básicos de vegetacion y floracion (top veg y top bloom) y para las primeras semanas ya en uso un enraizante (Top underground) y otros productos para terminar la floración de la mejor manera posible.
Sígueme en IG @cestlaweed para mayor información, y cualquier comentario o consejo es sumamente bien recibido ✨🌱


Likes
13
Share


@cookingwithninja
Follow
Pretty happy with this grow. Going to either reveg 1 and pop s2 for next or do all s2. Absolute 0 herm through all flower and all plants.
Chopped them. Will try to reveg 2
I am very baked
Likes
8
Share


@Woodysautos
Follow
Og candy dawg auto is into week 7. She has got super bushy and has a load of bud sites.... But i would rather have 8-10 good chunky colas rather than 50 small bud sites. The trimming kills me.
So i experimented... I have never defoliated an auto this severely before, i really massacred her. Probably stripped about 60% I know its a risk and i might have stressed her to the point of hermie but im curious as to how much abuse she can take.
We will see in next weeks update if there is one

Likes
5
Share


@SouthernStyle_Kronics
Follow
These Fastbudz Genetics have me kind of puzzled. Planted in Fox Farm Ocean Forest on Jan 3rd so today is day 18 and they seem to be growing slower than any others plants Ive grown. Just got a new Marshydro tent and its very well made. I love it but my humidity level has been hard to control. I have humidifiers going on the inside and still cant get my levels up to around 60% or higher. It wont seem to get above 42% and It use to be an easy 66%. I have not fed them yet besides giving them a little rooting supplement. I will be using some of the best line of Nutrients on the market with Humboldt Countys Own! Its hard to find a ph balanced and consistent nutrient line. They have some of the top products u will ever use so check them out! They are under a marshydro Eco 600 At 18 inches. Love everything about Marshydro. There lights and quality of products are astonishing. Love em. Of course i have “The Enhancer” bottle by TNB Naturals hanging around. If u have not tried the TNB Naturals The Enhancer Bottle then you definitely want to look them up. Cant go wrong with an always fresh, organic, and refillable CO2 enhancer!
Likes
26
Share


@eldruida_lamota
Follow
Que pasa familia, otra vez actualizamos la última semana de crecimiento, estás zkittalizious de Exotic seeds están bastante sanas van con un color verde potente y de 2 , 1 desarrollo varias puntas en la parte central. Si sigue así esto va ser proyectazo.
Agrobeta:
https://www.agrobeta.com/agrobetatiendaonline/36-abonos-canamo
Mars hydro:
Code discount: EL420
https://www.mars-hydro.com/
Bueno las maximas de temperatura no superan los 25 grados y las mínimas no bajan 19, así que no me puedo quejar.
Los niveles de humedad también son los correctos van entre 50%/60% de humedad relativa.
Por supuesto el Ph lo estamos dejando alrededor de 6.
Hasta aquí es todo poco más la verdad ya con ganas de empezar la floración , buenos humos 💨💨💨


Likes
Comments
Share

@Dr_Zauberer
Follow
Day 50-56
A lot of flowers, the screen is filled with it :) we like to see

Likes
18
Share


@MadeInGermany
Follow
Info:
Unfortunately, I had to find out that my account is used for fake pages in social media.
I am only active here on growdiaries.
I am not on facebook instagram twitter etc All accounts except this one are fake.
Have fun with the update.
Flowering day 54
since time change
to 12/12.
Hey everyone ☺️.
We are slowly getting closer to the harvest 😍.
You can see that the lady sucks all her energy out of the leaves and passes it on to the flowers.
The buds smell very tasty 😍.
It should be ready to harvest in the next 17 - 25 days.
But of course we will be observing this closely with the microscope from next week.
Otherwise the tent was cleaned as usual and the humidifier refilled.
I wish you a lot of fun with the update. Stay healthy and let it grow 🙏🏻
You can buy this Strain at :
https://sweetseeds.es/de/red-mandarine-f1-fast-version/
Type:
Red Mandarine F1 Fast Version
☝️🏼
Genetics:
Red Poison Auto®️ (SWS39)
X
Tangie (California Orange x Hybrid Skunk)
👍
Vega lamp:
2 x Todogrow Led
Quantum Board 100 W
💡
Bloom Lamp :
2 x Todogrow Led
Cxb 3590 COB 3500 K 205W
💡💡☝️🏼
Soil :
Canna Coco Professional +
☝️🏼
Fertilizer:
Green House Powder Feeding
☝️🏼🌱
Water:
Osmosis water mixed with normal water (24 hours stale that the chlorine evaporates) to 0.2 EC. Add Cal / Mag to 0.4 Ec Ph with Organic Ph - to 5.5 - 5.8 .
Likes
25
Share

@Ganjin
Follow
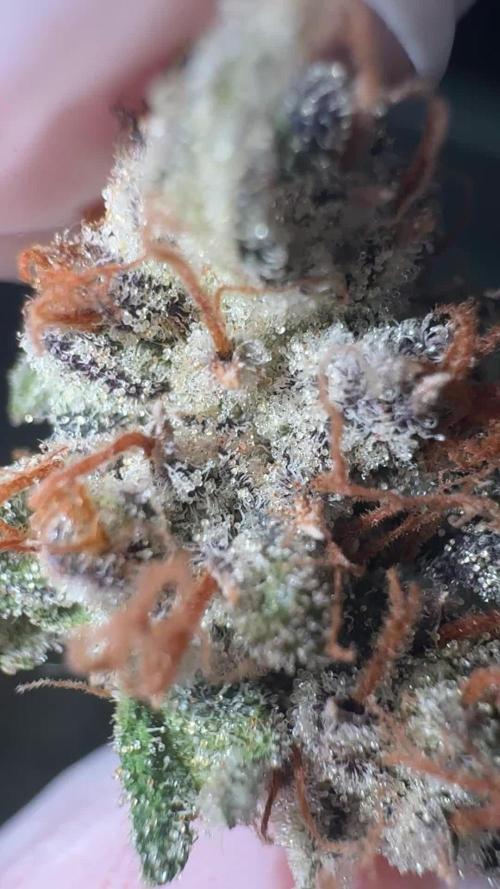
Drying went well, cured for over a month now and is really tasty. I got about 26g from the plant, if I remember correctly. Not much but more than enough for me. She had some nutrient issues and a small pot, so I am not judging that number too much. The bud quality is fire!


Likes
3
Share


@Passx
Follow
Plant ready to be harvested in 1,5 - 2 weeks so I stopped feeding it with nutrients. The flowers got bigger and much more sticky. The smell became very strong.

Likes
34
Share


@Salokin
Follow
Hello Growmies,
As we step into the eighth week of our Watermelon Candy F1 Hybrids' flowering stage, the dance of growth and aroma continues to enchant our senses. These delightful plants, sharing their space with Epic Buzz and Red Banana Pudding varieties, inch ever closer to the pinnacle of their bloom.
The Watermelon Candy cultivars are flourishing with an undeniable zest, their foliar tapestry thick with the potential of what's to come. The air is thick with their intoxicatingly sweet scent, a testament to their namesake, and their buds are expanding with satisfying robustness.
Plant #1 is maintaining its lead with a striking bud formation, clearly thriving in the consistent environment of the Tent-X system. Plant #2 and Plant #3 are not far behind, with each showing a wealth of budding sites and a sprawling canopy that speaks to a bountiful harvest ahead.
Despite being under a 12/12 light cycle along with the photoperiod plants, which may limit their yield compared to a 20/4 cycle, these plants are putting on a splendid show. They continue to swell, their trichome-frosted buds promising a powerful and flavorful finale.
Nutrition continues on a carefully scheduled five-day rotation, our blend of Alga Bloom, Sugar Royal, Power Roots, and Orca nurturing these beauties into their late flowering phase. The TrolMaster system diligently logs every parameter, ensuring our VPD and PPFD values are consistently optimized for peak performance.
As the eighth week unfolds, we see the evidence of our meticulous care in the uniform health and structure of the plants. The internodal spaces remain tight, the stems sturdy, and the flowering sites increasingly impressive.
With anticipation building for the harvest that lies ahead, we reflect on the journey so far. It's a path marked by shared knowledge and collective experience, all leading us toward what promises to be a remarkable culmination of our efforts.
Stay lifted,
Salokin

Likes
21
Share


@northsweed
Follow
the one in the middle has some issues because of pH & EC fluctuations (my mistake) but otherwise buds are forming nicely 👌🏻and that node spacing on the right plant is looking super promising 😈 and then we have the one on the left that's kinda recovering so fingers crossed 🤞🏻
end of week update:
speed of those buds fattening is incredible, every day they're becoming bigger and bigger 😮
Likes
23
Share


@Zuppler
Follow
**Grow Report by Zuppler - Week 1 Flowering Phase**
Ayo, what’s good fam? Zuppler back in this b**** with the week 1 flowering update, straight outta the capital. We just flipped the switch to that 12/12, and these girls already know what time it is – they starting to stretch out like they tryna reach for the stars. We runnin’ that Ape Formula from Advanced Nutrients, got the whole squad dialed in on some next-level s***. Feeding them queens like they royalty, nah mean?
We keepin' it real precise with that RO water – pure as it gets, no cap. I ain't lettin' no junk minerals mess up the game. We stayin’ locked on that pH balance like a sniper, so the nutes hit right, and them roots keep drinkin’ smooth. So far, no issues – the plants look strong, real healthy. Ain’t no signs of deficiencies, and the leaves stayin’ green like money.
The canopy lookin’ good too, spreadin’ out evenly. All them colas just gettin' ready to explode. You already know, we keepin’ everything low stress, tryin’ to maximize that yield without no drama. Temperature’s steady, humidity right where it need to be – we not takin’ no L’s, bro.
It’s early days, but the stretch is comin’ in strong. In a minute, these girls gon' be stackin’ up them buds real heavy. I can already tell we ‘bout to be sittin’ on some fire soon. Stay posted, this is just the beginning.
Zuppler signin' out.
Likes
4
Share


@Northern_Ent
Follow
July 8: big thunderstorm last night had a few minutes of hail that did mostly minor damage. Some fan leaves with holes and others taken right off the plant. Oh well. Now I know that some of the mystery holes in leaves might just be hail damage.
July 9: these Northern Lights are the fastest growing of the autos in this batch. Added Power Bloom and a handful of malted barley as a top dressing.
July 11: growing fast with hot and sunny forecast for the next two weeks. 👍
Likes
29
Share


@Dankdan
Follow
All going fantastic so far had a few problems with temp due to it being hot weather ... will update with more pics not checked on them in a few days