
Likes
Comments
Share


@eldruida_lamota
Follow
Vamos familia cosecha de Original de GrowBarato.
La verdad que el secado muy bien 7 días en Malla y a los botes, 40% humedad y 24 grados es la temperatura ambiental que han tenido en el secado.
Por lo demás de miedo os la recomiendo.
Gracias Agrobeta y Mars hydro , sin ellos este proyecto no sería igual 🙏.
Agrobeta:
https://www.agrobeta.com/agrobetatiendaonline/36-abonos-canamo
Mars hydro:
Code discount: EL420
https://www.mars-hydro.com/
Buenos humos.

Processing
Likes
7
Share


@420keef
Follow
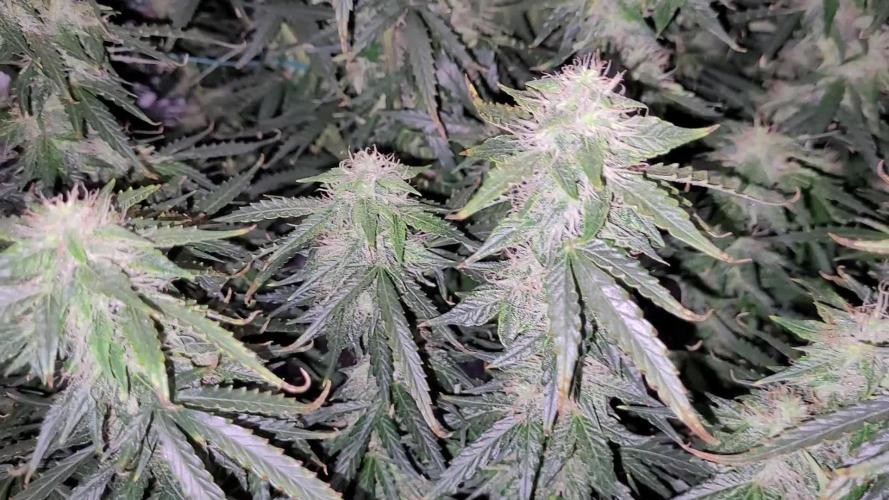
So i had to take all my plants inside because i found bud rot on 2 of them & the weather wasn’t going to get any better, had to transform my bedroom into a grow room😂 & i have 2 more plants which i am going to finish next to a window.. The smaller plant to the right is a Northern light by zamnesiaseeds that has a seperate diary if you are interested! I really hope the bud rot doesn’t spread anymore & if anyone has any tips or tricks for that they are always welcome!

Processing
Likes
9
Share


Likes
21
Share

@PersonalSmok3s
Follow
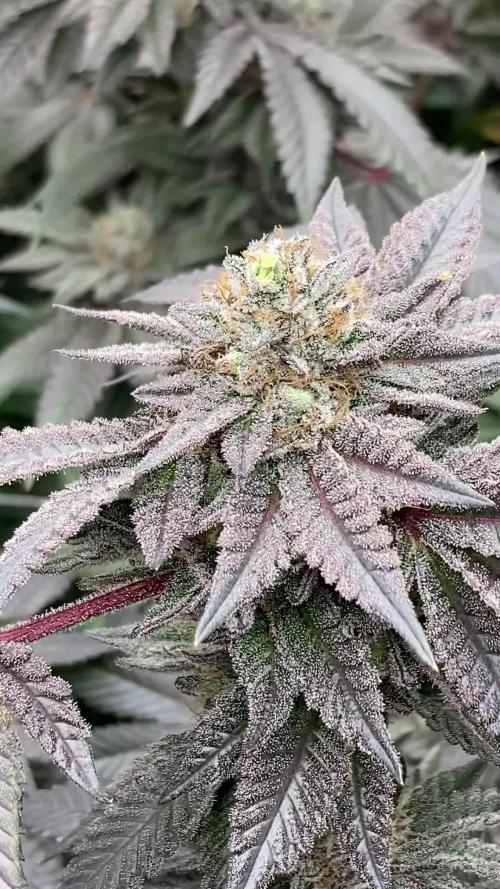
All done with the growing, now time for the long arduous harvest 😸🤦♂️🤷♂️✨.
Started the harvest on day 63 of flower, I’ve not just checked their trichomes with a loop or anything, but I’m happy with how they look.
The smell is very intense. Slightly worrying in all honesty 👀 filter is really struggling, contemplating getting out my spare extractor fan&filter just while it all drys. Maybe two filters will scrub the smell completely.
It’s a lovely smell, Sour Tangy Sherb, but now an extremely heavy gassy wall of smell has permeated everything.
Pretty much all the buds have turned purple, just a few of the lowers are a pale green, but that’s to be expected.
I’m in the process of cutting them all up into individual branches, giving them a quick wet trim, then hanging them on hangers.
I’m aiming for around 10 days drying, then a final trim and into jars for curing.
This was the final run of the MotorOG, it’s been a fun strain to run 😸 another decent one from LIT Farms.
I’d like to thank everyone who’s taken the time to have a look, comment or like this diary, I hope it’s been helpful in some way.
PersonalSmok3s 😸🌱💚
Likes
25
Share


@cheetah844
Follow
The tallest one of the bunch to date by a few inches.
I topped and defoliated every plant. I'm trying to form them into canna-bushes. Hopefully I'm doing the correct training procedures to make them all grow that way both indoors and out.

Likes
34
Share


@Salokin
Follow
Grow Diary - Week 1: Germination of Watermelon Candy F1 Hybrid Automatic
Introduction:
Greetings, Growmies! Salokin here, thrilled to share the exciting germination week of our newest addition, Watermelon Candy F1 Hybrid Automatic. A special shout-out to Patricia from the Zamnesia family for granting us the opportunity to be among the first to cultivate this fantastic strain. Our journey begins as we prepare these seedlings for their future home in the controlled environment of Tent X.
Germination Process:
On January 24th, the Watermelon Candy F1 Hybrid Automatic seeds were carefully placed in the EZ-Plug germination setup. After a brief 1 1/2 days in these nurturing plugs, the seeds sprouted, marking the commencement of their growth journey. The uniformity in their germination is impressive, showcasing synchronized and promising starts for each seedling.
Growing Environment:
While they're not yet in the Tent X environment, our Watermelon Candy seedlings are thriving in their current setup. We're preparing the optimal conditions for their transition into the controlled environment.
Observations:
The seedlings exhibit a thriving and lush green appearance, though slightly trailing their tent mates. This expected difference in early-stage growth is carefully monitored, and adjustments are made to ensure optimal conditions.
Acknowledgment:
A special thanks to Zamnesia Seeds and Patricia for the sponsorship and the opportunity to cultivate this exciting strain. We eagerly anticipate observing the Watermelon Candy F1 Hybrid Automatic's journey from germination to harvest.
Stay tuned for more updates as we nurture these promising seedlings through their growth stages.
Stay Lifted, Salokin

Processing
Likes
9
Share


@Tokologo
Follow
Day 78 plants are now going to grow outdoor.
Clones coming along nicely.
This week I'm giving the mothers a chance to get used to outdoor grow.
Day 84, mother enjoying the sun, got 91 clones from the first 3 batches.


Likes
2
Share


@Chrisandweed
Follow
Puues ya va quedando meenos.
Todas estan sufriendo de sobrefertilización, por suerte, esta y la Pakistan lo están asimilando muchisimo mejor.
Las critical si están bien sobrefertilizadas 😅.
En el proximo riego, a todas les haré el riego solo de agua con una dosis media del producto Flush, de la marca que sigo usando. En el siguiente algo de comida y ya en el siguiente enzym y de nuevo a los riegos normales, no por na, siento que aún quedará un mes minimo para empezar con los cortes.
PD: IMPORTANTE, voy a poner datos que no solía poner por la "dificultad" entre muchas comillas ya que es dificultad por una situación especifica, de sacar y es que como antes comentaba, habían bloqueos y tal... Bien, he medido el agua de drenaje de cada planta. En esta los valores de ph estan mas o menos bien, peeero la EC era lejia viva! En esta planta el ph era de 6.33 y la EC era de 10.25 MILISIMENS! que no microsimens... Una toxicidad altísima! Muy similar a las otras 4. Básicamente mis riegos eran por lo general 2 a la semana, uno de fertilizantes base con el especifico de cada fase que toque, y el segundo riego era de encimas con normalmente calmag (fertilizante muuuy salino) y a eso le juntamos que normalmente los riegos eran justitos, normalmente no había drenaje, por lo que las sales en el sustrato se iban acumulando hasta estos puntos. Hoy, tras varios dias de dejar secar las macetas, incluso buscando un poco de estres hidrico, he metido un riego de 6L por maceta de agua con el producto Flush para hacer un arrastre y limpieza de sales, en esta ocasion los 6L han sido la medida perfecta para que drenase agua suficiente como para que estos niveles de ec bajen, y ademas en el plato pudiera medirlos y darme el resultado que he puesto anteriormente.
Todo comenzó porque en la Kritical GB sentí un bloqueo de pk y la planta empezó a comerse sus hojas para conseguir magnesio, si llego a verlo como una carencia de magnesio o calcio la hubiera cagado atrozmente!
Likes
102
Share


@Aleks555
Follow
Hello, everyone. This week went great. We pruned our girl and took clones from her. Once the clones take root, we'll transition our girl to the flowering stage. Thanks to everyone who follows my diary, and thanks to those who don't forget to leave likes and comments.
Likes
7
Share


@x_grower
Follow
Last week the plants grew looking very healthy although I still have a feeling the low humidity is slowing their growth, by the end of the first week I started raising the EC to make the increasing for this week smoother, run-off EC is substantially increasing so I will start to fertigate them twice a day for this week.

Likes
17
Share

@StonedSteve
Follow
Today I am closing 6th week of blooming and starting 7th week
Day 83
I'm watering with 5 liters and I removed Bud Factor X and added Overdrive👌
Following HombreCZ advice, I reduced all nutrients for 50% except Vitamax. Děkuju😇

Likes
2
Share


@Growandroots
Follow
Wochenbericht – Pflanzprojekt (4. Woche)
In der vierten Woche haben die Pflanzen einen deutlichen Wachstumsschub erfahren. Sie haben nicht nur in der Höhe stark zugelegt, sondern auch die Blätter sind kräftig gewachsen. Die Entwicklung verläuft weiterhin sehr positiv.
Um die Pflanzen in ihrer Form zu optimieren, wurden die Köpfe getoppt, was zu einer noch dichteren Struktur führen soll. Die Pflege beschränkt sich weiterhin auf das Gießen mit Wasser, da die Erde ausreichend Nährstoffe bietet.


Likes
26
Share


@Nistnov
Follow
I finally had some time to harvest everything, left her for 2 days in the dark in a vase.
The smell was so intense in comparison to the painkiller. Since it rained a lot there was some bud rot but I guess that was inevitable.
The honey cream still grows strong has no bud rot since the buds seem fluffy enough for a good airflow.
Likes
46
Share


@gottagrowsometime
Follow
D92. RH hitting peak conditions 44%. Dehuimifier is working 5hrs a day.
Maybe another 15 days to go. Hoping to bring her to whole harvest. This half harvest thing is crap. I just want uniformed bud top-mid-low growth.
7/4/22 Bud is coming on real nicely. I'd say as she is she'll give an oz of frosty as f..k bud. With the addition of the lower led lights I'm hoping she'll finish off. As she's in soil. So half harvest isn't really an option as soil turn around is to long. Once you start a process like a flush you kinda have to follow through with it. So, if there is 10-15% of bud that has no more than 15%
of white pistils I'll be happy taking her once I feel she's reached the point where the buds stop expanding and focusing on terps. As she is, she's doing really well, has responded to the hard flush really well. PPM was only 490 so she's still eating. Happy days. Will do the test again next week and if she is at feed ppm level I'll know she's finish eating and I'll throw her into a week or 2 of flawless finish and harvest her. So depending on the flush during the week this might be her last week on nutes.
Bout 3 weeks in total left. 2 for the flush and a wk left on nutes. Will keep her dosed on micro enzymes for the rest of wk and 1ml/l during 1st wk of flush.
9/4/22 Finished this girl. Some stigma, (white pistils). Put her on overdrive just for 1 week. She's surprisingly still eating, not much 400ppm only. 1150ppm back, so she's coming to her end, sadly the end, that was full of stigma has kinda finished up, 90% of hairs have turned to Amber. I don't know if this is a good thing, but the sugar leafs are getting so packed down around the larf the sugar leafs have coned in on each other, full of tricks, I mean full of it, trim to keep for sure, all long trichs you can see them even with a scope you can see the top colas are fully cloudy. Few clear ones around the lowest end but they'll cloud up in the dark period. Absolutely stinks of orange zest, the tangerine smell is also coming out, full bodied zesty/crit stinky little bitch. I'd say she'll put out 20-30g dry. I'm really happy with what she's going to give me, I'll for sure am going to be roughly trimming her and letting most of the heavily heavily packed sugar leafs coming out of the bud sites. I'd say around 70% of the bud has finished off. If only last week I'd of taken the tops I could have kicked rhe bottom into feeding and finished her off, as most of that stigma was 90% white. Nearly 70% Amber now probably even 80-90% Amber. Around 20% clear around the end. As you can see in the pics, she's DONE!!!! Flawless Finish her for a week, I only gave her a 800ppm feed of overdrive and cal mag extra about 500ml on top of her weeks feed. I'll hard flush her in 4 days. And give her a week on flawless finish. Then I'm gonna hang dry her in the bathroom RH is 55% 19c temp, will have to take her out in morning for a showers and stuff but it'll be a perfect place. Also the house will be a pleasure to smell for our guests. Not saying its normally not, but the smell is normally burning weed, can't beat the fresh of smelly stinky bud. Going to dry this 1 in the long way....10-14 days hopefully. Shell be given 500ml an hour before harvest to prolong her drying time, increase terps and allow sugars to bring out the true taste of this beauty. Dont mind the rust spots. Its not from any def/tox she is 100% healthy. It was just a case of her getting a mix of overdrive 4 weeks ago when she was on big bud. It caused all these rust spots. I've been taking pics and placing something for scale and have been constantly checking and rechecking leafs and glad to say these are just war wounds from a beginners mistake. 4 weeks ago I was juggling 5 different plants and yeah I messed up and she got a dose of overdrive.
13/4/22 Plant looks very frosty. Stinks of orange zest to me more than tangerines. Has a very sharp citrus snap to her, you know what she is straight away. Something very very fruity, very pungent. Not a secret grow but it that way, nor is the zkittlez if ingcognito is your thing.
RH climed into the 50's for the 1st time in 4 days without dehuimifier, thankfully it's not a constant thing to run, fuck me it likes KWH. 1 every 3 hours nearly. That's 10hours of my light on full blast. 100 watt light 10hrs of use =1KWH for those who don't know that. Good to know exactly what you are spending on your grow. Your 1st will always clearly be the most expensive. Like nutes/lights/tents even substrates have more than 1 life. So what it comes down to in the end, is how much a month is it costing your bottom line. If you are like me, and not growing in mammys basement, then watts matter.
If you have noticed my PPM was double that nearly for the weeks 1st feed, I also cut out some nutes. I'm still giving high PK I'm just reaching my PPM differently is all. Still in the push during flower. But less, get her hungry to really eat as much as she can, pace her.
Thanks for reading! Be sure to drop a like so I can check out your grows!
gottagrowsometime

Likes
Comments
Share


@pHilosophy420
Follow
Day 35, She is growing well and started stretching . Another week LST and light defoliation.


Likes
6
Share


@gr3g4l
Follow
La semana inició con bajas temperaturas afectando directamente al crecimiento de las plantas, tenian mal aspecto , hojas caidas y un crecimiento muy lento.
A mitad de semana subieron las temperaturas y las plantas mejoraron aspecto y crecimiento , mucho mejor. Se nota que les gusta un buen tiempo a las señoritas, xd.
A final de semana , a los 21 dias les hice una poda de las hojas grandes que hacen más sombra.
De esta manera lo dejo ya todo preparado para que sigan engordando los cogollos y las ramas bajeras no se vean obligadas a estirar mucho más por falta de luz.

Likes
30
Share


@dataTwiiix
Follow
Assez fier la bud principales pèse 90g humide :D et l'odeur est lourde dans 10j un smoke report éclairera tout ça !
Likes
136
Share


@Kitties_and_Colas
Follow
~_~_~_~_~_~_~_~_~_~_~_~_~_~_~_~_~_~_~_~_~_~_~_~_~_~_~_~_~_~_~_~_~_~_~_~_~_~_~_~_~_~_~_~_~_~_~_~_~_~_~_~_~_~_~_~_~_~_~_~_~_~_~_~_~_~_~_~_~_~_~_~_~_~_~_~_~_~_~_~_~_~_~_
We're getting close! These buds are getting absolutely caked under the MarsHydro..you can tell these plants are going to be killer...I haven't pulled the glass out to inspect this week but last week we were only about 20% cloudy, probably 2 more weeks if I had to guess..flushing these seems to be tricky, we've been using water only for approximately 12 days and their color refuses to fade, some are still a little glossy..I think we're going to start watering these every other day with a gallon each until they're finished, harvesting anything that dark has never been good. We have a few plants lined up to flower the day these come down (White Widow likely) ..every Banger clone taken in week 2-3 of flower are growing and of good size now, we'd like to put a few outside this summer ... Not too much else to report, its been an awesome week, thanks for dropping by and happy harvests everyone!! ❤️💡🌱😽💨
⚡Mars Hydro/SP-3000⚡ Specifications ⚙️:
Diodes: Samsung LM301B / Osram 660nm (960 total!)
Driver: Meanwell 300watt 🔌 (300W±5% @AC120V-277V)
PPF: 824umol/S ☢️
PPE: 2.8 µmol/j 〰️〰️
Lifespan: 50k+ hrs ⌛
Weight: 10.1 lbs (4.6kg)
Veg Coverage: 3 x 5 ft 🌱
Flowering Coverage: 2 x 4 ft 🌼
-The SP-3000 uses an aluminum heatsink (no fan) and the driver can be placed outside the tent 🌡️⬇️
-IP65 waterproof ratings, tolerant to high humidity grow environments 💦 ..
-Up to 15 can be daisy-chained together and all controlled from a single light! 💡~💡~💡~💡~💡
~_~_~_~_~_~_~_~_~_~_~_~_~_~_~_~_~_~_~_~_~_~_~_~_~_~_~_~_~_~_~_~_~_~_~_~_~_~_~_~_~_~_~_~_~_~_~_~_~_~_~_~_~_~_~_~_~_~_~_~_~_~_~_~_~_~_~_~_~_~_~_~_~_~_~_~_~_~_~_~_~_~_~_