
Likes
Comments
Share


@RhodiesGrow
Follow
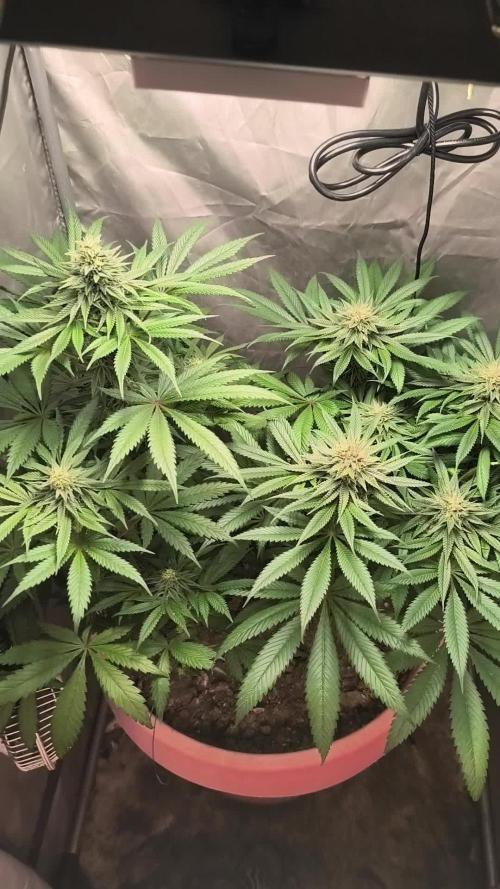
Day 30: Let grow, no water no feed. Thick stalks, RapidStart making a HUGE difference. Baby + Speed looking good for a baby. Big + Speed taking LST well. Tent Temp: 77º RH: 53º PPFD: 700 VPD: .67 kPa
Day 31: Both + Speeds looking really good. Excited to see how they stretch in the coming weeks. Fed 4ml FloraMicro, 4ml FloraGro, 6ml FloraBloom, 2ml CALiMAGic, 1ml RapidStart, 2.5ml ArmorSi, 1ml Floralicious Plus, 1ml Liquid KoolBloom and 5ml FloraNectar. Solution Temp 70º PH: 5.8 PPM: 950 Tent Temp: 77º RH: 52% PPFD: 750 VPD: .66kPa
Day 32: Same as yesterday. Good. Tent Temp: 77º RH: 51% PPFD: 800 VPD: .67kPa
Day 33: Let grow, no water no feed. Tent Temp: 77º RH: 52% PPFD: 750 VPD: .67kPa
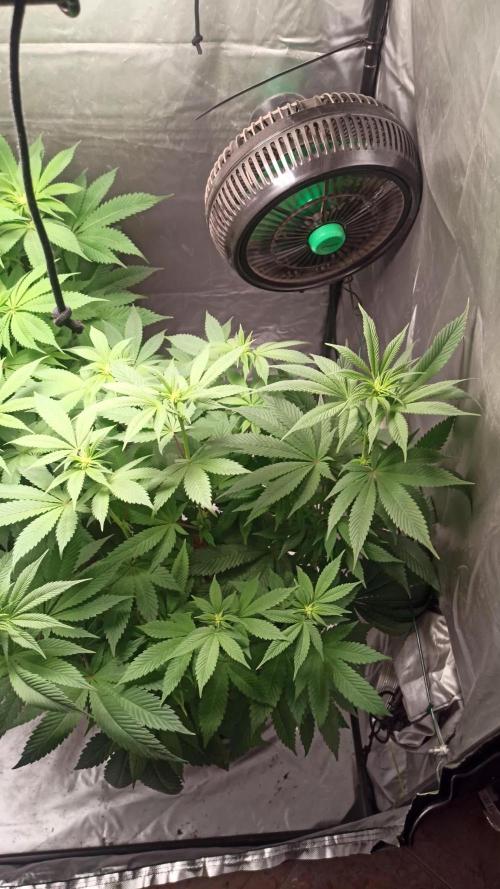
Day 34: Both + Speeds doing well. May perform some slight defoliation on the larger + Speed in the next few days. Leaf tucking for now. Removed small bud sights and lower fan leaves from smaller + Speed. Watered .5gl RO water PH: 6.1 Tent Temp: 75º RH: 55% PPFD: 750-800 VPD: .58 kPa
Day 35: Looking healthy and happy. Starting to get a slight skunky smell in the tent. Tent Temp: 75º RH: 55% PPFD: 750-800 VPD: .58 kPa
Day 36: Ready for feed again. Cutting out FloraMicro on this feed, Cosmo and + Speed(s) showing slight signs of nitrogen toxicity. Fed 4ml FloraGro, 6ml FloraBloom, 2mg CALiMAGic, 1ml Floralicious Plus, 2.5ml Armor Si, 1ml RapidStart, 1ml Liquid KoolBloom and 10ml FloraNectar PH: 6.1 Solution Temp: 71º PPM: 925 Tent Temp: 76º RH: 52% PPFD: 750-800 VPD: .67 kPa

Likes
11
Share


@Fullmeltalchemist
Follow
D56/F8 - 11.14 - Doing great! Loving the new Blumat Tropf system I installed for both of my tents. Starting to show sex and the very beginning of preflowers
D59/F11 - 11.17 - 👍 covered some vertical distance this week for sure. Back to having big ole leaves! :)
D60/F12 - 11.18 - <3


Likes
105
Share


@PEAKYPLANTERS
Follow
Respect for all of you, brother farmers! masters and beginners! thank you again for gathering on the pages of my diaries! we carry out our work with dedication and live on ambition!
This will be the last week of feeding before moving on to rinsing the roots in the soil
One of the girls is developing artichokes on the tops... nothing but gems😉😄😋💕

Likes
5
Share


@420Hydro
Follow
Clones got flipped before i wanted mom plant was getting to big. Just trying squeeze quick run in before move. Still trying dial in my new nutrient line.. masterblend 0 12 24 and cal nit

Likes
19
Share


@Mikado
Follow
Apr 6 - I'm adjusting ph on watering days - was using straight rain water, but it's ph is too high ~7.0. LST Northern Lights, reacted really well to it. Adjusted 04/07. Pink berry really kicking it up - 9 hrs into lights on, big difference from lights on. Bubblegum is a real beast. Just takes my mistakes.
Apr 10 - Between apr 8 and 10th, there was a big boost in growth. Well ph'd water goes a long way. Pink berry is a beast, bubblegum phenomenal looking. Northern Lights doing good - you can tell I fucked it up in comparison.

Likes
35
Share


@Bud_Koenig
Follow
Hey, fellow growers! Week 4 is complete, and as you can see, the ladies are thriving beautifully! ‘Sleepy Joe’ is already developing a lovely purple hue, and the terpenes are giving off a delicious minty, orange aroma. So far, everything has gone smoothly—Living Soil is doing its job perfectly, and I’m definitely sticking with it for all my future grows. If you have any questions about the products I use, feel free to reach out!


Likes
13
Share


@goeser
Follow
I love this strain. Really strong genetics. Nice fruity and og kush like smell. Cant wait to harvest and try them.

Likes
299
Share


@Metatronix
Follow
Hello to you all.
As a true visionary I decided to go FULL HYDRO this week, that means water in buckets and outside the buckets /s
This grow turns out to be an uphill battle but i already decided to bring it to completion no matter what...Icy weather, floods, alien invasions what's coming next a big bank crash?!
I'll bring this grow to the end! Who needs banks anyways when you got #coins ;)
On 22.02. added nutrients to the 140 liters of solution.
That's it, I hope to see y'all next week growmies.

Likes
18
Share


@RickJames_Mcdank
Follow
So I had some internet issues so I couldn't upload. But now everything is alright.
This last week I only gave her water 2 times. first time I gave her 500 ml water and the second time only 250 ml water only.
And I took more fan leafs off her as you can see I only had to hang her up without trimming or anything.
After she is dried I am going to weigh her and see how much I got.
*****************************************************************************************************
As for grow report :
Blue kush is really easy to grow just make sure the temps optimal.
The buds grow really dense thats 1 of the parts I like about this strain.
She takes normal feeding.
Very strong genetics.
And she can take a few mistakes so this strain is perfect for beginners and in medium or expert hands she can get really nice with the colors and smell and taste.
Next week i will post the weight and the dried product.
Likes
12
Share


@Zoe_Spacecake
Follow
He hecho varias podas para controlar el crecimiento de las plantas. Sirve también para hacer las ramas un poco más fuertes, porque es una variedad que tiene tendencia a crecer alta, fina, con ramas débiles.


Likes
6
Share


@Lomba610
Follow
is getting bigger and bigger, I made some toppings and continued with lst, out of curiosity I measured it, it occupies a space of 60x60cm impressive how fast it grows, this week I raised the ec to 2000, I think next week the I move 80x80cm to another box and make it bloom 🤩💪🏼
Likes
94
Share


@Tropicalstorm
Follow
Ladies and gentlemen, we are now entering the last week of flowering and finishing her 6th month alive! I got attached to her, will be difficult saying goodbye, BUT, these juicy buds are so worth it.
I've been flushing her with 3 liters of water every 2 days, and despite one cloudy day the sun appeared most of the time. I hope she gets a little fatter this last week.
The smell is incredible. Strong enough to notice when you're near, but not strong enough my neighbors will get it, perfect! I assume in a tent she'd be stinking everything up with her sweet, sweet smell. I can only imagine how her kief will be 🤩
Thanks for visiting and see you next week for one final update!
Processing
Likes
10
Share


@PisBaked
Follow
Everything is looking amazing! All plants are at 4.5wks -5wks old now. Growth is extremely rapid.
PPMS/PH of run off is less than what's going in! Still feeding to run off daily; vacuuming out the water everytime!! They're starting to need close to a gal. each :D
I have defoliated & continue to pinch lower plant growth to lolly pop each branch -- I find this the best method hands down for autos..
The canopy for the most part is even with the exception of LSD-25, Fruit Punch, & most importantly; the one GSC (fast buds) -- it is a fucking monster as you can see (tallest plant by FAR).
Cant wait to see the buds on what appears to be a Sativa dominate GSC pheno -- this plant was under the same 630w's worth of CMH along with the other GSC -- because it keeps growing, and was starting to developing light burn on leaves closer to the CMH's I've since switched spots with a GG#4 & it's now under two 600w LED's; growth continues to stretch on her, but I'm less concerned now that it's under less intense lighting, with a bigger distance from the lights .
Other than that, things are looking to be on track for an epic harvest. Once buds start forming, I will drop the temps on the AC gradually to bring out the colors in GSC/LSD/Fruit Punch -- with lights/fans on full blast I can hold temps as low as 70f / 30% RH with the AC at less than 50% -
Will be uploading more pics this weekend!

Likes
48
Share


@Northern_Ent
Follow
June 9: plant is doing great after first topping. Very hot and smoky again today.
Did a foliar spray of Extreme Blend and potassium silicate, pH adjusted using Apple cider vinegar to about 6.8. Might have overdone it slightly but they’ll recover.
June 10: foliar of soluble seaweed extract to help beat the 30 C heat. Still misting plants periodically to compensate for sub 30% humidity.
I knew it was a hot spring, but holy fuck, 5.8 C warmer than historic average is crazy.
June 14: rain day.
Compost tea in video was left for 36-48 hours before use.


Likes
9
Share


@TiRobotProds
Follow
Salut a tous, nous sommes à la 7ème semaine de floraison tout ce passe bien les tête on pris en densité c'est une semaine fraîche la température de la tente a diminuer mais sans incidents toujours dans la plage optimale. Je pense que 2 a 3 semaine suffiront pour que les bourgeons soit mûre pour pouvoir récolter cettte dame. J'ai commencé le flush de advanced nutrients en fin de semaine est l'odeur es agréablement bon a sentir elle à envahit toute l'appartement. Va bientôt faire le concours du mois sponsorisés par Ganja farmer seed. J'ai jeté un œil au trichomes celle-ci sont encore prématuré.

Likes
20
Share

@Michijardinero
Follow
Muy buenas familia aquí estamos una semana más mostrando el avance de mis nenas hoy finalizamos la segunda semana y damos comienzo a la 3° en el siguiente riego le pondré todo de floración asta el momento le puse de crecimiento ya tienen los 53cm de alto el foco lo tengo más o menos al 80% y a 30 cm de altura bueno de momento seguimos con los mismos parámetros ya están empezando a asomar los moñitos jiji espero todo siga bien y disfrutemos de una buena cosecha aunque es muy muy temprano para decirlo jejejeje alli les del un vídeo y unas fotos para que vean como va la cosa y como siempre mi frijol (el Michi jardinero) no pierde la oportunidad de hacer una poda mientras las miro 🤣🤣🤣🤣🤣🤣🤣bueno familia cualquier error que vean o cualquier tip que quieran dar bienvenido es que tengan una buena semana familia nos vemos en 7 días paz


