
Likes
Comments
Share


@Green_Peace
Follow
Increased Buddy to 1mm p/l. Will be adding PK14 in the next 2 weeks as they're peak flower and will need the Potassium etc. These plants are at the front and to the right in the timelapses.


Processing
Likes
11
Share


@GBudz
Follow
Getting close to harvest now.
Beggining to flush this week.
Cant wait the buds are rock hard smelling fruity fuel.
😍👌👌☺️
#dutch passion
#auto flower
#led
#glueberry og


Likes
3
Share


@Philippovic
Follow
Am Ende wird doch alles gut… kann man so sagen! :)
Nach einer Woche ohne Wasser hat die Lady nochmal richtig zugelegt und an Duft gewonnen.
Jetzt 2 Wochen trocknenund ab in die Grovebags

Processing
Likes
8
Share


@eldruida_lamota
Follow
Pfff, explicaros que estas green ak xL son una variedad bastante difícil de cultivar, los cambios ambientales le sientan fatal, y hay que tener cuidado con la alimentación ya que se Sobrefertiliza fácilmente así que ojo, eso por un lado.
Por otro si eres un cultivador con varios años de experiencia y todo te sale bien, es probarla, porque el sabor de esta cepa compensa la dificultad de su cultivo.
Thc hasta 18% , sativa predominante.
Genéticas: Afghan x Colombian x Mexican x Thai Landrades.

Likes
8
Share


@BigBaby420
Follow
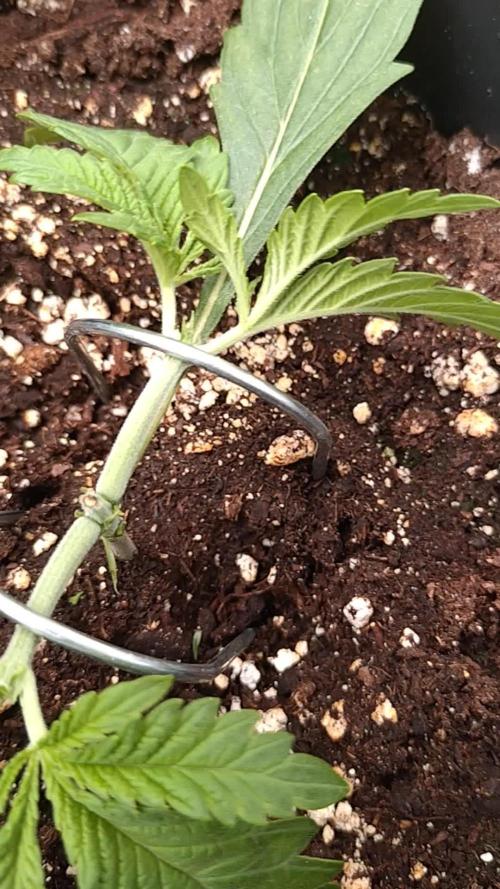
Started low stress training this week. Kind of in the style of mainlining, but I didn’t really start early enough for that. Tied all branches down to try and give all inside flowers some equal light. White widow leaves turned yellow and she just stopped growing. Need to figure out what I keep doing to kill my seedlings. Root system looked pretty healthy, not sure what was the culprit. Also used farmer freeman to determine sex since I used regular seeds. One male one female. And then there was one.


Likes
3
Share

@PhinolaGreen
Follow
3. Woche
Alle wurden mittlerweile 2x getoppt, jetzt dürfen sie sich erstmal erholen und dann schau ich ein paar Tagen nomma nach 😊
Likes
61
Share


@UnorthadoxDude
Follow
Welcome to the start of week four. We join her royal majesty as she begins what I suspect will be a big week.
She has continued to impress every day and I am increasingly excited to see what she can do. I'm beginning to dream of my next grow [G3] a tent full of princesses.
I still do not know what effect the attempted FIM has had but I suspect by the end of the week it will be obvious.
Day 23: Secondary shoots have overtaken primary. I'm curious as to how the FIM pans out.
Day 24: LST on lower nodes.
Day 25: Citronella continues to show mortals of lesser breeding what royalty can do.
Day 25.5: Scalpel! Wire! LST! HST! Defoliate! Defoliate! Defoliate! Her majesty has been adjusted (per royal decree).
Day 26: Her majesty is thirsty... I'm having to feed her twice a day. I need to move her into a bigger pot.
Day 27: Accidentally snapped off a side node attempting HST. Have dipped in rooting hormone and potted. Perhaps this will be the first Princess.
Day 28: Photo before lights on hence wilting.
Weekly summary: Because I took off four really big leaves Citronella's progress doesn't seem as impressive this week. However let me assure you it has been transformative. Her stem is thick, her colour is perfect, she responds willfully to my attentions (training).
She is a mother plant so everything I do is geared towards producing more and stronger side stems.

Likes
5
Share


@Jankky
Follow
Hoping we won't have to raise the structure, but probably will. They filled out pretty well and are smelling wonderful.


Likes
14
Share

@eldruida_lamota
Follow
Venga familia que ya viene la cosecha de estas Tropical Zmoothie de Seedstockers, que ganas que tenia ya de darles machetazo.
No veas que pinta que tienen estas plantas.
Las flores aparte se ven bien resinosas.
a sido una genética con la que disfruté mucho cultivarla, es algo complicada cultivarla pero merece la pena si eres cultivador con experiencia no te será problema cosechar.
Agrobeta:
https://www.agrobeta.com/agrobetatiendaonline/36-abonos-canamo
Mars hydro:
Code discount: EL420
https://www.mars-hydro.com/
Hasta aquí es todo , espero que lo disfrutéis, buenos humos 💨💨.

Likes
5
Share


@Ninjabuds
Follow
Last week, my pound cake auto plant totally exploded with growth! It's insane how much it's changed. I swear it grew several inches overnight. The leaves are this gorgeous shade of green, and the whole thing looks super healthy and happy. I'm seriously so proud of my little plant baby.


Likes
54
Share


@MrJones
Follow
MrJones Cream Mandeiran Auto XL - ViparSpectra XS2000 240W Infrared Full Spectrum LED Grow Light
´🍪⊱╮🍪╰⊰🍪 WEEKLY GOALS 🍪╰⊰´🍪⊱╮🍪
🏡Indoor - 3"x4"x8" Custom Built Grow Closet
🌞Environment - 80F and 50%Humidity - using Humidfyer as needed.
🌾LST and Defoliation - this strain likes to stretch!
🗓️Week 2 Seedlings
⚱️5-Gallon 📊6.2 PH
💧 Feeding / Using Dr. Earth Dry Organic Amendments - Home Grown & Bud / Bloom Booster
🌞ViparSpectra XS2000 240W x2 Infrared Full Spectrum LED Grow Light
🕷️ IPM - Will be using Green Cleaner" 1 OZ per Gallon, and CannControl from Mammoth alternating between products each month for Integrated Pest Management.
´🍪⊱╮🍪╰⊰🍪 PLANT UPDATES 🍪╰⊰´🍪⊱╮🍪
📝 Notes - Girls are just blowing up, they have doubled in size and started producing their second and third nodes, the leaves look perfectly healthy! The ViparSpectra XS2000's are just killing it!
╰⊰🍪╰⊰´🍪⊱╮🍪╰⊰🍪╰⊰🍪╰⊰´🍪⊱╮🍪╰⊰🍪╰⊰🍪╰⊰🍪⊱╮
🔶Sunday 06.27.21/ Continuing feeding just H20 PHed to around 6.0/6.5
🔶Monday 06.28.21/ Plants are just doing great, no water needed for today!
🔶Tuesday 06.29.21/ Plants are looking good, the soil is still moist going to water in the morning, along with a nice top dressing!
🔶Wednesday 06.30.21/ So I topped dress with 7 TBS Dr. Earth Flower Girl and 3 TBS Dr. Earth Home Grown
🔶Thursday 07.01.21/ If you could only see how these girls are doing from the beginning of the week until now they have at least doubled in size!
🔶Friday 07.02.21/ Just watering with H20 PH - 6.2
🔶Saturday 07.03.21/ Trouble-free grow, great lights these ViperSpectra XS-2000 they run so cool for the amount of light they put out!
╰⊰🍪╰⊰´🍪⊱╮🍪╰⊰🍪╰⊰🍪╰⊰´🍪⊱╮🍪╰⊰🍪╰⊰🍪╰⊰🍪⊱╮
Cream Mandarine XL Auto®️ Information
Tall-stemmed auto-flowering strain. This high-yielding 4th generation auto-flowering strain is the resulting hybrid from the cross between selected specimens of our Cream Mandarine Auto®️ (SWS29)) and a Super Tai’98 elite clone.
The genetic coming from the Super Tai’98 elite clone contributes with interesting Sativa characteristics to this hybrid, such as bigger size, but also subtle aromatic and spicy tones with hints of wood and nuts. The so much appreciated Cream Mandarine Auto®️ genetic contributes with traits from the Indica side, such as high flower and resin production, but also sweet and fresh aromas with tones of citric fruits of the mandarin orange type.
DATA SHEET
Variety SWS55
Indica: 35% / Sativa: 63,4% / Ruderalis: 1,6%
THC: 18-23% · CBD: 0,6%
Indoor Yield: 450-650 g/m2
Outdoor Yield: 50-300 g/plant
Indoor/Outdoor Harvest: 9 weeks from germination
Height: 110-150 cm

Likes
11
Share


@GREENPHOENIX6262
Follow
*03/01 - Week 8 (Week 4 flower) - Heavy Flower Fuel and Cal mag every other day - 18/6 light till harvest- Colas are getting heavy and terps coming in nicely - Lite defo*
Processing
Likes
39
Share


Likes
9
Share


@TheBulldozerSicily
Follow
Niente da dire, 0 stress questa settimana non ho fatto niente, la prossima settimana aggiungeremo acqua se necessario.
Si iniziano a vedere i fiorellini,

Likes
15
Share


@crystal_garden_0
Follow
Good week. One Mimosa cake is huge others nice .lots of buds sites .strong delicious smell. Plants are slower than the other strains I'm growing but might turn out big .
Likes
7
Share


@logangrowgan2020
Follow
Topped soil with layer of aquarium rock. Treated rather dry pot to 3:1 tap water:hydrogen peroxide mix, two quarts. sprayed 3:1 mix around/in plant, doused areas of activity in rock/soil with vinegar. Classic overwatering-led-to-fungus-gnats!
pot placed on riser, towel sitting underneath to capture/monitor runoff. two days after 3:1 fed pot two quarts of water with added general hydroponics 1/2/3. kept tent dry with towel replacements, idea was to saturate soil with nutrient rich water after the peroxide flush. brutal. plant is not happy.