The Grow Awards 2026 🏆 


Likes
Comments
Share
@ButterfliesLittleFarm
Follow
Hello Diary,
The harvest is approaching on my small farm.
Actually, one plant is already ripe for harvest and that is Titan F1, So Apollo F1 and Milky Way F1 will be left alone for another week.
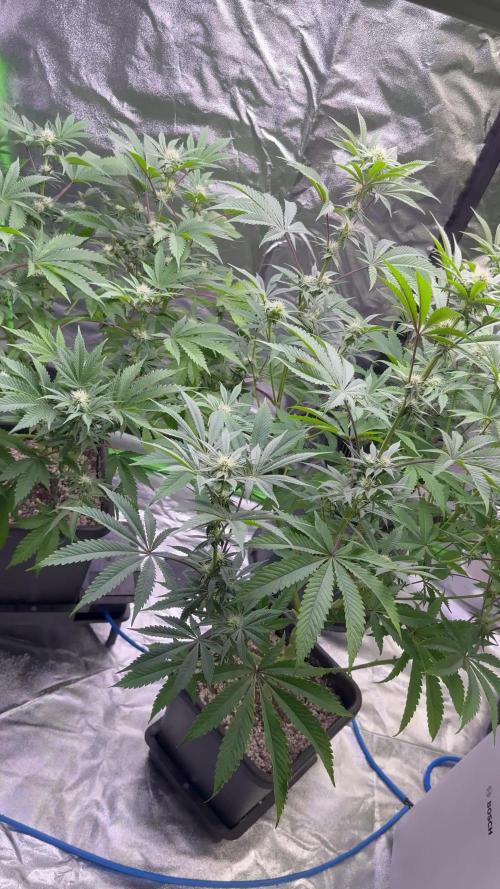
As seen in the photos, the Apollo F1 is truly a sight for the eyes.
The flowers are very densely packed, I have never seen anything like that before.
But the plant is low, the branches are strong and there is no bending under the weight of the flowers.
The flowers are full of trichomes that emit a strong fragrance. Here and there a yellowish leaf appears, which I immediately remove.
Watering is a little more frequent due to the high temperatures, but I stopped adding any nutrients.
Here's a quick recap of the week.
26/06/2023 - Day 58.
Watering. Only two days later, the plants drank all the water, so I watered them with two liters for each individual plant.
29/06/2023 - Day 61.
Watering. I repeated the procedure as I did three days earlier.
01/07/2023. - Day 63.
Photographing plants.
That's all for this week, see you soon.


Likes
21
Share
@AutoCrazy
Follow
Week 6
This plant is nearing the end. She never really fattened up but I am not surprised since she hermied 3ish weeks into flower.
Regardless, she does look pretty good. She has frosted up nicely and she smells super strong!! I will likely change out the rez to plain pHd water in the next few days and give her a 3 day flush before I take her down.
The majority of the pistils have receded and the trics are all cloudy with the odd amber one here and there. I can’t believe how quickly this plant finished up. I don’t expect a huge harvest but so long as it’s seed free or mostly seed free since she hermied I will be okay with that.
The next time I do a run I will do two plants in the cooler so if there I any issues I have options.
Likes
5
Share
@ROY4L_GU4RD
Follow
7/29/24 week 8. Flipping is around the corner. I have to defoliate before the flip. I added recharge nutrient this week to help the ladies have a quick recovery. I'm only feeding recharge with a 3 gallon res fill. I usually fill up by at least 6 gallons. What are yalls experiences using recharge?

Processing
Likes
15
Share
@MG2009
Follow
02/13/2020
Replacing with a back up female😊 I like to grow extras for this reason. Gonna train for a few more weeks until my Blue Dream-matic is harvested. So this is my clone mom for outdoor crop need 2 - 4 more clones for the garden. Then I can flower this girl out inside.
Also I'm switching nutes with this one because she's been Fed only 3-1-2 organic granular and was planning on putting her in the garden this spring.
02/14/2020
She has hollow stem, they day it's a good trait to look for in a keeper/breeder plant,so you can see i cut some clones ,and tied down her branches
Likes
15
Share
@CornishFarmer
Follow
--- Day 50 ---
22/06/2021
Shes really happy in the new tent, I'd officially say we're in preflower / flower now 😄 I'm watering 4L and she's really loving it.
I've watered her again with 4L of 23C, 1500PPM, 6.0PH water with the above nutrients
--- Day 51 ---
23/06/2021
Things are looking really good, flowers are coming in nicely, she's still growing and most of the low quality leaves have fallen off 😁
I've watered her again with 4L of 23C, 1500PPM, 6.0PH water with the above nutrient
--- Day 52 ---
24/06/2021
Shes really happy, everything is going great. I measure her and she's 32" tall now 😄
I've watered her again with 4L of 23C, 1500PPM, 6.0PH water with the nutrients above
--- Day 53 ---
25/06/2021
Nothing really to report, she's still growing good. The flowers and coming in more and more, they're everywhere now.
I've watered her again with 4L of 23C, 1500PPM, 6.0PH water with the nutrients above
--- Day 54 ---
26/06/2021
Yet again, nothing much to report. She's still really happy everything is going well 😄
I've watered her again with 4L of 23C, 1500PPM, 6.0PH water with the nutrients above
--- Day 55 ---
27/06/2021
Pistils are growing alot, they're starting to get quite long, there's more and more flowers popping up everywhere.
I've watered her again with 4L of 23C, 1500PPM, 6.0PH water with the nutrients above
--- Day 56 ---
28/06/2021
She's really happy. I'm glad I got the bigger tent and the new Extractor, it's really needed and working well. Nothing much to report, she's getting bigger and more and more flower spots are showing up 😁
I've watered her again with 4L of 23C, 1500PPM, 6.0PH water with the nutrients above


Likes
10
Share
@TiRobotProds
Follow
Bonjour a tous cette semaine j'ai pratiquer un LST leger, et je vais bientôt la passer en floraison.

Likes
120
Share
@CBD_Sweden
Follow
Hi all the happy people here in GrowDiaries.
This is my second cultivation ever and it will be fun to try a bigger space than my closet grows
First, I'm just going to say I'm done with the construction of my new growroom.
I put some pictures on the construction here in week one.
The room is 2.14 meters by 1.7 meters and has a ceiling height of 2 meters.
It provides a floor area of 3.6 square meters.
I use a 54 Watt Lightwawe T5 for germination and 2 Pcs 400 Watt HPS lamps.
I have a channel fan that replaces the room air about 40 times an hour to get a comfortable theme in the room, the air enters a fresh air intake from the outside.
The air is purified through a carbon filter to then leave the room to the rest of the basement.
Then I use that heat to heat the rest of the basement.
I will use 8 pcs 15 liter Autopots to grow with and a 100 liter water tank that supplies the pots of water and nutrition.
I will grow completely organically in soil and will watercure my buds to get the best possible medicine for me.
But there are no cultivation rooms to be displayed here, so I continue with what is most important.
Today I have put my seeds in my moisture dome and hope the seeds have germinated within a few days.
I am very excited to see how the new growroom will work and how this CBD Fast Eddy plant from Royal queen seeds will turn out.
CBD Fast Eddy Automatic is combining Cheese x Juanita la Lagrimosa x Ruderalis, Fast Eddy is a rapid growing, flavourful, and CBD-rich auto strain that goes from seed to harvest in 8-9 weeks, produce generous yields, and induce a clear, mellow, and most importantly, functional high.
THC: 9%
CBD: High
Yield Indoor : 400 - 450 gr/m2
Yield Outdoor: 80 - 130 gr/plant
Height Indoor: 60 - 100 cm
Height Outdoor: 80 - 120 cm
Flowering: 6 - 7 weeks
Harvest month: 8-9 weeks after sprouting
Genetic Background: Cheese x Juanita la Lagrimosa x Ruderalis
Type: Sa 50% In 40% Ru 10%
Effect: Clear, Painrelief
Climate: Mild
..............................................................................................................................................................................................................................................................................................................................................
Update 2017-08-15. Both seeds have germinated and planted in small pots inside the humidity dome.
I'm so glad it worked so well and now it's just hoping they'll start growing and become 2 big healthy girls :)
...............................................................................................................................................................................................................................................................................................................................................
Update 2017-08-16. I have mixed my own soil today. Its 40% sieved peat harrow H2-H4 0-30 mm, 45% sieved peat harrow H4-H6 0-30 mm. 5% sand and 10% of compost soil. And i use 15% of perlite and mix it all together.
...............................................................................................................................................................................................................................................................................................................................................
Update 2017-08-20. These girls are much slower to germinate and to start growing than the other 6 girls I started at the same time.
One of the germinated seeds split in half, so I had to take a new seed and germinate it. It took 2 days.
It was just a smal taproots after germination with this strain as opposed to my Fastbuds cbd.
But I hope everything goes well from now and that they live up to their name, Fast Eddy.
................................................................................................................................................................................................................................................................................................................................................
Update 2017-08-21. New pics.
................................................................................................................................................................................................................................................................................................................................................
2017-08-22. Nr1 dident make it and died. Started germinate a new seed to get another Nr1.
..............................................................................................................................................................................................................................................................................................
2017-08-27. Nr 1 is in a small pot in humidity dome and i hope shes going to break the surface soon. Nr 2 is slow but doing fine.
---------------------------------------------------------------------------------------------------------------------------------------------------------------------------------------
2017-08-28. Nr2 is transplanted in 15 liter autopot.
---------------------------------------------------------------------------------------------------------------------------------------------------------------------
2017-08-29. New movie of the girls Nr2. Its no water for 3 days now so the roots develop more and match the plant above the soil. The temp controlled fan is awesome, its easy to set what temp you like to have in the room. Right now its 28 celcius. And humidity is 56%.
-----------------------------------------------------------------------------------------------------------------------------------------------------------------------------------------------
2017-08-29.
Hello to you who read my diary, I just want to say that I am pleased that you have chosen to check in with me and in my diary.
I just want to say that I do this for myself and for a steady flow of my medicine.
Everything you read and see in my diary is 100% honest and I will never distort or beautify anything here.
I document my crops so that I can learn from my mistakes and also to look back at those different crops.
I try to update with pictures every day and with text if something special has happened in the garden.
This is my strainhunt for the best medicine and the beginning of my journey with cannabis and the cultivation of it.
-----------------------------------------------------------------------------------------------------------------------------------------------------------------------
2017-08-30. Cleaned the room this morning, just vacuuming and cleaning with chlorine solution. Im testing the fan to control temp and humidity, it works great.
Added a movie. Everything is looking great right now.
------------------------------------------------------------------------------------------------------------------------------------------------------------------------
2017-08-31. 3 New pics.
------------------------------------------------------------------------------------------------------------------------
2017-09-01. New pics and a video of the grow room from today.
----------------------------------------------------------------------------------------------------------------------
2017-09-04. Week 2 starts now, new pics.
--------------------------------------------------------------------------
2017-09-05. KL 08.00. Cleaned the room this morning, just vacuuming and cleaning with chlorine solution.
KL 12.00. The girl got 2 liters of water with nutes in it, added a video.
-------------------------------------------------------------------------------------
2017-09-06. KL 08.00. The girls woke up after their beauty sleep, the leaves are always a bit down after 6 h of darkness, but they will stretch now when the HPS lamp starts.
Everything looks good and I keep trying to tuck the leaves so they get the maximum amount of light where needed. Added pics and video.
--------------------------------------------------------------------------------------------------------------------------------------------------------------------------------------------
2017-09-07. Day 17 from sprouting. I have never tested PH in my grows, when growing organic in soil iv learned that it adapt PH by it self. But im curious by nature so i had to test.
Kl 10.00 Tested PH in the soil, it was 6.9 and tested my tap water and it was 6.8. Added video of the girl.
Kl 22.30. New pics.
-----------------------------------------------------------------------------------------------------------
2017-09-08 KL 08.00. Good morning, added new video.
2017-09-08. Kl 23.50. Gave every girl 3 liters of water and nutes, added new video.
-----------------------------------------------------------------------------------------
2017-09-09. Kl 21.00. Defoliated a lot and added pics.
------------------------------------------------------------------------------------
2017-09-10. Kl 08.00. Last day of week 2. New video.
2017-09-10. Kl 23.00. 3 new videos.
--------------------------------------------------------------------------------------------------
Likes
5
Share
@AustinRon
Follow
TH 1Q2025 - Week 2 - Seedling
(ON Haze X Original Haze) X Northern Lights #2
“Todd’s Haze”
Objective
- 8 Female Plants, Topped ONCE @ Flip, 12” when topped
- Modified Sea of Green
Seeds Wet: 1139PM, 28.2.2025
Germinated: 2.3.2025
Flip: 21.3.2025
Harvest: 77 Days, DATE: 6.6.2025
_________________________________________
__
Fri Mar 14, 2025
TH 1Q25 15:V:2:1
__
Sat Mar 15, 2025
TH 1Q25 16:V:2:2
- Moderate Fertigation, Root Biased, Reducing Container Moisture Levels
-
LightIntensity: [ 414, µMol/m2/s]
SIDE NOTE: We’re Still 14% Moisture Content on Orange Gasm #1
AM
Watering with PCAL1660, Kelpak, CalMag Fuel, Lush Green
- Starting with 1L PCAL1660 (@ 1g/gal)
- Add 1 ml Kelpak/L
- Cal Mag Fuel: 3.4 ml/L
- Lush Green: 1.7 ml/L
- EC: 0.9 (Delivered)
Sex Tests Returned, Selected 8 for grow, w/ Priority to
- Sex
- Root Development
- Seedling Size
Final Selection: 3,4,7,6,8,9,11,12


__
Sun Mar 16, 2025
TH 1Q25 17:V:2:3
Pots Hefty - #4 looking, meh. (Reduce Light from 75 - 67%)
Disassembled airpots for culled plants.
Notes:
- Overall - HIGHER Moisture than ideal - I’ll say it’s evidenced by sparse root development (Roots White, Top to Bottom - Roots throughout, but SPARSE
- Action: Need to keep OVERALL moisture content at a lower level - Perhaps aided by REDUCED PEAT PARTICLES in coco
- Fine Peat leads to Coco clumping. When it Clumps, it’s time to be washed,.
Mix 1 Liter
PCAL1660: [ 0.35, g]
CalMag Fuel: [ 4, ml]
Lush Green: [ 1, ml]

__
Mon Mar 17, 2025
TH 1Q25 18:V:2:4


Girls are displaying the funk of SMALL container = BUT - We just need some air . . .
Evening
Foliar, 1 Pt
- [x] Solar Rain: [ 2.5, ml]
- [x] Silica Skin: [ 2.5, ml]
Drowned Rats


__
Tue Mar 18, 2025
TH 1Q25 19:V:2:5
With Grow room doors closed last night, we hit max Temp and lost ability to hold RH, Resulting in VPD: 0.96 - 1.27. Opened doors ~0900, reduced max to 82, humidity back up, VPD back down.
We’re at the “I NEED NEW SHOES” stage -
SOP - Prep 1L Propagation Cells
- Assemble PCells
- Load with FRESHLY PREPARED Coco (Fresh, Unused) [NO FINE PEAT]
- Assure Sides are Taughtly packed, not Tightly packed
Evening:
- Fertigate Balance of EC: 1.0 PCAL, KelPak, Cal Mag Fuel, Lush Green, PSP, Quillaja 60 Powder
Fertigation Periphery, 1 pt
PCAL 1660: [ 0.25, g]
KelPak: [ 1, ml]
CalMag Fuel: [ 3.4, ml]
Lush Green: [ 1.7, ml]
__
Wed Mar 19, 2025
TH 1Q25 20:V:2:6

Girls need to look happy, even colored, lifted leaves, BEFORE Transplant and Flip.
Starting Standard Feed Regime at EC: 1.0 mS/cm
__
Thu Mar 20, 2025
TH 1Q25 21:V:2:7
We’ll water to runoff this morning - 8:6:4:5:4
Bumping CaMg, Bumping N
Watered entire Liter over 8 Plants, ~ 125 ml/plant
With LOWER Light, Girls are MUCH HAPPIER.
ALL PCells display ROOT MATS at bottom of airpot. We need to BALANCE THE GREEN across the plants, before Transplant.
A day or two, or three of a more relaxed environment should better prepare us for transplant.

We’re gonna need more water than we’ve harvested.
- [x] 8 Gallons of Distilled Water
For Transplant
Consider P/K ≥ 2.5 (Root BIAS)

Likes
20
Share
@HiGHLYDiGESTiBLE
Follow
1/4-1/11 week 6
1/4 2pm - canopy looking nicer and more even .. thinking to scrog soon

Likes
14
Share
@concentrate_on_coco
Follow
Thank you to anyone who likes or comments on my grow! For some reason this site wont let me verify so I can respond.
12/26 - Feeding leftover from 12/25 @6.6/6.7ph
12/27 - Feeding 2 gal nutrients @ 6.4/6.5ph
12/28 - A little damp from yesterday, some more dry. Feeding 1 gal nutrients @ 6.4ph, to those who need it. Turned lights up to 85%
12/29 - Feeding 2.5 gal nutrients @ 6.3/6.4ph
12/30 - Feeding 3 gal nutrients @ 6.2/6.3ph
12/31 - Feeding 2 gal nutrients @ 6.2/6.3ph
1/1/2021 - Feeding 3 gal nutrients @ 6.4ph


Likes
1
Share
@Spliffi29
Follow
Defoliated both and stripped the cali octane naked.
She didn’t stretch rlly so the tangie is overshadowing her a a bit.
i have ordered a raiser for the CA that will arrive in a few days to level it out.
Going strong into week 3 of flower 💚💚💚

Processing
Likes
11
Share
@rudiak
Follow
The girls continue to grow very nicely! All the girls have gone into flowering and I have upgraded to the 600W light now to push these girls and see what we can get from the final harvest 😋 They are still on the vega feed for now whilst they are in the early flower stage.
Not alot to report except the front girl had a very slight amount of nute burn but rolling with it as the other girls are fine and its minimal signs so far! If it gets worse maybe will adjust the feed!
Processing
Likes
13
Share
@kevgrow
Follow
Hey friends, end of week 13 from seed.
A big incident happened this week, I had 3 clones growing in the same tent. I had placed them on some cardboard boxes so they could be closer to the light. Woke up one morning and saw all 3 plants on the floor, pots fell on plant #1 and destroyed 2 stems on the bottom, they had some small buds formed already.
I chopped the 2 stems and hanged them up for drying, I left all the leaves on, did no trimming.
After 3 days, buds were dry, smelled like plant and bud combined, not too pleasant. I couldn't resist to try it out, so I crushed some on my vape. It kicked in as a sativa, eyes got weak, head high, it slowly starts to give you a appetite and after 40 mins, you want to sleep, overall it felt like a sativa - Hybrid. The taste at the beginning was not very pleasant I guess because these buds were not ready for harvest yet and I did not flush them.
Will need to do more research on harvesting / drying and curing.
1- how dry to should the buds be before curing?
2- is it better to trim leaves before or after drying for a better taste?
Noticed some amber on trichomes
Will begin to flush in week 14
Smell is stronger
Leaves are slowly fading to a different color
Will keep you guys posted!
Likes
9
Share
@Bafforr_autoflower
Follow
Se realiza transplante a maceta definitiva de 20 LT AIRPOT
Sigue el riego día por medio

Likes
32
Share
@Chucky324
Follow
Hello. It's been hot this week. I'm about 4 days from flush and I'll try to flush for 2 weeks. I've seen some fungus gnats, but I try to run a very healthy greenhouse. I've seen 3 different types of spiders helping me out this year. 2 different types of jumping spiders, several harvesters (Daddy long legs) and a bunch of small web spiders. I think a nest of web spiders hatched near by, their webs are about the size of your palm. And of course Paper Wasps. I allow to live in the greenhouse. (check out week 5 for more on that).
>I going to make my own seeds this year. I want my females to be about 3 weeks ahead of the male on flowering. The male is under lights and checked every couple of days for flower sacks, NO preflowers
sacks too. As i have said before that's a male Dr. Atomic Northern Lights. Going to be crossed with my Amnesia Lemon, Burmberry and Skunkberry. What I want is the Burmberry to have more solid buds.
> Amnesia lemon has not had any powdery mildew this year nor has her sister had any. I've gotten some on the other 2 strains. I'm trying frequency changed water " White Wash" works great, knocks the pm right out. I'll see if I'll use it again I'll be able to tell on the smoke and taste test when it done. That's all for now. Chuck.

Processing
Likes
6
Share
@CommanderCannabis
Follow
4/5 First day of 12/12 light cycle. Updated solution and looking forward to the stretch. Smell is noticable and branches are getting thicker.
4/7 Had to trim some of the bigger leaves which were blocking lower branches. Switched the Bloom spectrum LEDs on and will keep the White LEDs from veg on for now.
4/9 Heat inside chamber has risen 5 degrees since I turned the bloom LEDs on.

Likes
31
Share
@crystal_garden_0
Follow
Great week. Bit of nutrient burn but nothing to worry about. Buds starting, hopefully all goes well. End of week 4. Low stress training almost daily
Likes
27
Share
@eldruida_lamota
Follow
Buenas noches , espero que empecéis con bien pue la semana, yo acabo la tercera semana de crecimiento y estás do sweet dos de sweet seeds me tienen enamorao.
.
Lo primero, se han trasplantado a final de semana a su depósito real 11L.
.
La humedad anda entre 60/70% la temperatura está entre 23/26 grados, el led es increíble , y como siempre el ph está en 5,8/6,0.
.
AgroBeta:
0,8 ml x L Growth black line , vía radicular.
0,2 ml x L Tucán , vía radicular.
0,15 ml x L Flash Root , vía radicular.
0,05 ml x L Gold Joker, vía radicular.
.
Hasta aquí todo esta semana a sido algo complicado y todavía queda montar la extracción pero es ya lo último. Espero que os guste buenos humos 💨💨💨.
Likes
23
Share
@ChachoGreenCrown
Follow
Buenas a todos compañeros cultivetas! Seguimos trabajando las Critical Purple de GeaSeeds y decir que llevan un ritmo brutal ! Aquí en la tercera semana de la etapa de flora... las he guiando un poquito con la malla y la verdad pinta fantastico. Soportan el peso de la rama muy bien.
Seguimos abonando con línea orgánica grotek y bueno los resultados pintan bien
En cuanto a la iluminación.. estamos con un Lec 315W solux selecta a pena potencia de w jejeje. He instalado unas trampas para insectos por si algún polizonte le da por aparecer. De momento todo limpio
Destacar que las temperaturas vuelven a bajar.. han rondado entre 17 y 19°C en apagado y unos 22°C en encendido. Hemos conseguido vencer las temperaturas del exterior , aún así les falta un pelin de calor Jajaja
HE COLGADO UN VIDEO DONDE APARECEN RECIEN ENCECIDO EL ARMARIO Y BUENO AHI SE VE QUE LA TEMPERATURA ES BASTANTE BAJA. Aún así la raíz se mantiene calentita y la canopia no peligra.
la humedad relativa en torno al 65% osea que genial. En breves volvemos con más contenido. Un saludo a todos compañeros
