


Likes
51
Share


@Chumpkilla
Follow
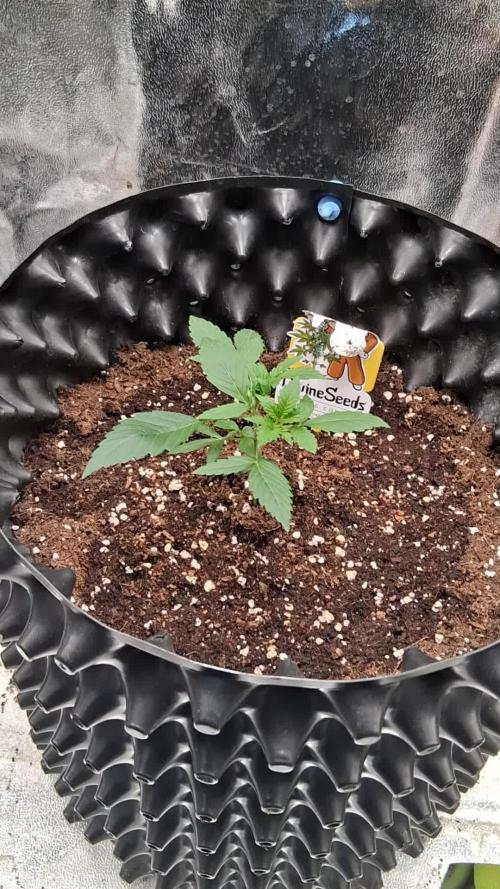
11/16/23 - Day 10 - Here we are on day 10 and she had a root hit the water over night. About 8 hrs later she had two roots in the water and her leaves are starting to perk up. From here on out I expect a rocket ship. Shes getting access to all the nutes now.
11/18/23 - Day 12 - The roots are going about as I expected in this Leaf Box. Shes always sad until her roots hit the water, then the fuse has been lit! There is no going back. When I looked at the water today there was one root that was floating about 7 - 8 in long that surprised me. Yesterday it was long maybe 4" but today it's at least doubled. 😀
Its so much fun growing in this Leaf Box. You really get to experience the joy in it, rather than the stress of trying to figure out some technical issue. Here the techical issues are close to none. I really get to focus on the training part. It also allows me to be more observant and I get more time to think about the little changes that I see. Usually my mind is so clouded with some engineering issue with her life support that I dont usually get the time to really focus on the plant. Its a whole different feel growing in the Leaf box.
I posted a video up top. If you watch it you'll understand my above statement. Choosing the option to move to the next phase in the software is about as hard as it will ever get (aside from harvest, thats ALWAYS a bitch) Watch the video and if your feeling some kind of way let me know what you think.
Likes
Comments
Share

@Broffel
Follow
The end of the second week, she still growing a little bit slow but looking very healthy. She split herself in 3 stams, look at the last picture. Lets see what it becomes.
I started this week with a little bit nutriënts

Likes
Comments
Share


Likes
26
Share


@Bakeryguy420
Follow
Start of week 6 of flowering for 4
Getting really frosty !!! Coming to and end of week 6 of flowering
Tangie ,gg4,sweet creme and glueberry all.started.to.get flushed!!! Exciting.for.chop . The hazes are all looking amazing .
Forgotten cookies is amazing =).
Just added grapey walter and douple grape. =)

Glueberry Auto · Expert Seeds
Gorrila Glue #4 Auto (Expert Gorilla Auto) · Expert Seeds

Tangie Auto · Fast Buds
Sweet Cream Auto · Expert Seeds

Amnesia Haze Auto · Vision Seeds

Amnesia Gold · Pyramid Seeds
OGesus Auto · Expert Seeds

Royal Haze Automatic · Royal Queen Seeds

Caramella Auto · Custom Breeder & Strain
Rhino Ryder Auto · Fast Buds

Fugue State · Mephisto Genetics
Likes
8
Share


@eldruida_lamota
Follow
Que pasa familia, vamos con la sexta semana de floración de estás Zkittelz de Seeds Mafia.
La humedad está entorno al 50%, y la temperatura la tengo entre los 22/24 grados.
Controlamos en ph en cada riego a 6.2.
Y el agua que utilizo de riego suele estar estancada entre 24 / 36 horas, hasta aquí todo bien, tienen un buen color, ya van progresando y floreciendo a buen ritmo, vemos cómo avanzan estas semanas y como avanza el progreso de las flores.
Mars hydro:
Code discount: EL420
https://www.mars-hydro.com/
Agrobeta:
https://www.agrobeta.com/agrobetatiendaonline/36-abonos-canamo
Hasta aquí todo, Buenos humos 💨💨💨

Likes
37
Share


@The_Bearded_Grower
Follow
welcome to Day 83 3/10/2021 the girl sure got super big but the buds still never got very fat. but still 400 Grams wet is good I estimate 80 grams dry there are more updates on the way as she dry's out and I get the real weight

Likes
1
Share

@DrGL_Thumb
Follow
Dropped the 3 seeds in water bath with a little HESI rooting mix, little mycorrhizae.
On a heat mat, covered for complete darkness. 24 Hr soak -
then seeds moved into own Seed Germinator - Karl’s Bubatz Popper 😂
24 hrs after 22 degrees and 90-95% humidity seeds developed long enough roots to hit the soil. To avoid any chance of damage the cotton pads hit the soil too.


Processing
Likes
7
Share


@Alejangrow
Follow
Giving straight ph adjusted tap water this week. Hoping a fresh start can help straighten these clones up a bit.I have to admit they dont look too happy topside right now but the root development is hanging good in the net pots so ima let it grow 🤷♂️🏽🌿

Likes
20
Share


@Insaniac_0
Follow
8set Mainline & 6/4set Manifold in Auto Pot - Selfie Seeds Sweet Slurry x Sugar Cane (6X4) - Week 11
Flower Week 2 Day 14 to 20 - 4/1 to 4/7
Simply watching the stretch from this point. Defoliation is needed by day 20 (4/07) so I removed all but the top 1 or 2 fan leaf sets as well as a few of the lowest branches. The idea here being that I want to mostly lolipop the colas and allow more airflow/light into the center.
Feed this week was an auto pot reservoir feed now at 700ppm total before add-ins. I used 175ppm Veg concentrate mix (recipe week 2) and 525ppm Bloom concentrate mix (recipe week 5). However, I also added 1ml/gal of CaliMagic (General Hydroponics 1-0-0) and ph balance this week was for 5.8 where Io plan to maintain it until harvest.
Video
Post defoliation
Next week nutes will increase in Bloom mix again but also eliminate Veg mix. Feed will again be 700ppm before add-ins with 5.8ph before feeding.
Likes
5
Share


@jojopfoh
Follow
This is an easy strain to grow. I didn't have to use any LST. I am just waiting on some amber trichomes and I will chop.
Likes
6
Share


@Reidy_B
Follow
So far my confidence in this next go around is very high! 😃☀️ Putting the seeds straight into a jiffy pellet is the way I am going to proceed with germination going forward. You are just adding extra variables to what should be a simple equation (seed in sterile medium + warmth + moisture = seedling) unlike with the paper towel method, where you need to transfer them to the medium. But this is just one opinion of a rookie grower.
Likes
6
Share


Likes
3
Share


@Northern_Ent
Follow
June 13: cool and rainy spring but she will start growing quickly with warmer temperatures near the solstice.
This backup seed is actually about 5 weeks old and not seven.
June 14: nice weather today but supposed to get rainy again this week.
June 17: did first topping for the manifold. Rain again today.
June 18: more rain again today.

Likes
8
Share


@RunWithIt
Follow
Seemingly overnight, the A.K. plant overcame Sour Ripper in growth! Been a fun week as far as the plants go, havent needed to water them at all. Ill take a peak into the tent occasionally, witnessed the growth pick up exponentially this week. I noticed the pots are getting pretty light when i was taking these pictures. Will likely water them tomorrow.
Notes for those interested: My last grow was RUINED from consistently overwatering and NEVER checking pH of feed water. Everything that could have went wrong as a result, did go wrong. Murphy's Law eh? Just trying to see to it that doesnt happen again.
For those interested in the DWC girls, their growth has been nothing less than great 👍. It was less than two weeks ago that i went to the local hydro shop to pick up some hydroguard and damn! Is that shit good or what?! Root rot has been stripped away in almost ALL of my DWC girls, tons of white, happy root growth in their place.
Ive decided that i will flip them all either halfway through this week or monday of next.
Going to mother both A.K. and S.R. 2-3 weeks into flower transition.
Again, great job @RipperSeeds and @Nirvana, really loving this stuff.


Likes
13
Share


@STAYINGONMYMAINCBATORUNTWO
Follow
I’ll start by saying I’m NOT using both bud blood and bud ignitor in one solution, I am using bud blood on the rear tropicanna poison plant and bud ignitor on the front one to test the outcome of them individually to see the best results! I tied down and defoliated twice in the week and have switched to 12-12 yesterday so they’re transitioning now and should be in bloom by week 7! I made some extract them made some gummies successfully I might add and added the photos in the diary!
Likes
22
Share


@BlumenBot
Follow
2/13 - a little bit of LST to bring the branches to the edges of the pot and down a bit, then letting the 8 shoots grow long enough to spread out evenly along the edge of the pot. Also got a plain watering.
2/18 - she got her feeding and almost ready for the final training before letting her grow height

Likes
10
Share


@Weedman268
Follow
Really love this strain, grown it a few times, happy with how she turned out, greasy an sticky and the smoke is heavy an euphoric, she smells like fruit punch with hints of nut meg, a smell I can't explain very pungent...

Likes
44
Share


@Chedderbob112
Follow
Waiting on a full plant hang dry so will wait at least two weeks maybe three hope ma vegging station holds up n can dae tge damage the now as av said guys this is definitely not the perfect set up am not on good terms with land lord so basically squatting here lol and growing and a got caught with one in this house the land lord doesn’t even know lol 😂


Likes
4
Share


@Drtomb
Follow
By the looks of the trichomes these are almost ready. Looking at the hairs though it looks like it could be a bit. We will see how things turn around in the next 2 days. Harvest is set for Saturday.
