
Likes
Comments
Share


@Lucyfer
Follow
So whats new?, well recently, as of 08/23/23 got my water chiller, which is A BLESSING, honestly the constant bottle changing was driving me NUTS, not only that, i had to use my roomates fridge (in secret) and mine to keep enough water bottles to last for a day, and most of the time it was just not enough so water temps were gettin all the way up to 90, a pain in my assholes that seems to be over. great success.
have seen some strange thigns going on with the water, such as EC level that keeps going up, which i think it was realetd to the plants drinking more water than nutrients and don't know if it was becasue of the temps as I'm very new to the hydro space, but will soon be paying 12 buckaroos to the youtuber that got me started in hydro, shotout to "How Weed Grow at Home - Indoor Cannabis Tutorials", So far i've been folowing his Hydro guide to the theet, so thats why I'll be subbing to his personalized patreon.
Here's a small log of how water's been in the last 6 days.
17-08-23
- Ph, 5.85
- 29.2 C
- 49ppm (new water, i used purified)
18-08-23
- Ph 7.10
- 30.01 C
- 70 PPM (water bottles in place)
19-08-23
- Ph 6.69
- 26.9 C
- 96 PPM (14 hrs after first feed)
20-08-23
- Ph 5.89(been lowering it)
- 25.8 C
- 125 PPM
21-08-23
- Ph 6.31
- 28 C
- 127 PPM (here i noticed EC going up so started taking notes)
22-08-23
- Ph 6.36
- 28.3 C
- 137 PPM
- EC 274 (added more water to the reservoir)
-Ph 5.9 (ph down 1 ml)
- 141 PPM
- 28.3 C
- EC 282
AnnnnnnnnnNDDDD today is the 23 of august and levels after chiller are as follows:
- Ph 6.31
- 145 PPM
- 23.2 C
- EC 290 +
So some things that will come, the viparspectra lights and will soon lst them, also i might change the reservoir as EC seems to keep rising.


Likes
10
Share


Likes
9
Share


@Rufytaro
Follow
I think the plant goes very well... it’s my first time... It is arrived the exact week to use PK13/14, what do you think?
Likes
35
Share


@eldruida_lamota
Follow
Como estáis familia, yo entre humos os comento la última semana de crecimiento de una de las últimas novedades de sweet seeds, red hot cookies, y es que Estoy contento todas las variedades del cultivo, pero está en concreto me tiene ansioso para poder apreciar los resultados finales.
Buen crecimiento en general , bien ramificada, se cambio el fotoperiodo a 12 y en breves entramos en la prefloracion.
.
La humedad anda entre 50% la temperatura está entre 20/22 grados , y como siempre el ph, está en 5,8/6,0.
.
AgroBeta:
1 ml x L Growth black line , vía radicular.
0,2 ml x L Tucán , vía radicular.
0,2 ml x L Flash Root , vía radicular.
0,05 ml x L Gold Joker, vía radicular.
.
Hasta aquí todo familia pronto veremos El Progreso de esta novedad ,espero que os este gustando, un saludo y buenos humos 💨💨💨.


Likes
12
Share


@QueenBZA
Follow
Beautiful take off from these ladies with the Wedding Cake Roots already touching water!


Likes
37
Share


@Gardener_of_Goodness
Follow
Here’s where I’m upto guys, I’m really now not sure what to do next,
The canopy is pretty even, there some strong branches and a healthy amount of bud sites. Can anyone advise...? Please :)

Likes
101
Share


@morganfreeman420
Follow
El frio se ah anticipado bastante, el dia dura 12hs y la planta esta empezando a ponerse cada vez más morada cosa que me gusta mucho, ya que hace mucho que no cultivo una variedad morada

Likes
6
Share

@TheRexxx
Follow
Wahnsinn, die Papayton ist jetzt schon bei 110 cm angekommen. Die schießt echt ordentlich in die Höhe! Wir sind jetzt mitten in Woche 4 und die letzte Zeit war echt nervenaufreibend. Ich musste die Mädels ordentlich durchspülen, weil der EC-Wert im Topf auf 4+ hochgeballert war. Das war ein ordentlicher Salz-Endgegner, aber ich hab ihn jetzt auf 2,6 runtergekriegt.
Heute gab’s dann endlich wieder frisches Futter mit dem neuen Plagron-Zeug und ordentlich CalMag. Ich fahre jetzt auch die Lichtleistung mit 345W auf 13 Stunden. Dazu hab ich Deep Red und Infrarot aktiviert. Das IR läuft 15 Minuten länger als das Hauptlicht, damit die Mädels bei der kurzen Nacht direkt in den Schlafmodus finden und regenerieren können.
Im Zelt ist es jetzt ein richtiger Dschungel, alles ist extrem dicht gewuchert. Morgen oder übermorgen wird deshalb radikal rasiert. Alles was unten im Schatten liegt oder sich gegenseitig das Licht wegnimmt, kommt ab, damit die Energie endlich in die dicken Buds fließt. Die Harzproduktion sieht bei der Forbidden Nectar jetzt schon richtig vielversprechend aus.
Likes
11
Share


@ChiefSmitt
Follow
This week is going pretty good too! the bugs seem to be swelling up a little more and getting a little more sugary. I added in a video of another one of my purple punch plants (the one with he purple nugs growing)
Likes
119
Share


@Natrona
Follow
***DIVINE SEEDS *****
*****OPIUM*****
Sponsored grow
Week 4
Germination April 6.
Week 1 water only
Week 2 water only
Week 3 added recharge and* TPS1 increasing ppm to 570.
Week 4 added calmag, did LST and defoliation. Before & after pics. Increase ppm to 685
This week 4/28-5/4 consisted of plain ph 6.6-6.9 water with recharge, calmag and TPS1.
4/24 updated my ACInfinity app and started using the advanced programming settings for early vegetation. This is keeping humidity in 70% with temps in 80.
What I don't like is using advanced programming, the humidifier is at level6 . This spews moisture directly on my plants, into the drain tray and floor.
5/1 I did some LST and defoliation. Before and after pics above.
Until the plants are big enough to go outside, I will be using my AC Infinity tent and equipment. Once outside, I will be watering with well water and recharge and any additional fertilizers or amendments will be determined at that time.
Thank you @DivineSeeds
Thanks for the likes and comments, I appreciate all the plant love💚.
Have fun & love what you grow 💚
Sending love and light 💫
💫Natrona 💫
DIVINE SEEDS
***OPIUM***
Harvest:1000 g/m2
Divine Seeds developed Opium as a new champion strain, unprecedently powerful and loaded with unbelievable quantities of resin. Certainly, no average genetic base could be behind such brilliant parameters! Several Afghani Indica landraces, recognized as most potent and resinous, were bred together with a mighty Brazilian Sativa which Opium inherits its bright berry taste from. Then a great deal of work followed aiming for the highest THC level and endurability as well as a branchy structure that would provide maximal yields. Now we can proudly title Opium the best Indica you could dream of growing!
Indoors these plants mostly stay mid-height (1.5 m), reaching up to 2.0 m out of doors. Depending on your height limitations, Opium flourishes universally in grow boxes, balconies, green houses and terraces. Due to its Afghani parentage, this strain can stand hot weather if provided enough water and some shadow. Responds well to any training techniques: ScroG and SoG, LST, topping and FIM, supercropping. The start of blooming is marked with a rush of growth, when plants stretch almost 1.4x. Expect heavy colas that often require additional supports. Whilst ripening, Opium gives off a pungent earthy stench with fruity and berry undertones, also a bit of pine. Ready for outdoor harvesting in October.
The stoning psychedelic impact of Opium is like being hypnotized (unless you’ve had too much, then it feels more like a blackout). Stone-lovers will appreciate every minute with Opium: its spicy taste immerses your mind into daydreaming, while the body rests flat. Recreation with this psychedelic Indica means silent tripping from one insight to another. Mighty enough to kill chronical pains, Opium is also medically efficient against insomnia, nausea, appetite disorders, muscle spasms, headaches, irritation, fatigue, panic attacks, epilepsy. Best consumed at night time, the effects keep going for up to 4 hours.
Equipment and nutrients
Pots: 5gallon Air pots
Soil Fox Farm Happy Frog Amended with worm castings, dolomite lime and mychorihiza Recharge
Seeds provided by Divine Seeds
Divine Seeds breeding company
The link to Opium Feminized Seeds
Opium - Divine Seeds breeding company
The link to Opium Auto Seeds
Auto Opium - Divine Seeds breeding company
=================================
Equipment: AC Infinity
CLOUDLAB 844 – Advance Grow Tent 48”x48”x80”
CONTROLLER 69 PRO – Grow Tent Controller
CLOUDLINE LITE 6 - Inline Fan 6"
IONBOARD S44 – LED Grow Light Board 400W
CLOUDRAY S6 – Oscillating Circulation Clip Fan
Carbon Filter 6” 4
Likes
8
Share


@NuttyYeti
Follow
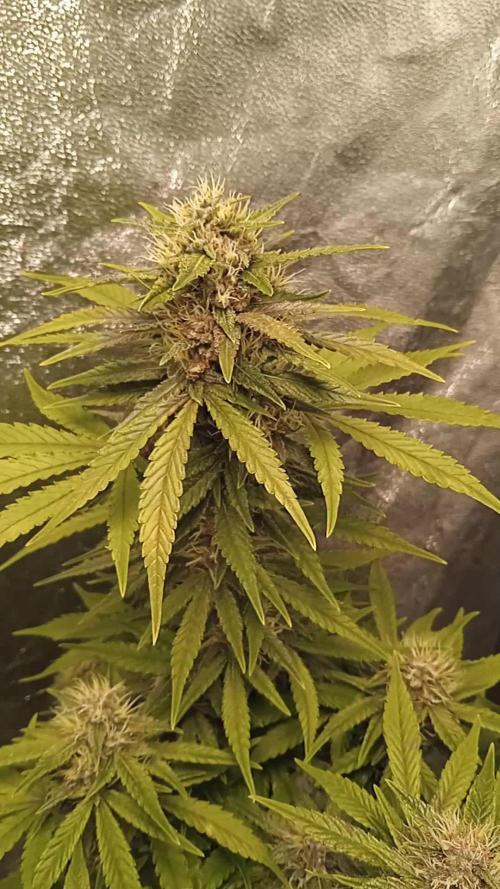
She smells great! I wish she didn't get powdery mildew at the end but I couldn't risk it spreading to my other plants. Fortunately I caught it in time and the buds look good. The biggest one weighs 36 grams.


Likes
112
Share


@Dunk_Junk
Follow
She grew another 17cm this week! 145cm tall!!!!!!!!!
She is totally out of headroom now, her top cola is through the lights and getting close to the roof of the tent 😅
Fastbuds do say it can reach 1.4M... 😁 It's accurate, she is a MONSTER of a plant.
This week I have done a quick video showing the result of my experiment a few weeks ago where I FIMed a couple of side branches. Take a look 😃
Nothing else to the report as I'm just letting her do her own thing.
For nutrients I'm using 15g of 20-20-20 powder mixed with 10L of water. Also added 4ml/L of both Cannazym and Terpinator. This brings it to around 1600ppm including ~300ppm for my clean water.
Timelapse Sequence:
Blue Dream
Auto Jack
*** Pineapple Express ***
CBD Compassion
BLue Dream
Auto Jack
*** Pineapple Express ***
CBD Compassion


Processing
Likes
10
Share

@CrackinBeans
Follow
Plants are growing at a nice pace especially dealing with the extra high PH runoff


Likes
31
Share


@bybil
Follow
Ниагара зацвел раньше Рок машин с разницей в неделю, у Ниагары структура растения не требует подвязывания, головки гонит самостоятельно вверх даже подвязывание необходимость появилась только при переселение в бокс большего размера

Likes
183
Share


@OrganicNature420
Follow
Germination date 🌱 12/07/2021
Day 57 09/09/2021
Strain 🍁 Ethos Genetics Banana Hammock R1
(Mandarin Sunset x Grapegod)
THC% • Unknown
💡 Mars Hydro FC4800
• Power draw 480W + 5%
• Max coverage 5 x 5
• LED 2070pcsSamsungLM30B1&Osram660nm
• Max Yield 2.5g / watt
• Noise level 0 DB
• Removable Driver +2m cable
• Daisy chain (multiple lights)
https://marshydroled.co.uk/products/mars-hydro-fc-4800-led-grow-light-samsunglm301b-commercial-greenhouse-medical-indoor-kit 🇬🇧
https://www.mars-hydro.com/buy-fc-4800-480w-4x4-energy-saving-full-spectrum-commercial-led-grow-light-mars-hydro-for-sale 🇺🇸
PROMO CODE • (ORG420) DISCOUNT 👍🏻 marshydroled.com
⛺ Mars Hydro 120 x 120 x 200cm
📤📥 AC infinity 6inch
💧 10lt dehumidifier
❄️ 3.1kw air con system
💉 Nutrients GreenBuzzLiquids
Organic Grow Liquid • 1-4ml until 2wk flower
Organic Bloom Liquid • 2-4ml flower stage
Organic More PK • 2-4ml +wk3 of flower
Organic Calmag • 1-2ml/lt whole grow
Fast Plants Spray • first 3days at night lights off
More Roots • 2-5ml veg +2wks flower
Fast Buds • 5ml +wk2 of veg until 1wk flower
Humic Acid Plus • 2-5ml whole grow
Growzyme • 2-5ml whole grow
Big Fruits • 2-5ml flower stage
Clean Fruits • 5ml flush 1wk
Ph powder
Root Gel
Living Organics
PROMO CODE • organicnature420 15%off ✌️🏼
https://greenbuzzliquids.com/
🥥 Growing Media • Coco Coir
Notes 📝
Undergrowth catching up nicely so nets working well. Leaves look nice dark green and HD and out if the 4 girls, looks the healthiest. Nothing to worry about so I will see you all next week 💚 thanks for all the love GD
Remember PROMO codes for both GreenBuzzLiquids and MarsHydro.com in the grow bio above 🖕🏼
Happy growing fam ❤️🌱🍁👍🏻

Likes
41
Share


@PrairieFrostGrow
Follow
******** Week 3 of flower, Week 12 growth - Oct 3 to 9/20 ***********
It has been less exciting this week with respect to new issues👍😃
Leaves are getting a little darker for my liking this week. It is one of the things I have often struggled with using AN Sensi Grow and Bloom base nutes.,,,,,,keeping the feeding at 1ml.L to maybe 1.5ml at max.....stopped using their CalMag Basie of nitrogen levels as well. Not sure where else to go and will just give her some time for now and stay the course and see what the next two weeks bring.......keep up, increase, the plain water feedings.
Little more detail........
Oct 3/20, Day 15
- 4L watering with CalMag, Rezin @ 2ml, Sensyzime @ 1.5ml
- 450ppm and 5.7pH
- they look to be stretching a bit.
Oct 4/20, Day 16
- 4L feed with Rezin, Terpinator @ 2ml, CalMag, Sensi Bloom, Big Bud, B52, Bud Candy @ 1ml
- 1025ppm and 5.8pH
- left alone for the most part.
- C472 needs some lower branching removed.
Oct 5/20, Day 17
- 3L - Vitathrive, Piranha, Microbial Mass @ 1.5ml = 110ppm and 5.9pH
- 100ppm and 5.9pH
- fair bit of runoff yesterday with 4L so backing down a bit.
Oct 7/20, Day 19
- 4L - Rezin, Terpinator @ 2ml, Rhino, Big Bud, B52 @ 1.5ml, CalMag, Sensi Bloom, Bud Candy @ 1ml
- 1025ppm and 5.9pH
- girls are really frosting up! Bud sites stacking......feeling might be a little slow though????
Oct 9/20, Day 21
- 3L- Rezin @ 2ml, CalMag, B52, Sensi Bloom @ 1ml,
- 500ppm and 5.9pH
Girls are looking good.....slow though?????
Likes
114
Share


@GMSgrows
Follow
Late in the day update. Sorry, pics aren't the best.
Girls are starting to spread out now that the daylight hours are nearing the 14 hour mark.
Hormone change is starting to happen.
The Gelato once again., what can I say. Hitting ove 8 and a half ft now. The Silver Widow is pushing up to where it always grew like a round bush. It is close to 6 ft. The Breakup Cake is going on 7 ft. Stalks are getting very large., just healthy all the way around.
Thanks to all my growmies, grow um big.

Likes
13
Share


@masterofsmeagol
Follow
7/6 Plants looked great thos morning. I WATERED A GALLON to the 50 and split one between the two tens. Top of the bags are still moist amd they still have some heft. I'm hoping this will at least carry me 48hrs. These are BIG plants and the wind goes right through those bags and dries them out. I'd rather have that though than worry about overwatering. I noticed some minor deficiencies on a couple plants so it's time to start the nutes. Calcium I'd guess. Just a beginning stage but it's time. Next feeding they'll get some food too. I'll still monitor during the day to make sure they ront dry out. It's amazing how fast they come back after they dry out but it stresses them.
EDIT: I WENT OVER AROUND 2OM AND IT WAS OVERCAST AND 83°. ALL THE PLANTS LOOKED GREAT AND ALL OF THEM WERE STILL SLIGHTLY NOIST EXCEPT THE 10TH PLANET. THEY ALL HAD SOME HEFT TO THEM TOO. THE SUN IS OUT BRIGHTER NOW BUT IT MAY RAIN TONIGHT AND CONSIDERING HOW GOOD THE PLANTS LOOKED I THINK IVE FOUND MY CORRECT WATERING RATIO. IM NOT GOIMG TO 9VET WATER IN THESE GROW BAGS WITH ALL THIS WIND. I NOTICED SOME FOUR LINED PLANT BUG MARKS ON ONE OF THE LITTLE PLANTS AND REMOVED A FEW LEAVES FROM THAT THIRSTY 10TH PLANET THAT COULD BE SEPTORIA. IM GOING TO TREAT IT BUT I HAVENT DECIDED WITH WHAT YET. I MEAN I NEED TO MAKE SURE ITS NOT JUST PESTS OR WATER SPLASHES FIRST TOO. I'VE BEEN PRETTY SANITARY THIS YEAR. IF I HAD A PLANT THAT DIDNT RESPOND TO TREATMENT AND IT WAS INDEED LEAF SEPTORIA I THINK ID RATHER SACRIFICE THE PLANT THAN RISK SPREADING IT. IM PROBABLY JUMPING THE GUN BUT I NEED TO BE READY IN CASE THAT'S THE CASE. IF NOT FOR LOCAL LAWS I WOULD THE PLANT ISOLATED. BUT IM TALKING I PULLED MAYBE FOUR LEAVES OUT OF THE LEAFIEST BUNCH AND INSPECTED EVERYTHING.
7/7 We got thunder storms last in the afternoon and last night. For at least 45 mins it rained harder than I've EVER seen it. Pure sheet rain. It turned over to heavy rain before moving out. The plan was to water everything this morning and start feeding. As I said in the video the soul was still moist amd the bags still had some heft. Not like I just watered them though. I stopped by a local dispo on my way home and talked with the best grower I personally know (thanks Junior) and his advice was the same as what I was planning. I planned on going around noon to check them. He said I could probably wait until like six and then when I do water give them like a 1 1/2 gallons to make up for that monsoon we had earlier. I showed him the video and explained how I have been watering. My intuition feels good about this. I may go check on them earlier but I don't think it's necessary. As usual I'll update as I go.
EDIT: AS SUGGESTED (WELL I SPLIT THE DIFFERENCE) I WENT OVER TO FIND ALL NY PLANTS LOOKING GORGEOUS EXCEPT THE 10TH PLANET REVEG THAT WAS A "LITTLE" SAGGY. I LIFTED THEM AND FELT THE SOIL IN THE BAGS. I DECIDED ON WATERING AS PLANNED EVEN THOUGH IT MIGHT HAVE MADE IT UNTIL NORNING. THIS WAS MY WATERING DAY ANYWAY. HOWEVER I ONLY WATERED 1 GAL PER 20 1.5 FOR 30 AND .5 FOR 10. I THINK THAT WILL WORK OUT GREAT WITH THE UPCOMING COOLER TEMPS. IT WAS SO HOT. DIDNT HAVE TIME BUT SHIT IS LOOKING GOOD.
7/8 Finally that hot streak has broken. It's in the 70s and it rained a little last night. Had to use an iPhone and send it to me because my phone was dead. My plan worked out great and everything is looking fantastic. We may get some rain tonight but I'll be watching the forecast. I DO need to feed and may do that. I might wait until next week. I also need to figure out what to do about that four lined plant bug. The birds that perch on my cage do a good job getting pests. Knock on wood I haven't seen many. I killed one pillar and there's just that four lined plant bug. That's really the only damage. I'd Hate to spray my girls with a bunch of shit over ONE bug. We shall see and I'll keep this updated.
7/9 Phone was dead this morning. Went back over later and defoliated a little bit. On reveg ive found a few spots that look like it could be septoria. Could be splash up or a million other things too. The birds have been taking care of pillars. I've found two this season which were promptly killed. Everything looked good. We are in much cooler weather now. Still high 70s with at least 90%rh. Could have showers but I need to keep up with my watering. I kept with the increase and watered everything with 2 gallons. With the exception of the 50 and the two 10's the 50 I skipped and each 10 got 1 gallon. Now it's time for a shout out. I get my seeds from North atlantic seed company. They have a sister company @dirtybirdgenetics which produces amazing strains that flourish in Maine. N.A.S.C has always used me good but this will be my first dirty bird grow next year. None of this was necessary but it's greatly appreciated. The hand written note put a huge smile on my face.
7/10 Rained last night. Phone won't charge so I used an iPhone and uploaded some pictures and a video. Plants are looking good but I've noticed "a" leaf with pillar markings. It's time to start feeding. I'm not sure if I'll start tonight or next watering. I'm not really sure. Any deficiencies are minor. I need to check my supply and see what I'm going to use. I'm suprised I haven't seen any wpm (knock on wood) with rh so high and "rolling mists". Happy 7/10 to those that indulge in oil.
7/11 Hurried morning. Watered this morning. I watered the ones that drink more with two gallons and a couple that were heavier got 1.5 gallons and the 10's got about a gallon apiece. I also fed for the first time this year. Plants are still in that transition stage and are starting to stretch. I still have nutes left on hand. I used I tsp grow big, .5 tsp cal mag and 2 tsp big bloom (per gallon) just to see how they react. I mixed two gallons and gave everything a little less than a powerade bottle I think is 1.75 pints. I can tell that some of the leaves aren't as lush green as they were. It's time to start feeding. Probably past time. Next year I'll probably go organic all the way bit this year I'm just going to be doing the same thing I have in years past. If it's not broke don't fix it. I have liquid kool bloom and some other nutes for later on in flowering. I'll be looking at nutes today but I'll probably stick with what I've been using. I also am considering plant doctor for the 10th planet that LOOKS like it may have a small case of septoria and I'm not even sure. It looks like splash back to me but we'll see. No wpm so far though. The birds are really doing great with pest control. I'll still be using BT a little bit later on.
7/12 Plants looked great this morning. I decided that if I treat its going to be with plant doctor. Most plants have hairs so I'm reluctant to use copper. I'm reluctant in general. But the plant that seems to expose a leave or two is a reveg and will be the first one thatci treat. I also went to get nutes and found my grow store turned into a "feed" store. I bought some fresh big bloom as that's all that was available. Then after purchase the cashier explained they still HAD the NUMERIOUS shelves of nutes (pretty much everything) but it took up to much room and was "spilling" the legit are wasting store space on packaged seeds opposed to the high end nutes they are known for. Whatever. I'm doing what my buddy said and to do what I do every year. If its not broke don't fix it. I'm think9ng of treating with plant doctor tomm. Or next watering.

