


Likes
10
Share


@DeepRootsGrowTrees
Follow
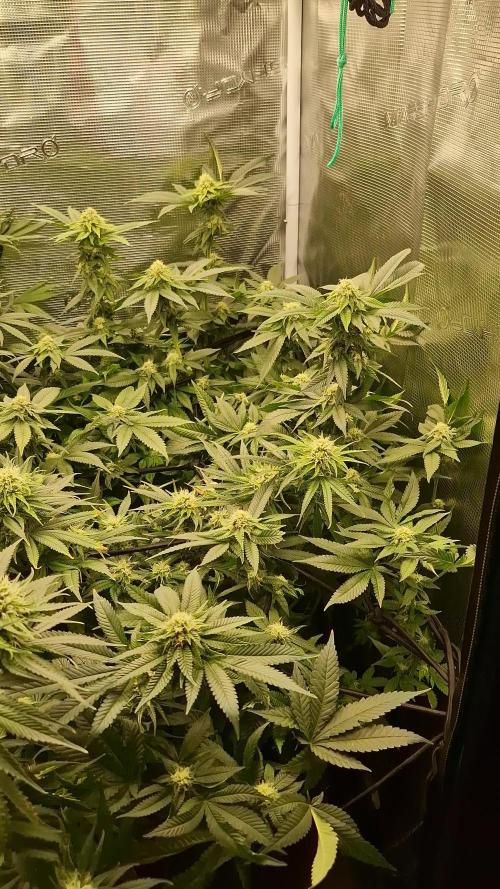
ROYAL QUEEN CBG AUTO
ROYAL QUEEN SEEDS
Week #4 overall
Week #3 Veg
This week she really took off stretched along with side growth she's doing well in the organic soil and with the FOOP nutrient line. This strain is great for cancer patients as far dealing with symptoms and not getting the high.
Stay Growing!!
ROYAL QUEEN CBG AUTO


Likes
13
Share


@valiotoro
Follow
Week 8 for the Cherry coco🍒
One Green Pheno in the garden.
Green sensation next week
I can already see the harvest👀
Have a good one Take care😎
Likes
6
Share


@Lordviper28
Follow
All the girls looking good all have bud forming on their tops this strain has been really with no problems at all. All except one has staid short and bushy the one topped stretched up and fanned out real nice

Likes
1
Share


@SidekickGrowie
Follow
Das Outdoor Projekt hat gestartet!
Ich habe das erste mal probiert Stecklinge zu ziehen und es hat wunderbar geklappt.
- 5 / 4 gewurzelt
- mit Clonex angezogen
- 10 Tage bis zur ersten Wurzel
- Am 22 Tag verschickt
- 4 Stecklinge auf 2 Personen aufgeteilt
- Anzucht im Zelt
- Nach den Eisheiligen geht es nach draußen
Das ganze wird ein Outdoor Projekt was ich parallel mit meinen Buddie zusammen durchführen werde.

Likes
8
Share

@timbarin
Follow
31/aug
Week 4 of flowering is done. She stoped growing and now focus is on bud growth and density. I defloatied her to allow light to come in hand also took off the lower tiny flowers. Food is normal minus 2l of water since I've seen minor burns on some leafs.

Likes
6
Share


@Kirsten
Follow
Orion F1 Organic dry amendments grow:
This week the plant has started to show some progress.
I will top the plant soon. Now that everything is growing steadily.
8.5.25:
The plant was watered with 1ltr of dechlorinated water PH'd to 6. This may be the last watering before she's done. I added per litre;
♡ 1ml Trace
♡ 1/4 TSP Ecothrive Biosys
PPM: 636
PH: 6.1
Thanks for stopping by and hanging out 💚 ✌️ 🍃 😊 🌱
Likes
3
Share


@XxBILLZAxX
Follow
The purchase of a new light finally! starting to fill the tent so will need to possibly defoliate soon. Leaves are a much nicer colour.
At the end of the first video shows the start of the leaf claw. Didn't notice it for about a week after this. :(
Likes
3
Share


@LandFarm420
Follow
Questa settimana la pianta a iniziato a tirar fuori i nuovi rami, e abbiamo iniziato con i fertilizzanti 1 ml per parte grow bloom micro della adv nutrients

Likes
25
Share


@Sators
Follow
Add slightly nutrients. Day Nr 16 doing topping. Nutrient tank with capacity 10L turning little bit in alkaline, at the beginning I added 3ml ph down and reach 6.4 pH, than now it’s inccrise to 6.6 on 5 days time. Same I can telling about TDS. At the beginning it was 350 ppm, but now it’s step up on 400ppm without adding nothing. Day 18 start moving out new branches from places around where was topping. Keep watering with 1.5L with slight nutrients dosage… Day 20 we can see how flower keep moving ahead after topping days ago…
Likes
10
Share


@Bread_n_Buds
Follow
We are almost at the moment of working our magic, we are about to go into flowering and the vegetative phase is coming to an end, our Zamensia Slurricane is a very beautiful plant with low internodal distance that looks like a small Japanese tree.
We are about to do the last topping that will bring it to 16 tops, 16 small clones of the main cola that will come up I hope at the same time and all together and above all I hope that the cold will give us a great resin and a beautiful coloration.
During the topping the use of nitrogen is a very delicate subject. The topping cuts slow down the plant and the leaves tend to grow bigger going a bit into over, it happened to her then you detach and it tends to discharge now we are at the moment that we are starting to give nitrogen again to then go into flowering. It is a process that must be nuanced very delicately. Ideally it is to start by preparing the soil with fertilizer and add if necessary. I over-fertilized the plants a bit but it's something I've always managed very well once I got to flowering. Next time we'll add something to the soil with fertilizers with this technique it's very suitable.
Wait for the uncle BreadandBuds....
We are always using soil, feeding and all the recommended additives from Plagron 100% organic, we have only lowered the amount of grow in this topping phase for the reasons mentioned above.
---- Decide on the right soil and calculate your fertilizer sheet based on the soil on the official website.
-- www.plagron.com
Try a seed of this strain that drives us crazy...It's a super News!
---- https://www.zamnesia.io/it/11177-zamnesia-seeds-slurricane.html
Zamnesia Description // Do you want to add a prestigious genetics to your grow room? Slurricane is a premium US strain created by In House Genetics and now available to growers thanks to the breeding processes implemented by Zamnesia. Born from the fusion of Purple Punch and Do-Si-Dos, Slurricane is 60% indica and incredibly vigorous. Whether grown indoors, outdoors or in a greenhouse, this strain can produce large quantities of dense and aromatic buds. Add Slurricane to your assortment and enjoy growing one of the most beloved hybrids in the United States.
All the best that mother nature can offer is on ---- www.zamnesia.com
Likes
55
Share


@Hempface86
Follow
Day 43 week 8 has started and as you can see I am still training as she is stretching into flower.. I'm harvesting the smoothie today and that will make much more room for her to spread out.. so far she's been growing great and I look forward to the end result.. I hope and pray everybody is having a great day and so are their plants.. good luck to everybody in the contest into everybody else happy growing ✌️😎

Likes
106
Share


@Fibro_Witch
Follow
Solid 10 inches of growth this week. Ladies were top dressed with more soil on Thursday night. Also game them a cal-mag boost with some Earth Pods back on Monday. The larger ladies are staying out in the garden, but the more finicky Critical Mass and Charlotte's Angel's are in the small greenhouse.


Likes
11
Share


@bastiBLond
Follow
I sorry for not uploading photos, I've been very busy and without having time to appreciate my girls, I'll upload pictures soon before finishing this week.
change the topbloom for bloombastic starting with 1ml

Likes
62
Share


@masterofsmeagol
Follow
8/9 It didn't rain last night and there is no rain in the forecast so I lightly watered. I actually had a copper fungicide in my hand yesterday but decided against buying it after research saying it burn cannabis. I didn't research enough and I may end up going that route. I may also move the problem plant. We shall see. Instead I treated all plants early this morning with the amazing Dr. Zymes. I'll follow up with another form of treatment and see what happens. All around I can see foliage with septoria. Not around my grow but still. It's in the area. Burdocks, maple trees and other small foliage on the ground. I hate having to make decisions like this. Otherwise plants seem to be doing great. Definitely transitioning to flower. Found moth eggs and damage on inner leaves in the pm.
8/10 No water today as the plants were soaked. It rained last night. 68 at 9am. This morning I defoliated and really got on the inside of my plants. I wanted to see if I could find what was damaging leaves. I found an earwig on a plant. That makes me fairly certain they are responsible for the sporadic damage I'm finding. Lower branches have some small leaves dying and in a couple spots it looks like the ate off a bud site. It was were I would've lollipoped but still. I think another application of Spinosid may be needed. Plants are definitely in flower with the dreamcatcher's leading the bunch with small little buds formed. Flowering seems much later than the strains I grew last year. I need to go in the cage at night with some kind of light to see what's going on then. pH meter wouldn't read.
8/11 It had rained earlier but it's been so hot that the plants needed water. I watered but not thoroughly as pots weren't completely dried out. I didn't see any earwigs. I was prepared this time with a spray bottle with dawn. That is supposably supposed to kill them on contact. Unfortunately I haven't had the opportunity to test it. I did find a jpn beetle this morning. I believe they may be responsibly for some of the damage I've noticed. I had a very early appointment this morning so I didn't get a chance to take any pictures or a chance to feed. Plants are definitely flowering. The seedling (I say seedling only because the others are clones) in the 50 gallon pot hasn't been watered as much and I'm not sure if I have been watering enough. I figured the rain would help but I noticed that the soil is very compressed and appeared dry before watering. I also had no idea how much the nutrients effect the pH of the water after added. I have the drops I use to measure pH but that's basically impossibly with big bloom murking the water all up. Also I don't think the plant I was going to cull has leaf septoria. I think it's just been ravaged by pests and has white powder mildew. I will continue to monitor. Temps are supposed to be very high the next few days.
8/12 Fed two gallons to the garden today. Used tiger bloom as I think it plays better. I'll use the Kool bloom though. I do need to say my plants were much further along by now last year. Different strains though. Added a pinch of pH up but it appears the pH is fine after mixing my nutes. Rained AGAIN last night. All this rain brings the earwigs out to climb plants. I included a picture of the damage. I need to do another app of Spinosid it appears. Then alternate with a spray treating the wpm that I see. It's a bad year for mildew. UPDATE 90 degrees out at 2pm. Defoliated the dead spots inside and looked to see what kind and how much damage from ear wigs. It's all minor but still. A few lower branches (bottom that probably should've been clipped) have shoots that are damaged. At spots it appears the earwigs lollipopped the stem. Nothing up high or middle though. Buds are developing and they (luckily) haven't gotten there. I've tried a few things already but today I put petroleum jelly on all my stocks and supports so hopefully those little bastards can't get up to the plant. If the rain laid off it would probably be better. Not a single aphid though and no signs of typical cannabis pests so I guess it's a little give and take. Made a video but will have to upload later.
8/13 Didn't water this morning. A storm came through at 6pm last night. Torrential rain and high winds but no damage. Found more moth eggs and two spots where leaves were rolled up with webbing and inch worms emerged when opened. Other growers suggested the damage could be from inch worms so I think before I do much else I'll apply BT tonight.today is going to be even hotter than yesterday. 85 at 9:30. Will update as I progressed. Added a video.
8/14 Watered this morning as it's been dreadfully hot. In the 90s with super high humidity. Found another leaf with moth eggs and a inch worm crawling on a bud. I did a treatment of BT this morning that I hope will take care of things. Plants look amazing. Walking down to the cage I get hit in the face with a pungent skunky smell. Plants are huge and seem to be flowering more everyday. Strange the amount of difference I notice in just a days time.
8/15 No water today as it rained yesterday off and on and soil was damp. Plants are flowering nice with dreamcatcher in the lead and ice cream cake bringing up the rear. Everyday the little buds seem a little bigger. I will probably need to do another application of BT since it rained yesterday. Still finding some lower branches stripped of new growth shoots where a bud site should be. I don't know if inch worms are capable of this or whether it's earwigs. I WILL find out though. I'll go out LATE tonight and look with a flashlight and spray bottle. Smell is incredible. As long as we have a nice September and a warm fall this is going to be a good year. It got down to like 50 last night but it was 90 yesterday. These plants are resilient to take temp changes like that without it phasing them.


Likes
11
Share


@CanadianFillmore
Follow
Start of week 3 of flowering. This GG#4 girl is hungry! She's needing more feeding each week, now up to 6 liters per feeding. Bud sites are developing nicely, added B52 to the feed this week too. She's yellowed more than her sisters over the course of the week, hopefully the extra feed will stop that from spreading further.
Likes
20
Share


@420DeepGrow
Follow
📆 Semana 7
Blue Zushi sigue avanzando con mucha presencia y estilo propio.
Esta semana los cogollos han ganado aún más volumen, y la compactación empieza a ser realmente destacable. Las flores están cada vez más recubiertas de resina, dando un aspecto brillante y pegajoso que promete una buena producción final. El tono azul se intensifica, especialmente en las puntas más cercanas a la fuente de luz, lo que le da ese toque exótico tan especial.
En cuanto a la nutrición, continúo con la base de XpertNutrients y el aporte de Sticky Fingers, que está haciendo maravillas con la producción de tricomas. El aroma sigue evolucionando: más penetrante, más complejo… con matices cítricos y un fondo terroso que se mezcla con esa dulzura fresca tan típica.
Los Adlite mantienen su rendimiento uniforme. La penetración de luz está siendo excelente y hasta las zonas bajas están desarrollando cogollos bien formados y densos.
Las condiciones climáticas siguen dentro del rango ideal: temperaturas estables entre 22 y 25 °C, y humedad en torno al 50-55%, siempre bajo vigilancia para evitar cualquier contratiempo.
Los olores en el cuarto de cultivo ya son más intensos y empiezan a llenar el ambiente. La combinación de frutas ácidas y notas kush es cada vez más evidente. Los tricomas siguen mayormente lechosos, con algunos empezando a mostrar tonos ámbar, pero aún no es momento de cosechar.
Una planta vistosa y con mucha clase.
¡Seguimos creciendo fuerte! 💪

Likes
27
Share


@adam_pawloski87
Follow
Let’s Go day 85 from Seed!! These ladies have all got the chop !! We will be hanging to dry over the next 2 weeks or 12-14 days an we will be ready for trim an jar up for cure! What a very satisfied grow this was @fastbuds_genetics very happy with the strains an would definitely run em again! Hope you all enjoy stay tuned for next week! Start trim up an get some weights!


