
Likes
Comments
Share


@51sGarden
Follow
Posting this as I’m on the last few days of the 3rd week from germination
Great progress, a lot of roots for such a short period but not too much plant growth, will start watering daily instead of watering every 2-3 days
Topped the girls today (Day 18 from germ) and starting to do mainline on all the Bubba kush.

Likes
4
Share


@pzwags420
Follow
week 3 flower is going great. I increased my UVA lights to 8 hrs on. Gsc and Blueberry have decent bud-lets already on day 17. OG kush has preflowers. waiting on Blueberry muffin to show pre fowers should be soon. At the end of week 3 GSC and Blueberry are doing the best and starting to get more trichomes. Im waiting on OG kush And Blueberry Muffin to really get going!


Likes
93
Share


@Natrona
Follow
FBA2502 Plants 1-6
Week 7 May 11– 17
FLOWER 3
Nutrients :
Micro 25 ml
Gro 10 ml
Bloom 30ml
CalMag 30 ml
Recharge 10ml
Green sensation 16.5ml
Power buds 7.5 ml
5/11 PH 6.56, PPM 1560, temp 69
2ltr each
5/12 PH 6.31, PPM 1120, temp 68
1 ltr each
5/14 PH 6.66, PPM 1280, temp 70 1 ltr each
5/15 PH 6.66, PPM 850, temp 72 1 ltr each
5/11 Defoliation, feed, pics & videos
I made 4 gallons, used 3 to water then poured the runoff back into the rest in the bucket. The next feeding, I added a gallon of tap water to residual and ph to 6,31 temp 69 & PPm 1120. Did the same on 5/14 and 15 using up the remainder of the feed solution.
I must monitor and control the tent environment manually. For the past month, the humidifier has been an issue putting out way too much humidity; often leaving water in the bottom of the tent. In addition, the temperatures are also out of control. I added an AC last week to keep the temperature below 80. I finally determined the exhaust vent is also broken and has been for some time.
I have been giving good reviews on the AC infinity system. However, during the time I’ve owned this tent (2 yrs), I had to replace the lights twice, fans, humidifier and now the vent twice also. Everything but the tent containment has been replaced. AC infinity does stand by their products, but they are in California, and it takes at least 2 weeks to receive the replacement. This is extremely frustrating at the critical transition to flower for my equipment to fail again. For the time being until a replacement arrives, I pulled the 4” exhaust vent from my 3x3 and hooked it up. I have the AC pushing air in and the exhaust pulling air out. This should create a neutral pressure tent environment-neither positive nor negative. I do have 3 circulating fans in the tent to move air around the plants.
It looks like growth spurts have slowed and plant height has been reached. Now is the time for buds to fatten and frost up. All of them (6) are short remaining less than 3 ft. They range from 15 to 31 inches. The tallest #4 &5 and #6 have very light leaves and appear nutrient deficient compared to the shorter phenotypes. Pictures taken later in the week show fading on a few the older leaves. All are receiving the same solution and are in the same soil blend. Moving the gals in and out of the tent for their glamor shots, I bent one limb and snapped another. The bent one I taped with a splint and the snapped one I medicated manuka honey and wired it back to the main stalk.
Leaves look like sativa leaning. I hope FBA2502-2 is a good daytime. I’m getting excited to see what develops in the next month or so. News Break: I’ve been informed that 2502 is FastBuds New Frostbanger and is indica for nighttime. I’m disappointed that I didn’t get a sativa to test because I really need a daytime strain. The 2 Blue Cheese plants I just grew are also nighttime.
Upon opening the tent, a faint odor was detected, and some stickiness was observed during the process of defoliation. Pictures of the puffy buds even show differences. #4 &5 buds hairs are different from the others being crinklier and the others are straighter. Some like #2 &5 are showing frost on the leaves. Wow at the beginning of flower to have that much frost. They are living up to the new strain’s name.
I’ve noticed that when I water, sometimes water shoots out of the side holes I the air pots. I will pack the soil firmly into the sides for future runs.
Measurements:
#1 15”
#2 20”
#3 17”
#4 30”
#5 31”
#6 24”
Your likes and comments are appreciated. Thanks for stopping by.
Growers love 💚🌿
💫Natrona💫
Likes
78
Share


@Hou_Stone
Follow
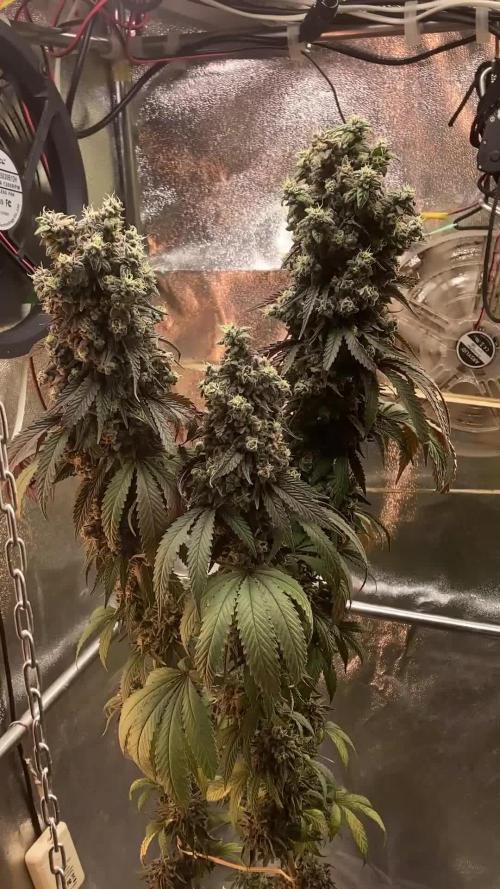
2 Gran Jefa au 53ème jour de floraison. 45G de bourgeons sec et effeuillés
J'ai commis des erreurs durant cette culture et je n'avais malheureusement pas la possibilité de m'en occuper comme je le voulais.
Je vous suggère de ne pas reproduire mon dosage pour les nutriments(+serait mieux) et ma fréquences d'arrosage(moins d'eau et + souvent serait mieux).
Je compte modifier certaines choses pour ma prochaines culture en espérant améliorer le rendement 👌
Merci pour votre visite les amis 💪

Likes
12
Share


@GREENPHOENIX6262
Follow
Starting week 2 Veg - See below for specs
Nutrient feeds remain the system
Height - 2 inches (Not much progress in height) Width has definitely grown out
Water feeds continue to be everyday - Have a gallon+Nutes
Light Intensity - 100%
*Mid-week review - 8/18*
Introduced Cal-Mag (4 ml/Gal)
Plants grown approximately .5 inches in height - 2.5 -3.0 inches in width
Light Intensity 100%
*End of week recap* (08/20)
Both have grown about 1 - 1.5 inches in height and 2 - 2.5 inches in width.
Fan leafs deep lushes green
Bud sites topped
Thus far all is running smoothly.

Likes
6
Share


@IQuSX
Follow
Первое, что можно подметить - растение полностью восстановилось.
>>
Начато полноценное кормление на 2 неделю вегетации!
>>
Отсчитываем недели…хочется увидеть эту ZZ во всей красе

Likes
9
Share


@M3_Growing
Follow
High hopes for next week, just bought Biobizz Trypack Indoor and BioBizz ActiVera.


Likes
30
Share


@dataTwiiix
Follow
04/10: je compte encore lui fonner 2/3 semaines. Histoire de la topping encore 4 ou 8 fois on verra le kours venu.
Likes
2
Share


@Cefek
Follow
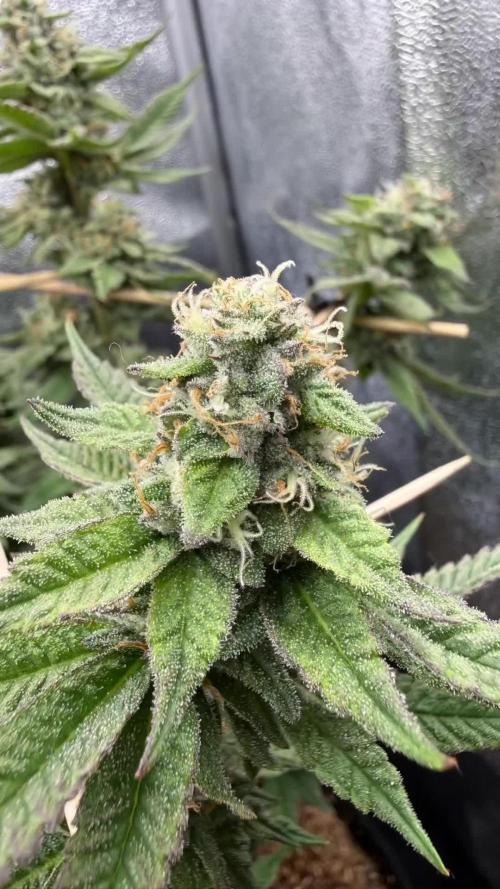
31.3 The plant has entered the flowering stage, with the first pistils starting to show. I think both plants are going to be the purple phenotype. You can already see the first hints of purple on the early-stage buds—or at least they seem to have a purple tint. We’ll know for sure in the coming days.
2.4 They’re definitely going to be fully purple. Even at this early stage, they’re already starting to show deep purple hues. I’m really excited to see how they develop.
Likes
9
Share

@deFharo
Follow
Bienvenidos cultivadores de marihuana! 🖐️ 👨🌾
He comenzado a fumar esta planta y es muy, muy fuerte! Los cogollos están completamente escarchados y sueltan polen por doquier. Los aromas son cítricos con toques de pimienta de Jamaica y tierra de bosque.
=========================================- 21 semanas desde que puse la semilla a germinar! 🌱
- 19 semanas desde el trasplante a la maceta final.
- 17 semanas desde el corte apical
- 13 semanas desde el cambio a horario de floración a 12/12H.
- 12 semanas desde que comenzó la floración...
3M 🍨 Green Gelato
RIP
*08/09/25
†29/01/26
"Tus padres orgullosos: Sunset Sherbet x Thin Mint Girl Scout Cookies"
==========================
Hoy, después de las 12 horas en la carpa de cultivo, saqué la planta al frío del exterior durante unas horas, después, al medio día la saqueé sin contemplaciones.
Esta temporada casi todos los cultivos han mostrado crecimiento en modo foxtail. La gran diferencia con otros años ha sido el aumento a 13 horas de luz en las últimas semanas. Probablemente ahí esté el error. Lo pienso ahora, claro, cuando ya es tarde, como hacen los humanos. Lo lógico habría sido justo lo contrario: empezar la floración con 13 horas y terminarla con 12, acompañando de forma más natural el ciclo vital de la planta.
No tengo nada en contra de las colas de zorro, pero verlas repetidas en cultivos tan distintos me dejó claro algo importante: las plantas, incluso a esta edad, todavía tenían ganas de seguir creando flores. Eso es bueno. Retrasa la senescencia, mantiene la energía… aunque también retrasa la maduración de los cogollos. Todo tiene su precio. Incluso la vitalidad.
La próxima temporada volveré a probar. Ajustaré mejor el fotoperiodo. Bajaré un poco la intensidad lumínica en las últimas semanas. Porque aquí nadie lo sabe todo, y el jardín siempre acaba enseñándome algo, normalmente cuando ya no puedes cambiarlo.
😁 HASTA LA PRÓXIMA. SALUD Y SALUDOS PARA TODOS!
==============================
GREEN GELATO (Royal Queen Seeds) "Las semillas de marihuana Green Gelato, ganadoras de la Soft Secrets Cup, fueron creadas en honor al mismísimo Larry Bird."
- Genética: Sunset Sherbet x Thin Mint Girl Scout Cookies
- Sativa 45% Indica 55%
- Tiempo de Floración: 8.10 Semanas
- 500 - 700 G/M2
- THC: 27%
https://www.royalqueenseeds.es/semillas-feminizadas-de-marihuana/416-green-gelato.html
==============================
Likes
2
Share

@hassehujasse
Follow
Estoy disfrutando de lo que hago. Usted?
No Os perdeis que sandra de esta mujercita !!!
Transformation de la chica a la mujer. Disfruta lo conmigo
Strong begining of the week, looking forward to give her all my love
Likes
16
Share


@BluHaze007
Follow
I still believe that Banana Kush #2 and Zkittlez are stunted, I wanted to remove those two but i think i will just let them grow out for the experience. I'm really banking on Banana Kush #1 to bring home the bacon.
Likes
121
Share


@Tropicannibis_Todd
Follow
💩Holy Crap Growmies We Are Back💩
Well after another short break we are back at it 😁
So what do you say we have some fun 👈 We got some FASTBUDS TESTERS FBT2307 😛
Well growmies we are at 7 days in and everything is going great 👌
Lights being readjusted and chart updated .........👍rain water to be used entire growth👈
👉I used NutriNPK for nutrients for my grows and welcome anyone to give them a try .👈
👉 www.nutrinpk.com 👈
NutriNPK Cal MAG 14-0-14
NutriNPK Grow 28-14-14
NutriNPK Bloom 8-20-30
NutriNPK Bloom Booster 0-52-34
I GOT MULTIPLE DIARIES ON THE GO 😱 please check them out 😎
👉THANKS FOR TAKING THE TIME TO GO OVER MY DIARIES 👈
Likes
4
Share


@Growtendo64
Follow
Week 5 – Balanced Bloom & Nutrient Adjustment (16 Oct – 23 Oct)
Budshot Betty keeps pushing forward in mid-bloom. The canopy is full and even, and the buds are starting to bulk up nicely.
I kept the light at 100W / 32cm, which gives her great intensity without any stress signs.
At the start of the week she received plain water (2.7 L) to reset the medium a bit and let the roots breathe. After that, I returned to her regular feeding but slightly modified the mix because I noticed a few small rust spots on some leaves. Since I can’t check pH directly, I decided to lower the nutrient strength by about 25% from the manufacturer’s chart.
Current feed (2.7 L water):
• Iguana Juice Bloom – 3 ml/L
• Ancient Earth OG Organics – 2 ml/L
• Big Bud OG Organics – 1.5 ml/L
• CalMag (BioBizz) – 1 ml/L
She looks healthy and vibrant again — the rust hasn’t spread, and the leaves stay strong and green. The buds are swelling, pistils multiplying, and the smell is getting more intense every day.
Overall, a calm and balanced week focused on stability and prevention rather than pushing too hard.


Likes
Comments
Share

@Grow4ever
Follow
Die PH Probleme machten sich bei allen Pflanzen deutlich bemerkbar. Trotzdem war Sie wirklich vom Geruch ein wahrer Traum. Süßliche, fruchtige Note mit einem gassigen Aromer.


Likes
4
Share

@Samsationalseeds
Follow
The auto rotation is picking up ! Less then half are small . 8 out of ten fem. Glad I feminized all my seeds.
The second video is a recent one of the seedlings i just started for outdoor grows. (Autos)
Processing
Likes
66
Share


@DrGreenThumb95
Follow
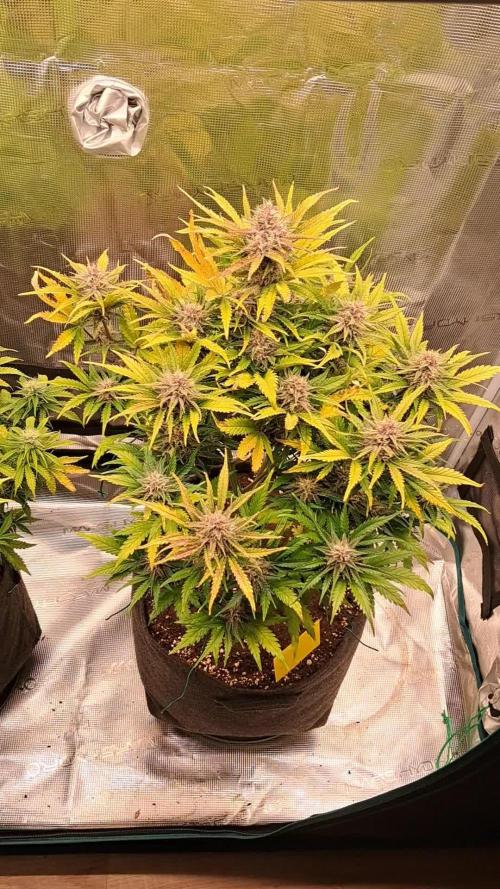
This week I have fed my girls for the last time (feed-water-water-feed) and I think they are ready to go into a flush, I know one of them really needs it but I shall not name and shame 😂 but overall been a pretty boring ass week, although last week I said I didnt care about the deficiencies something is getting worse and I want to know why to stop it getting g worse a d prevent this happening again I shall ask the question down below, thanks for dropping In and giving this a read,
Happy Growing!👊👍

Likes
13
Share


@Skinnytalls420
Follow
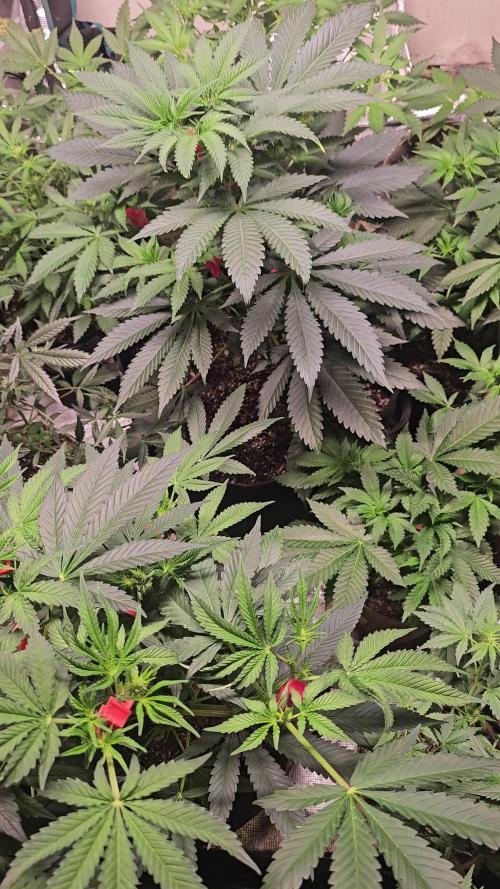
Day 29-06/05/22 all looking good looks like most of them are starting to flower!!!!
Day 31-08/05/22 all except one have started to flower!!! So exciting they look very well healthy a bit of dropping in pics and video as only just watered them!!!
Likes
7
Share


@Kushma666
Follow
Day 1 beginning of wk 3 flower fed the girls up this morning 4.5 ltr phostrogen to all but bubblegum #1 she gets fed 10ltrs of bud burst they are starting to smell so good 3 strains iv never grown before or even smoked lol exciting stuff 5-6 more weeks to go
