
Likes
Comments
Share


@Madman2020
Follow
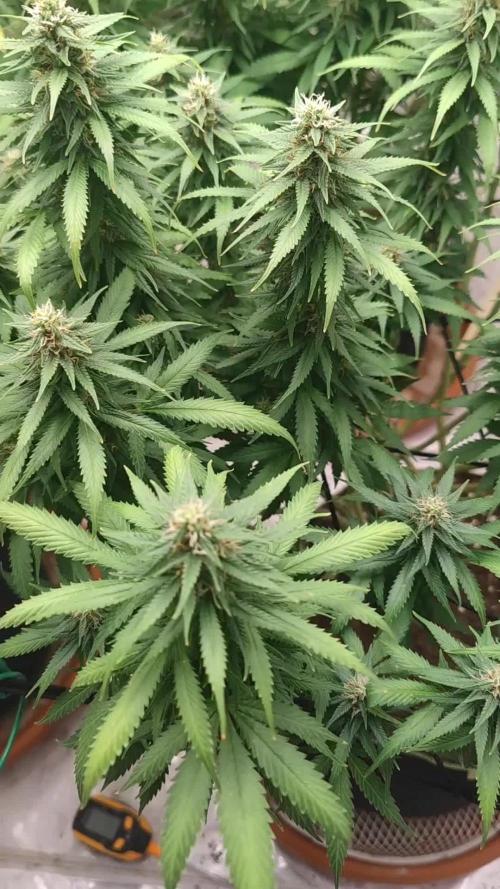
Week5 Vegetative steering
Day 29
————-
4 minute shots(220+-ml).
50-60klux
68 leaf temp
Defoliated/Lollipopped
Plants seem to be inefficiently spaced. I moved them all closer and they are now positioned better under the lights
————
Day 30
VPDis about a .95
Vegetative steering schedule for 3gal who drink a little over a quart a day
220 P1
440 P1
660 P1
880 P1
1000 P1
1220 P2
1330(1%)P3
I achieve runoff at end of P1 then do a maintenance shot and finish the day off with a watering.
P1 waters every 15 min starting 1.5hours after lights on
Plants are swelling. But not as well as when i use CO2. I think plants in flower still need co2 so that we can get these lights closer.(as long as the leaf(temp does not go over 80 and vpd stays good)
Also, i found a plant to have hermied in week 2 so i removed the pollen sac and rubbed some pollen on 2 plants. Seems like they are just starting to take form on the flowers.
**need to check for hermies beginning week 2** Am happy to get seeds from these ladies as this was very isolated in the grow
________________
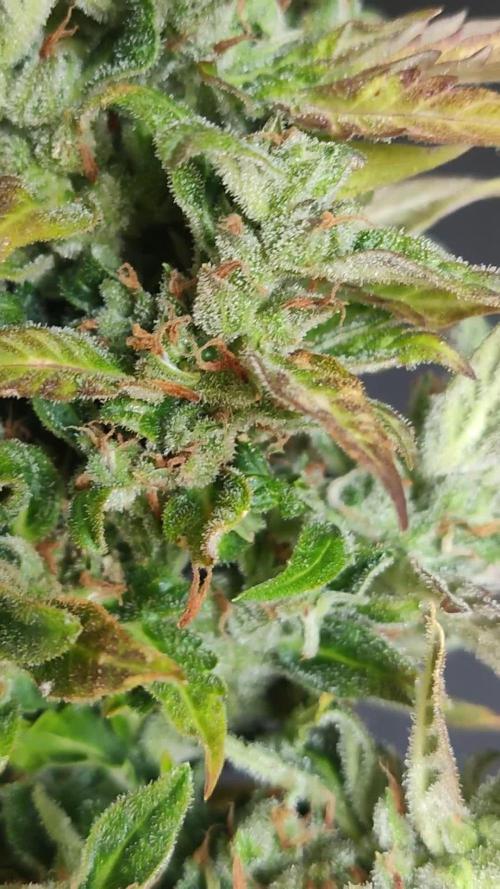
Day 31
Plants are starting to frost.
Group1 has swelled the most
Group 2 has average growth and nice frost
Group 3 looks like it was over dosed.
*Bras&MJ study shows that MJ does mot need to be sprayed with Bras as it will over stress the plants.
Brass was completely fine to spray without having adverse reactions.
MJ seems to decrease yields but is a worthy tradeoff(will continue to use)-*
—————
Day 32
Sprayed 2 plants with MJ(they now have been sprayed both week 4&6)
Sprayed 3 with bras(also have been sprayed twice in flower)
Finally frosting On the plants


Likes
15
Share


@DeadHeadChef420
Follow
Awesome harvest and very happy with the outcome. Starting another journal next week. Will be even more detailed and I won't miss any weeks. I uploaded some video of my drying room.

Likes
6
Share


@Ninjabuds
Follow
My Runtz plant has some dark green leaves, and they're the most interesting of all the plants in the tent. They're really pointy and almost look like they have some old European genetics.
It's been a challenging week with the constant rain and ridiculously high humidity. Keeping things dry indoors has been a real struggle. Despite the weather, I managed to flip all my feminized photoperiod plants to flower this week. I'm hoping the switch will go smoothly, but with this humidity, it's going to be tough.

Likes
3
Share

@Chrisandweed
Follow
Buueno, pues seeguimos. Estoy viendo en esta y la Oreoz, algo de sobrefertilización, pero quizas muuy leve y mas posiblemente provocado a raiz de algun ligero bloqueo por el calor, que ya no consigo bajarle de los 30° el armario, pero bueno, en general no muestran sintomas de estres fuerte por calor asique guay.
Las critical si están sobrefertilizadas 😅.
En el proximo riego, a todas les haré el riego solo de agua con una dosis media del producto Flush, de la marca que sigo usando. En el siguiente algo de comida y ya en el siguiente enzym y de nuevo a los riegos normales, no por na, siento que aún quedará un mes minimo para empezar con los cortes.
PD: IMPORTANTE, voy a poner datos que no solía poner por la "dificultad" entre muchas comillas ya que es dificultad por una situación especifica, de sacar y es que como antes comentaba, habían bloqueos y tal... Bien, he medido el agua de drenaje de cada planta. En esta los valores de ph estan mas o menos bien, un poco bajos, pero aceptables, peeero la EC era lejia viva! En esta planta el ph era de 6.07 y la EC era de 11.24 MILISIMENS! que no microsimens... Una toxicidad altísima! Muy similar a las otras 4. Básicamente mis riegos eran por lo general 2 a la semana, uno de fertilizantes base con el especifico de cada fase que toque, y el segundo riego era de encimas con normalmente calmag (fertilizante muuuy salino) y a eso le juntamos que normalmente los riegos eran justitos, normalmente no había drenaje, por lo que las sales en el sustrato se iban acumulando hasta estos puntos. Hoy, tras varios dias de dejar secar las macetas, incluso buscando un poco de estres hidrico, he metido un riego de 6L por maceta de agua con el producto Flush para hacer un arrastre y limpieza de sales, en esta ocasion los 6L han sido la medida perfecta para que drenase agua suficiente como para que estos niveles de ec bajen, y ademas en el plato pudiera medirlos y darme el resultado que he puesto anteriormente.
Todo comenzó porque en la Kritical GB sentí un bloqueo de pk y la planta empezó a comerse sus hojas para conseguir magnesio, si llego a verlo como una carencia de magnesio o calcio la hubiera cagado atrozmente!

Likes
6
Share


@ItsAllAuto
Follow
She was great off the start ! Nothing bad to say except I only got 1 seed of this strain :( I wish I had more loll

Likes
5
Share


@GrowLegend
Follow
Bien aquí esta el día esperado la cosecha, es mi primer cultivo y considero que lo logre. En muchos medios de lectura y en especial en vídeos mencionan que no puedes esperar mucho es tu primer cultivo. En mi caso es falso y lo demuestro ya que si aprendes, investigas por cuenta y lees lo suficiente, obtendrás un alto porcentaje de que los resultados se den. Muy contento con mi plantas y sus tonos morados. Puntos a mejorar tener una carpa de cultivo y por su puesto un extractor de humedad para que baje la humedad preferiblemente a 45 grados
Vendrán mejores contenidos y cosechas mas abundantes. Gracias a todos por su vistas y comentarios. Saludos y bendiciones!

Likes
62
Share


@JuanHaze_Arg
Follow
La amnesia tiene una flora extraña pero linda. Muchos cogollitos por todos lados. Largas colas. Por suerte se está recuperando de la quemadura de las luces.
27/04 Se riega con 2.5 litros de agua + calmag + top auto. PH:5.5 EC:0.9
30/04 se riega con 2,5 L de agua + biopotenciador, 1g x L. PH:6.0 EC 1.0

Processing
Likes
27
Share


@Fullmeltalchemist
Follow
9.30 - I build a little fermenting CO2 generator this week, mostly for shits since I'm not going to seal the tent up. Otherwise things are going as expected. Noticed a really big change in bud structure and how they are densing up. Really enjoying the show and the change in colors and pistil behavior. Got her propped up to increase circulation and get a better idea of when she needs water.
10.1 - Just documenting the bud evolution for fun :)
10.4 - Whatchu guys think of my rescue marijuana plant!? Not bad, huh?!
10.6 - Plant grew some new whites and oranges and buds are bigger
10.7 - changing every day. What a wonderful thing
Likes
9
Share


@JoeyGonz
Follow
Peyote slowed down a bit, Broke a couple mains like a tool while doing some Lst bending. But she is moving along again. White widow is kicking ass and just going nicely. Great flower development all over her.. Blacksugar small but still moving slow with that tight pinch in the lower trunk. But the ladies are healthy and happy so I’m happy. Gonna start germinating orange creamsicle soon to follow these up.

Likes
28
Share


@MrGrowthSpurt
Follow
This strain was easy to grow, she started flowering on the 5th week and reached maturity on the 13th week (8th week of flowering). I had 2 of these plants growing at the same time. White LSD#2 took on a reddish/burgundy tone which made it look completely different from#1 All in all it was really a easy grow.
Likes
9
Share


@Oxytiger1995s
Follow
สัปดาห์นี้พวกเธอเติบต่ออย่างต่อเนื่องและแข็งแรง แต่อาจช้าไปหน่อยสำหรับต้น3สัปดาห์ แค่นี้ฉันก็ดีใจแล้ว
Likes
9
Share

@SkunkyDog420
Follow
Hallo zusammen 🤙.
Habe sie heute geerntet. Wir hören uns in 3 Wochen mit dem Erntebericht.
Wer einen Rabatt von 20 % haben möchte muss den Code: ZAMMIGROW2024 eingeben.
Processing
Likes
12
Share


@Hawkbo
Follow
Pics taken on Monday, video was taken on Tuesday. Doing good chuggin along

Likes
12
Share


@Staffedition
Follow
Привет друзья. Моей растихе сегодня 80 дней.
Растение хорошими темпами приходит в себя.
Через неделю буду переводить на цвет.
Начал применять LST технику на 19 дне и продалжаю применять её через день, а 18 августа добавил ДЕФОЛИЗАЦИЮ
С 20.08 ДЕФОЛИЗАЦИЮ делаю каждые 3,4 дня
С 20.08 LST технику делаю каждые 4.6 дней
На сегодняшний день влажность 54%
5.09.2023 заметил высокий Ph 7.9
С 48 дня Ph не ниже 5.8
На сегодняшний день Ph 6.0
Начал кормить с 60 дня Canna Terra Vega
PPM 550
Погладитель влажности хорошо справляется со своей задачей. Рекомендую
Всем мира и добра!
Не забудь поставить лайк❤️, если понравилась как прошла неделя
И читайте наш TELEGRAM: https://t.me/smail_seeds
#Smail_Seeds 😀
Likes
4
Share


@Jahrulez
Follow
AAAAh Fastbuds, End of WEEK 11 Beginning of week 3 and shes BIG.
The beginning leaves are a biut fucked up but the new ones look great so thats nothing rll that worries me.. had it often on the first few leaves but ittl grow out of that.
Everything going great :D
Likes
6
Share

@PavementPunk
Follow
6/30/26 This resilient little sweetie isn't done growing! Its a shame i didn't get my lil 3x5 outdoor tent sooner but alas better late than never. The capertillers (yeah thats how i say it lol) really did a number on her main stem and fan leaves. Honestly it shows how tough and resilient these girls are. Also the extreme conditions they are growing in cannot be underestimated or understated. Feels like 103 with level 11 Sun intensity! This baby is making a few nice stinky flowers too. It seems like when i make a note of some gearbo need in my diaries itd not long before it comes to fruition. Ive been working really hard being extra meticulous and I'm taking more detailed notes. I would love to compete and I would really love to win a Cannabis related grow contest or cup or award and get some recognition and sponsorships maybe even a career 🤔 😉 🤞Probably not off of this poor girl lol happy growing friends ✌️
Likes
6
Share

@k0nz1
Follow
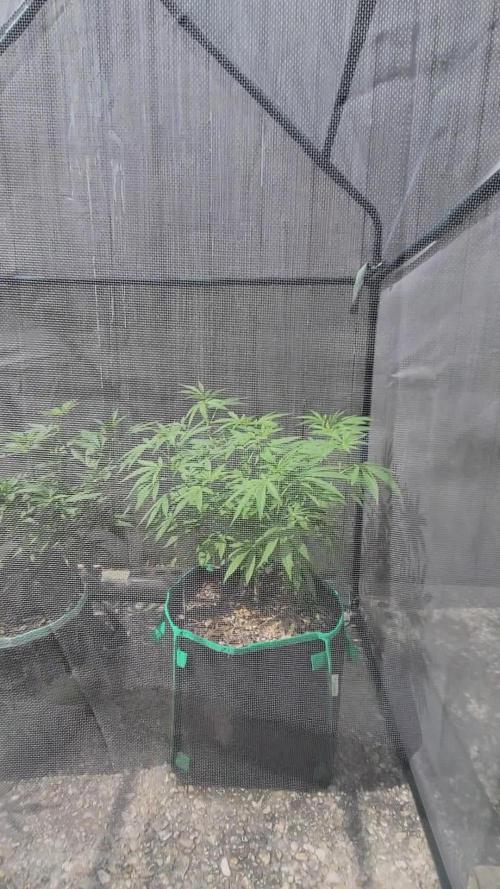
The tent ist getting really full rn. Big defoliation and lollipopping in the coming days .
The Lemon Orange stretching crazy. The Blueberry Pancakes are Bushmonsters with lots of Side branches. One of the BBP has little Nitrogen deficiency. Nothing serious.
All in all very healthy plants. Waiting for the first trichomes and aroma in the tent.
~55- 60 % rh
~ 21-26 celsius


Likes
7
Share


@WakeAndBake
Follow
I'm surprised 😮 about the difference between now and last week ...they became really 😳 monsters 👻 👽 I'm very happy with this grow I can say #RipperSeeds are one of the best 👌
Likes
11
Share


@DogDoctorOfficial
Follow
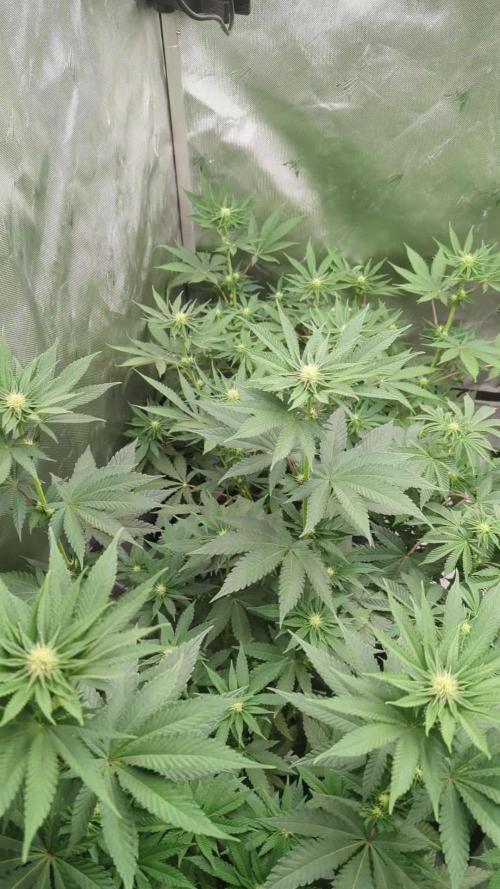
🌿 Nectar Drip – Week 5 Report
Early Vegetative Development (12/12 from Seed)
Zamnesia Seeds x TICAL – Pack #268
Note on timing:
This is labeled as Week 5 in GrowDiaries / Grow Iris, even though in real growth rhythm we are closer to Week 3 of true vegetative development.
This offset comes from starting the diary early and using photo-heavy germination documentation. We’ll continue to clarify this each week for transparency and consistency.
⸻
🌱 Growth Overview – Training Reveals Character
This week confirmed something important:
training doesn’t slow a plant — it reveals it.
Last week, we began Low Stress Training (LST) on one selected plant using clamps to gently guide the main stem close to horizontal. At the time, she was the smallest plant of the Nectar Drip group.
This week, her response has been nothing short of beautiful.
Despite being smaller, she reacted with:
• accelerated side branching
• clear apical redistribution
• strong node activation
• healthy, vibrant green growth
She is opening up, spreading out, and showing structure — not by force, but by invitation.
⸻
✂️ Training Focus – Low Stress, High Precision
The trained plant is now the focus of this week’s report, because she’s telling us a story worth listening to.
What’s being done:
• Main stem gently bent and held near-parallel to the soil
• Leaves progressively opened and repositioned
• Lower growth sites intentionally exposed to light
• No snapping, no crushing, no stress points
This is classic Low Stress Training (LST) — the goal is not control, but redirection.
What we’re seeing:
• Lower branches actively pushing upward
• Tighter internodal spacing
• A wider, flatter structure
• Balanced energy distribution
She’s currently entering her fourth node, and already the lower growth is responding like it knows it’s been invited to participate.
You can clearly see this in the macro photos — the symmetry, the confidence, the way each branch is waking up.
⸻
📸 Macro Session – When the Plant Earns the Spotlight
This week, the trained plant earned her moment.
She was taken into the studio for a dedicated macro session — and she deserved it.
The photos reveal:
• clean, healthy tissue
• vibrant green coloration
• active growth points
• no signs of stress or hesitation
Up close, it becomes obvious:
this plant isn’t struggling — she’s thinking.
⸻
🌿 The Other Plants – Natural Expression
The remaining Nectar Drip plants are not being trained as intensively.
For them:
• leaves are gently tucked
• some bending is done to guide light penetration
• no structural manipulation beyond basic canopy management
They are:
• taller
• more vertical
• opening naturally
• branching in their own rhythm
They look fantastic — healthy, lush, and confident — but their expression is clearly different from the trained plant. Same genetics, same room, same feed… different guidance.
This contrast is exactly why this approach is valuable.
⸻
🌡️ Environment & Room Conditions (Unchanged)
Conditions remain consistent with last week:
• Relative Humidity: ~65%
• Day Temperature: ~26 °C
• Night Temperature: ~18 °C
• CO₂: ~666 ppm
• Lamp Distance: ~1.70 m
• Substrate Temperature: ~22 °C
• Solution Temperature: ~22 °C
Airflow continues to increase slightly, encouraging movement and stem strength without stress.
⸻
💡 Light – Growing Into Intensity
PPFD continues its gradual rise:
• Previously: ~500 PPFD
• Current range: 500 → 600 PPFD, depending on plant height
Once again, the plants are growing toward the light, not being forced into it. This progressive increase matches structure and development perfectly.
⸻
Nutrition – Stay the Course
Nutrition remains unchanged, because the plants are clearly happy.
• Terra Grow
• Power Roots
• Pure Zym
• Sugar Royal
• Vita Race (foliar)
Leaf color, posture, and response all confirm that stability is working. This is a deliberate mix of mineral precision and biological support, based on experience and personal philosophy.
As always:
everything shared here reflects my own experience, opinions, lessons, and mistakes, offered openly to the community.
⸻
🔮 What to Expect / What Not to Expect
Expect:
• continued lateral development on the trained plant
• more defined structure
• increased canopy complexity
• visible divergence between trained vs untrained plants
Do Not Expect:
• instant size catch-up
• explosive vertical growth
• stress reactions
The trained plant may not become the tallest —
but she may become the most interesting.
⸻
🤝 Gratitude
Much love and respect to:
• Zamnesia Seeds
• TICAL (artist and collaborator)
• Plagron
• Future of Grow
And thank you to everyone following this journey —
supporters, critics, silent readers, and longtime friends.
⸻
🌟 Week 5 Summary
• Training is working
• Genetics are solid
• Differences are emerging
• Structure is forming
• The story is getting richer
She was the smallest.
She’s responding the strongest.
And she’s just getting started.
Growers love always 💚
FOR DISCOUNT CODES AND MORE JUST FOLLOW THE LINK https://website.beacons.ai/dogdoctorofficial
📲 Don’t forget to Subscribe and follow me on Instagram and YouTube @DogDoctorOfficial for exclusive content, real-time updates, and behind-the-scenes magic. We’ve got so much more coming, including transplanting and all the amazing techniques that go along with it. You won’t want to miss it.
GrowDiaries Journal: https://growdiaries.com/grower/dogdoctorofficial
Instagram: https://www.instagram.com/dogdoctorofficial/
YouTube: https://www.youtube.com/@dogdoctorofficial
⸻
Explore the Gear that Powers My Grow
If you’re curious about the tech I’m using, check out these links:
🔆 Lighting & Environmental Control
• Future of Grow — Advanced LED lighting technology
https://www.futureofgrow.com/
DISCOUNT CODE: DOG20
• Lumiflora — Under-canopy LED lighting
https://lumiflorade.com/
• TrollMaster — Environmental controllers and automation gear (past collaboration)
⸻
Genetics
• Zamnesia Seeds — Genetics used in this project
https://www.zamnesia.com/
⸻
🌱 Soil, Substrates, Boosters & Root Support
• Plagron — Substrates, bio mixes, and supportive products
https://plagron.com/en/
⸻
🎒 Storage, Curing & Preservation
• Grove Bags — Curing and storage solutions
https://grovebags.com/
⸻
📸 Photography Equipment & Tools
(Not sponsors, but part of my creative toolkit)
• Sony A6700
• Sony full-frame macro lens + few more
• Stacking photography workflow - learning
• iPhone (for behind-the-scenes shots)
We’ve got much more coming as we move through the grow cycles. Trust me, you won’t want to miss the next steps, let’s push the boundaries of indoor horticulture together!
As always, this is shared for educational purposes, aiming to spread understanding and appreciation for this plant. Let’s celebrate it responsibly and continue to learn and grow together.
With true love comes happiness. Always believe in yourself, and always do things expecting nothing and with an open heart. Be a giver, and the universe will give back in ways you could never imagine.
💚 Growers love to all 💚
📸 P.S. – The Eye Behind the Lens
All photos in this diary (for now — except for the ones showing the camera, which I took with an iPhone) are taken with a Sony A6700 paired with a Sony full-frame macro lens and a few more.
Photography is part of the story — it’s how we share the fine textures, the glow, and the quiet details that words can’t always capture.
I’ve also started experimenting with photo stacking — a technique where multiple images, each taken at a slightly different focus point, are layered together to create one perfectly sharp image from front to back.
It’s not digital enhancement or AI; it’s pure photography — a way to reveal the plant’s beauty in microscopic depth, from trichome to petal.
You’ll even see a few shots of "ghost me" capturing the shots — camera, lens, setup — because every grow deserves not just to be cultivated, but documented like art.
FOR DISCOUNT CODES AND MORE JUST FOLLOW THE LINK https://website.beacons.ai/dogdoctorofficial
NEW DISCORD - Official Server Invite Link : https://discord.gg/ksjAkA5T74
Likes
15
Share


@Fabii
Follow
Sorry I’ve been to Busy working , I work Construction and I started growing because I wasn’t working for a long time but construction is so Random you won’t work for 5 months and then you start working Monday - Monday
Anyways THIS Is My First Grow EVER , Super excited I’ve been reading to grow marijuana since I was 16 and learned it and understood it . Now that I’m a bit older and it’s Legal in California I shall try my best to grow some great Flowers.
